一、说明
cup型号: Intel(R) Celeron(R) CPU G1610 @ 2.60GHz
内存大小: 8G
显卡型号:NVIDIA P104-100
注意:系统睡眠问题sudo systemctl mask sleep.target suspend.target hibernate.target hybrid-sleep.target
网卡设置
sudo vim /etc/netplan/50-cloud-init.yaml
network:
ethernets:
enp3s0:
dhcp4: false
addresses: 192.168.1.12/24
optional: true
routes:
- to: default
via: 192.168.1.1
nameservers:
addresses: 8.8.8.8,114.114.114.114
version: 2
#sudo netplan apply
开放端口7860sudo apt-get install iptables
sudo iptables -I INPUT -p tcp --dport 7860 -j ACCEPT
sudo iptables-save
#永久保持,重启不丢失
sudo apt-get install iptables-persistent
sudo netfilter-persistent save
sudo netfilter-persistent reload
sudo cat /etc/iptables/rules.v4
二、安装nvidia驱动
这将输出关于显卡的详细信息,包括制造商、型号和使用的内存量等。
sudo lshw -class display
*-display
description: 3D controller
product: GP104 P104-100
vendor: NVIDIA Corporation
physical id: 0
bus info: pci@0000:01:00.0
version: a1
width: 64 bits
clock: 33MHz
capabilities: pm msi pciexpress bus_master cap_list
configuration: driver=nouveau latency=0
resources: irq:27 memory:f6000000-f6ffffff memory:e0000000-efffffff memory:f0000000-f1ffffff
*-display
description: VGA compatible controller
product: Xeon E3-1200 v2/3rd Gen Core processor Graphics Controller
vendor: Intel Corporation
physical id: 2
bus info: pci@0000:00:02.0
logical name: /dev/fb0
version: 09
width: 64 bits
clock: 33MHz
capabilities: msi pm vga_controller bus_master cap_list rom fb
configuration: depth=32 driver=i915 latency=0 resolution=1600,900
resources: irq:28 memory:f7000000-f73fffff memory:d0000000-dfffffff ioport:f000(size=64) memory:c0000-dffff
禁用nouveau编辑文件blacklist.conf:
sudo vim /etc/modprobe.d/blacklist.conf
在文件最后部分插入以下两行内容
blacklist nouveau
options nouveau modeset=0
更新系统
sudo update-initramfs -u
重启系统(一定要重启)
sudo reboot
验证nouveau是否已禁用
lsmod | grep nouveau
没有信息显示,说明nouveau已被禁用,接下来可以安装nvidia的显卡驱动。
下载驱动
wget https://us.download.nvidia.cn/XFree86/Linux-x86_64/550.135/NVIDIA-Linux-x86_64-550.135.run
sudo apt-get update
sudo apt-get remove nvidia-*
安装:
sudo chmod a+x NVIDIA-Linux-x86_64-550.135.run
sudo apt-get update
sudo apt-get install build-essential
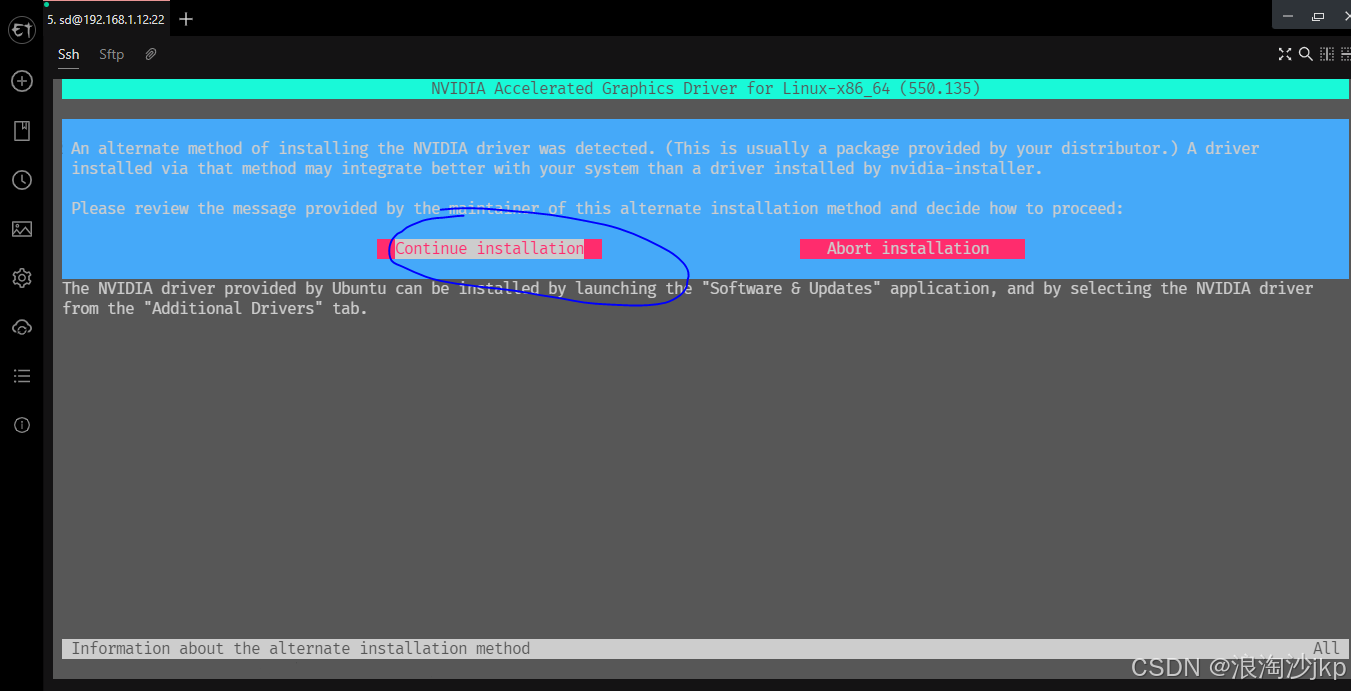
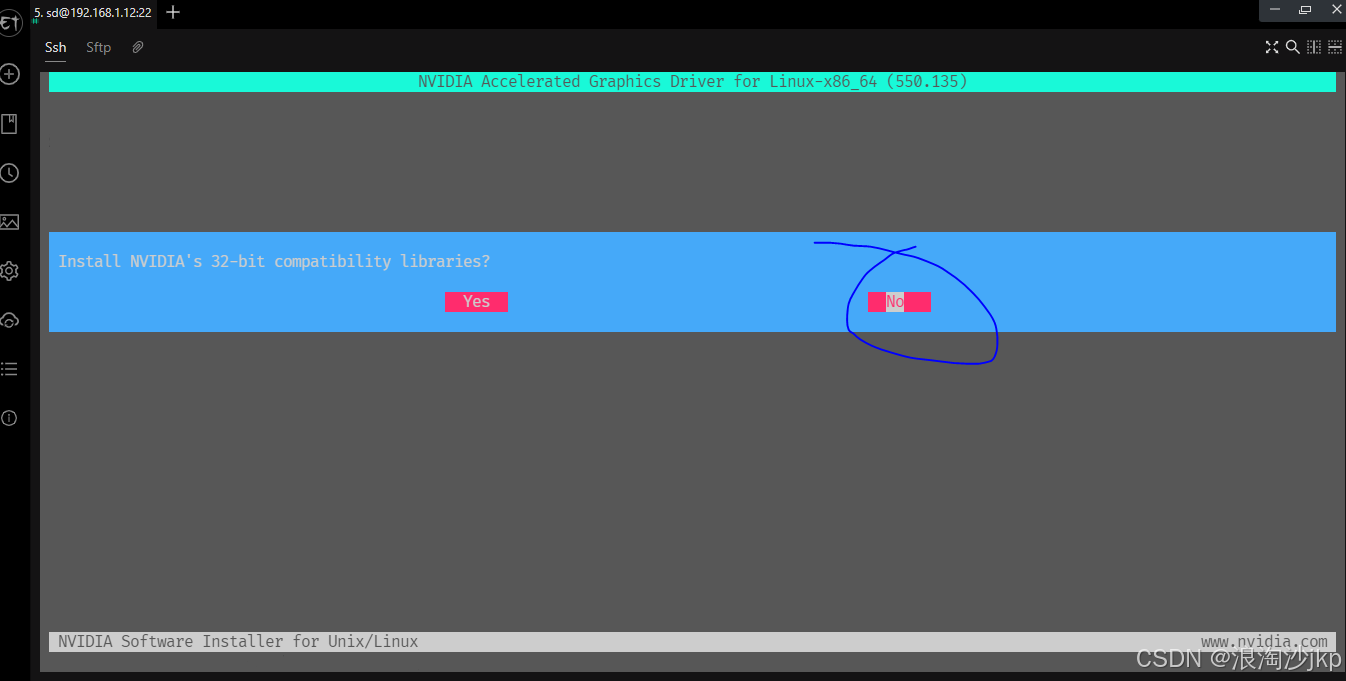
sudo ./NVIDIA-Linux-x86_64-550.135.run -no-x-check -no-nouveau-check -no-opengl-files
//只有禁用opengl这样安装才不会出现循环登陆的问题
-no-x-check:安装驱动时关闭X服务
-no-nouveau-check:安装驱动时禁用nouveau
-no-opengl-files:只安装驱动文件,不安装OpenGL文件


安装完毕之后
挂载Nvidia驱动:
modprobe nvidia
检查驱动是否安装成功:nvidia-smi
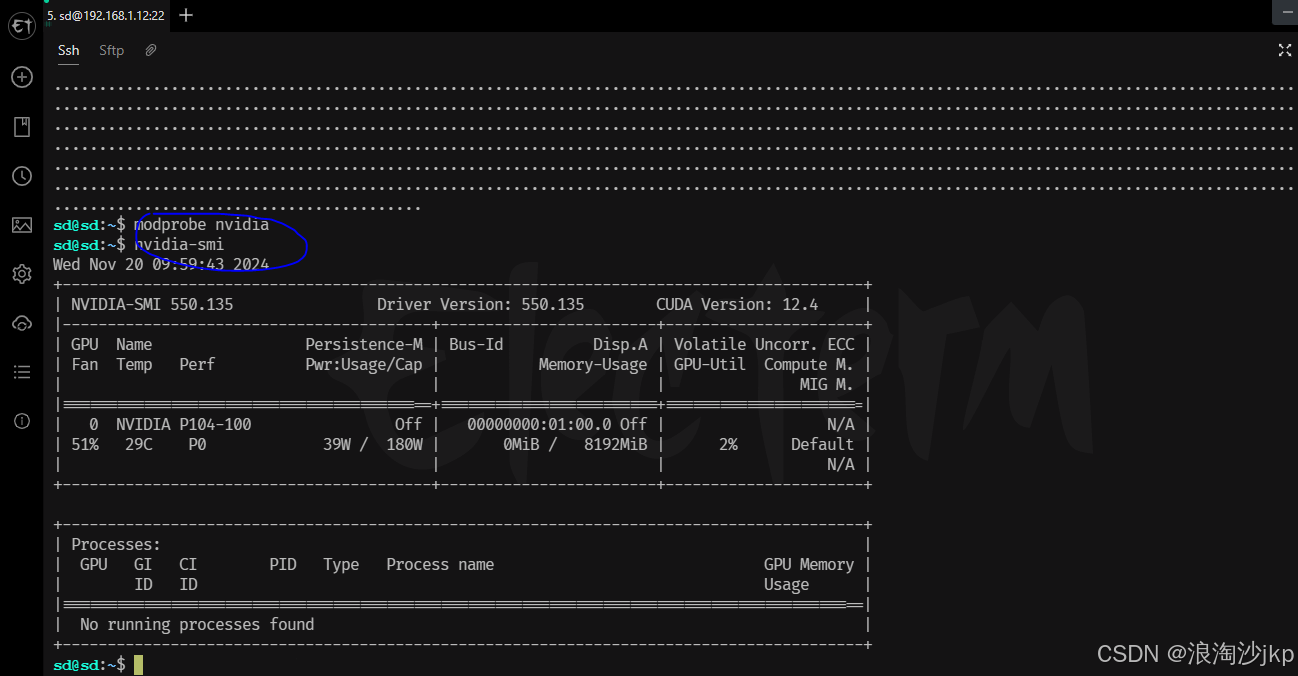
还是重启一下吧,据说不用重启,以前没用 modprobe nvidia
三、安装Anaconda3,安装python环境
wget --user-agent="Mozilla" https://mirrors.tuna.tsinghua.edu.cn/anaconda/archive/Anaconda3-2024.10-1-Linux-x86_64.sh
chmod a+x Anaconda3-2024.10-1-Linux-x86_64.sh
bash Anaconda3-2024.10-1-Linux-x86_64.sh
source ~/.bashrc
conda -V
conda config --set auto_activate_base false
配置清华源
删除之前的镜像源,恢复默认状态
conda config --remove-key channels
#添加镜像源
conda config --add channels https://mirrors.tuna.tsinghua.edu.cn/anaconda/pkgs/main
conda config --add channels https://mirrors.tuna.tsinghua.edu.cn/anaconda/pkgs/free
conda config --add channels https://mirrors.tuna.tsinghua.edu.cn/anaconda/pkgs/r
conda config --add channels https://mirrors.tuna.tsinghua.edu.cn/anaconda/pkgs/pro
conda config --add channels https://mirrors.tuna.tsinghua.edu.cn/anaconda/pkgs/msys2
#显示检索路径
conda config --set show_channel_urls yes
#显示镜像通道
conda config --show channels
虚拟环境创建
#创建
conda create -n sd python=3.10
#删除
conda remove -n sd --all
conda info --envs
#激活
conda activate sd
出错: EnvironmentNameNotFound: Could not find conda environment: sd
这个错误搞得时间较长喔,解决起来很简单,看下面
#先删除
conda remove -n sd --all
用下面创建,上面不行
#再次创建,不按照python,可以实现
conda create -n sd
再创建的环境中安装python,这样就搞定了上面的错误 ubuntu24没有这个问题
conda install python=3.10
#退出
conda deactivate
#查看已有环境
conda env list
python -m pip install --upgrade pip
pip config set global.index-url https://pypi.tuna.tsinghua.edu.cn/simple
四、也可以直接升级到python3.10.6
1、从官网下载源文件
wget https://www.python.org/ftp/python/3.10.6/Python-3.10.6.tgz
2、安装
先安装依赖文件
sudo apt update
sudo apt install build-essential zlib1g-dev libncurses5-dev libgdbm-dev libnss3-dev libssl-dev libreadline-dev libffi-dev libsqlite3-dev wget libbz2-dev
tar -zvxf Python-3.10.6.tgzcd Python-3.10.6
./configure --enable-optimizations
make
sudo make install
如果上面不成功则可以,输入以下命令安装Python二进制文件sudo make altinstall
3、验证安装是否成功
python3.10 --version
4、设置python的环境变量
#查找路径
which python3.10
sd@sd:~/tools/Python-3.10.6$ which python3.10
/usr/local/bin/python3.10
编辑
sudo vi ~/.bashrc
添加
alias python='/usr/local/bin/python3.10'
source ~/.bashrc
sd@sd:~$ python -V
Python 3.10.6
5、更新pip默认指向
rm /usr/bin/pip #如果原来有pip的链接先删除,没有的话,这步不用管。
sudo ln -s /usr/local/bin/pip3.10 /usr/bin/pip
pip -V
python -m pip install --upgrade pip
pip config set global.index-url https://pypi.tuna.tsinghua.edu.cn/simple
五、通过仓库直接安装cuda (不用安装)
conda search cudatoolkit
conda install cudatoolkit==11.8.0
六、安装cudnn(不用安装)
conda search cudnn
conda install cudnn==8.9.2.26
七、安装pytorch
不装,sd运行是会安装
八、安装 Stable Diffusionn
下载stable-diffusion-webui
git clone https://github.com/AUTOMATIC1111/stable-diffusion-webui
下载模型
cd stable-diffusion-webui/models/Stable-diffusion/
模型放在这里
启动sd
nohup ./webui.sh --listen --enable-insecure-extension-access --xformers --no-half-vae &
tail -f nohup.out
错误:Cannot locate TCMalloc. Do you have tcmalloc or google-perftool installed on your system? (improves CPU memory usage)
ps -aux | grep "webui.sh"
先安装这个
sudo apt-get install google-perftools
修改到国内镜像 sudo vi launch_utils.py
def prepare_environment():
torch_index_url = os.environ.get('TORCH_INDEX_URL', "https://download.pytorch.org/whl/cu121")
torch_command = os.environ.get('TORCH_COMMAND', f"pip install torch==2.1.2 torchvision==0.16.2 --extra-index-url {torch_index_url}")
torch_index_url = os.environ.get('TORCH_INDEX_URL', "https://mirrors.aliyun.com/pytorch-wheels/cu121")
torch_command = os.environ.get('TORCH_COMMAND', f"pip install torch==2.1.2 torchvision==0.16.2 -f {torch_index_url}")

模型下载
用迅雷下载
磁力地址:
magnet:?xt=urn:btih:2daef5b5f63a16a9af9169a529b1a773fc452637&dn=v1-5-pruned-emaonly.ckpt&tr=udp%3a%2f%2ftracker.opentrackr.org%3a1337%2fannounce&tr=udp%3a%2f%2f9.rarbg.com%3a2810%2fannounce&tr=udp%3a%2f%2ftracker.openbittorrent.com%3a6969%2fannounce&tr=udp%3a%2f%2fopentracker.i2p.rocks%3a6969%2fannounce&tr=https%3a%2f%2fopentracker.i2p.rocks%3a443%2fannounce&tr=http%3a%2f%2ftracker.openbittorrent.com%3a80%2fannounce&tr=udp%3a%2f%2ftracker.torrent.eu.org%3a451%2fannounce&tr=udp%3a%2f%2fopen.stealth.si%3a80%2fannounce&tr=udp%3a%2f%2fvibe.sleepyinternetfun.xyz%3a1738%2fannounce&tr=udp%3a%2f%2ftracker2.dler.org%3a80%2fannounce&tr=udp%3a%2f%2ftracker1.bt.moack.co.kr%3a80%2fannounce&tr=udp%3a%2f%2ftracker.zemoj.com%3a6969%2fannounce&tr=udp%3a%2f%2ftracker.tiny-vps.com%3a6969%2fannounce&tr=udp%3a%2f%2ftracker.theoks.net%3a6969%2fannounce&tr=udp%3a%2f%2ftracker.publictracker.xyz%3a6969%2fannounce&tr=udp%3a%2f%2ftracker.monitorit4.me%3a6969%2fannounce&tr=udp%3a%2f%2ftracker.moeking.me%3a6969%2fannounce&tr=udp%3a%2f%2ftracker.lelux.fi%3a6969%2fannounce&tr=udp%3a%2f%2ftracker.dler.org%3a6969%2fannounce&tr=udp%3a%2f%2ftracker.army%3a6969%2fannounce