Spring Web MVC 是基于 Servlet API 构建的原始 Web 框架,从一开始就包含在 Spring 框架中。它的正式名称"Spring Web MVC"来自其源模块的名称(Spring-webmvc),但它通常被称为"SpringMVC".
什么是Servlet呢?
Servlet 是一种实现动态页面的技术. 准确来讲Servlet是一套 Java Web 开发的规范,或者说是一套Java Web 开发的技术标准. 只有规范并不能做任何事情,必须要有人去实现它. 所谓实现 Servlet 规范,就是真正编写代码去实现 Servlet 规范提到的各种功能,包括类、方法、属性等.Servlet 规范是开放的,除了 Sun 公司,其它公司也可以实现 Servlet 规范,目前常见的实现了Servlet 规范的产品包括 Tomcat、Weblogic、Jetty、Jboss、WebSphere 等,它们都被称为"Servlet 容器". Servlet 容器用来管理程序员编写的 Servlet 类.
Spring Web MVC 是一个 Web 框架.
下面咱们简称之为: Spring MVC
然而要真正的理解什么是 Spring MVC?我们首先要搞清楚什么是 MVC?
MVC定义
MVC 是 Model View Controller 的缩写,它是软件工程中的一种软件架构设计模式,它把软件系统分为模型、视图和控制器三个基本部分
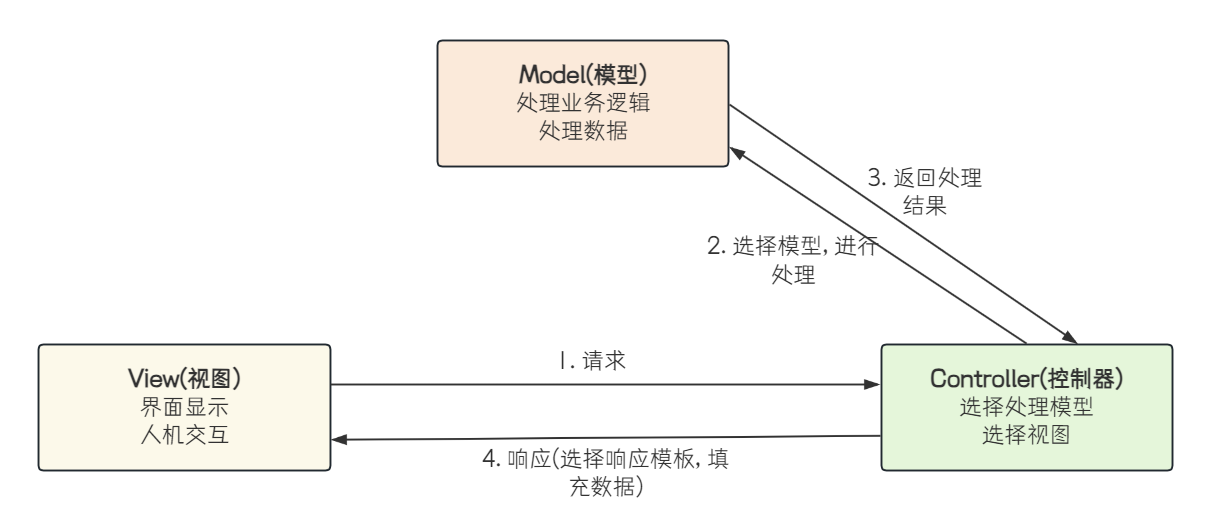
- 视图View 指在应用程序中专门用来与浏览器进行交互,展示数据的资源.
- 模型Model 是应用程序的主体部分,用来处理程序中数据逻辑的部分.
- 控制器Controller 可以理解为一个分发器,用来决定对于视图发来的请求,需要用哪一个模型来处理,以及处理完后需要跳回到哪一个视图。即用来连接视图和模型
比如去饭店吃饭
客户进店之后, 服务员来接待客户点餐, 客户点完餐之后, 把客户菜单交给前厅, 前厅根据客户菜单给后厨下达命令. 后厨负责做饭, 做完之后, 再根据菜单告诉服务员, 这是X号餐桌客人的饭.
在这个过程中服务员就是View(视图), 负责接待客户, 帮助客户点餐, 以及给顾客端饭前厅就是Controller(控制器), 根据用户的点餐情况, 来选择给哪个后厨下达命令.后厨就是Model(模型), 根据前厅的要求来完成客户的用餐需求
其实, Spring MVC 我们在前面已经用过了, 在创建 Spring Boot 项目时,我们勾选的 Spring Web 框架其实就是 Spring MVC 框架:
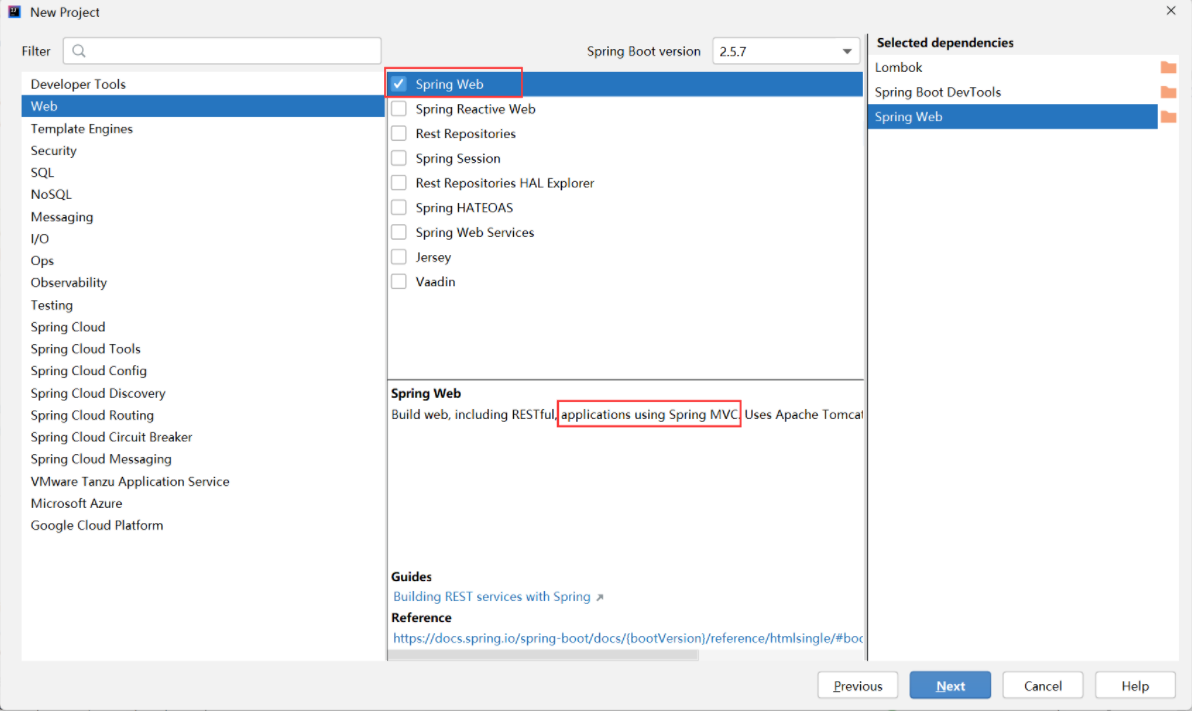
Spring Boot 是实现Spring MVC的其中一种方式而已.
Spring Boot 可以添加很多依赖, 借助这些依赖实现不同的功能. Spring Boot 通过添加Spring WebMVC框架, 来实现web功能.不过Spring在实现MVC时, 也结合自身项目的特点, 做了一些改变, 相对而言, 下面这个图或许更加合适一些.
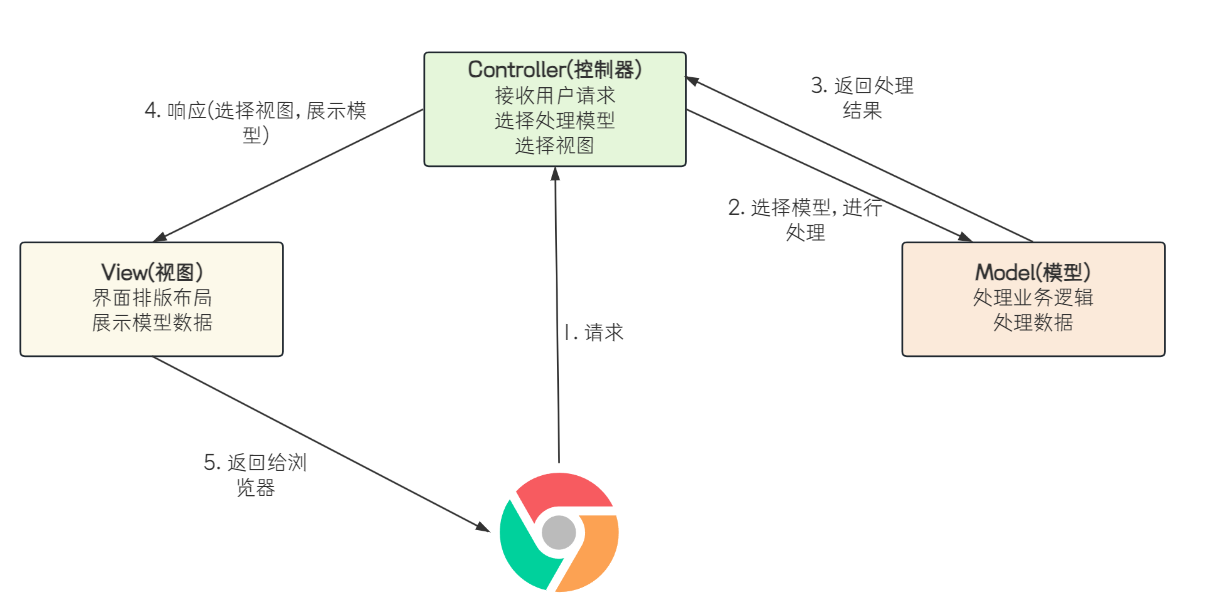
SpringMVC
学习Spring MVC, 重点也就是学习如何通过浏览器和用户程序进行交互.
主要分以下三个方面:
-
建立连接:将用户(浏览器)和 Java 程序连接起来,也就是访问一个地址能够调用到我们的Spring 程序。
-
请求: 用户请求的时候会带一些参数,在程序中要想办法获取到参数, 所以请求这块主要是 获取参数的功能.
-
响应: 执行了业务逻辑之后,要把程序执行的结果返回给用户, 也就是响应.
建立连接
在 Spring MVC 中使用 @RequestMapping 来实现 URL 路由映射 ,也就是浏览器连接程序的作用
创建一个 UserController 类,实现用户通过浏览器和程序的交互,具体实现代码如下:
package com.example.demo_test2.controller;

import org.springframework.web.bind.annotation.RequestMapping;
import org.springframework.web.bind.annotation.RestController;

@RestController
public class UserController {
    // 路由器规则注册
    @RequestMapping("/sayHi")
    public String sayHi(){
        return "hello,Spring MVC";
    }
}
@RequestMapping注解介绍
@RequestMapping 是 Spring Web MVC 应用程序中最常被用到的注解之一,它是用来注册接口的路由映射的.
表示服务收到请求时, 路径为 /sayHi 的请求就会调用 sayHi 这个方法的代码.
路由映射: 当用户访问一个 URL 时, 将用户的请求对应到程序中某个类的某个方法的过程就叫路由映射.
@RequestMapping 即可修饰类,也可以修饰方法 ,当修饰类和方法时,访问的地址是类路径 + 方法路径.
@RequestMapping标识一个类:设置映射请求的请求路径的初始信息
@RequestMapping标识一个方法:设置映射请求请求路径的具体信息
@RequestMapping("/user")
@RestController
public class UserController {
    @RequestMapping("/sayHi")
    public String sayHi(){
        return "hello,Spring MVC";
    }
}
@RequestMapping 的URL 路径最前面加不加 / (斜杠)都可以, Spring程序启动时, 会进行判断, 如果前面没有加 / , Spring会拼接上一个 /
@RequestMapping 的URL路径也可以是多层路径, 最终访问时, 依然是 类路径 + 方法路径
@RequestMapping("/user/m1")
@RestController
public class UserController {
    @RequestMapping("/say/hi")
    public String sayHi(){
        return "hello,Spring MVC";
    }
}
测试RequestMapping注解是GET还是POST请求
打开PostMan,在PostMan中发送请求
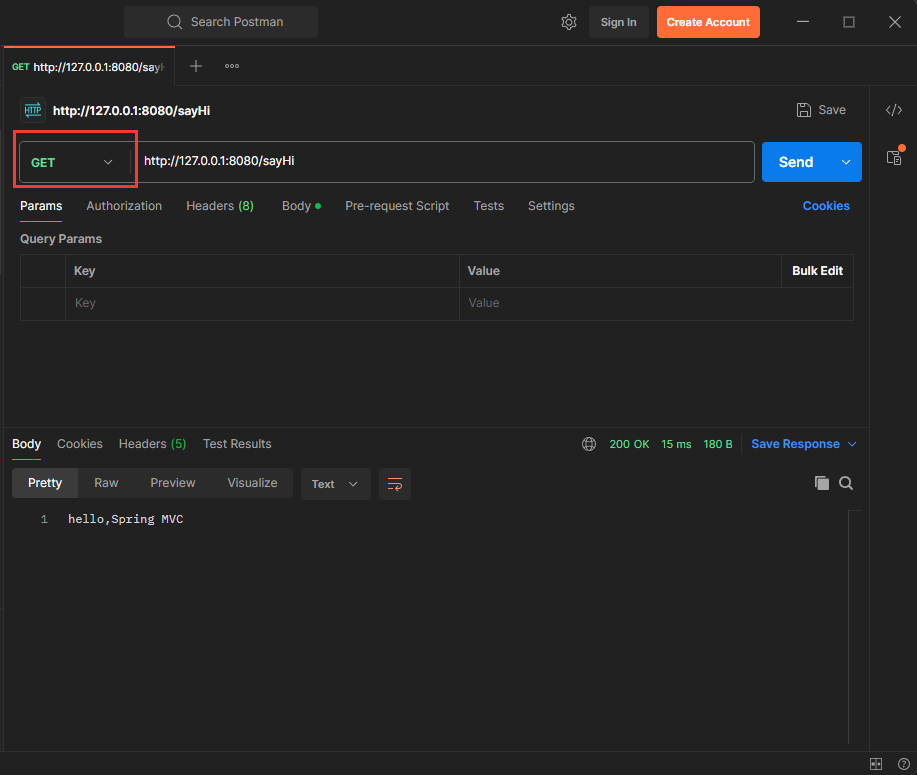
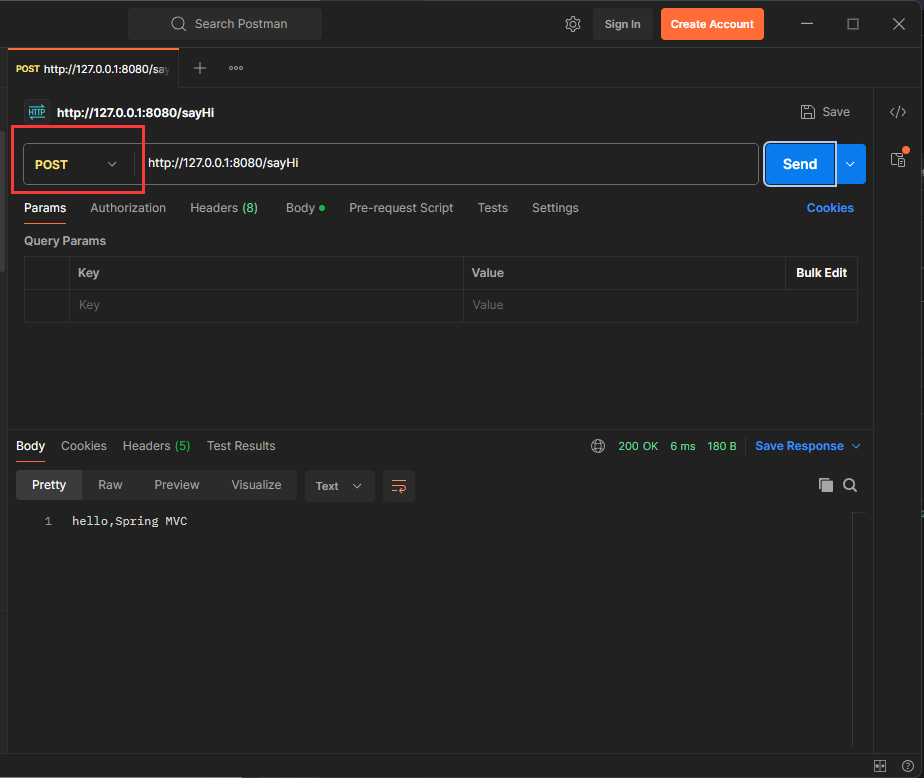
@RequestMapping 既支持Get请求, 又支持Post请求. 同理, 也支持其他的请求方式.
限制RequestMapping的请求方式
注解没有写属性名,默认是value
使用@RequestMapping的的method属性可以限制请求方式
package com.example.demo_test2.controller;

import org.springframework.web.bind.annotation.RequestMapping;
import org.springframework.web.bind.annotation.RequestMethod;
import org.springframework.web.bind.annotation.RestController;

@RestController
public class UserController {
    // 注解没有写属性名,默认是value
    @RequestMapping("/sayHi")
    public String sayHi(){
        return "hello,Spring MVC";
    }

    // 限制请求方式
    @RequestMapping(value = "/sayHi1", method = RequestMethod.GET)
    public String sayHi1(){
        return "hello,Spring MVC";
    }
}
请求
访问不同的路径, 就是发送不同的请求. 在发送请求时, 可能会带一些参数
传递单个参数
接收单个参数, 在 Spring MVC 中直接用方法中的参数就可以,比如以下代码:
package com.example.demo_test2.demos.web;

import org.springframework.stereotype.Controller;
import org.springframework.web.bind.annotation.ModelAttribute;
import org.springframework.web.bind.annotation.RequestMapping;
import org.springframework.web.bind.annotation.RequestParam;
import org.springframework.web.bind.annotation.ResponseBody;
@RestController
public class BasicController {

    // http://127.0.0.1:8080/hello?name=lisi
    @RequestMapping("/hello")
    public String hello(String name) {
        return "Hello " + name;
    }
}
使用浏览器发送请求,并传递参数。

可以看到, 后端程序正确拿到了name参数的值.
Spring MVC 会根据方法的参数名, 找到对应的参数, 赋值给方法
如果参数不一致, 是获取不到参数的.

注意事项
使用基本类型来接收参数时, 参数必须传(除boolean类型), 否则会报500错误
类型不匹配时, 会报400错误.
传递多个参数
如何接收多个参数呢?
和接收单个参数一样, 直接使用方法的参数接收即可. 使用多个形参.
@RestController
public class UserController {
    // 注解没有写属性名,默认是value
    @RequestMapping("/sayHi")
    public String sayHi(){
        return "hello,Spring MVC";
    }

    // 限制请求方式
    @RequestMapping(value = "/sayHi1", method = RequestMethod.GET)
    public String sayHi1(){
        return "hello,Spring MVC";
    }

    // 传递多个参数
    @RequestMapping("/sayHi2")
    public String sayHi2(String name, Integer age){
        return name + " " + age;
    }
}
当有多个参数时,前后端进行参数匹配时,是以参数的名称进行匹配的,因此参数的位置是不影响后端获取参数的结果.
传递对象
如果参数比较多时, 方法声明就需要有很多形参. 并且后续每次新增一个参数, 也需要修改方法声明.
我们不妨把这些参数封装为一个对象.
Spring MVC 也可以自动实现对象参数的赋值,比如 User 对象:
package com.example.demo_test2.demos.web;

public class User {

    private String name;

    private Integer age;

    public String getName() {
        return name;
    }

    public void setName(String name) {
        this.name = name;
    }

    public Integer getAge() {
        return age;
    }

    public void setAge(Integer age) {
        this.age = age;
    }

    public String toString() {
        return "name: " + name + " age: " + age;
    }
}

package com.example.demo_test2.controller;

import org.springframework.web.bind.annotation.RequestMapping;
import org.springframework.web.bind.annotation.RequestMethod;
import org.springframework.web.bind.annotation.RestController;

import com.example.demo_test2.demos.web.User;

@RestController
public class UserController {
    // 注解没有写属性名,默认是value
    @RequestMapping("/sayHi")
    public String sayHi(){
        return "hello,Spring MVC";
    }

    // 限制请求方式
    @RequestMapping(value = "/sayHi1", method = RequestMethod.GET)
    public String sayHi1(){
        return "hello,Spring MVC";
    }

    @RequestMapping("/sayHi2")
    public String sayHi2(String name, Integer age){
        return name + " " + age;
    }


    // 传递对象
    @RequestMapping("/sayHi3")
    public String sayHi3(User user){
        return user.toString();
    }
}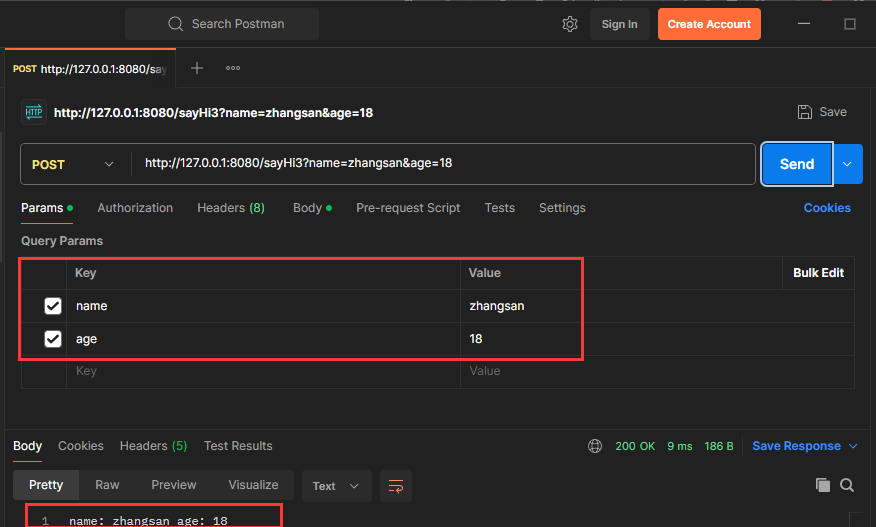
Spring 会根据参数名称自动绑定到对象的各个属性上, 如果某个属性未传递, 则赋值为null(基本类型则赋值为默认初识值, 比如int类型的属性, 会被赋值为0)
后端参数重命名(后端参数映射)
某些特殊的情况下,前端传递的参数 key 和我们后端接收的 key 可以不一致,比如前端传递了一个time 给后端,而后端是使用 createtime 字段来接收的,这样就会出现参数接收不到的情况,如果出现这种情况,我们就可以使用 @RequestParam 来重命名前后端的参数值.
具体示例如下,后端实现代码:
package com.example.demo_test2.controller;

import org.springframework.web.bind.annotation.RequestMapping;
import org.springframework.web.bind.annotation.RequestMethod;
import org.springframework.web.bind.annotation.RequestParam;
import org.springframework.web.bind.annotation.RestController;

import com.example.demo_test2.demos.web.User;

@RestController
public class UserController {
    @RequestMapping("/m1")
    public String m1(@RequestParam("time") String createTime){
        return "hello " + createTime;
    }
}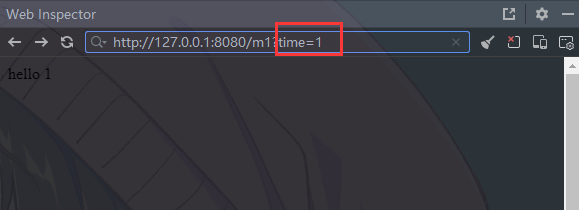
可以看到, Spring可以正确的把浏览器传递的参数time绑定到了后端参数caretetime参数上
使用 @RequestParam 进行参数重命名时, 请求参数只能和@RequestParam 声明的名称一致, 才能进行参数绑定和赋值.
使用 @RequestParam 进行参数重命名时, 参数就变成了必传参数.
非必传参数设置
如果我们的实际业务前端的参数是一个非必传的参数, 针对上述问题, 如何解决呢?
先来了解下参数必传的原因, 我们查看 @RequestParam 注解的实现细节就可以发现端倪,注解
实现如下:
@Target({ElementType.PARAMETER})
@Retention(RetentionPolicy.RUNTIME)
@Documented
public @interface RequestParam {
    @AliasFor("name")
    String value() default "";
    @AliasFor("value")
    String name() default "";
    boolean required() default true;
    String defaultValue() default "\n\t\t\n\t\t\n\ue000\ue001\ue002\n\t\t\t\t\n"
}
可以看到required 的默认值为true, 表示含义就是: 该注解修饰的参数默认为必传
既然如此, 我们可以通过设置 @RequestParam 中的 required=false 来避免不传递时报错,
具体实现如下:
package com.example.demo_test2.controller;

import org.springframework.web.bind.annotation.RequestMapping;
import org.springframework.web.bind.annotation.RequestMethod;
import org.springframework.web.bind.annotation.RequestParam;
import org.springframework.web.bind.annotation.RestController;

import com.example.demo_test2.demos.web.User;

@RestController
public class UserController {
    @RequestMapping("/m1")
    public String m1(@RequestParam("time") String createTime){
        return "hello " + createTime;
    }

    @RequestMapping("/m2")
    public String m2(@RequestParam(value = "time", required = false) String createTime){
        return "hello " + createTime;
    }
}
可以看到, 添加required=false之后, time前面也加了key, 变成了 value = "time"
注解属性赋值时, 没有指明key的话, 默认为value属性.
如果需要有多个属性进行赋值时, 需要写上key
传递数组
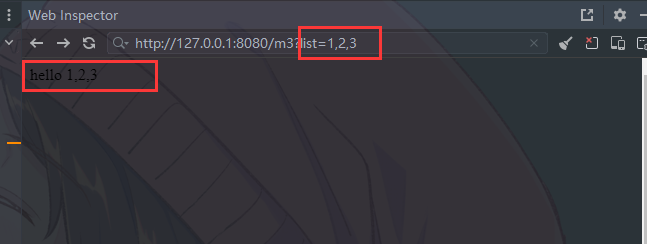
Spring MVC 可以自动绑定数组参数的赋值
后端实现代码:
package com.example.demo_test2.controller;

import org.springframework.web.bind.annotation.RequestMapping;
import org.springframework.web.bind.annotation.RequestMethod;
import org.springframework.web.bind.annotation.RequestParam;
import org.springframework.web.bind.annotation.RestController;

import com.example.demo_test2.demos.web.User;

import java.util.Arrays;
import java.util.List;
import java.util.stream.Collectors;

@RestController
public class UserController {
    // 传递数组
    @RequestMapping("/m3")
    public String m3(@RequestParam(value = "list") String[] list){
        return "hello " + Arrays.stream(list).filter(s -> s != null).collect(Collectors.joining(","));
    }
}
传递集合
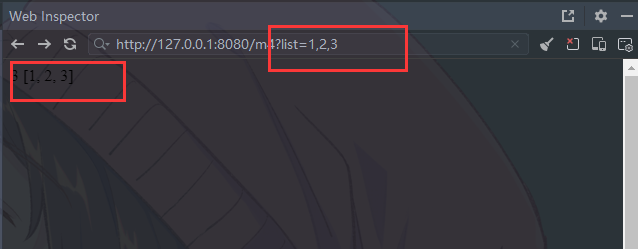
集合参数:和数组类似, 同一个请求参数名有为多个, 且需要使用 @RequestParam 绑定参数关系
默认情况下,请求中参数名相同的多个值,是封装到数组. 如果要封装到集合,要使用@RequestParam 绑定参数关系
请求方式和数组类似:
package com.example.demo_test2.controller;

import org.springframework.web.bind.annotation.RequestMapping;
import org.springframework.web.bind.annotation.RequestMethod;
import org.springframework.web.bind.annotation.RequestParam;
import org.springframework.web.bind.annotation.RestController;

import com.example.demo_test2.demos.web.User;

import java.util.Arrays;
import java.util.List;
import java.util.stream.Collectors;

@RestController
public class UserController {
    @RequestMapping("/m4")
    public String m4(@RequestParam List<String> list) {
        return list.size() + " " + list.toString();
    }
}
传递JSON数据
JSON:JavaScript Object Notation 【JavaScript 对象表示法】
JSON是一种轻量级的数据交互格式. 它基于 ECMAScript (欧洲计算机协会制定的js规范)的一个子集,采用完全独立于编程语言的文本格式来存储和表示数据。
简单来说:JSON就是一种数据格式, 有自己的格式和语法, 使用文本表示一个对象或数组的信息, 因此JSON本质是字符串. 主要负责在不同的语言中数据传递和交换.
看一段JSON数据
{
    "squadName": "Super hero squad",
    "homeTown": "Metro City",
    "formed": 2016,
    "secretBase": "Super tower",
    "active": true,
    "members": [{
        "name": "Molecule Man",
        "age": 29,
        "secretIdentity": "Dan Jukes",
        "powers": ["Radiation resistance", "Turning tiny", "Radiation blast"
    }, {
        "name": "Madame Uppercut",
        "age": 39,
        "secretIdentity": "Jane Wilson",
        "powers": ["Million tonne punch", "Damage resistance", "Superhuman r
    }, {
        "name": "Eternal Flame",
        "age": 1000000,
        "secretIdentity": "Unknown",
        "powers": ["Immortality", "Heat Immunity", "Inferno", "Teleportation
    }]
}
也可以压缩表示:
{"squadName":"Super hero squad","homeTown":"Metro
City","formed":2016,"secretBase":"Super tower","active":true,"members":
[{"name":"Molecule Man","age":29,"secretIdentity":"Dan Jukes","powers":
["Radiation resistance","Turning tiny","Radiation blast"]},{"name":"Madame
Uppercut","age":39,"secretIdentity":"Jane Wilson","powers":["Million tonne
punch","Damage resistance","Superhuman reflexes"]},{"name":"Eternal
Flame","age":1000000,"secretIdentity":"Unknown","powers":["Immortality","Heat
Immunity","Inferno","Teleportation","Interdimensional travel"]}]}
和上面描述的数据一样, 只不过上面的进行了格式化, 更易读.
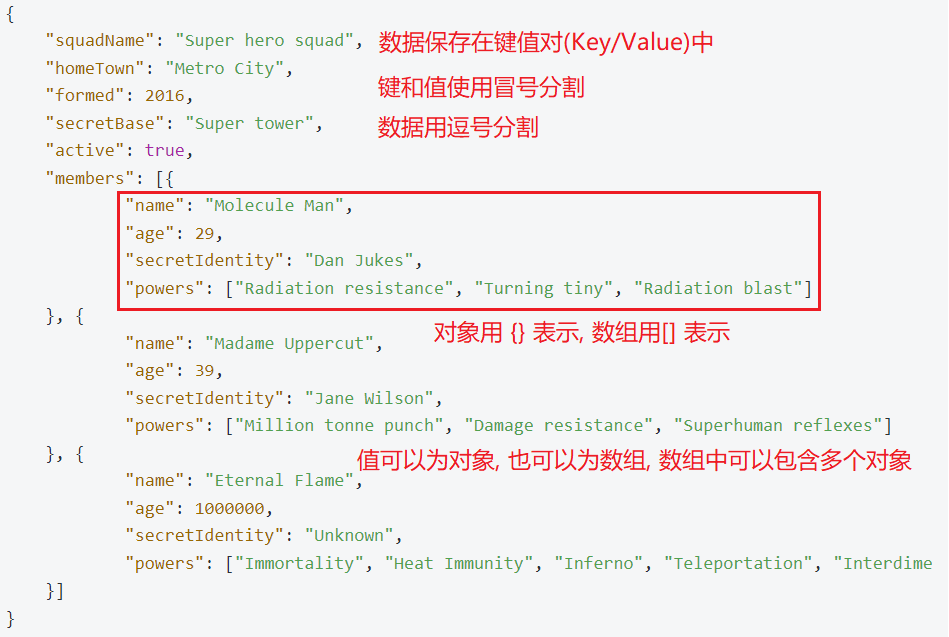
JSON的语法
-
数据在键值对(Key/Value) 中
-
数据由逗号 , 分隔
-
对象用 {} 表示
-
数组用 [] 表示
-
值可以为对象, 也可以为数组, 数组中可以包含多个对象
JSON的两种结构
- 对象: 大括号 {} 保存的对象是一个无序的键值对集合. 一个对象以左括号 { 开始, 右括号 }
结束。每个"键"后跟一个冒号 : ,键值对使用逗号, 分隔 - 数组: 中括号 [] 保存的数组是值(value)的有序集合. 一个数组以左中括号[ 开始, 右中括
号] 结束,值之间使用逗号 , 分隔。
所以, 以下都是合法的JSON数据
{"name":"admin","age":18}
["hello", 3.1415, "json"]
[{"name":"admin","age":18},{"name":"root","age":16},{"name":"张三","age":20}]
JSON字符串和java对象互转
JSON本质上是一个字符串, 通过文本来存储和描述数据
Spring MVC框架也集成了JSON的转换工具, 我们可以直接使用, 来完成JSON字符串和Java对象的互转。
本质上是jackson-databind提供的功能, Spring MVC框架中已经把该工具包引入了进来, 咱们直接使用即可, 如果脱离Spring MVC使用, 需要引入相关依赖。
<dependency>
    <groupId>com.fasterxml.jackson.core</groupId>
    <artifactId>jackson-databind</artifactId>
    <version>2.13.5</version>
</dependency>
JSON的转换工具包有很多, jackson-databind只是其中的一种.
package com.example.demo_test2;

import com.fasterxml.jackson.core.JsonProcessingException;
import com.fasterxml.jackson.databind.ObjectMapper;

import com.example.demo_test2.demos.web.User;

public class JSONUtils {
    private static ObjectMapper objectMapper = new ObjectMapper();
    public static void main(String[] args) throws JsonProcessingException {
        User user = new User();
        user.setAge(5);
        user.setName("zhangsan");
//对象转为JSON字符串
        String jsonStr = objectMapper.writeValueAsString(user);
        System.out.println("JSON字符串为:"+jsonStr);
//JSON字符串转为对象
        User u = objectMapper.readValue(jsonStr,User.class);
        System.out.println(u.toString());
    }
}
使用ObjectMapper 对象提供的两个方法, 可以完成对象和JSON字符串的互转
writeValueAsString: 把对象转为JSON字符串
readValue: 把字符串转为对象

传递JSON对象
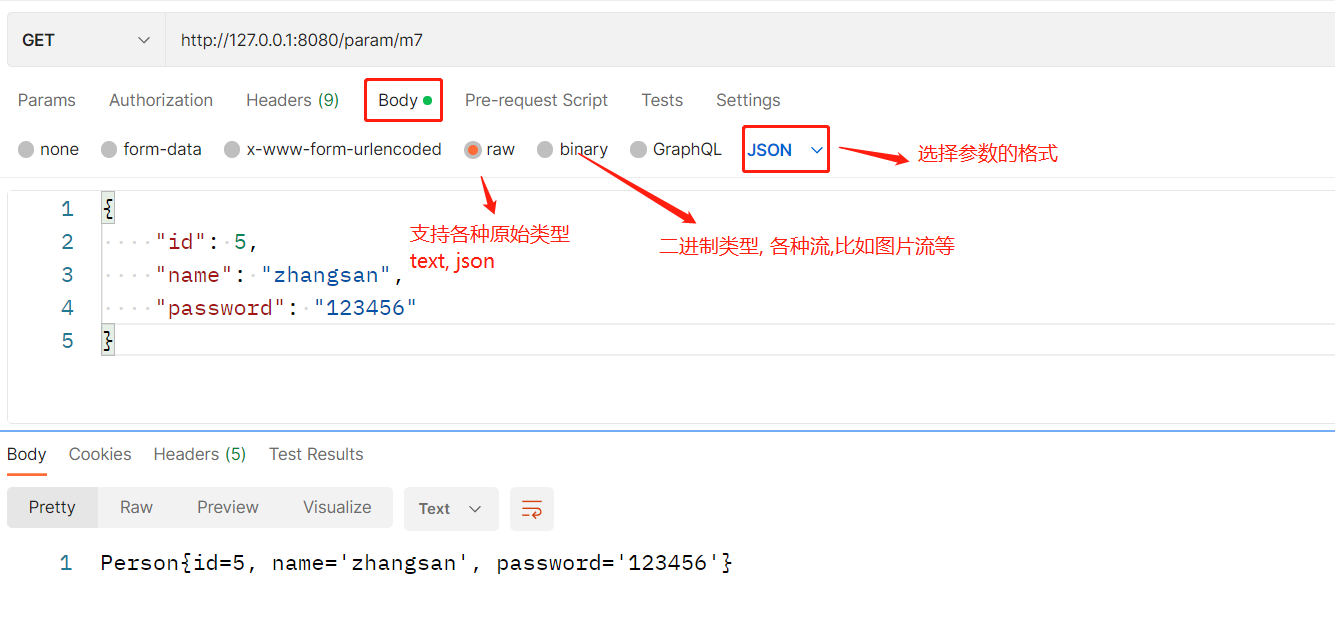
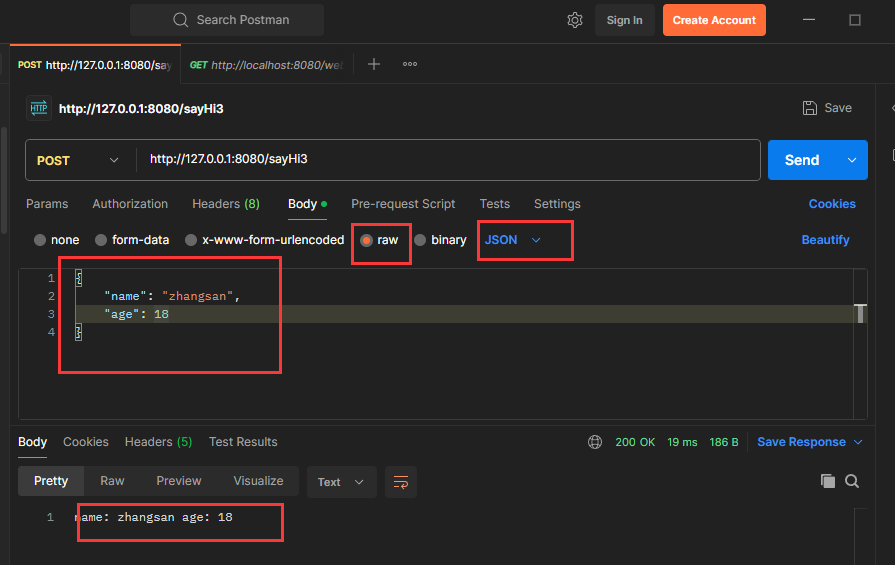
接收JSON对象, 需要使用 @RequestBody 注解
RequestBody: 请求正文,意思是这个注解作用在请求正文的数据绑定,请求参数必须在写在请求正文中
后端实现:
package com.example.demo_test2.controller;

import org.springframework.web.bind.annotation.*;

import com.example.demo_test2.demos.web.User;

import java.util.Arrays;
import java.util.List;
import java.util.stream.Collectors;

@RestController
public class UserController {
    // 传递JSON
    @RequestMapping("/sayHi3")
    public String sayHi3(@RequestBody User user){
        return user.toString();
    }
}
使用Postman来发送json请求参数:
获取URL中的参数@PathVariable
path variable: 路径变量
和字面表达的意思一样, 这个注解主要作用在请求URL路径上的数据绑定
默认传递参数写在URL上,SpringMVC就可以获取到
后端实现代码:
package com.example.demo_test2.controller;

import org.springframework.web.bind.annotation.*;

import com.example.demo_test2.demos.web.User;

import java.util.Arrays;
import java.util.List;
import java.util.stream.Collectors;

@RestController
public class UserController {
    @RequestMapping("/m5/{userId}/{name}")
    public String m5(@PathVariable Integer userId, @PathVariable String name){
        return userId + " " + name;
    }
}
可以看到, 后端正确获取到了URL中的参数。

如果方法参数名称和需要绑定的URL中的变量名称一致时, 可以简写, 不用给@PathVariable的属性赋值, 如上述例子中的id变量
如果方法参数名称和需要绑定的URL中的变量名称不一致时, 需要@PathVariable的属性value赋值,如上述例子中的userName变量.
上传图片@RequestPart
后端代码实现:
package com.example.demo_test2.controller;

import org.springframework.web.bind.annotation.*;

import com.example.demo_test2.demos.web.User;
import org.springframework.web.multipart.MultipartFile;

import java.util.Arrays;
import java.util.List;
import java.util.stream.Collectors;

@RestController
public class UserController {
    @RequestMapping("/m6")
    public String m6(@RequestPart MultipartFile file) {
        System.out.println(file.getOriginalFilename());
        return "success";
    }
}
使用Postman发送请求:


获取Cookie/Session
在学习Servlet中获取cookie是这样获取的
@RequestMapping("/m10")
public String method10(HttpServletRequest request,HttpServletResponse response)
    // 获取所有 cookie 信息
    Cookie[] cookies = request.getCookies();
    //打印Cookie信息
    StringBuilder builder = new StringBuilder();
    if (cookies!=null){
        for (Cookie ck:cookies) {
            builder.append(ck.getName()+":"+ck.getValue());
        }
    }
    return "Cookie信息:"+builder;
}
Spring MVC是基于 Servlet API 构建的原始 Web 框架, 也是在Servlet的基础上实现的 HttpServletRequest , HttpServletResponse 是Servlet提供的两个类, 是Spring MVC方法的内置对象. 需要时直接在方法中添加声明即可.
HttpServletRequest 对象代表客户端的请求, 当客户端通过HTTP协议访问服务器时,HTTP请求头中的所有信息都封装在这个对象中,通过这个对象提供的方法,可以获得客户端请求的所有信息.
HttpServletResponse 对象代表服务器的响应. HTTP响应的信息都在这个对象中, 比如向客户端发送的数据, 响应头, 状态码等. 通过这个对象提供的方法, 可以获得服务器响应的所有内容
Spring MVC在这两个对象的基础上进行了封装, 给我们提供更加简单的使用方法.
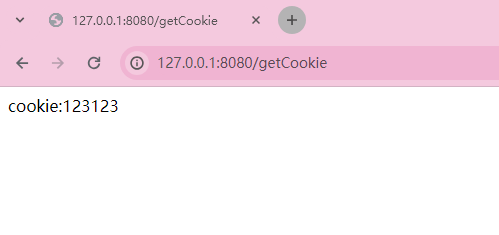
此时没有设置Cookie, 通过浏览器访问: http://127.0.0.1:8080/param/m10 ,得到Cookie为null
新方式
    @RequestMapping("/getCookie")
    public String cookie(@CookieValue String cookie) {
        return "cookie:" + cookie;
    }
获取Session
Session是服务器端的机制, 我们需要先存储, 才能再获取
Session 也是基于HttpServletRequest 来存储和获取的
@RequestMapping("/setSess")
public String setsess(HttpServletRequest request) {
    // 获取Session对象
    HttpSession session = request.getSession();
    if (session != null) {
        session.setAttribute("username", "java");
    }
    return "session 存储成功";
}
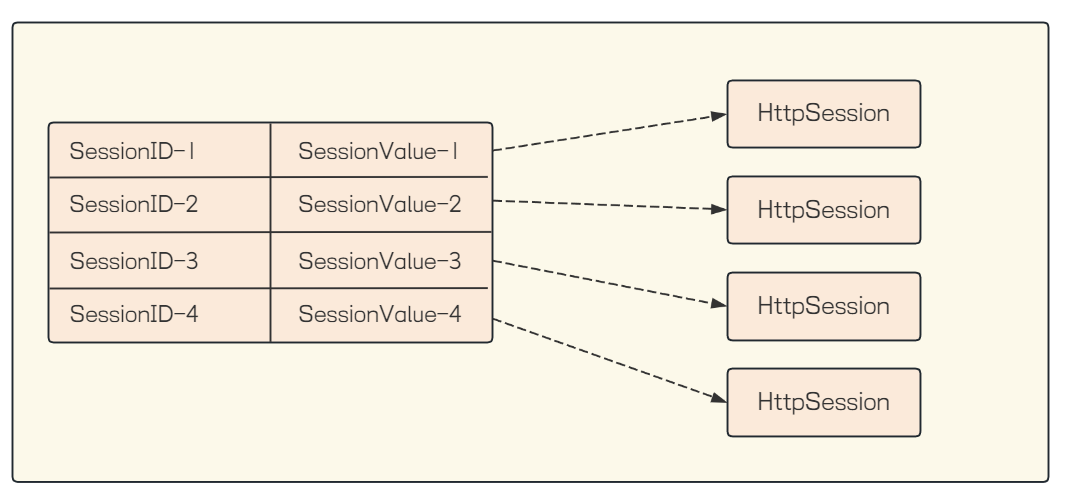
这个代码中看不到 SessionId 这样的概念的. getSession 操作内部提取到请求中的Cookie 里的SessionId, 然后根据SessionId获取到对应的Session 对象, Session 对象用HttpSession来描述
获取Session有两种方式
HttpSession getSession(boolean create);
HttpSession getSession();
HttpSession getSession(boolean create) : 参数如果为 true, 则当不存在会话时新建会话; 参数如果为 false, 则当不存在会话时返回 null
HttpSession getSession(): 和getSession(true) 含义一样, 默认值为true.
void setAttribute(String name, Object value): 使用指定的名称绑定一个对象到该 session 会话
// servlet 获取session
@RequestMapping("/getSess")
public String sess(HttpServletRequest request) {
    // 如果 session 不存在, 不会自动创建
    HttpSession session = request.getSession(false);
    String username = null;
    if (session != null && session.getAttribute("username") != null) {
        username = (String) session.getAttribute("username");
    }
    return "username:" + username;
}

// Object getAttribute(String name): 返回在该 session 会话中具有指定名称的对象,如果没有指定名
// 称的对象,则返回 null.

// 通过@SessionAttribute注解 方式获取Session
@RequestMapping("/getSess2")
public String sess2(@SessionAttribute(value = "username",required = false) Strin
    return "username:"+username;
}
获取Header
@RequestMapping("/header")
public String header(@RequestHeader("User-Agent") String userAgent) {
    return "userAgent:"+userAgent;
}
@RequestHeader注解的参数值为HTTP请求报头中的"Key"
响应
在我们前面的代码例子中,都已经设置了响应数据, Http响应结果可以是数据, 也可以是静态页面,也可以针对响应设置状态码, Header信息等.
返回静态页面
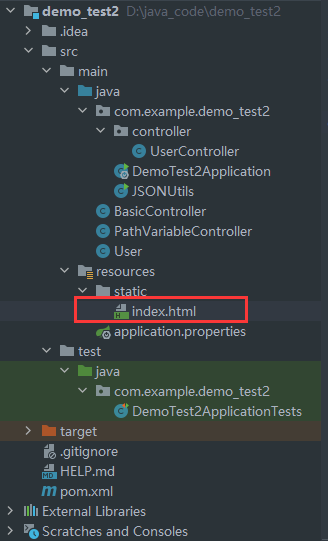
创建前端页面 index.html(注意路径)
<html>
<body>
<h1>hello word!!!</h1>
<p>this is a html page</p>
</body>
</html>

package com.example.demo_test2.controller;

import org.springframework.web.bind.annotation.RequestMapping;
import org.springframework.web.bind.annotation.RestController;

@RestController
@RequestMapping("/return")
public class ReturnController {

    @RequestMapping("/index")
    public Object index() {
        return "/index.html";
    }
}
结果却发现, 页面未正确返回, http响应把"/index.html" 当做了http响应正文的数据那Spring MVC如何才能识别出来 index.html 是一个静态页面, 并进行返回呢?我们需要把 @RestController 改为 @Controller
package com.example.demo_test2.controller;

import org.springframework.stereotype.Controller;
import org.springframework.web.bind.annotation.RequestMapping;
import org.springframework.web.bind.annotation.RestController;

@Controller
@RequestMapping("/return")
public class ReturnController {

    @RequestMapping("/index")
    public Object index() {
        return "/index.html";
    }
}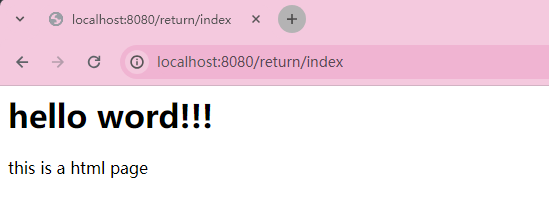
页面正确展示
@RestController 和 @Controller 有着什么样的关联和区别呢?
前面说了MVC模式, 后端会返回视图, 这是早期时的概念
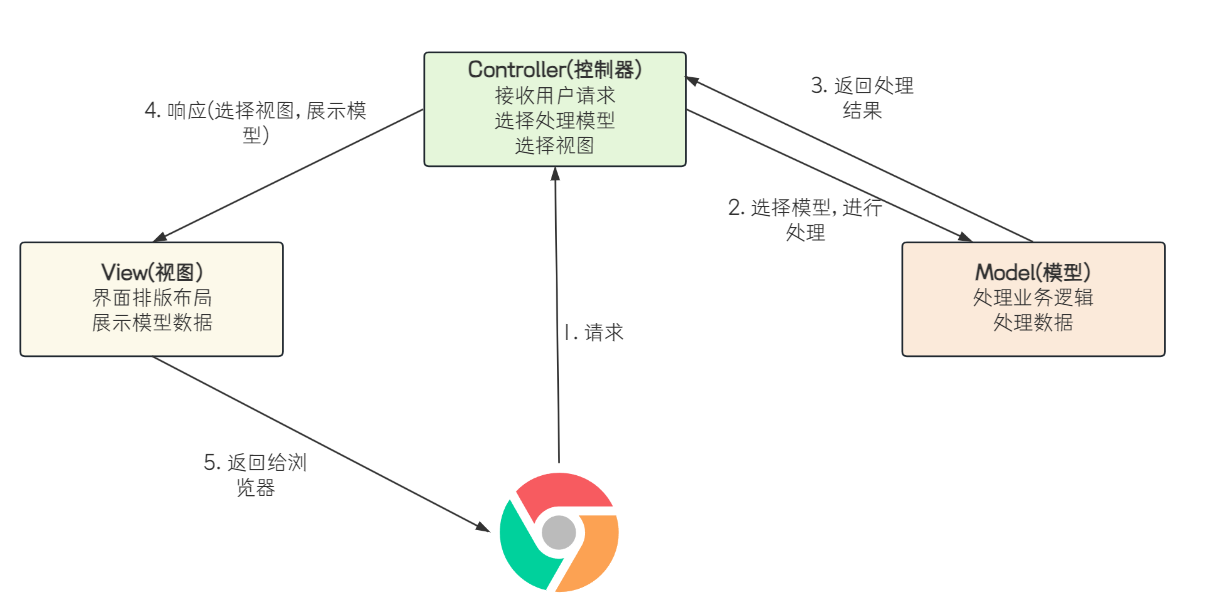
随着互联网的发展, 目前项目开发流行"前后端分离"模式, Java主要是用来做后端项目的开发, 所以也就不再处理前端相关的内容了MVC的概念也逐渐发生了变化, View不再返回视图, 而是返回显示视图时需要的数据.
所以前面使用的@RestController 其实是返回的数据.@RestController = @Controller + @ResponseBody
@Controller : 定义一个控制器, Spring 框架启动时加载, 把这个对象交给Spring管理.
@ResponseBody : 定义返回的数据格式为非视图, 返回一个 text/html 信息
@RestController 源码:
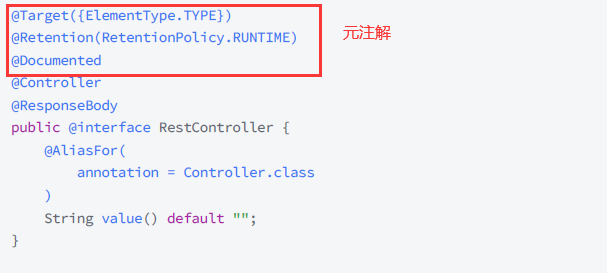
如果想返回视图的话, 只需要把@ResponseBody 去掉就可以了, 也就是@Controller
@Controller 会告诉Spring帮我们管理这个代码,我们后续访问时,才能访问到。
返回数据@ResponseBody
@ResponseBody 表示返回数据
@Controller
@RequestMapping("/return")
public class ReturnController {
    @RequestMapping("/index1")
    public String index1() {
        return "返回视图需要的数据";
    }
}
在不加ResponseBody的情况下,会把这个字符串当成一个视图返回。
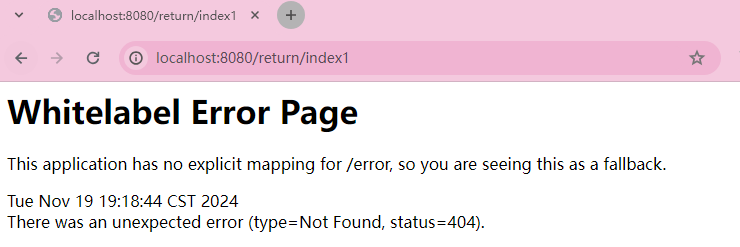
加上@ResponseBody会把这个字符串当成一个数据返回给前端。
package com.example.demo_test2.controller;

import org.springframework.stereotype.Controller;
import org.springframework.web.bind.annotation.RequestMapping;
import org.springframework.web.bind.annotation.ResponseBody;
import org.springframework.web.bind.annotation.RestController;

@Controller
@ResponseBody
@RequestMapping("/return")
public class ReturnController {
    @RequestMapping("/index1")
    public String index1() {
        return "返回视图需要的数据";
    }
}
@ResponseBody 既是类注解, 又是方法注解如果作用在类上, 表示该类的所有方法, 返回的都是数据, 如果作用在方法上, 表示该方法返回的是数据.也就是说: 在类上添加@ResponseBody 就相当于在所有的方法上添加了@ResponseBody 注解.
同样, 如果类上有@RestController 注解时:表示所有的方法上添加了@ResponseBody 注解, 也就是当前类下所有的方法返回值做为响应数据
如果一个类的方法里, 既有返回数据的, 又有返回页面的, 就把@ResponseBody 注解添加到对应的方法上即可.
多个注解时, 没有先后顺序, 先写哪个都可以
返回HTML代码段
vb
`@Controller
@RequestMapping("/return")
public class ReturnController {

    @ResponseBody
    @RequestMapping("/returnHtml")
    public String returnHtml() {
        return "<h1>hello world</h1>";
    }
}`
通过Fiddler观察响应结果, Content-Type 为text/html
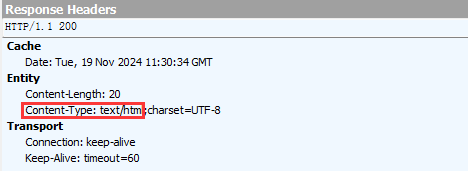
响应中的 Content-Type 常见取值有以下几种:
- text/html : body 数据格式是 HTML
- text/css : body 数据格式是 CSS
- application/javascript : body 数据格式是 JavaScript
- application/json : body 数据格式是 JSON
如果请求的是js文件, Spring MVC会自动设置Content-Type为application/javascript
如果请求的是css文件, Spring MVC会自动设置Content-Type为text/css
返回JSON
Spring MVC 也可以返回JSON
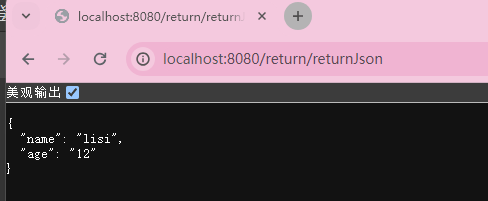
后端方法返回结果为对象
package com.example.demo_test2.controller;

import org.springframework.stereotype.Controller;
import org.springframework.web.bind.annotation.RequestMapping;
import org.springframework.web.bind.annotation.ResponseBody;
import org.springframework.web.bind.annotation.RestController;

import java.util.HashMap;

@Controller
@RequestMapping("/return")
public class ReturnController {
    @ResponseBody
    @RequestMapping("/returnJson")
    public HashMap<String, String> returnJson() {
        HashMap<String, String> map = new HashMap<>();
        map.put("name", "lisi");
        map.put("age", "12");
        return map;
    }
}
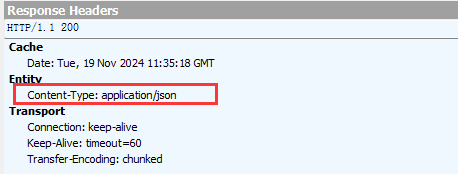
通过Fiddler观察响应结果, Content-Type 为 application/json
设置状态吗
Spring MVC会根据我们方法的返回结果自动设置响应状态码, 程序员也可以手动指定状态码通过Spring MVC的内置对象HttpServletResponse 提供的方法来进行设置
@Controller
@RequestMapping("/return")
public class ReturnController {
    @ResponseBody
    @RequestMapping("/returnHtml")
    public String returnHtml(HttpServletResponse response) {
        response.setStatus(401);
        return "设置状态码成功";
    }
}
状态码不影响页面的展示
设置Header
Http响应报头也会向客户端传递一些附加信息, 比如服务程序的名称,请求的资源已移动到新地址等, 如:
Content-Type, Local等.
这些信息通过@RequestMapping 注解的属性来实现
先来看@RequestMapping 的源码:
//
// Source code recreated from a .class file by IntelliJ IDEA
// (powered by FernFlower decompiler)
//

package org.springframework.web.bind.annotation;

import java.lang.annotation.Documented;
import java.lang.annotation.ElementType;
import java.lang.annotation.Retention;
import java.lang.annotation.RetentionPolicy;
import java.lang.annotation.Target;
import org.springframework.core.annotation.AliasFor;

@Target({ElementType.TYPE, ElementType.METHOD})
@Retention(RetentionPolicy.RUNTIME)
@Documented
@Mapping
public @interface RequestMapping {
    String name() default "";

    @AliasFor("path")
    String[] value() default {};

    @AliasFor("value")
    String[] path() default {};

    RequestMethod[] method() default {};

    String[] params() default {};

    String[] headers() default {};

    String[] consumes() default {};

    String[] produces() default {};
}- value: 指定映射的URL
- method: 指定请求的method类型, 如GET, POST等
- consumes: 指定处理请求(request)的提交内容类型(Content-Type),例如application/json,
text/html; - produces: 指定返回的内容类型,仅当request请求头中的(Accept)类型中包含该指定类型才返回
- Params: 指定request中必须包含某些参数值时,才让该方法处理
- headers: 指定request中必须包含某些指定的header值,才能让该方法处理请求
设置Content-Type
通过设置produces属性的值,设置响应的报头Content-Type
@RequestMapping(value = "/returnJson2",produces = "application/json")
@ResponseBody
public String returnJson2() {
    return "{\"success\":true}";
}
通过Fiddler来观察设置的结果:
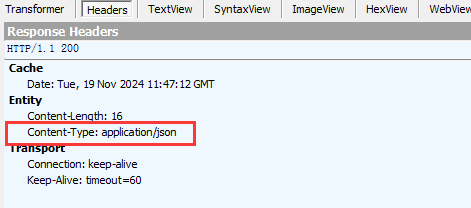
如果不设置produces , 方法返回结果为String时, Spring MVC默认返回类型, 是text/html.设置返回类型时, 也可以同步设置响应编码
@Controller
@RequestMapping("/return")
public class ReturnController {
    @RequestMapping(value = "/returnJson2",produces = "application/json;charset=utf8")
    @ResponseBody
    public String returnJson2() {
        return "{\"success\":true}";
    }
}
观察Fiddler的响应结果

设置其他Header
设置其他Header的话需要使用Spring MVC的内置对象HttpServletResponse提供的方法来进行设置
void setHeader(String name, String value)设置一个带有给定的名称和值的 header. 如果 name
已经存在, 则覆盖旧的值.
Lombok
Lombok是一个Java工具库,通过添加注解的方式,简化Java的开发.
依赖
<dependency>
    <groupId>org.projectlombok</groupId>
    <artifactId>lombok</artifactId>
    <version>1.18.24</version>
    <scope>provided</scope>
</dependency>
使用
lombok通过一些注解的方式, 可以帮助我们消除一些冗长代码, 使代码看起来简洁一些
比如之前的Person对象 就可以改为
@Data
public class Person {
    private int id;
    private String name;
    private String password;
}
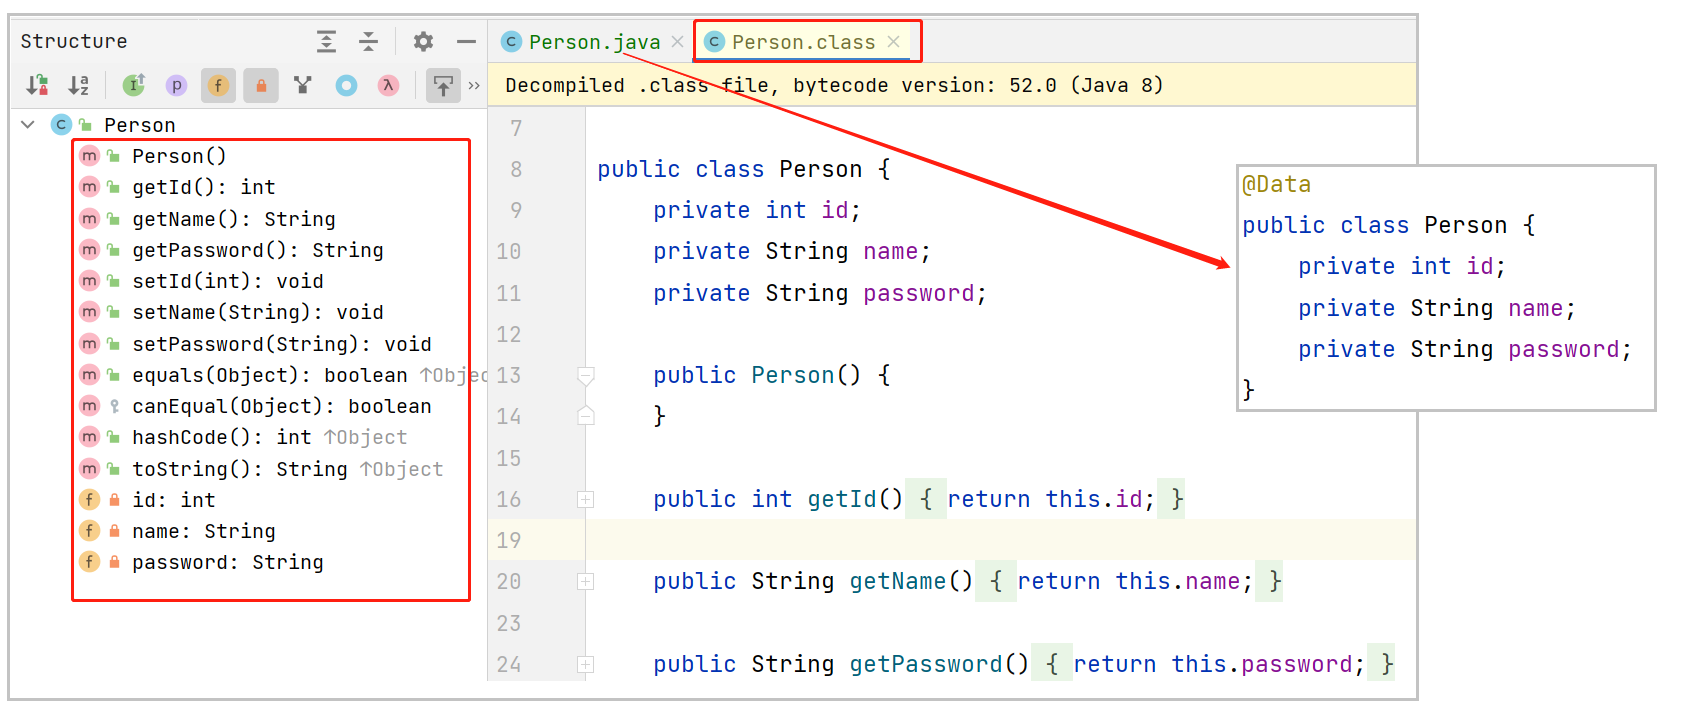
@Data 注解会帮助我们自动一些方法, 包含getter/setter, equals, toString等
原理
可以观察加了@Data 注解之后, Idea反编译的class文件
这不是真正的字节码文件, 而是Idea根据字节码进行反编译后的文件,反编译是将可执行的程序代码转换为某种形式的高级编程语言, 使其具有更易读的格式. 反编译是一种逆向工程,它的作用与编译器的作用相反.

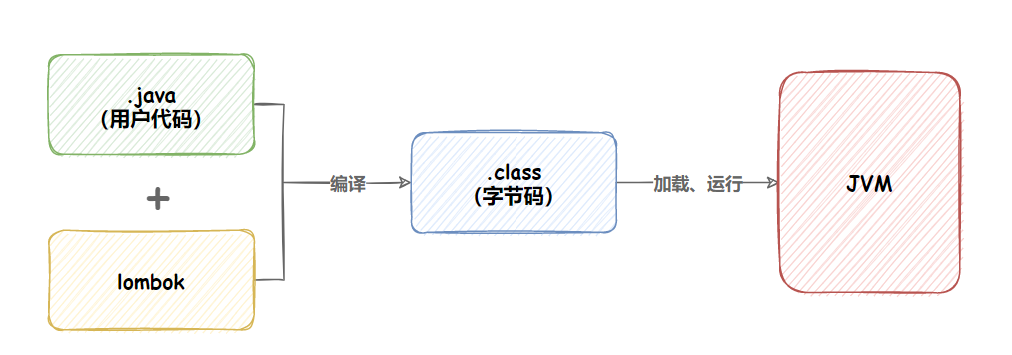
lombok是一款在编译期生成代码的工具包.

其他注解
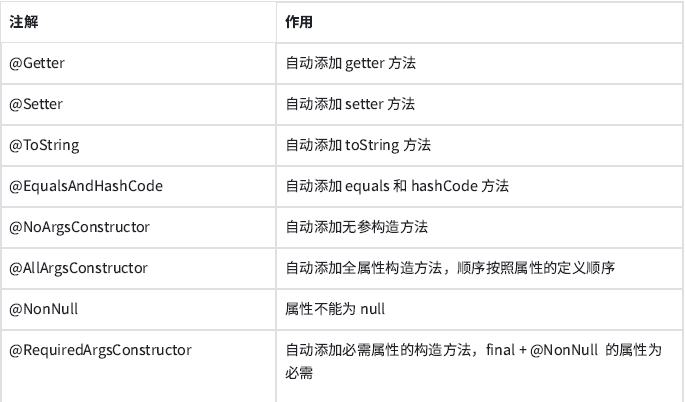
@Data = @Getter + @Setter + @ToString + @EqualsAndHashCode + @RequiredArgsConstructor
+ @NoArgsConstructor
更快捷的引入依赖
上述引入lombok依赖, 需要去找lombok的坐标
接下来介绍更简单引入依赖的方式
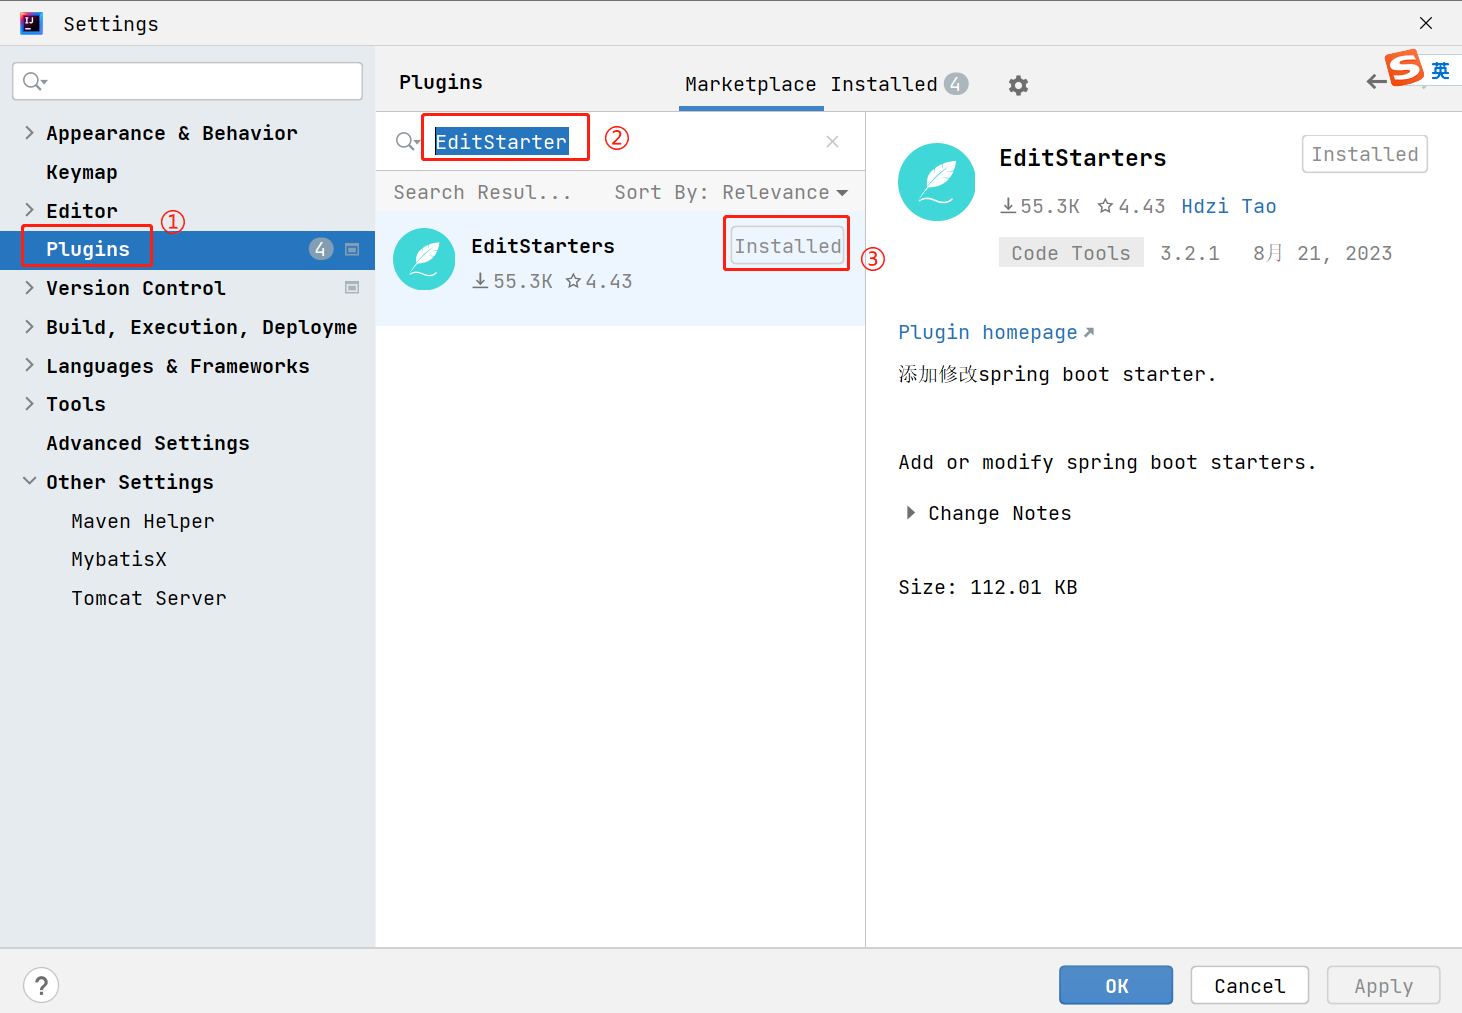

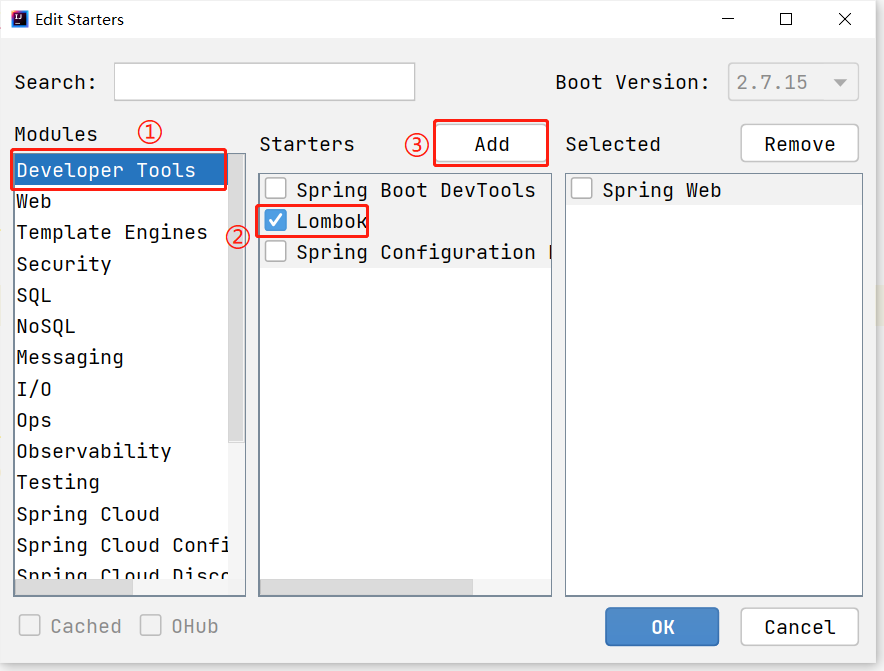
不是所有依赖都可以在这里添加的, 这个界面和SpringBoot创建项目界面一样.
依赖不在这里的, 还需要去Maven仓库查找坐标, 添加依赖.
综合性练习
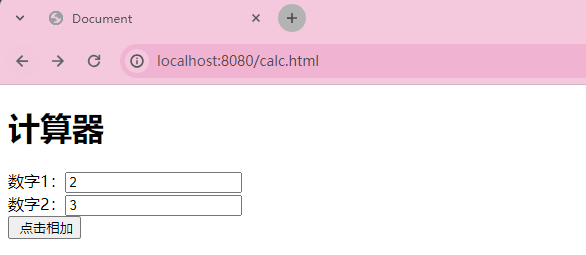
加法计算器
需求: 输入两个整数, 点击"点击相加"按钮, 显示计算结果
接口定义
请求路径:calc/sum
请求方式:GET/POST
接口描述:计算两个整数相加
请求参数

示例: num1=5&num2=3
响应数据
Content-Type: text/html
响应内容: 计算机计算结果: 8
服务器给浏览器返回计算的结果
前端代码
<form action="calc/sum" method="post">
<h1>计算器</h1>
数字1:<input name="num1" type="text"><br>
数字2:<input name="num2" type="text"><br>
<input type="submit" value=" 点击相加">
</form>
后端代码
package com.example.demo_test2.controller;

import org.springframework.web.bind.annotation.RequestMapping;
import org.springframework.web.bind.annotation.RequestParam;
import org.springframework.web.bind.annotation.RestController;

@RestController
@RequestMapping("/calc")
public class CalcController {

    @RequestMapping("/sum")
    public String sum(@RequestParam("num1") Integer num1,@RequestParam("num2") Integer num2){
        Integer sum = num1 + num2;
        return "计算结果为:" + sum;
    }
}

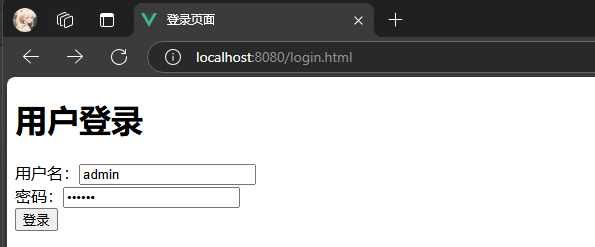
用户登录
需求: 用户输入账号和密码, 后端进行校验密码是否正确
- 如果不正确, 前端进行用户告知
- 如果正确, 跳转到首页. 首页显示当前登录用户
- 后续再访问首页, 可以获取到登录用户信息
需求分析
对于后端开发人员而言, 不涉及前端页面的展示, 只需要提供两个功能
- 登录页面: 通过账号和密码, 校验输入的账号密码是否正确, 并告知前端
- 首页: 告知前端当前登录用户. 如果当前已有用户登录, 返回登录的账号, 如果没有, 返回空
接口定义
请求路径:/user/login
请求方式:POST
接口描述:校验账号密码是否正确
请求参数

响应数据
Content-Type: text/html
响应内容:
true //账号密码验证成功
false//账号密码验证失败
前端代码
<!doctype html>
<html lang="en">

<head>
    <meta charset="UTF-8">
    <meta name="viewport"
          content="width=device-width, user-scalable=no, initial-scale=1.0, maximum-scale=1.0, minimum-scale=1.0">
    <meta http-equiv="X-UA-Compatible" content="ie=edge">
    <title>用户登录首页</title>
</head>

<body>
登录人: <span id="loginUser"></span>

<script src="https://cdn.bootcdn.net/ajax/libs/jquery/3.6.4/jquery.min.js"></script>
<script>
    $.ajax({
        type: "get",
        url: "/user/getUserInfo",
        success: function (result) {
            $("#loginUser").text(result);
        }
    });
</script>
</body>

</html>

<!DOCTYPE html>
<html lang="en">

<head>
  <meta charset="UTF-8">
  <title>登录页面</title>
</head>

<body>
<h1>用户登录</h1>
用户名:<input name="userName" type="text" id="userName"><br>
密码:<input name="password" type="password" id="password"><br>
<input type="button" value="登录" onclick="login()">

<script src="https://cdn.bootcdn.net/ajax/libs/jquery/3.6.4/jquery.min.js"></script>
<script>
function login() {
  $.ajax({
    type: "post",
    url: "/user/login",
    data: {
      "userName": $("#userName").val(),
      "password": $("#password").val()
    },
    success: function (result) {
      if (result) {
        location.href = "/index.html"
      } else {
        alert("账号或密码有误.");
      }
    }
  });
}
</script>
</body>

</html>
后端代码
package com.example.demo_test2.controller;

import org.springframework.util.StringUtils;
import org.springframework.web.bind.annotation.*;

import com.example.demo_test2.demos.web.User;
import org.springframework.web.multipart.MultipartFile;

import javax.servlet.http.HttpSession;
import java.io.File;
import java.io.IOException;
import java.util.Arrays;
import java.util.List;
import java.util.stream.Collectors;

@RestController
@RequestMapping("/user")
public class UserController {

    @RequestMapping("/login")
    public Boolean login(String userName, String password, HttpSession session) {
        if (!StringUtils.hasLength(userName) || !StringUtils.hasLength(password)) {
            return false;
        }

        if ("admin".equals(userName) && "123456".equals(password)) {
            session.setAttribute("userName", userName);
            return true;
        }

        return false;
    }

    @RequestMapping("/getUserInfo")
    public String getUserInfo(HttpSession session) {
        return (String) session.getAttribute("userName");
    }
}

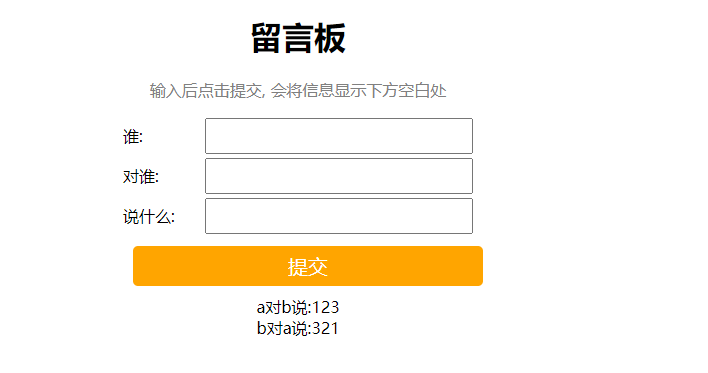
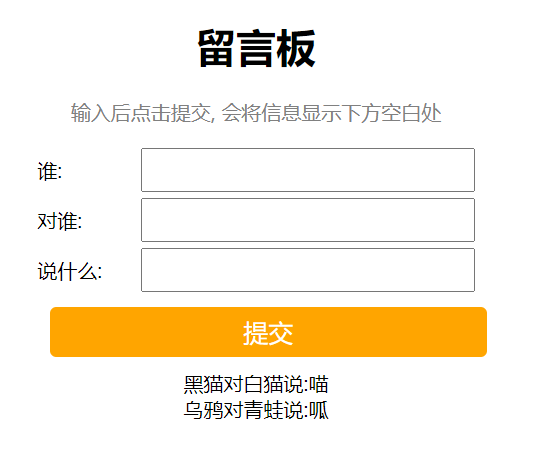
留言板
需求:
界面如下图所示
- 输入留言信息, 点击提交. 后端把数据存储起来.
- 页面展示输入的表白墙的信息
接口定义
获取全部留言
全部留言信息, 我们用List来表示, 可以用JSON来描述这个List数据.
请求:
GET /message/getList响应:JSON格式
[
  {
    "from": "黑猫",
    "to": "白猫",
    "message": "喵"
  },{
    "from": "黑狗",
    "to": "白狗",
    "message": "汪"
  },
  //...
]
浏览器给服务器发送一个 GET /message/getList 这样的请求, 就能返回当前一共有哪些留言
记录. 结果以 json 的格式返回过来.
发表新留言
POST /message/publish
{
  "from": "黑猫",
  "to": "白猫",
  "message": "喵"
}
响应:JSON格式
{
  ok: 1
}
我们期望浏览器给服务器发送一个 POST /message/publish 这样的请求, 就能把当前的留言提交给服务器.
前端代码
<!DOCTYPE html>
<html lang="en">

<head>
    <meta charset="UTF-8">
    <meta name="viewport" content="width=device-width, initial-scale=1.0">
    <title>留言板</title>
    <style>
        .container {
            width: 350px;
            height: 300px;
            margin: 0 auto;
            /* border: 1px black solid; */
            text-align: center;
        }

        .grey {
            color: grey;
        }

        .container .row {
            width: 350px;
            height: 40px;

            display: flex;
            justify-content: space-between;
            align-items: center;
        }

        .container .row input {
            width: 260px;
            height: 30px;
        }

        #submit {
            width: 350px;
            height: 40px;
            background-color: orange;
            color: white;
            border: none;
            margin: 10px;
            border-radius: 5px;
            font-size: 20px;
        }
    </style>
</head>

<body>
    <div class="container">
        <h1>留言板</h1>
        <p class="grey">输入后点击提交, 会将信息显示下方空白处</p>
        <div class="row">
            <span>谁:</span> <input type="text" name="" id="from">
        </div>
        <div class="row">
            <span>对谁:</span> <input type="text" name="" id="to">
        </div>
        <div class="row">
            <span>说什么:</span> <input type="text" name="" id="say">
        </div>
        <input type="button" value="提交" id="submit" onclick="submit()">
        <!-- <div>A 对 B 说: hello</div> -->
    </div>

    <script src="https://cdn.bootcdn.net/ajax/libs/jquery/3.6.4/jquery.min.js"></script>
    <script>

        $.ajax({
            type: "get",
            url: "/message/getList",
            success: function (result) {
                for (var message of result) {
                    var divE = "<div>" + message.from + "对" + message.to + "说:" + message.message + "</div>";
                    $(".container").append(divE);
                }
            }
        });

        function submit() {
            //1. 获取留言的内容
            var from = $('#from').val();
            var to = $('#to').val();
            var say = $('#say').val();
            if (from == '' || to == '' || say == '') {
                return;
            }
            $.ajax({
                type: "post",
                url: "/message/publish",
                data: {
                    from: from,
                    to: to,
                    message: say
                },
                success: function (result) {
                    if (result) {
                        //2. 构造节点
                        var divE = "<div>" + from + "对" + to + "说:" + say + "</div>";
                        //3. 把节点添加到页面上
                        $(".container").append(divE);
                        //4. 清空输入框的值
                        $('#from').val("");
                        $('#to').val("");
                        $('#say').val("");
                    } else {
                        alert("发表留言失败!");
                    }
                }
            });
        }
    </script>
</body>

</html>
后端代码
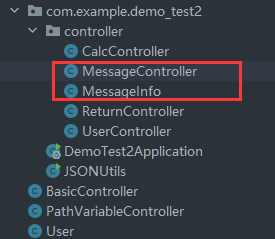
package com.example.demo_test2.controller;


import lombok.Data;

@Data
public class MessageInfo {
    private String from;
    private String to;
    private String message;
}

package com.example.demo_test2.controller;


import org.springframework.util.StringUtils;
import org.springframework.web.bind.annotation.RequestMapping;
import org.springframework.web.bind.annotation.RestController;

import java.util.ArrayList;
import java.util.List;


@RestController
@RequestMapping("/message")
public class MessageController {

    private List<MessageInfo> messageInfos = new ArrayList<>();

    @RequestMapping("/publish")
    public Boolean publishMessage(MessageInfo messageInfo){
        System.out.println(messageInfo.toString());
        if (!StringUtils.hasLength(messageInfo.getFrom())
                || !StringUtils.hasLength(messageInfo.getTo())
                || !StringUtils.hasLength(messageInfo.getMessage())){

            return false;
        }

        messageInfos.add(messageInfo);
        return true;
    }

    @RequestMapping("/getList")
    public List<MessageInfo> getMessageInfo(){
        System.out.println("get message list");
        return messageInfos;
    }
}