Centos7环境下nifi单机部署
- 前言
- 一、安装Nifi
-
- [1.1 下载并解压](#1.1 下载并解压)
- [1.2 修改配置文件](#1.2 修改配置文件)
- 二、启动Nifi程序
- 三、Nifi的简单使用
-
- [3.1 文件移动](#3.1 文件移动)
- [3.2 本地文件传到HDFS](#3.2 本地文件传到HDFS)
- 参考博客
前言
本以为在服务器上部署nifi很简单,跟着教程走就好,但是并没有成功,可能是因为版本的问题,也可能有其他原因,导致我一直没有部署成功,后面想着先在本地windows上部署,先学着再说,在看完windows部署教程后,发现了之前教程中没有提到的一点,就是在nifi.properties配置中https和http只能保留一组,于是我再去centos7下部署nifi就成功了,好了,接下来我将具体介绍nifi的部署过程。
一、安装Nifi
1.1 下载并解压
下载所需版本的Nifi,这里我下载版本为nifi-1.19.1-bin.zip
下载地址:https://archive.apache.org/dist/nifi/1.9.1/nifi-1.19.1-bin.zip
如果觉得官网慢,可以在我的百度网盘中下载,里面还有其他相关文件
网盘链接:https://pan.baidu.com/s/1WoeCQ_bLh5hrRv9t0hAUDw?pwd=2xwq

下载好后解压到相应目录下
bash
cp nifi-1.19.1-bin.zip /opt/module/
cd /opt/module/
unzip nifi-1.19.1-bin.zip
1.2 修改配置文件
修改conf目录下的nifi.properties文件
bash
cd nifi-1.19.1/
vim conf/nifi.properties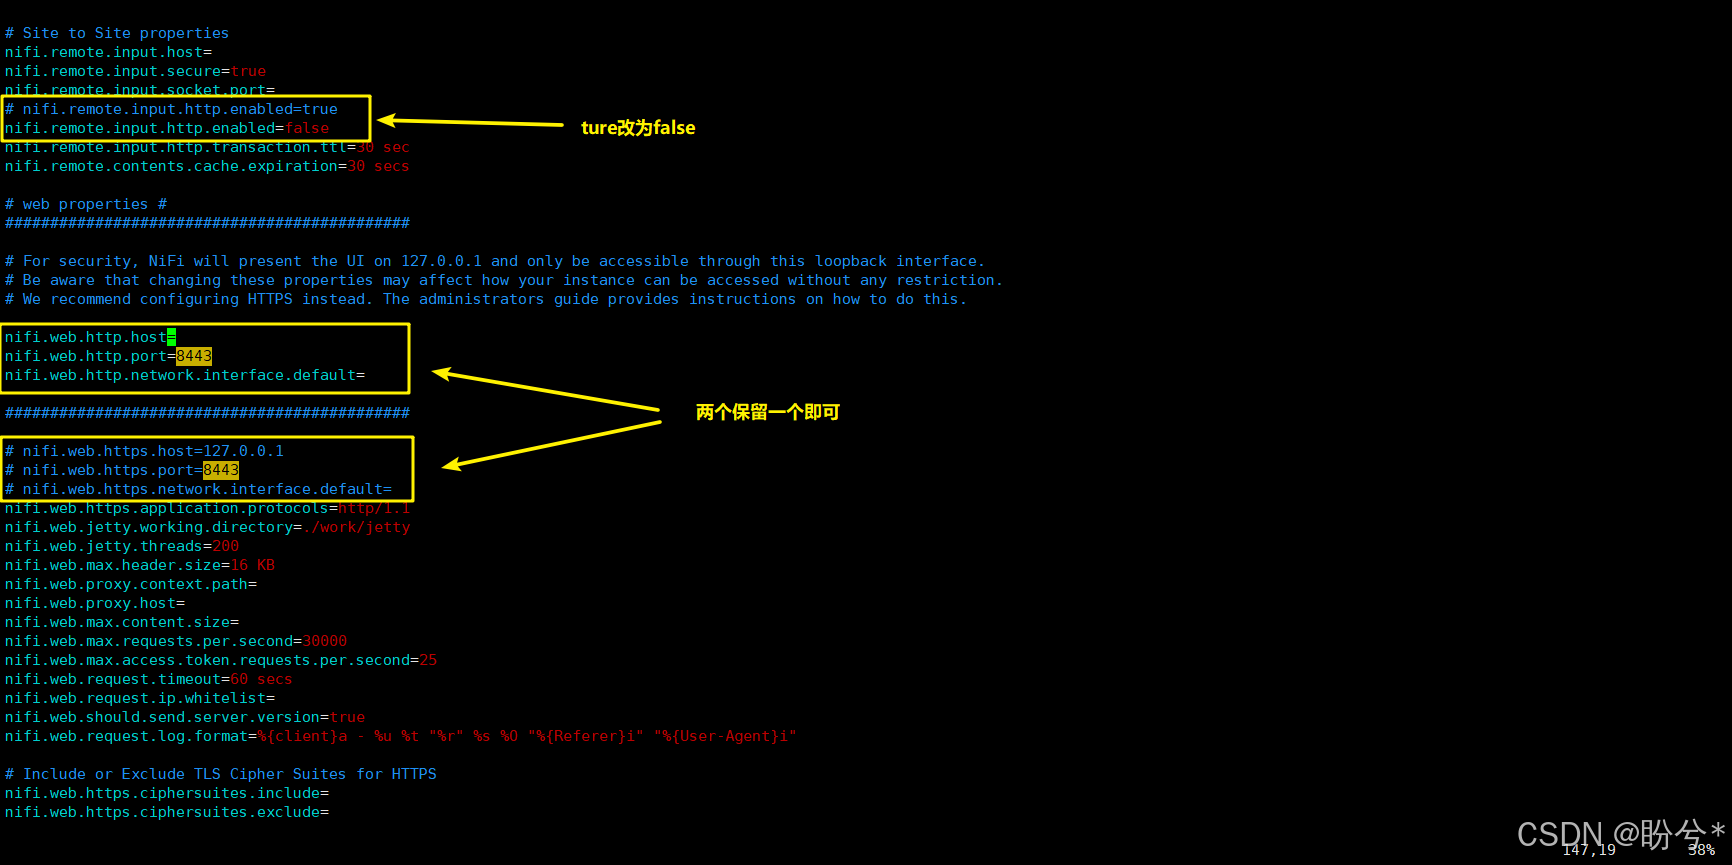
修改nifi端口和host地址,查找 nifi.web.http.port 和 nifi.web.http.host,(这里的nifi.web.http.port,nifi.web.http.host,nifi.web.http.network.interface.default与 nifi.web.https.host,nifi.web.https.port,nifi.web.https.network.interface.default 只能共存一组,区别就是请求的时候一个是http请求,一个是https的请求),我之前一直没有成功就是因为这里都放开了,现在我将把https给注释,配置http,nifi.remote.input.http.enabled为false,具体配置参数如下:
bash
# Site to Site properties
nifi.remote.input.host=
nifi.remote.input.secure=true
nifi.remote.input.socket.port=
# nifi.remote.input.http.enabled=true
nifi.remote.input.http.enabled=false
nifi.remote.input.http.transaction.ttl=30 sec
nifi.remote.contents.cache.expiration=30 secs

# web properties #
#############################################

# For security, NiFi will present the UI on 127.0.0.1 and only be accessible through this loopback interface.
# Be aware that changing these properties may affect how your instance can be accessed without any restriction.
# We recommend configuring HTTPS instead. The administrators guide provides instructions on how to do this.

# chen 是我服务器的 hostname
nifi.web.http.host=
nifi.web.http.port=8443
nifi.web.http.network.interface.default=

#############################################

# nifi.web.https.host=
# nifi.web.https.port=8443
# nifi.web.https.network.interface.default=
nifi.web.https.application.protocols=http/1.1
nifi.web.jetty.working.directory=./work/jetty
nifi.web.jetty.threads=200
nifi.web.max.header.size=16 KB
nifi.web.proxy.context.path=
nifi.web.proxy.host=
nifi.web.max.content.size=
nifi.web.max.requests.per.second=30000
nifi.web.max.access.token.requests.per.second=25
nifi.web.request.timeout=60 secs
nifi.web.request.ip.whitelist=
nifi.web.should.send.server.version=true
nifi.web.request.log.format=%{client}a - %u %t "%r" %s %O "%{Referer}i" "%{User-Agent}i"
nifi.web.http.host可以不写,也可以配置成0.0.0.0,我这里就不配置了
二、启动Nifi程序
在前面保持配置文件后就可以启动Nifi程序进行测试了
bash
./bin/nifi.sh start如下便是启动成功,一般过个一两分钟就可以访问nifi的web网页了,即 ip:端口号

可以使用 netstat -tuln | grep 8443 命令查看端口使用情况

Nifi Web界面如下(如何nifi启动了还是访问不通记得看看服务器8443端口号是否开放):

三、Nifi的简单使用
3.1 文件移动
新建一个组,命名好后 双击 该组进入

选择Processor处理器,选择getFile处理器,即获取某路径下的文件

再次点击Processor处理器,选择putFile处理器,即文件存放路径

右键configure

配置待传输文件的所在路径

然后配置存放文件的路径,APPLY

将两个处理器链接起来,APPLY

这里可以看到PutFile有警告,说明还没配置好

配置一下该处理器失败或结束后停止还是继续

现在两个处理器都配置好了,先执行getFile处理器

我现在在服务器端向 /root/nifi/input 里面写入两个文件,可以看到 Queue 中已经有两个文件

右击 Queue ,点击 List Queue 便可查看Queue中存放的文件信息,点击 小眼睛 可以查看文件内容

右键GetFile,停掉,开始执行PutFile

在 /root/nifi/output 中可以查看到文件

3.2 本地文件传到HDFS
PutHDFS主要配置 hdfs配置文件 和 存储文件的路径
bash
# hdfs配置文件 有多个文件用 , 分隔
Hadoop Configuration Resources
bash
/opt/module/hadoop-3.1.3/etc/hadoop/core-site.xml,/opt/module/hadoop-3.1.3/etc/hadoop/hdfs-site.xml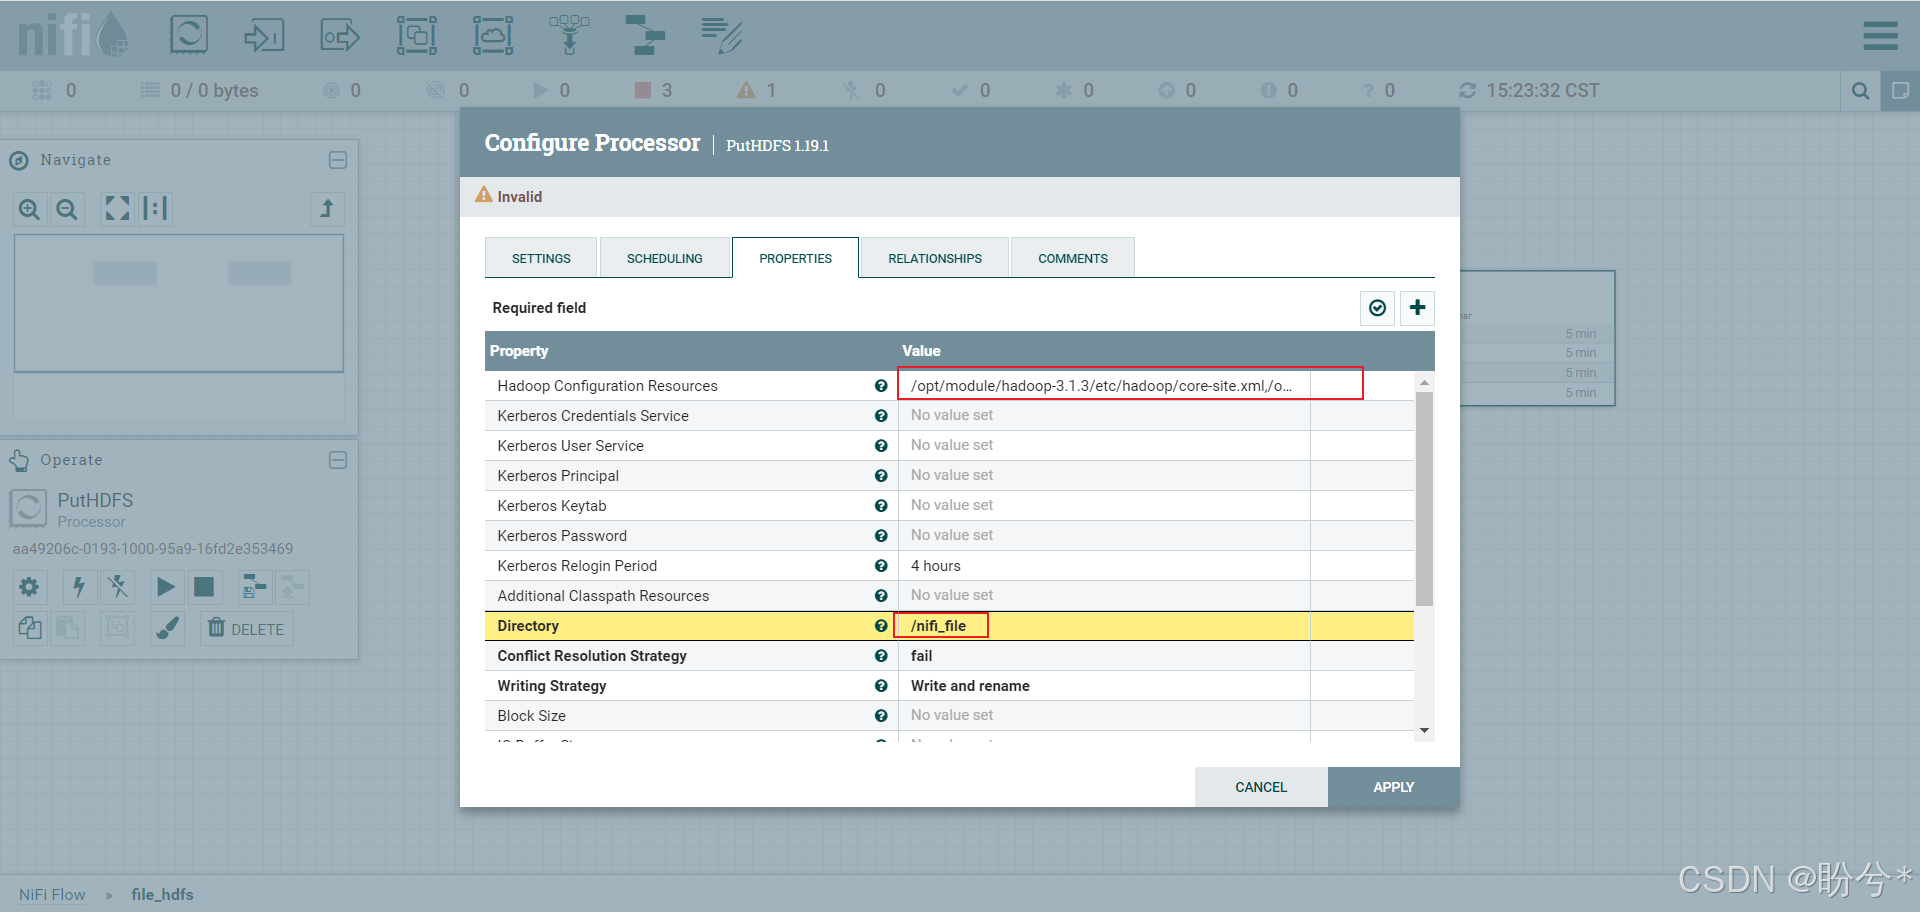
在服务器 /root/nifi/input 下写入文件

StopGetFile,放开PutHDFS,即可往HDFS中写入文件

在HDFS中可查看到需要传输的文件

NIFI除了以上这些,还可以联通Mysql、Kafka进行文件传输,对文件内容进行格式转换等。