目录
- [1 微搭的部门管理](#1 微搭的部门管理)
- [2 如何自定义树形组件](#2 如何自定义树形组件)
- [3 搭建界面](#3 搭建界面)
- [4 组件搭建思路](#4 组件搭建思路)
-
- [4.1 创建布局框架](#4.1 创建布局框架)
- [4.2 引入树形组件](#4.2 引入树形组件)
- [4.3 实现右键菜单功能](#4.3 实现右键菜单功能)
- [4.4 点击节点显示表单](#4.4 点击节点显示表单)
- 总结
部门表设计之后,就需要考虑如何搭建界面了。界面这个部分搭建有多种方案,主要是要考虑方便用户添加和修改数据。微搭的角色用户就提供了一个不错的功能模板,我们先拆解一下微搭的方案。
1 微搭的部门管理
在产品自带的内部用户管理,提供了一种方便录入数据的功能。

移动上去会有更多的功能

这个时候就可以添加子部门或者修改部门了
他这种方式也没有问题,那更多的我们是习惯用右键,弹出更多的功能去操作。
2 如何自定义树形组件
官方提供的树形组件没有办法定义右键功能,这里我们就需要使用JSX组件。JSX组件相当于提供了一个React语法的自定义组件,支持你按照JSX的语法编制组件。但是缺点是不允许npm引入第三方的包。
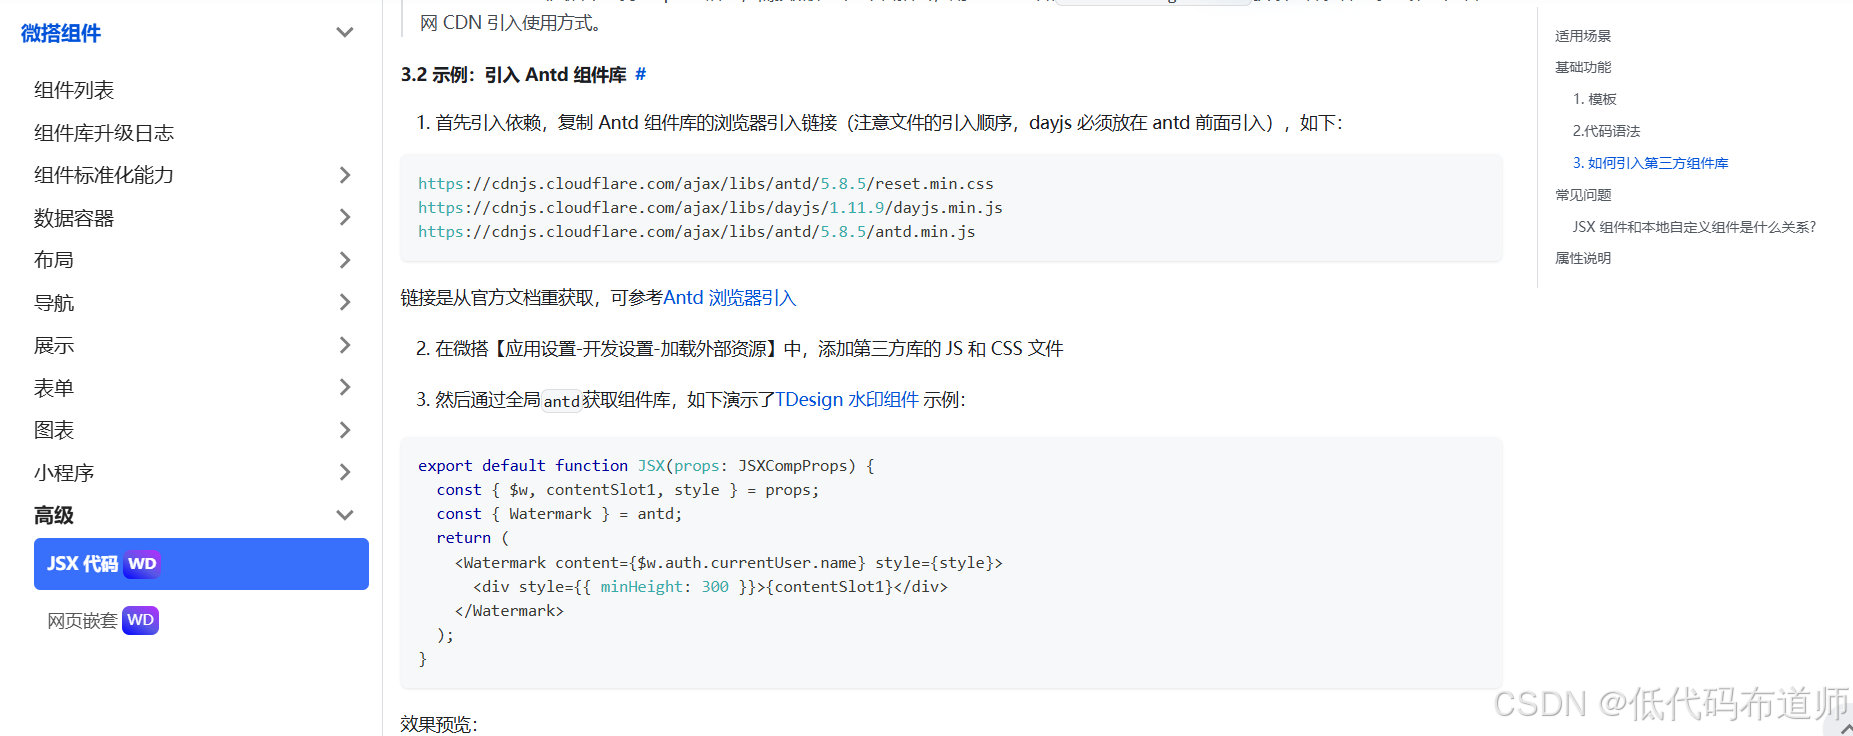
我们就需要通过CDN的方式进行引入。
打开组件的说明文档
https://docs.cloudbase.net/lowcode/components/wedaUI/src/docs/compsdocs/super/Jsx#3-如何引入第三方组件库

参考官方提供的CDN的地址
bash
https://cdnjs.cloudflare.com/ajax/libs/antd/5.8.5/reset.min.css
https://cdnjs.cloudflare.com/ajax/libs/dayjs/1.11.9/dayjs.min.js
https://cdnjs.cloudflare.com/ajax/libs/antd/5.8.5/antd.min.js
点击应用的设置图标

一次将CSS和JS的资源加入

3 搭建界面
资源库引入之后我们就可以搭建页面了,点击创建页面的图标

输入页面的名称,选择左侧导航布局

在内容插槽里添加布局组件

选中布局内容,添加AI代码块组件

点击编辑JSX代码

贴入如下代码
bash
export default function DepartmentTree(props: JSXCompProps) {
  const { $w, contentSlot1, style } = props;
  const { Modal, Input, Tree, Button, Form } = antd;

  const [treeData, setTreeData] = React.useState([
    { id: 1, name: "总公司", parentId: null, children: [], isOpen: true }
  ]);
  const [selectedNode, setSelectedNode] = React.useState(null);
  const [addChildModalVisible, setAddChildModalVisible] = React.useState(false);
  const [newDepartmentName, setNewDepartmentName] = React.useState("");
  const [contextMenuTargetId, setContextMenuTargetId] = React.useState(null);
  const [contextMenuPosition, setContextMenuPosition] = React.useState(null);
  const [form] = Form.useForm();

  // 点击节点事件
  const handleNodeClick = (node) => {
    setSelectedNode(node);
    setContextMenuTargetId(null);
    form.setFieldsValue({ name: node.name });
  };

  // 切换节点展开/收起
  const toggleNode = (node) => {
    node.isOpen = !node.isOpen;
    setTreeData([...treeData]);
  };

  // 递归更新树节点
  const updateTree = (nodes, callback) => {
    return nodes.map((node) => {
      if (callback(node)) {
        return { ...node };
      }
      if (node.children) {
        return { ...node, children: updateTree(node.children, callback) };
      }
      return node;
    });
  };

  // 添加子部门逻辑
  const handleAddChild = () => {
    if (!newDepartmentName.trim()) {
      return Modal.warning({
        title: "部门名称不能为空",
        content: "请输入部门名称后重试。"
      });
    }

    const newChild = {
      id: Date.now(),
      name: newDepartmentName,
      parentId: contextMenuTargetId,
      children: [],
      isOpen: false
    };

    setTreeData((prevTreeData) =>
      updateTree(prevTreeData, (node) => {
        if (node.id === contextMenuTargetId) {
          node.children = [...(node.children || []), newChild];
          return true;
        }
        return false;
      })
    );

    setAddChildModalVisible(false);
    setNewDepartmentName("");
  };

  // 保存表单修改
  const handleSaveForm = () => {
    form
      .validateFields()
      .then((values) => {
        setTreeData((prevTreeData) =>
          updateTree(prevTreeData, (node) => {
            if (node.id === selectedNode.id) {
              node.name = values.name;
              return true;
            }
            return false;
          })
        );
        Modal.success({ title: "保存成功", content: "部门信息已更新。" });
      })
      .catch((info) => console.error("Validate Failed:", info));
  };

  // 右键点击事件
  const handleRightClick = (e, node) => {
    e.preventDefault();
    setContextMenuTargetId(node.id);
    setContextMenuPosition({ x: e.clientX, y: e.clientY });
  };

  // 渲染树节点
  const renderTree = (nodes) =>
    nodes.map((node) => (
      <Tree.TreeNode
        key={node.id}
        title={
          <span
            onClick={() => handleNodeClick(node)}
            onContextMenu={(e) => handleRightClick(e, node)}
          >
            {node.name}
          </span>
        }
      >
        {node.children && renderTree(node.children)}
      </Tree.TreeNode>
    ));

  return (
    <div style={{ display: "flex", ...style }}>
      {/* 左侧树 */}
      <div
        style={{
          flex: "1",
          borderRight: "1px solid #ddd",
          overflowY: "auto",
          padding: "10px",
          minHeight: "300px"
        }}
      >
        <Tree showLine defaultExpandAll>
          {renderTree(treeData)}
        </Tree>
      </div>

      {/* 右侧表单 */}
      <div
        style={{
          flex: "2",
          padding: "10px",
          minHeight: "300px"
        }}
      >
        {selectedNode ? (
          <Form form={form} layout="vertical">
            <h3>部门信息</h3>
            <Form.Item
              label="部门名称"
              name="name"
              rules={[{ required: true, message: "请输入部门名称" }]}
            >
              <Input />
            </Form.Item>
            <Form.Item label="部门编号">
              <Input value={selectedNode.id} disabled />
            </Form.Item>
            <div style={{ marginTop: "10px" }}>
              <Button
                type="primary"
                onClick={handleSaveForm}
                style={{ marginRight: "10px" }}
              >
                保存
              </Button>
              <Button onClick={() => form.resetFields()}>取消</Button>
            </div>
          </Form>
        ) : (
          <p>请选择左侧树节点以查看或编辑部门信息。</p>
        )}
      </div>

      {/* 添加子部门 Modal */}
      <Modal
        title="添加子部门"
        visible={addChildModalVisible}
        onOk={handleAddChild}
        onCancel={() => setAddChildModalVisible(false)}
      >
        <Input
          placeholder="请输入部门名称"
          value={newDepartmentName}
          onChange={(e) => setNewDepartmentName(e.target.value)}
        />
      </Modal>

      {/* 右键菜单 */}
      {contextMenuPosition && (
        <div
          style={{
            position: "absolute",
            top: contextMenuPosition.y,
            left: contextMenuPosition.x,
            backgroundColor: "#fff",
            boxShadow: "0 2px 8px rgba(0,0,0,0.15)",
            borderRadius: "4px",
            zIndex: 1000
          }}
          onMouseLeave={() => setContextMenuPosition(null)}
        >
          <div
            onClick={() => setAddChildModalVisible(true)}
            style={{
              padding: "8px 16px",
              cursor: "pointer",
              borderBottom: "1px solid #f0f0f0"
            }}
          >
            添加子部门
          </div>
        </div>
      )}

      {/* 插槽 */}
      <div>{contentSlot1}</div>
    </div>
  );
}
点击保存按钮

点击实时预览的功能查看效果


选择总公司,右键,点击添加子部门

录入部门名称,科技部,点击保存将部门更新到树里

4 组件搭建思路
首先,我们需要构建一个显示部门信息的页面。在页面的左侧,我们将展示一个树形结构,右侧则展示与选中的部门相关的详细信息和表单。
4.1 创建布局框架
我们开始构建基础布局,使用 flexbox 来设置左右两栏。左侧是树形结构,右侧是显示部门详细信息的表单。整体布局如下:
bash
export default function DepartmentTree(props: JSXCompProps) {
  const { $w, contentSlot1, style } = props;
  const { Modal, Input, Tree, Button, Form } = antd;

  // 设置树的数据
  const [treeData, setTreeData] = React.useState([
    { id: 1, name: "总公司", parentId: null, children: [], isOpen: true }
  ]);

  // 选择的节点和表单
  const [selectedNode, setSelectedNode] = React.useState(null);
  const [form] = Form.useForm();

  return (
    <div style={{ display: "flex", ...style }}>
      {/* 左侧树 */}
      <div
        style={{
          flex: "1",
          borderRight: "1px solid #ddd",
          overflowY: "auto",
          padding: "10px",
          minHeight: "300px"
        }}
      >
        {/* 树形组件 */}
      </div>

      {/* 右侧表单 */}
      <div
        style={{
          flex: "2",
          padding: "10px",
          minHeight: "300px"
        }}
      >
        {/* 表单组件 */}
      </div>

      {/* 插槽 */}
      <div>{contentSlot1}</div>
    </div>
  );
}
使用 flex 布局来让左侧树和右侧表单自适应宽度,左侧占 1 列,右侧占 2 列。左侧树的 minHeight 为 300px,右侧表单区域也有相同的高度,保证页面美观。
4.2 引入树形组件
在左侧区域展示树形结构时,我们使用 antd 的 Tree 组件。我们首先在组件的顶部引入 Ant Design 库中的相关组件:
bash
const { Tree } = antd;然后我们使用 Tree 组件来展示部门的树结构。Tree 组件允许嵌套节点,这正符合我们的需求。树的数据结构是一个包含 id、name 和 children 的对象数组。
我们通过递归来渲染树形节点,每个节点的 title 是部门的名称,点击时会选择该节点,并展示其详细信息。
bash
const renderTree = (nodes) =>
  nodes.map((node) => (
    <Tree.TreeNode
      key={node.id}
      title={<span>{node.name}</span>}
    >
      {node.children && renderTree(node.children)}
    </Tree.TreeNode>
  ));

<Tree>{renderTree(treeData)}</Tree>;
在 Tree 组件中,我们递归地渲染每个部门节点。每个部门节点的 key 是唯一的 ID,title 是部门的名称。
4.3 实现右键菜单功能
我们希望在树节点上右键点击时,弹出一个菜单,允许用户执行一些操作,比如"添加子部门"。为了实现这一功能,我们需要监听右键点击事件。
在树节点上添加 onContextMenu 事件,捕获鼠标点击的位置,显示一个右键菜单。
bash
const handleRightClick = (e, node) => {
  e.preventDefault();
  setContextMenuTargetId(node.id);
  setContextMenuPosition({ x: e.clientX, y: e.clientY });
};
接下来,使用一个 div 来展示右键菜单,位置由 contextMenuPosition 确定。右键菜单中,我们可以添加操作,例如"添加子部门"。
bash
{contextMenuPosition && (
  <div
    style={{
      position: "absolute",
      top: contextMenuPosition.y,
      left: contextMenuPosition.x,
      backgroundColor: "#fff",
      boxShadow: "0 2px 8px rgba(0,0,0,0.15)",
      borderRadius: "4px",
      zIndex: 1000
    }}
    onMouseLeave={() => setContextMenuPosition(null)}
  >
    <div
      onClick={() => setAddChildModalVisible(true)}
      style={{
        padding: "8px 16px",
        cursor: "pointer",
        borderBottom: "1px solid #f0f0f0"
      }}
    >
      添加子部门
    </div>
  </div>
)}
4.4 点击节点显示表单
我们希望用户点击树节点时,右侧展示该节点的详细信息(如部门名称、部门编号)。这些信息将通过一个表单展示,用户可以修改后保存。
通过 Form 组件,展示当前选中节点的信息。通过 form.setFieldsValue 设置表单的初始值。
bash
const handleNodeClick = (node) => {
  setSelectedNode(node);
  setContextMenuTargetId(null);
  form.setFieldsValue({ name: node.name });
};

{selectedNode ? (
  <Form form={form} layout="vertical">
    <h3>部门信息</h3>
    <Form.Item label="部门名称" name="name" rules={[{ required: true, message: "请输入部门名称" }]}>
      <Input />
    </Form.Item>
    <Form.Item label="部门编号">
      <Input value={selectedNode.id} disabled />
    </Form.Item>
    <Button type="primary" onClick={handleSaveForm}>保存</Button>
  </Form>
) : (
  <p>请选择左侧树节点以查看或编辑部门信息。</p>
)}
当用户修改了表单数据后,可以点击保存按钮,保存修改后的部门信息。此时,我们更新树形数据中的相应节点。
bash
const handleSaveForm = () => {
  form
    .validateFields()
    .then((values) => {
      setTreeData((prevTreeData) =>
        updateTree(prevTreeData, (node) => {
          if (node.id === selectedNode.id) {
            node.name = values.name;
            return true;
          }
          return false;
        })
      );
      Modal.success({ title: "保存成功", content: "部门信息已更新。" });
    })
    .catch((info) => console.error("Validate Failed:", info));
};
总结
本篇我们介绍了通过引入antd来实现部门管理的功能,有时候如果低代码组件的功能有限时,就需要借助第三方的组件库来搭建自己需要的功能。