关于gitlab ci/cd,就是实现DevOps的能力,即Development &Operations的缩写,也就是开发&运维。CI/CD 指的是软件开发的持续集成方法,我们可以持续构建、测试和部署软件。通过持续方法的迭代能使得我们减少在错误代码或者错误先前版本上的开发。从而也能提高开发的效率。
CI/CD 的持续集成方法主要分为三种:持续集成 、持续交付 、持续部署。下面我们分别介绍其在gitlab的概念。
持续集成:指的是开发人员每天多次推送代码的更改,对于每次推送到仓库,都可以创建一组脚本来构建和测试我们的应用程序。这些脚本将会减少我们在代码里引入错误的机会。
持续交付:指的是每次将代码推送到仓库,不仅会构建、测试我们的应用,并且会持续部署应用。但是对于持续交付,需要我们手动触发部署。
持续部署:是在持续交付的基础上更进一步,不同的是,持续交付需要我们手动部署,持续部署则是自动进行部署。
对于Gitlab CI/CD 其实与我们熟知的Jenkins、CircleCI概念上没有什么区别,其都是一套可以集成这些持续方法的系统。当然每套系统在集成过程中可能会略有不同、各有特色。
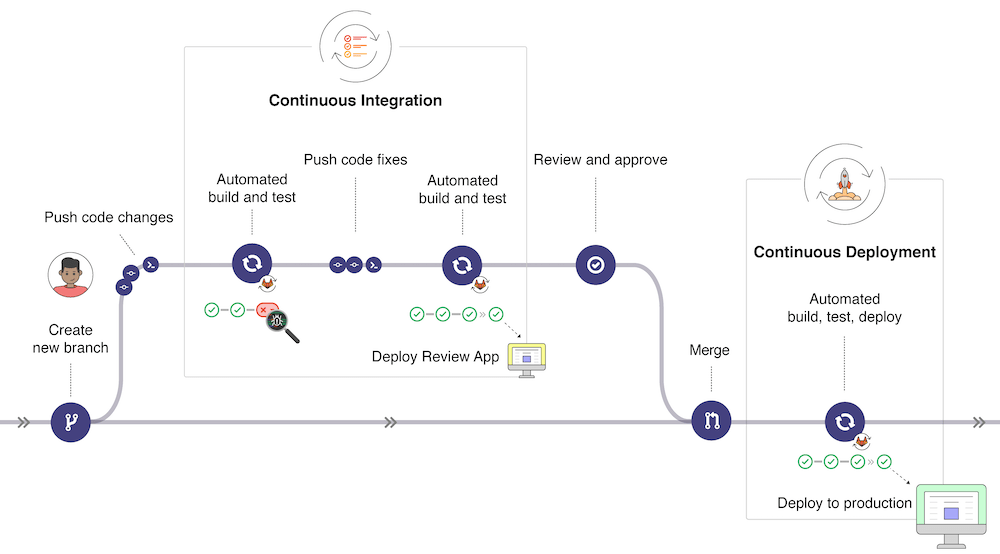
- 用户从主分支check一个开发分支,进行一些feature/fix的开发工作后,add->commit->push 改动到分支,这个时候会触发持续集成;
- 当持续集成进行自动构建、测试失败之后,需要用户再次提交fixed 代码,再次触发持续集成;
- 当持续集成通过之后进行review 以及 approve,然后merge 到主分支(一般设置为protected),触发持续交付/持续部署;
- 持续交付/持续部署进行自动构建、测试、部署,成功通过后应用即也成功部署了。
这就是gitlab CI/CD的工作流。
这里以使用gitlab-ce为例,主要分为三大步骤
- 安装gitlab-ce
- 安装gitlab-runner
- 运行gitlab-ci
既然要部署上面的服务,创建了一台阿里云的ecs服务器,这里注意⚠️开机需要4G以上内存,后文有使用情况介绍。
1.创建ECS
环境准备如下所示
|---------------|------|------------------|-----------------|----------------|
| 规格 | 内存核心 | 私网IP | 公网IP | 镜像信息 |
| ecs.c6.xlarge | 4c8G | 192.1**.*.237 | 182.92.**.153 | CentOS 7.9 64位 |
后面访问的时候主要是用公网IP,同时配置安全组的入方向规则,并打开80,22,8000端口

2.安装gitlab-ce
gitlb-ce安装
登录ecs执行如下的命令
bash
1.相关环境、依赖安装(缺少服务器可以去天翼云试用一个月的2核4G,这是最低要求的配置,否则跑不动gitlab,大致使用2.3G)
yum -y install policycoreutils openssh-server openssh-clients postfix
yum install  policycoreutils-python
systemctl enable sshd && sudo systemctl start sshd
systemctl enable postfix && systemctl start postfix

2.关闭防火墙或者防火墙增加白名单
systemctl stop firewalld.service

3.下载软件
⚠️第三步安装的时候可能存在网络不通的问题,需要配置yum源
既可以使用上述链接中的安装方式,也可以使用下面的安装命令
wget --content-disposition https://packages.gitlab.com/gitlab/gitlab-ce/packages/el/7/gitlab-ce-15.2.2-ce.0.el7.x86_64.rpm/download.rpm

4.开始安装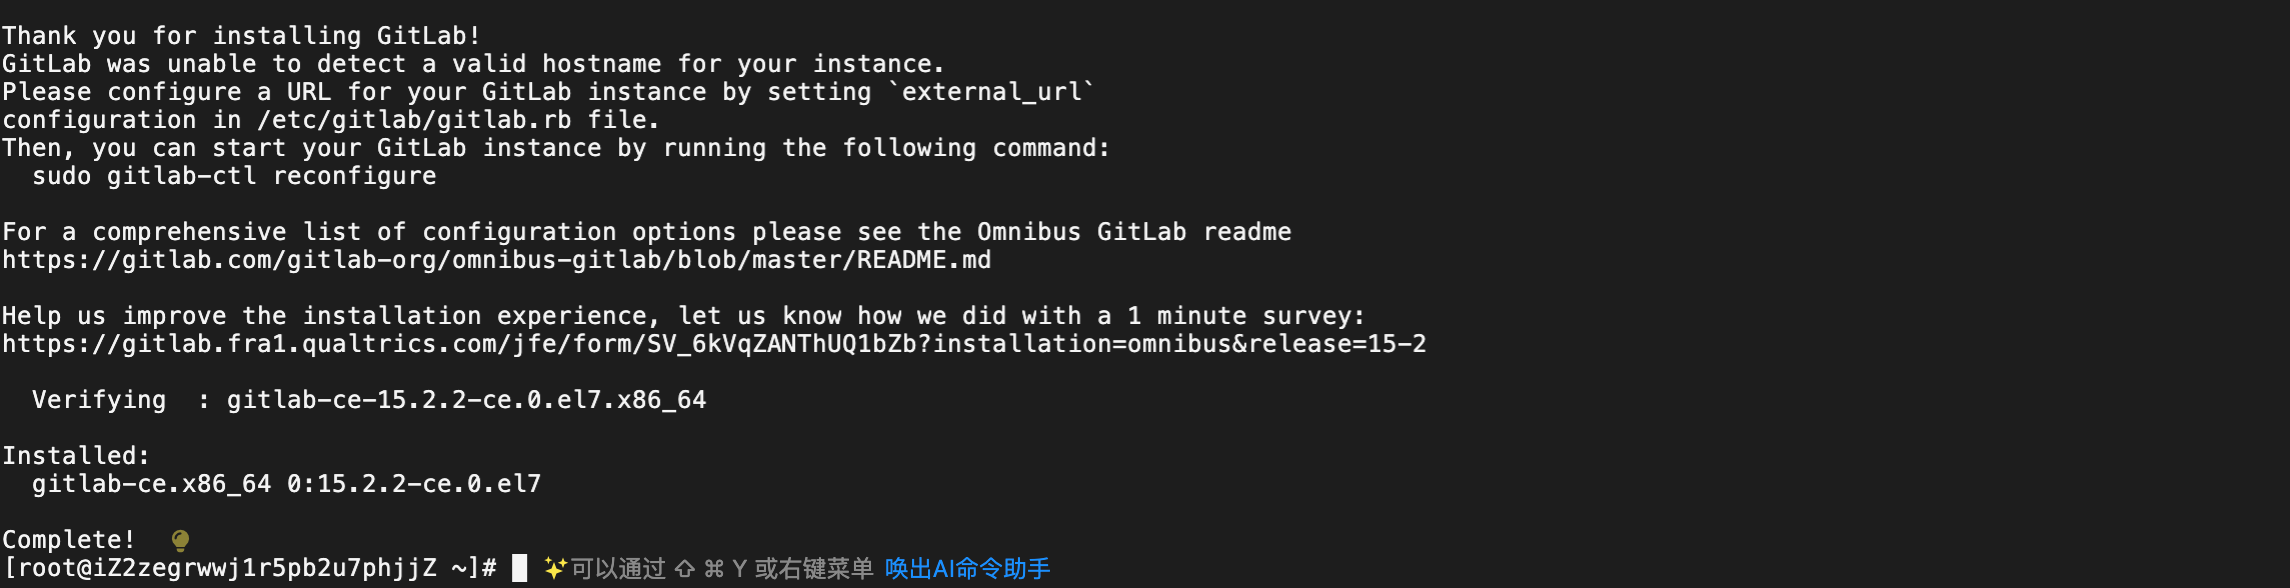
yum install -y gitlab-ce-15.2.2-ce.0.el7.x86_64.rpm如果安装失败参考yum源配置,gitlab-ce安装成功如下所示
bash
5.修改默认端口
cd /etc/gitlab
vi gitlab.rb

6.在文件中修改 external_url和nginx['listen_port']的key对应的内容,IP为公网IP
external_url 'http://182.92.*.153:80'
nginx['listen_port'] = 80
如下所示:

需要修改external_url和nginx'listen_port'修改为:


bash
6.重启
gitlab-ctl reconfigure
gitlab-ctl restart
7.页面输入即可访问,能访问,表示gitlab-ce安装成功了
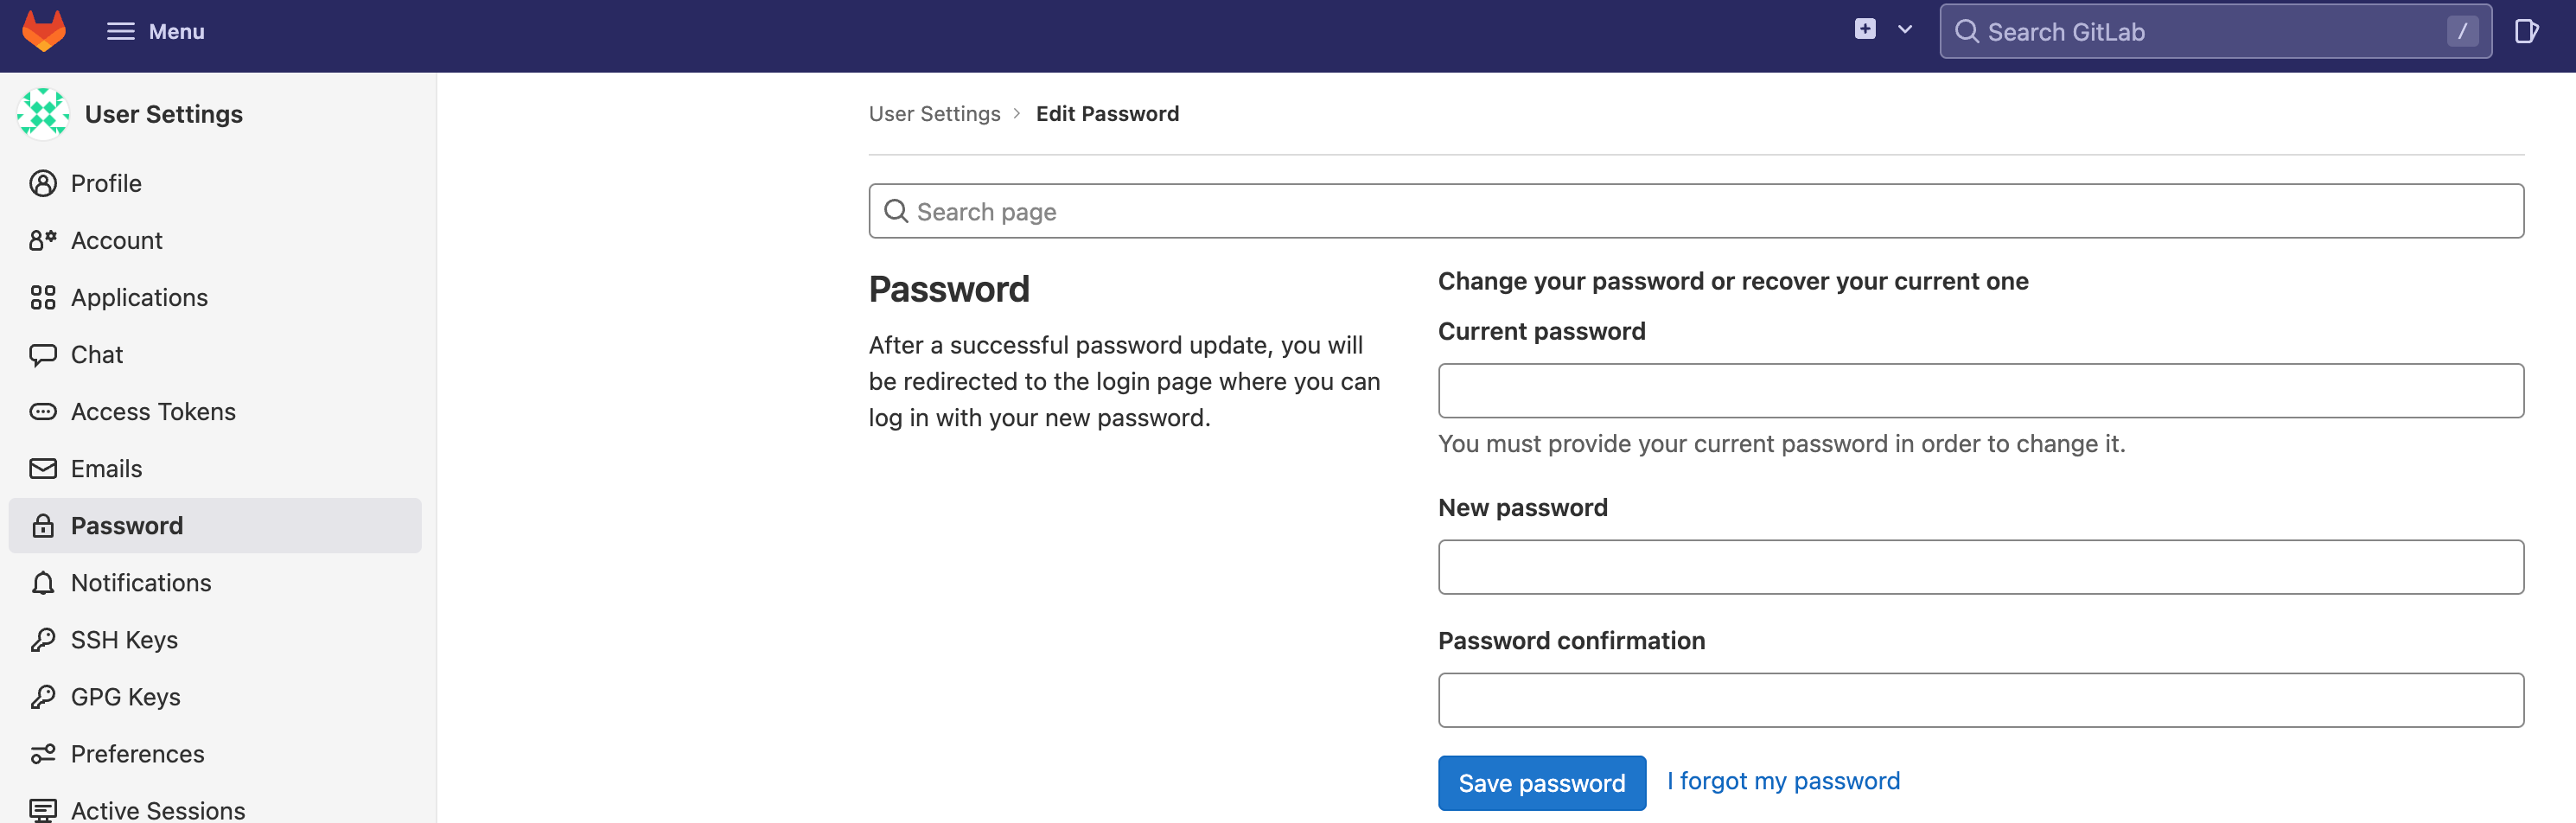
http://182.92.*.153:80gitlab登录和密码重置
打开浏览器:http://182.92.*.153/users/sign_in
用户名默认是root,那密码如何查看呢?
bash
[root@iZ2zegrwwj1r5pb2u7phjjZ ~]# cat /etc/gitlab/initial_root_password
# WARNING: This value is valid only in the following conditions
#          1. If provided manually (either via `GITLAB_ROOT_PASSWORD` environment variable or via `gitlab_rails['initial_root_password']` setting in `gitlab.rb`, it was provided before database was seeded for the first time (usually, the first reconfigure run).
#          2. Password hasn't been changed manually, either via UI or via command line.
#
#          If the password shown here doesn't work, you must reset the admin password following https://docs.gitlab.com/ee/security/reset_user_password.html#reset-your-root-password.

Password: it65735Xe/rwNwUB8iE0GSZm6Zphm1r0dXWmr+dWXgY=

# NOTE: This file will be automatically deleted in the first reconfigure run after 24 hours.
上述密码只有24h的有效期。使用root登录,密码为上面的Password.接着需要重置密码。

重置密码后重新登录
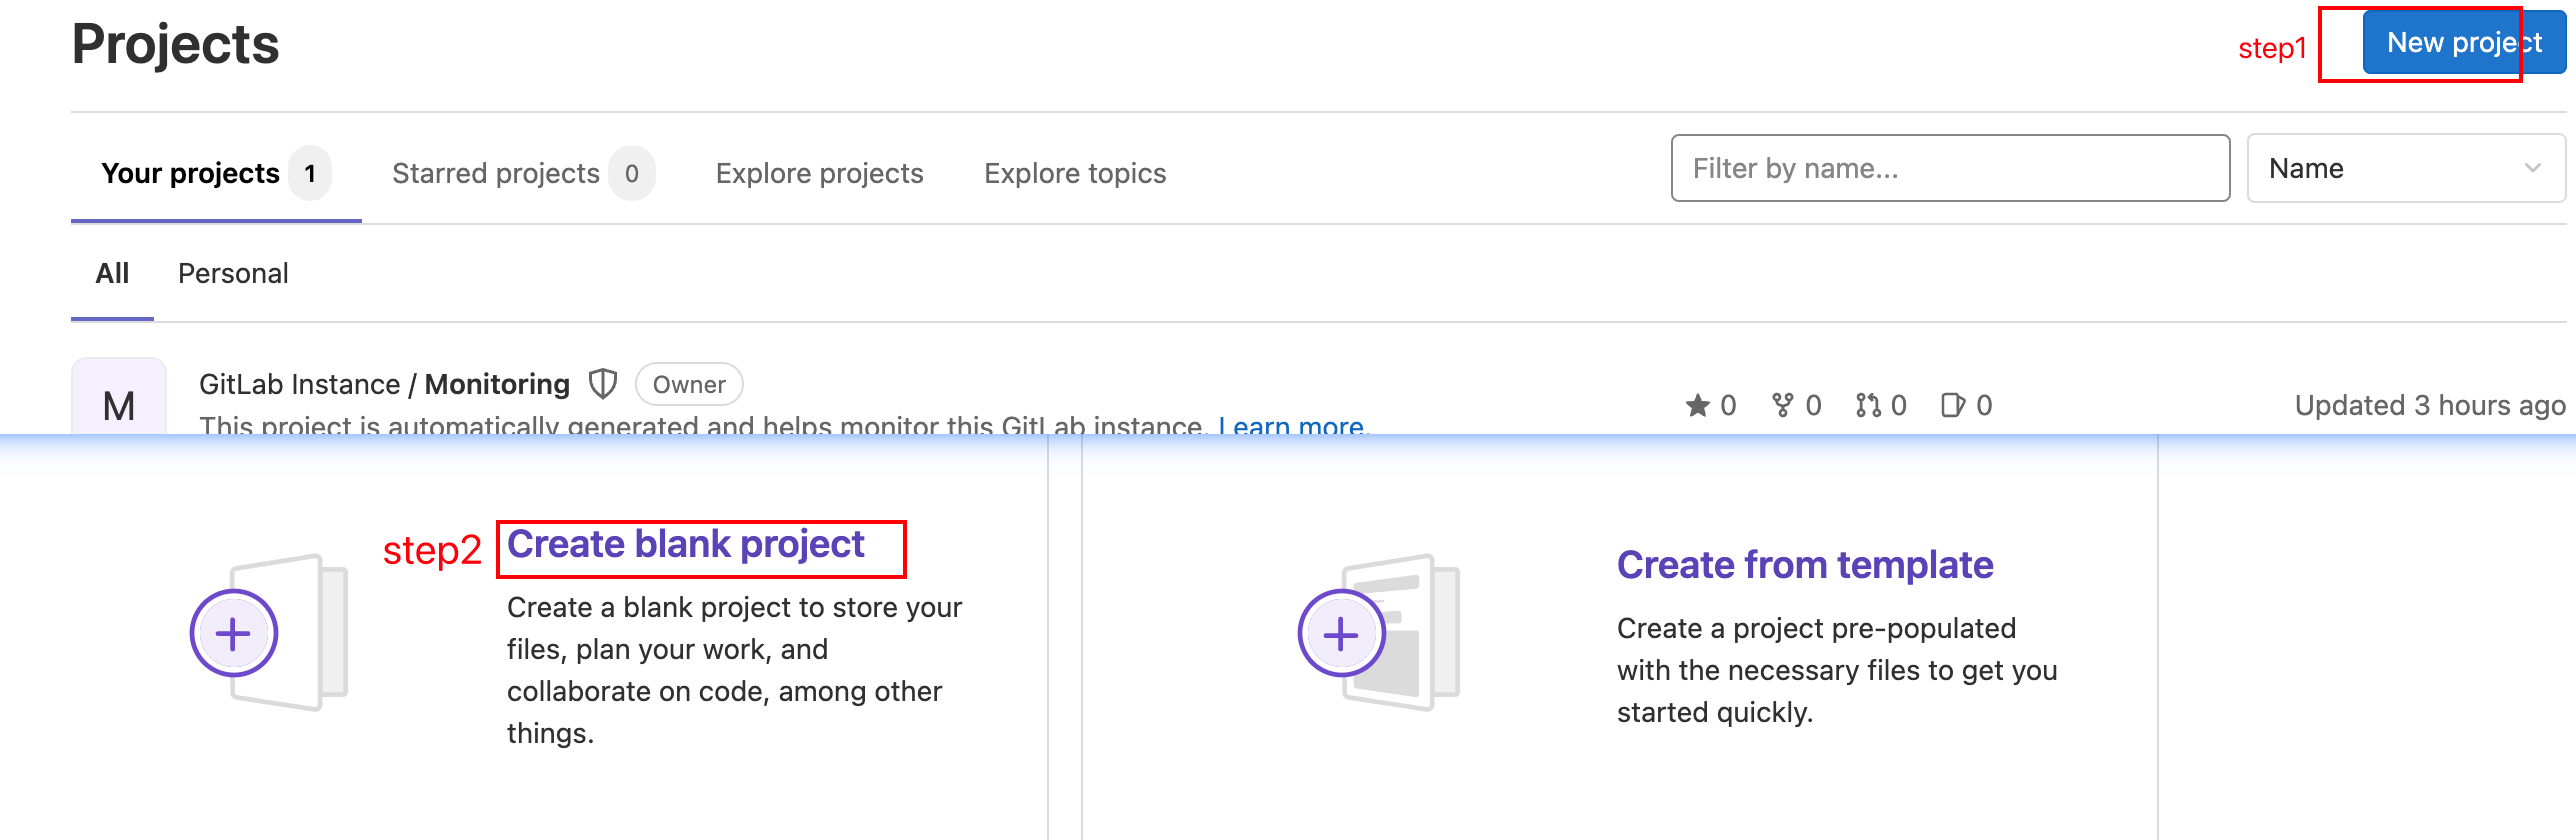
创建项目
创建新项目:New project -> Create blank project

本地开发
git从origin 先克隆到本地

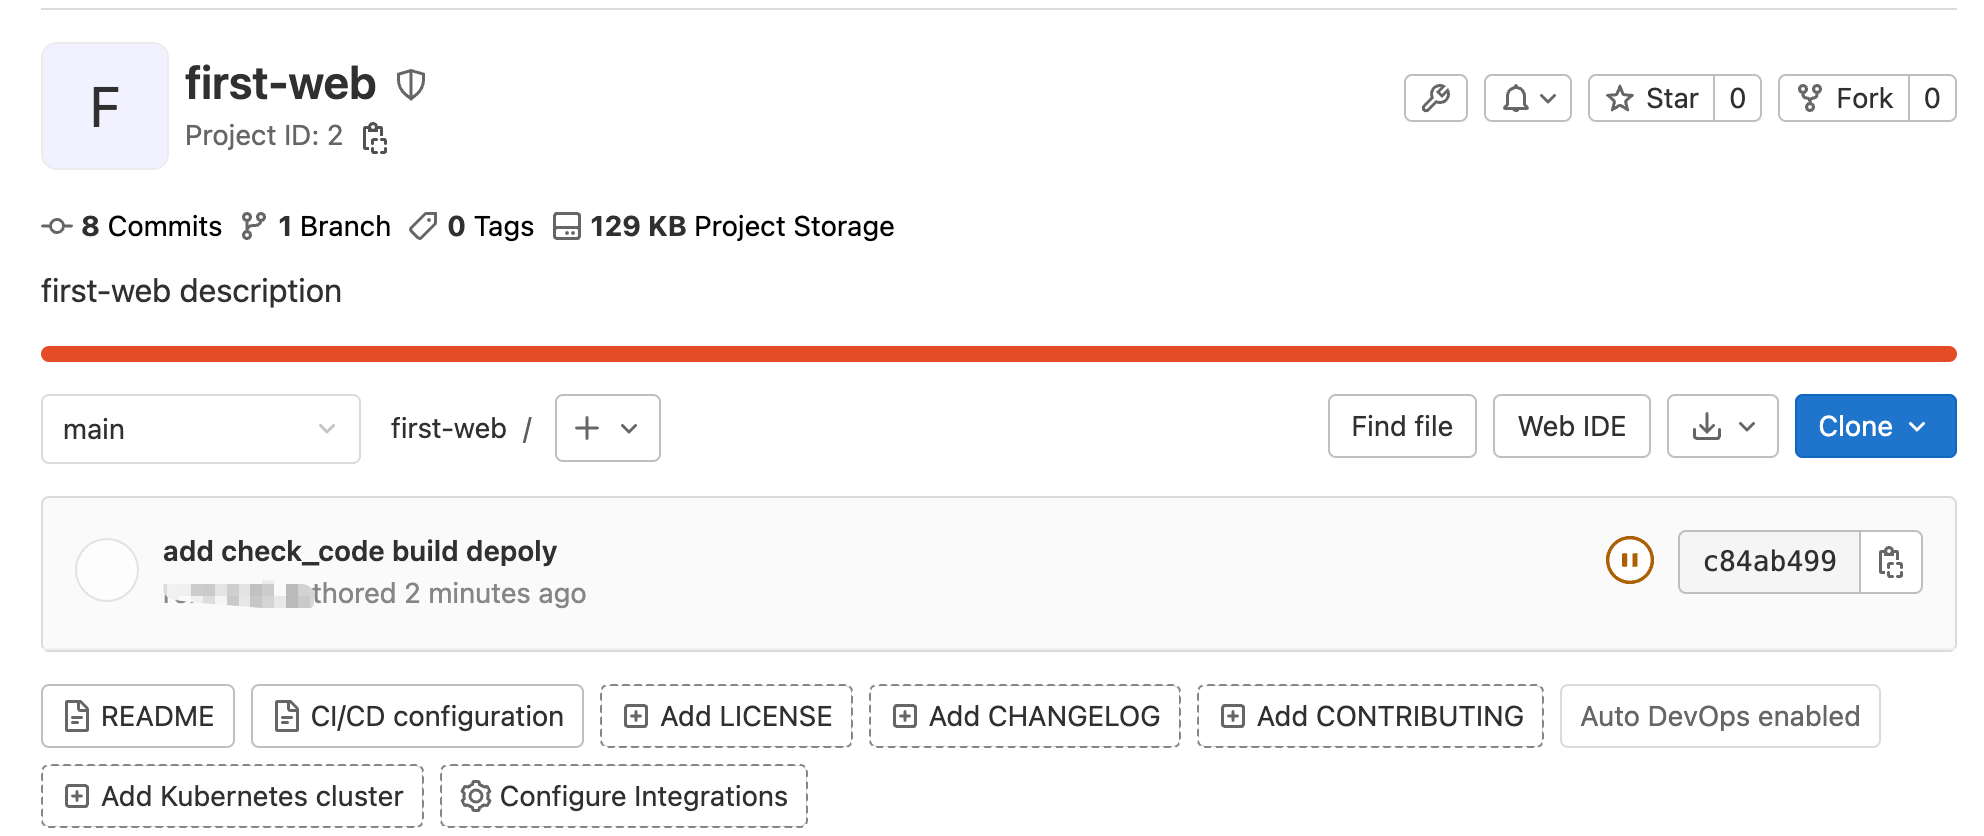
pull到本地后,开发新增一个index.html文件,开发完成后推送到主干分支,项目结构如下所示
bash
.
├── README.md
└── index.html
html
<!doctype html>
<html lang="en">
<head>
    <meta charset="UTF-8">
    <meta name="viewport" content="width=device-width, initial-scale=1">
    <title>Document</title>
</head>
<body>
 <h1>
     gitlab-ci/cd first web
 </h1>
</body>
</html>3.Gitlab Runner安装
Gitlab runner命令安装
bash
# For RHEL/CentOS/Fedora 下载安装包
curl -L https://packages.gitlab.com/install/repositories/runner/gitlab-runner/script.rpm.sh | sudo bash
bash
# For RHEL/CentOS/Fedora 安装
sudo yum install gitlab-ci-multi-runner
gitlab-runner 注册
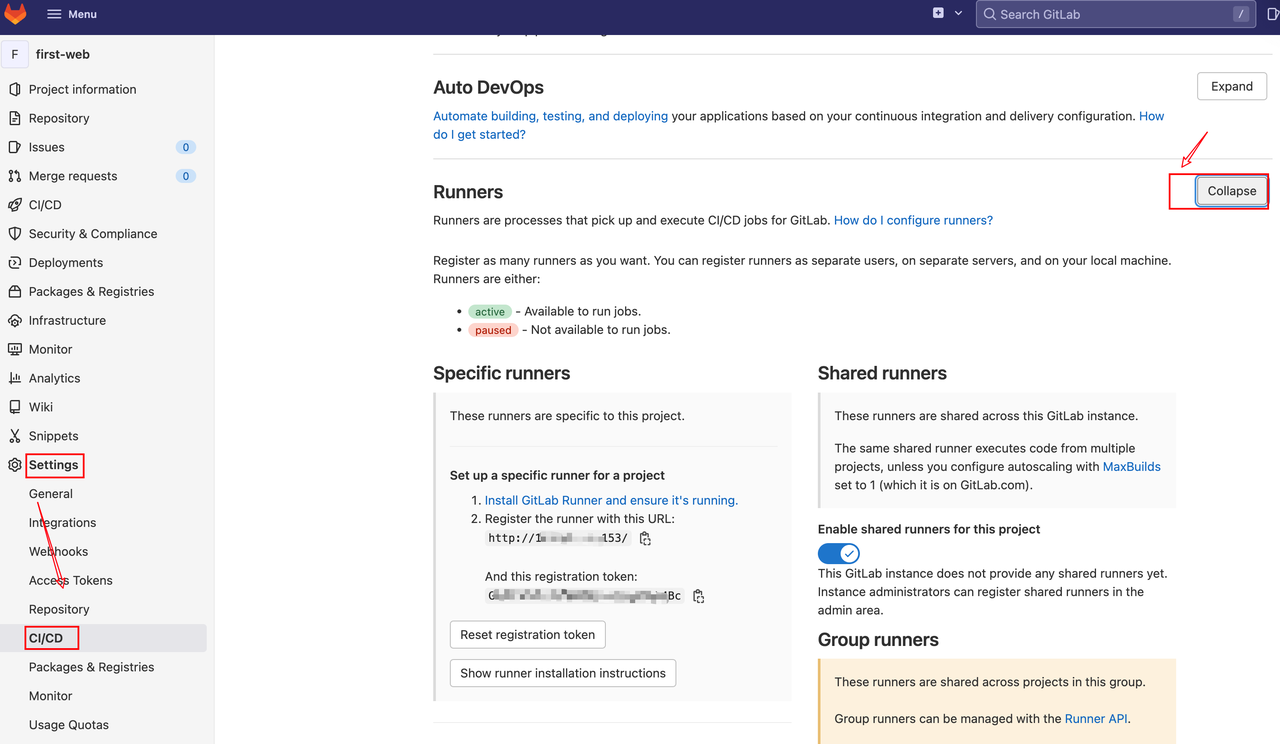
首先要先获取gitlab-ci的Token:
项目主页 -> Sttings -> CI/CD -> Runners Expand
使用命令注册gitlab-runner
bash
gitlab-runner register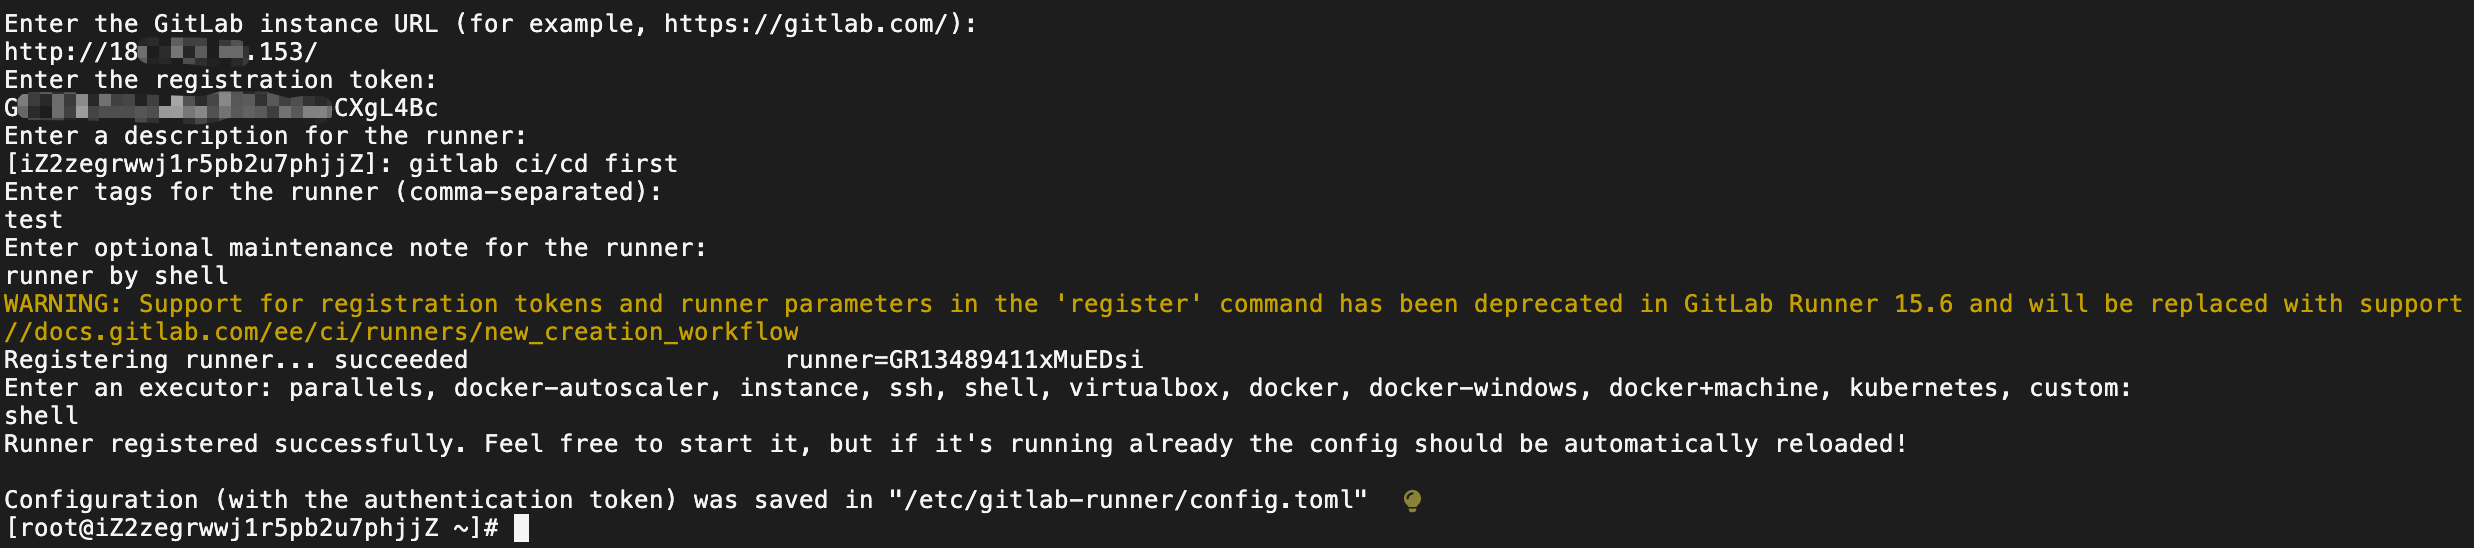
bash
Runner registered successfully. Feel free to start it, but if it's running already
the config should be automatically reloaded!
⚠️上面在注册的时候输入的一个tag在后面部署的时候有用
再次进入到Gitlab上并刷新

这个就是用来跑自动化部署的
4.gitlab-ci运行
在first-web根目录下新增一个.gitlab-ci.yml文件
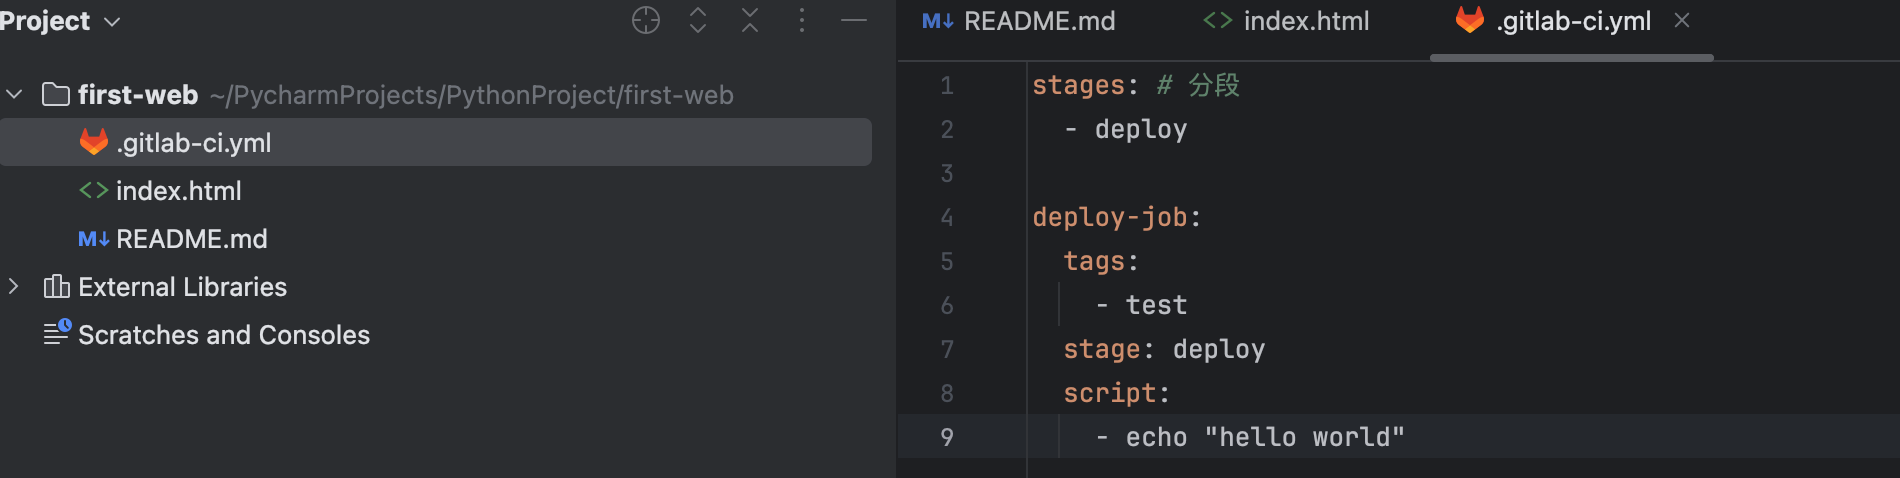
bash
stages: # 分段
- deploy
deploy-job:
tags:
- test
stage: deploy
script:
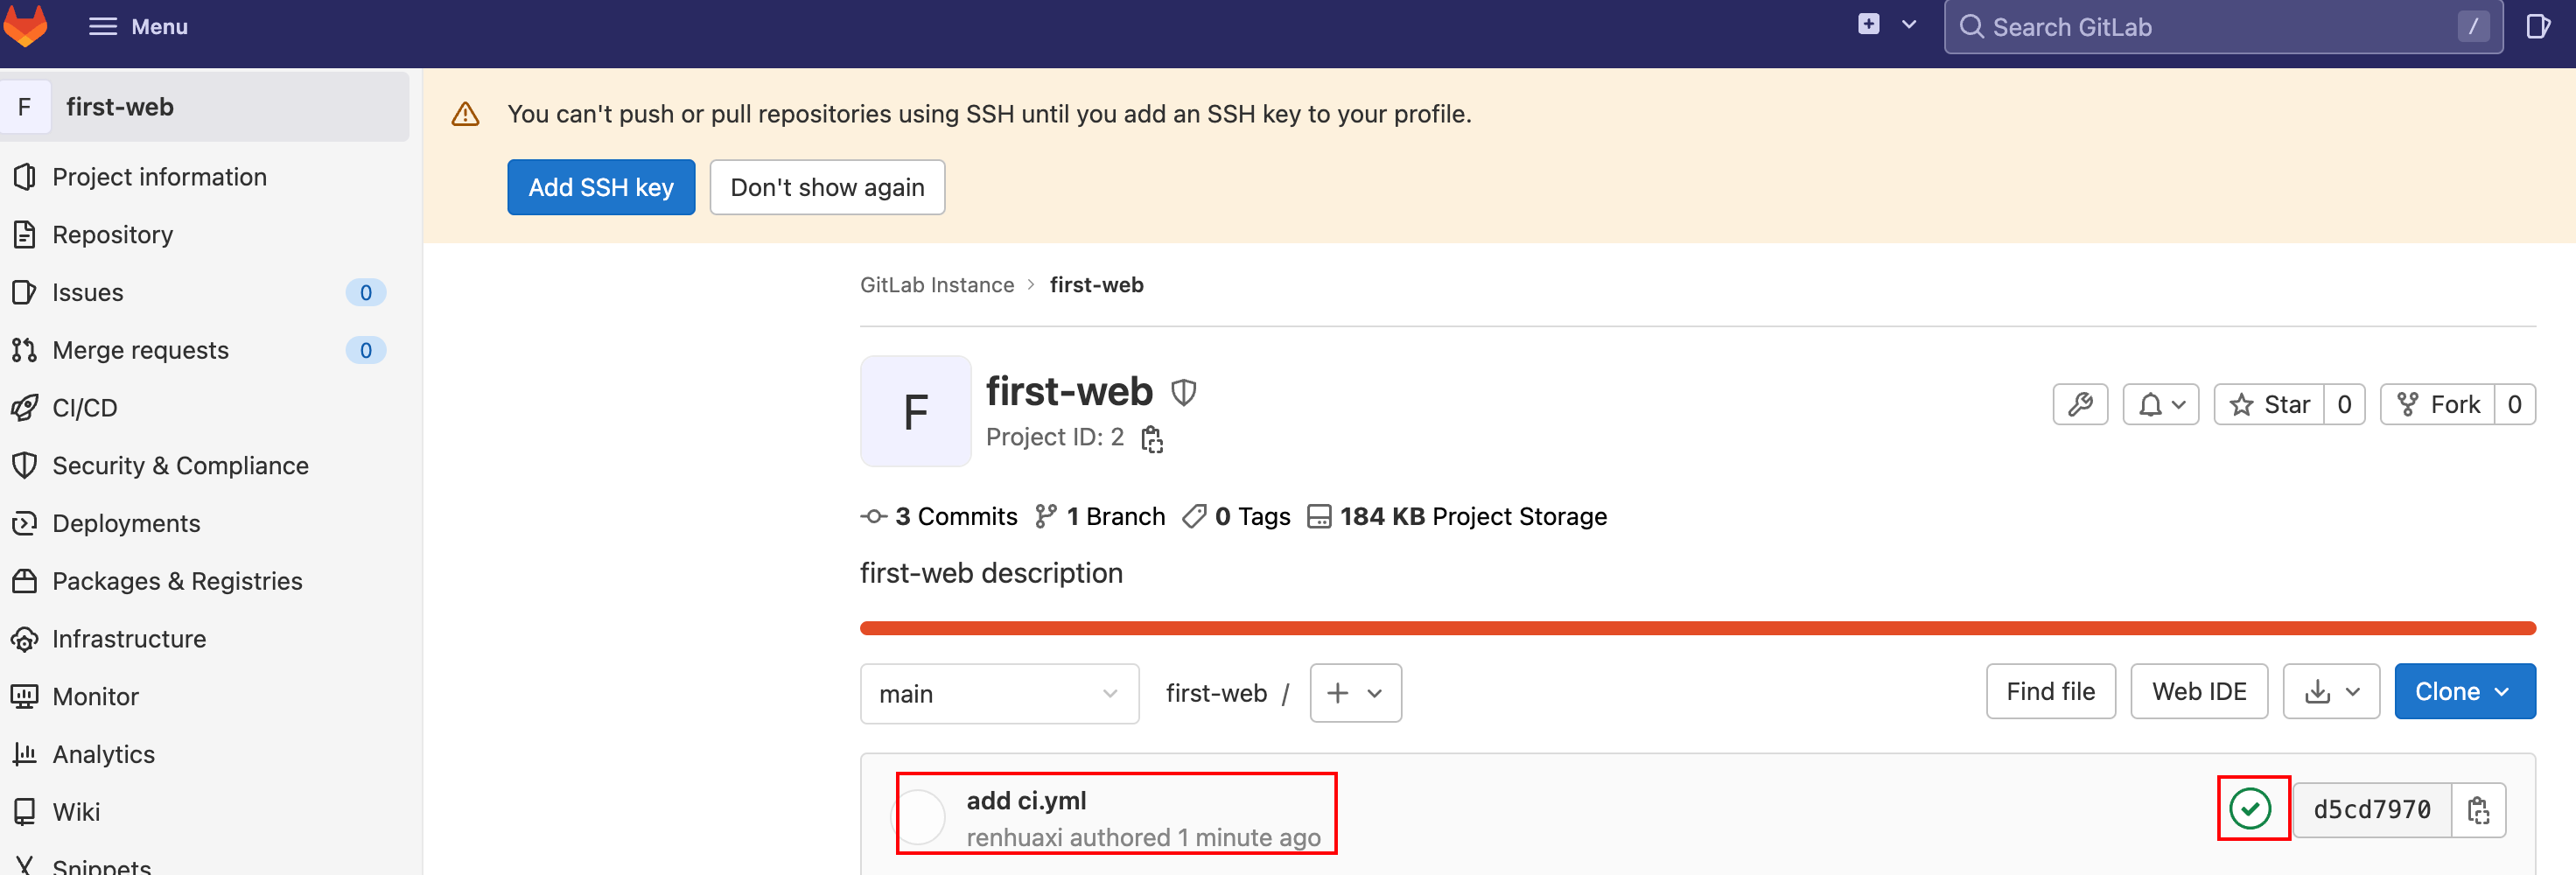
- echo "hello world"接着push 到远端的main分支上。刷新后

如果这里在.gitlab-ci.yml文件没有tags 推送后会失败
bash
stages: # 分段
- deploy
deploy-job:
stage: deploy
script:
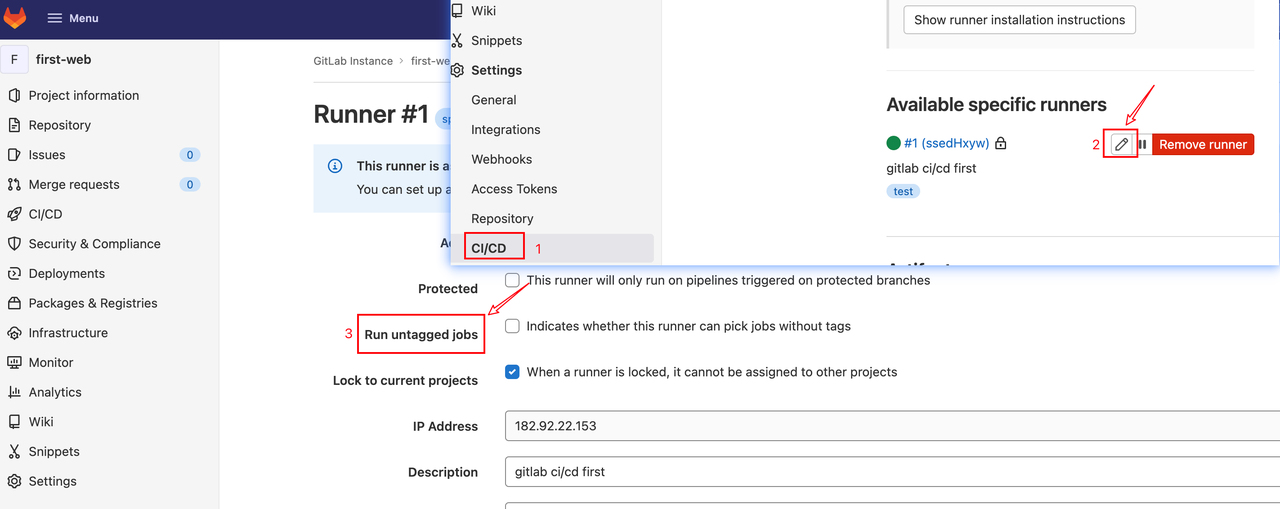
- echo "hello world" 如果不想要标签就能推送呢,如何设置呢?
接着看一下如何自动部署呢
需要安装一个静态服务器,用来展示页面的
bash
[root@iZ2zegrwwj1r5pb2u7phjjZ ~]# yum intall httpd
[root@iZ2zegrwwj1r5pb2u7phjjZ ~]# httpd -v
Server version: Apache/2.4.6 (CentOS)
Server built:   May 30 2023 14:01:11
安装完后的apache会在服务器下新增**/var/www/html/**目录, 这个目录就是存放网站资源的位置
最后我们只需要在每次部署的时候把生产的单页面拷贝到这个页面下,就能在浏览器上通过对应的 IP+路径来访问Web页面了.
因为gitlab已经占了80端口,所以需要修改httpd的默认80端口为8000
bash
[root@iZ2zegrwwj1r5pb2u7phjjZ conf]# pwd
/etc/httpd/conf
[root@iZ2zegrwwj1r5pb2u7phjjZ conf]# vi httpd.conf

修改之后启动下
[root@iZ2zegrwwj1r5pb2u7phjjZ html]# service httpd start
Redirecting to /bin/systemctl start httpd.service
首先通过手动的方式在/var/www/html/下新增一个文件
bash
[root@iZ2zegrwwj1r5pb2u7phjjZ html]# ls
index.html
[root@iZ2zegrwwj1r5pb2u7phjjZ html]# cat index.html
<h2>hell gitlab-ci</h2>访问下:http://182.92.*.153:8000/

那我们要做的就是开发了代码之后push之后,就会自动部署到/var/www/html/中,在前端访问对应的路径就可以访问成功
再次修改.gitlab-ci.yml
bash
stages: # 分段
  - deploy

deploy-job:
  tags:
    - test
  stage: deploy
  script:
    - echo "hello world"
    - sshpass -p Root@123.oas scp ./index.html root@182.92.22.153$:/var/www/html
需要使用sshpass命令所以在机器上先安装
bash
[root@iZ2zegrwwj1r5pb2u7phjjZ html]# yum install sshpass接着我们项目中first-web/index.html新增一行,并push到远端
html
<h1>
    gitlab-ci deploy
</h1>
此时发现报错如下所示

为什么呢,因为在ssh连接的时候,有个连接交互。我们知道ssh的时候有交互提示如下所示
 我们需要把这个提示给关闭。因为首次访问的时候才有这个提示。
html
[root@iZ2zegrwwj1r5pb2u7phjjZ html]# cat /etc/ssh/ssh_config
修改改文件
StrictHostKeyChecking no
再次修改first-web/index.html并推送到原端,并刷新web网页
html
<h1>
    gitlab-ci deploy last
</h1>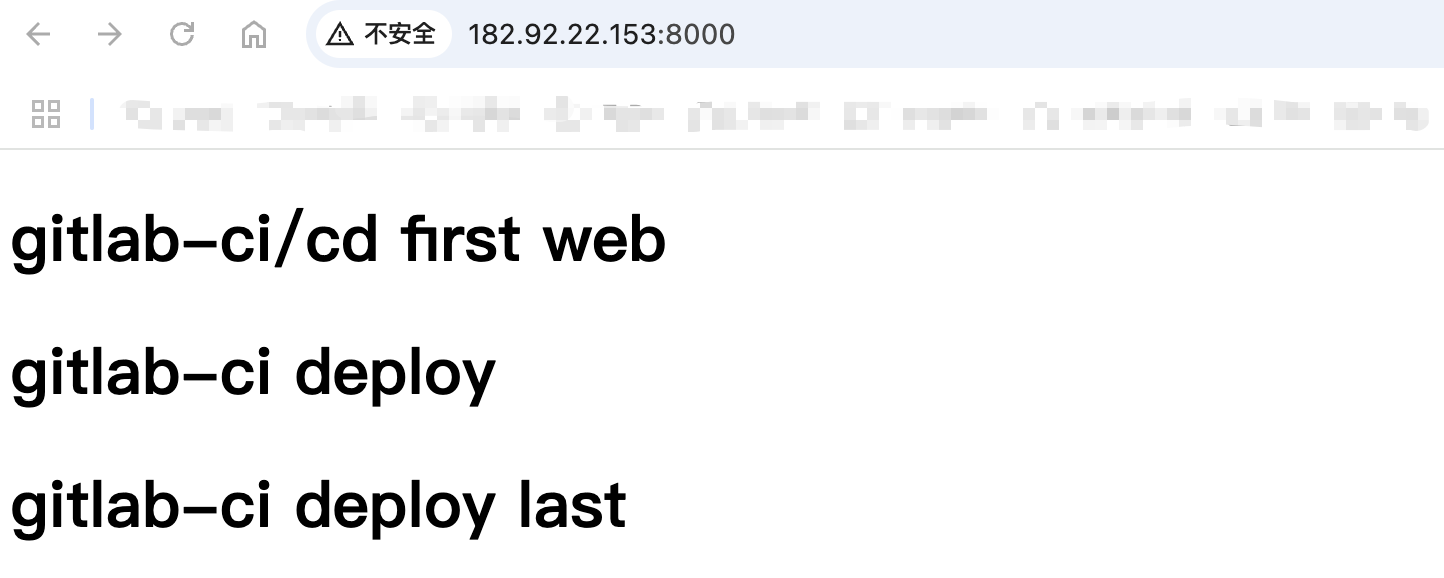
这样就是实现了自动部署的能力。
gitlab-ci.yml文件的运用非常灵活,上面给出简单的示例,这里继续丰富该文件。在介绍之前,先了解下gitlab的variable。一种是在.gitlab-ci.yml中定义变量,使用variables关键字定义变量和值。
variables:
  GLOBAL_VAR: "A global variable"

job1:
  variables:
    JOB_VAR: "A job variable"
  script:
    - echo "Variables are '$GLOBAL_VAR' and '$JOB_VAR'"

job2:
  script:
    - echo "Variables are '$GLOBAL_VAR' and '$JOB_VAR'"
也可以在指定job中跳过,即不使用全局定义的变量,此时可以将variables设置为{}
variables:
  GLOBAL_VAR: "A global variable"

job1:
  variables: {}
  script:
    - echo This job does not need any variables
可以利用gitlab variables能力,该变量是一种环境变量,用于控制作业、流水线;存储重复使用的值,避免在.gitlab-ci.yml中硬编码。
#流水线的stages的顺序可以自己定义
#相同阶段的任务将会并发的执行,上一个阶段的任务完整的结束之后,下一个阶段的任务才会开始执行
stages:
  - check_code
  - build
  - deploy
job1:
  stage: check_code
  script:
     - echo 'stage1 job ,读取变量为:' $param1

job2:
  stage: build
  script:
     - echo 'stage2 job  ,读取变量为:' $param2

job3:
  stage: deploy
  script:
     - echo 'stage3 job  ,读取变量为:' $param3
     - sshpass -p your-password scp ./index.html root@182.92.22.153:/var/www/html
同时在setting/ci/cd中新增变量
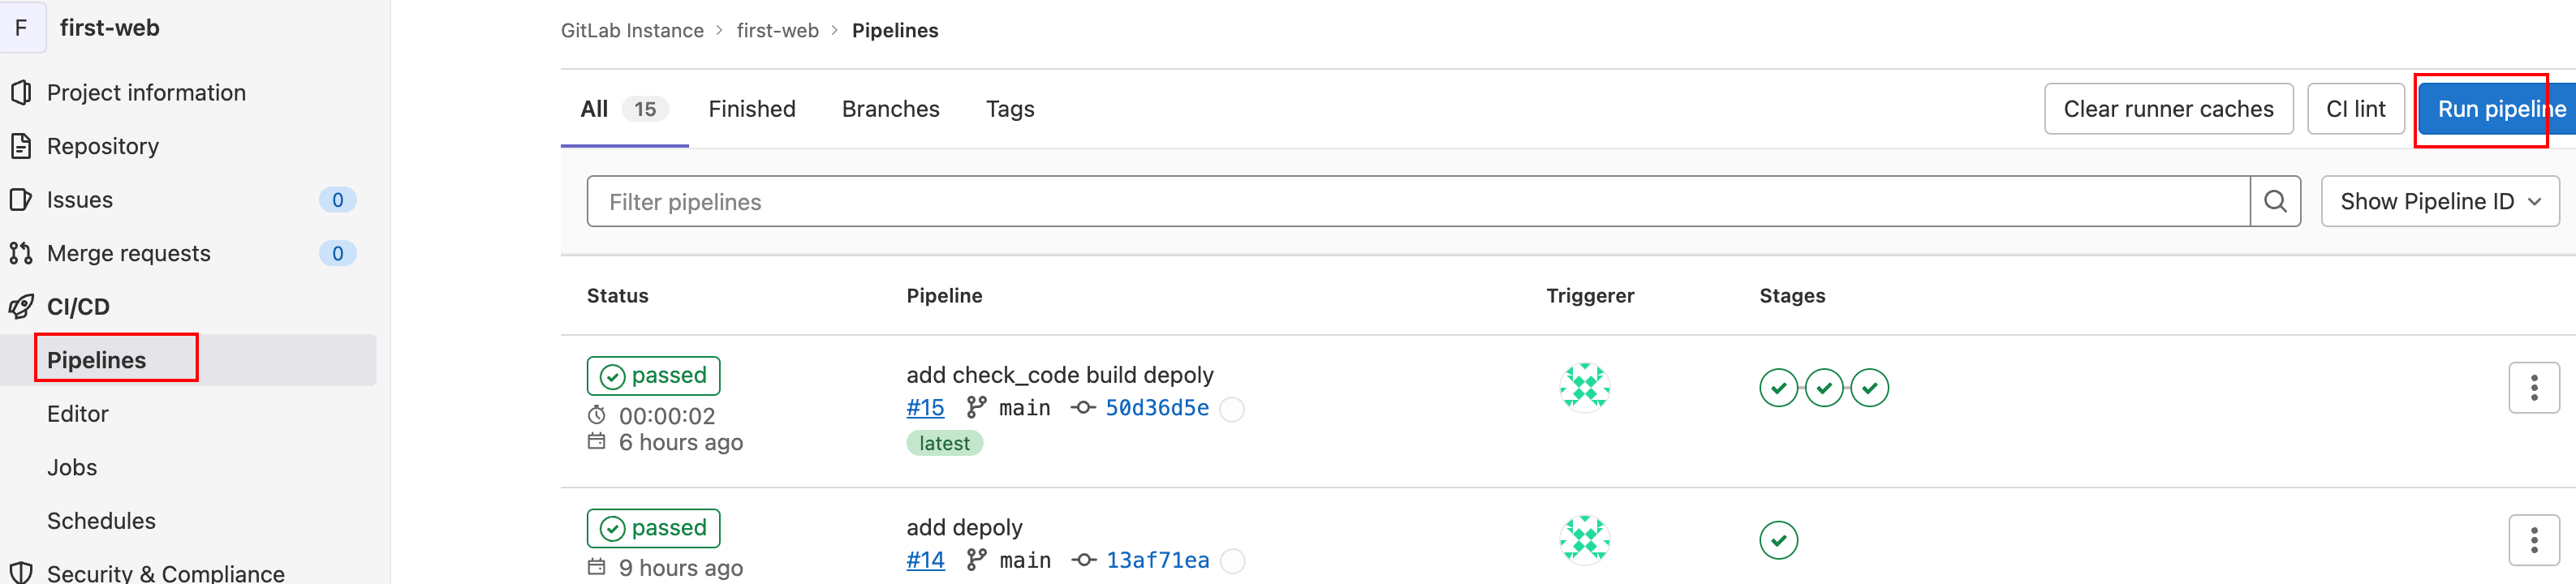
 再次刷新
再次刷新
进入到CI/CD中

这里在每个job中输出相应的变量信息。