单元三 页面搭建及功能实现
学习目标
该部分就是我们最重要的一部分,现在开始进行页面搭建,并完成一些功能的实现等等,最后整合完成该项目的制作。
任务3.1 登录页面
任务描述
这个任务我们将进行登录页的搭建,以及使用AJAX在登陆的时候,检测''用户输入的账号和密码,对服务器发起请求,查看账号和密码是否能与user.txt对应上。若都正确则管理员跳转到管理员系统,用户跳转到用户系统。若不正确则会提示账号或密码错误。
任务实施
该任务我们首先创建一个登录页面的HTML文件,并创建好管理员系统和用户系统的html文件用来测试是否能够正常跳转。最后分别一个登录界面的CSS以及JS文件。
3.1.1页面框架搭建
登录界面基本框架很简单只需要一个<form>表单其中有来让用户输入账号密码的input,还有一个登录按钮。也可以有一个<h1>表示进入到登录页面。
代码如下:
html
<body>
    <h1>欢迎来到图书管理系统</h1>
    <div>
        <h2>登录</h2>
        <form>
            <input type="text" placeholder="请输入账号" id="username">
            <input type="password" placeholder="请输入密码" id="password">
            <button id="login" type="button">登录</button>
        </form>
    </div>
</body>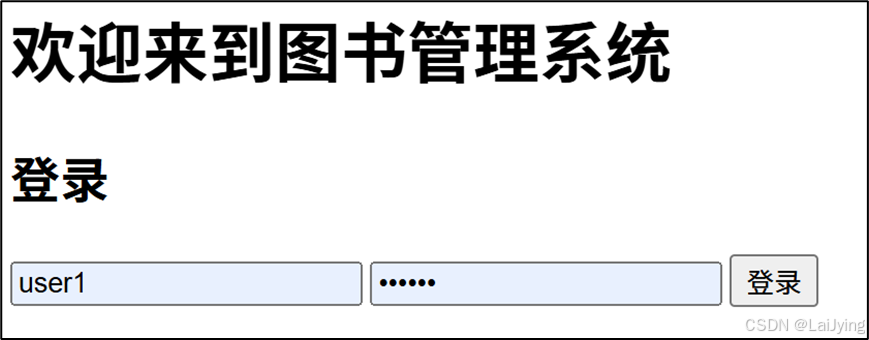
3.1.2 登录界面样式设置
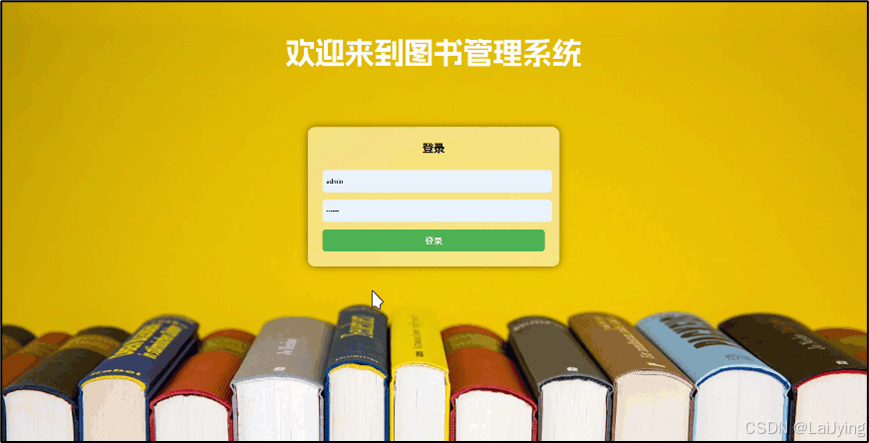
这里我们主要是先进行背景图片的设置,以及表单的样式设置。这里的样式部分大家可自行发挥。美观即可。
我这里进行样式设置如下:
通用样式:清除所有元素的默认边距和内边距
css
* {
    margin: 0;
    padding: 0;
}- 背景设置:设置页面的背景为一张图片,并使其覆盖整个背景。
css
body {
    background: url(../img/login.jpg);
    background-size: cover;
}- 容器样式:设置了一个中央容器,白色背景带有一定透明度,并添加了阴影效果、内边距和圆角设计等。
css
div {
    width: 30rem;
    margin: 0 auto;
    background: rgba(255, 255, 255, 0.5);
    padding: 2rem;
    box-shadow: 0 0 1rem rgba(0, 0, 0, 0.5);
    margin-top: 6rem;
    border-radius: 1rem;
}- 输入框样式:定义了输入框的宽度、高度、内边距、底部外边距、边框样式、圆角和背景颜色。
css
input {
    width: 100%;
    height: 2rem;
    padding: 0.5rem;
    margin-bottom: 1rem;
    border: none;
    border-radius: 0.5rem;
    background: #f5f5f5;
}-
除此之外还有对按钮样式,标题样式,字体设置,鼠标悬停设置。等
全部代码如下:
css*{ margin: 0; padding: 0; } body{ background: url(../img/login.jpg); background-size: cover; } h1{ color:#fff; text-align: center; font-size: 4rem; line-height:8rem;margin-top: 3rem;font-family: mama;} div{ width: 30rem; margin: 0 auto; background: rgba(255,255,255,0.5); padding: 2rem; box-shadow: 0 0 1rem rgba(0,0,0,0.5); margin-top: 6rem; border-radius: 1rem; } h2{ text-align: center; margin-bottom: 2rem; font-family: mama; } input{ width: 100%; height: 2rem; padding: 0.5rem; margin-bottom: 1rem; border: none; border-radius: 0.5rem; background: #f5f5f5; } button{ width: 100%; height: 3rem; padding: 0.5rem; background: #4CAF50; color: #fff; border: none; font-size: larger; border-radius: 0.5rem; cursor: pointer; } button:hover{ opacity: 0.9; } @font-face { font-family: 'mama'; src: url(../font/阿里妈妈方圆体/AlimamaFangYuanTiVF-Thin.ttf); }
3.1.3 登录功能的实现(JS部分)
这里我们将使用jQuery语言来进行编写所以首先在html文件中引用jQuery.js。

首先写入$(document).ready(function () {})确保在DOM文档加载完成后执行内部的代码,确保所有元素都可以被操作。
接下来进行为id为login的按钮添加点击事件。当用户点击该按钮时,将触发下面的代码。创建完监听事件之后使用$.get()方法从../user.txt文件中获取用户数据。获取成功后,将数据解析为JSON格式,并调用login(data)函数进行登录验证。
此时我们的user.txt还是为空的状态,所以我们可以先将账号密码信息写入到user.txt中。注意:该格式一定要符合json规范。数组中套字典的格式,注意逗号以及引号的使用。
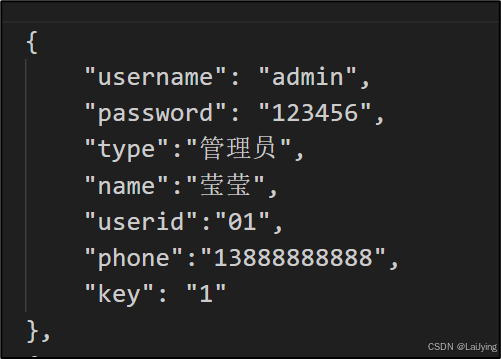
当txt文件写入完毕时,接下来进行编写登录验证函数:
首先获取输入值
var username = $("#username").val();
var password = $("#password").val();
然后进行遍历下用户的数据进行验证使用 $.each() 遍历用户数据
如果输入的用户名和密码正确,并且用户的key为"1",则重定向到管理员页面Admin.html。
如果输入的用户名和密码正确,且key为"2",则重定向到用户页面user.html。
如果输入的用户名和密码均不匹配,将弹出提示框,显示"账号或密码错误"。
具体代码如下:
javascript
    function login(data) {
        var username = $("#username").val();
        var password = $("#password").val();
        $.each(data, function (i, n) {
            if(username == n["username"] && password == n["password"] && n["key"] =="1") {
                window.location.href = "./Admin.html";
            }else if(username == n["username"] && password == n["password"] && n["key"] =="2") {
                window.location.href = "./user.html";
            }else if(username !== n["username"] && password !== n["password"]){
                alert("账号或密码错误");
            }
        })
    }
JS部分全部代码:
$(document).ready(function () {
    $("#login").click(function () {
        $.get('../user.txt',function(data){
            data = JSON.parse(data);
            login(data);
        },'text');
    });
    function login(data) {
        var username = $("#username").val();
        var password = $("#password").val();
        $.each(data, function (i, n) {
            if(username == n["username"] && password == n["password"] && n["key"] =="1") {
                window.location.href = "./Admin.html";
            }else if(username == n["username"] && password == n["password"] && n["key"] =="2") {
                window.location.href = "./user.html";
            }else if(username !== n["username"] && password !== n["password"]){
                alert("账号或密码错误");
            }
        })
    }
});
任务3.2 用户系统页面
任务描述
主要完成用户系统界面框架及样式的制作,包括签到,留言。查看图书,借书还书。等功能。
任务实施
3.2.1 页面框架搭建
该界面最终效果如图:
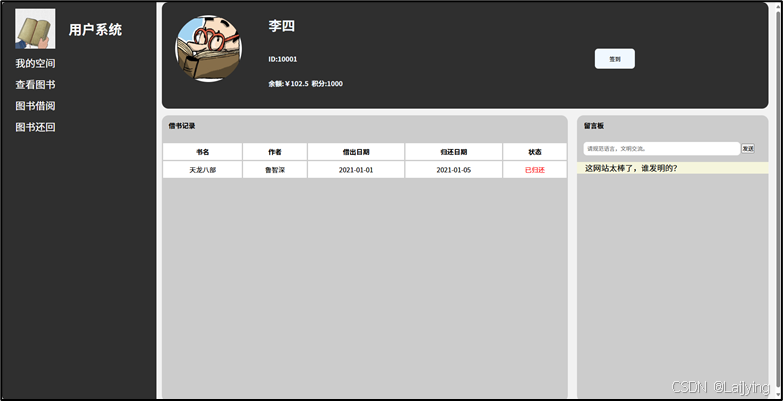
所以我们可以根据这个分析可以主要分为三块盒子左面的导航栏,右面上下分别一个头像框下面左右各两个小功能。
分析完毕开始框架的编写。
导航栏区域代码:
html
<div class="nav">
    <div class="nav-header">
        <img src="./img/user1.png" alt="">
        <h3>用户系统</h3>
    </div>
    <div class="nav-menu">
        <ul>
            <li><a href="#" id="my-space">我的空间</a></li>
            <li><a href="#" id="look-book">查看图书</a></li>
            <li><a href="borrow.html">图书借阅</a></li>
            <li><a href="repaid.html">图书还回</a></li>
        </ul>
    </div>
</div>
包含一个导航头部,显示系统名称和用户图标。
导航菜单里包含多个链接,便于用户快速访问不同功能。
用户信息展示区域代码:
html
<div class="header">
<div><img src="./img/usre2.png" alt=""></div>
<div class="ziliao">
<h1>李四</h1>
<h4>ID:10001</h4>
<h4>余额:¥102.5 积分:1000</h4>
</div>
<button id="qiandao">签到</button>
</div>显示用户的头像和信息,包括名字、ID、余额和积分。
提供一个"签到"按钮,用户可以通过点击进行签到操作。
主内容区域代码:
html
<div class="content">
    <div class="content-left">
        <h4>借书记录</h4>
        <table>
            <thead>
                <tr>
                    <th>书名</th>
                    <th>作者</th>
                    <th>借出日期</th>
                    <th>归还日期</th>
                    <th>状态</th>
                </tr>
            </thead>
            <tbody>
                <tr>
                    <td>天龙八部</td>
                    <td>鲁智深</td>
                    <td>2021-01-01</td>
                    <td>2021-01-05</td>
                    <td style="color: red;">已归还</td>
                </tr>
            </tbody>
        </table>
    </div>
    <div class="content-right">
        <h4>留言板</h4>
        <input type="text" placeholder="请规范语言,文明交流。">
        <button id="btn">发送</button>
        <div class="message">
            <p>这网站太棒了,谁发明的?</p>
        </div>
    </div>
</div>
图书查看区域代码:
注意:该查看图书功能的代码我同样放在了主内容区域,不过是将其隐藏起来,带你给我们点击查看图书时,就会将其显示出来,查看图书功能,再次点击我的空间几再次将其隐藏起来。
全部代码:
html
<div class="look">
<h2>查看图书:所有图书信息如下</h2>
<table>
<thead>
<tr>
<th>书名</th>
<th>作者</th>
<th>出版社</th>
<th>出版日期</th>
<th>页数</th>
<th>价格</th>
<th>内容摘要</th>
</tr>
</thead>
<tbody>
</tbody>
</table>
</div>
HTML全部代码:
<!DOCTYPE html>
<html lang="en">
<head>
<meta charset="UTF-8">
<meta name="viewport" content="width=device-width, initial-scale=1.0">
<title>用户系统</title>
<link rel="stylesheet" href="./css/user.css">
<script src="./js/jQuery.js"></script>
</head>
<body>
<div class="container">
<div class="nav">
<div class="nav-header">
<img src="./img/user1.png" alt="">
<h3>用户系统</h3>
</div>
<div class="nav-menu">
<ul>
<li><a href="#" id="my-space">我的空间</a></li>
<li><a href="#" id="look-book">查看图书</a></li>
<li><a href="borrow.html">图书借阅</a></li>
<li><a href="repaid.html">图书还回</a></li>
</ul>
</div>
</div>
<div class="header">
<div><img src="./img/usre2.png" alt=""></div>
<div class="ziliao">
<h1>李四</h1>
<h1> </h1>
<h4>ID:10001</h4>
<h2> </h2>
<h4>余额:¥102.5 积分:1000</h4>
</div>
<button id="qiandao">签到</button>
</div>
<div class="content">
<div class="content-left">
<h4>借书记录</h4>
<table>
<thead>
<tr>
<th>书名</th>
<th>作者</th>
<th>借出日期</th>
<th>归还日期</th>
<th>状态</th>
</tr>
</thead>
<tbody>
<tr>
<td>天龙八部</td>
<td>鲁智深</td>
<td>2021-01-01</td>
<td>2021-01-05</td>
<td style="color: red;">已归还</td>
</tr>
</tbody>
</table>
</div>
<div class="content-right">
<h4>留言板</h4>
<input type="text" placeholder="请规范语言,文明交流。">
<button id="btn">发送</button>
<div class="message">
<p>这网站太棒了,谁发明的?</p>
</div>
</div>
</div>
<div class="look">
<h2>查看图书:所有图书信息如下</h2>
<table>
<thead>
<tr>
<th>书名</th>
<th>作者</th>
<th>出版社</th>
<th>出版日期</th>
<th>页数</th>
<th>价格</th>
<th>内容摘要</th>
</tr>
</thead>
<tbody>
</tbody>
</table>
</div>
</div>
</body>
<script src="./js/user.js"></script>
</html>3.2.2 页面样式设置
接下来进行样式设置这部分没有什么可说的就是把刚制作的页面美化一下。
例如:
首先进行使用通用选择器*清除所有元素的默认边距和内边距,设置body的背景颜色为浅灰色,并使其居中。
容器样式,
导航栏样式:nav-header中的图标和标题的样式使用了Flex布局。
导航菜单的字体颜色为白色,链接显示为无下划线,添加了合适的间距。
用户信息区域样式:.header定义了用户信息区域的样式,包括背景颜色、边框圆角以及绝对定位,用户头像为圆形,签到按钮的样式和悬停特效也被定义。
内容区域、留言区
查看图书区:.look是查看图书的信息区域,初始状态为隐藏(display: none),待动态显示。
表格和单元格样式:设置了.look中的表格行与单元格的样式,确保文本在单元格宽度不足时使用省略号显示。
CSS全部代码:
css
* {margin: 0;padding: 0;}
body {background-color: #f2f2f2;margin: 0 auto;}
.container {width: 100%;margin: 0 auto;}
.nav {background-color: #2f2f2f;width: 20%;height: 100vh;float: left;}
.nav-header {
    height: 6rem;
    display: flex;
}
.nav-header img {
    width: 6rem;
    height: 6rem;
    margin: 1rem 2rem;
}
.nav-header h3 {
    color: #fff;
    font-size: 2rem;
    margin-top: 1rem;
    text-align: center;
    line-height: 6rem;
}
.nav-menu {
    height: 80%;
}
.nav-menu ul {
    list-style: none;
    margin-top: 2rem;
}
.nav-menu ul li {
    margin-bottom: 1rem;
    text-indent: 2rem;
}
.nav-menu ul :hover{
    opacity: 0.9;
}
.nav-menu ul li a {
    color: #fff;
    text-decoration: none;
    font-size: 1.5rem;
} .header {
    width: 75%;
    height: 16rem;
    background-color: #2f2f2f;
    padding: 0 2rem;
    position: absolute;
    left: 24rem;
    border-radius: 1rem;
    color: aliceblue;
}

.header img {
    width: 10rem;
    height: 10rem;
    border-radius: 50%;
    margin-top: 2rem;
}

.header .ziliao {
    position: absolute;
    left: 16rem;
    top: 2rem;
}
#qiandao{
    width: 6rem;
    height: 3rem;
    position: absolute;
    top: 7rem;
    left: 65rem;
    background-color: aliceblue;
    border-radius: 0.5rem;
    border: none;
}
#qiandao:hover{
    opacity: 0.9;
}
.content {
    width: 75%;

    position: absolute;
    top: 17rem;
    left: 24rem;
}
.content-left {
    width: 70%;
    height: 43rem;
    float: left;
    background-color: #ccc;
    border-radius: 1rem;
}
.content-left h4{
    height: 3rem;
    text-indent: 1em;
    line-height: 3rem;
}
.content-left table{
    width: 100%;
    border-collapse: collapse;
    margin-top: 1rem;
}
.content-left table th,td{
    border: 0.2rem solid #ccc;
    background-color: #ffffff;
    text-align: center;
    padding: 0.5rem;
}
.content-right{
    width: 33%;
    height: 43rem;
    position: absolute;
    top: 0;
    right: -4rem;
    background-color: #ccc;
    border-radius: 1rem;
    margin-left: 2rem;
}
.content-right h4{
    height: 3rem;
    text-indent: 1em;
    line-height: 3rem;
}
.content-right input{
    width: 80%;
    height: 2rem;
    margin-top: 1rem;
    margin-left: 1rem;
    border: none;
    border-radius: 0.5rem;
    padding-left: 0.5rem;
}
.content-right p{
    margin-top: 1rem;
    text-indent: 1em;
    font-size: 1.2rem;
    background-color: beige;
}
.message {
    max-width: 100%;
    overflow-wrap: break-word;
    white-space: normal;

}
.look {
    width: 78.7%;
    height: 40rem;
    position: absolute;
    top: 17rem;
    left: 24rem;
    background-color: #90d8cc;
    border-radius: 10px;
    display: none;
}

.look table {
    width: 100%;
    height: 50%;
    border: none;
}

.look table thead {
    background-color: #f2f2f2;
    color: #000000;
    text-align: center;
    font-size: 1.5rem;
}

.look table tbody {
    background-color: #ffffff;
    color: #000000;
    text-align: center;
}

.look h2 {
    height: 3rem;
    ;
    line-height: 3rem;
    text-indent: 2rem;
}
.look td {
    max-width: 230px;
    overflow: hidden;
    white-space: nowrap;
    text-overflow: ellipsis;
}
3.2.3 用户系统功能实现
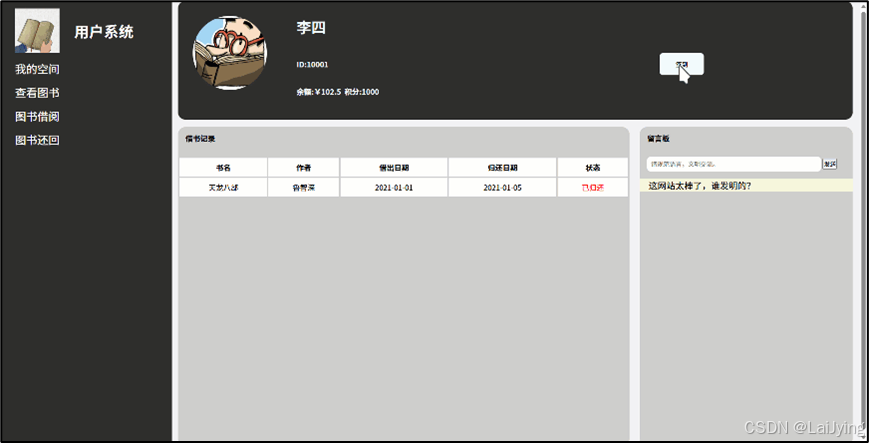
首先是签到功能,这里面没有做太难,只是一个简单的提示框。
当用户点击 ID 为 qiandao 的元素时,会弹出一个提示框,提示"签到成功"。
javascript
$('#qiandao').click(function () {
    alert('签到成功!')
})
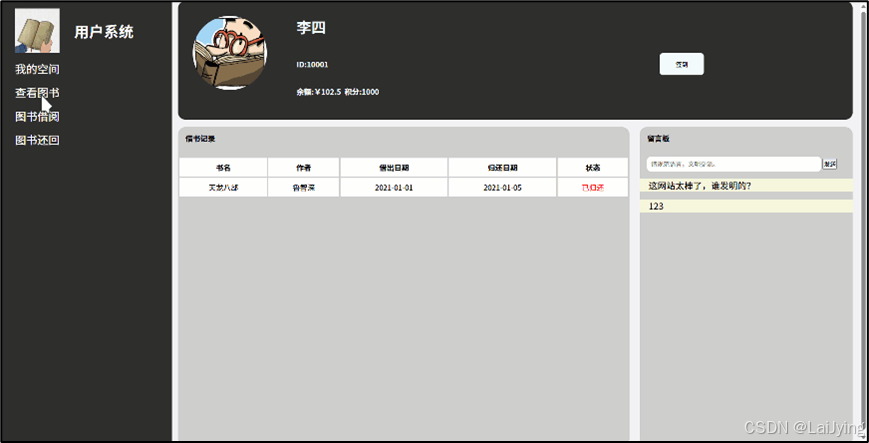
接下来是留言功能,当用户点击 ID 为 btn 的按钮时,获取 .content-right 下的输入框的值,并将其添加到 .message 区域的 <p> 标签中,最后清空输入框。
javascript
$('#btn').click(function () {
    var message = $('.content-right input').val();
    $('.message').append('<p>' + message + '</p>');
    $('.content-right input').val('');
});
然后是查看书籍功能,即获取书籍信息,通过 AJAX 获取 books.txt 文件的数据,解析成 JSON 格式并遍历每一本书的信息,将书籍的详细信息添加到表格中。
javascript
$.get('../books.txt', function (data) {
    var usres = JSON.parse(data);
    $.each(usres, function (i, book) {
        $('.look table tbody').append(
            `
                    <tr>
                        <td>${book.bookname}</td>
                        <td>${book.author}</td>
                        <td>${book.publisher}</td>
                        <td>${book.publishdate}</td>
                        <td>${book.page}</td>
                        <td>${book.price}</td>
                        <td>${book.content}</td>
                    </tr>
                    `
        )
    })
})
最后还需实现切换视图的功能,点击 ID 为 look-book 的元素时,显示 .look 区域并隐藏 .content;反之,点击 ID 为 my-space 的元素时,显示 .content 并隐藏 .look。
javascript
$('#look-book').on('click', function () {
    $('.look').show();
    $('.content').hide();
})
$('#my-space').on('click', function () {
    $('.content').show();
    $('.look').hide();
})
JS部分全部代码:
javascript
$('#qiandao').click(function () {
    alert('签到成功!')
})
$('#btn').click(function () {
    var message = $('.content-right input').val();
    $('.message').append('<p>' + message + '</p>');
    $('.content-right input').val('');
});
$.get('../books.txt', function (data) {
    var usres = JSON.parse(data);
    $.each(usres, function (i, book) {
        $('.look table tbody').append(
            `
                    <tr>
                        <td>${book.bookname}</td>
                        <td>${book.author}</td>
                        <td>${book.publisher}</td>
                        <td>${book.publishdate}</td>
                        <td>${book.page}</td>
                        <td>${book.price}</td>
                        <td>${book.content}</td>
                    </tr>
                    `
        )
    })
})
$('#look-book').on('click', function () {
    $('.look').show();
    $('.content').hide();
})
$('#my-space').on('click', function () {
    $('.content').show();
    $('.look').hide();
})
任务3.3 管理者系统页面
任务描述
主体框架还是和用户系统是一个框架结构,不过在此基础上首先点击进入的是读者管理,还会有搜索功能。
任务实施
3.3.1 页面框架搭建
这里的整体框架不变,不过右边部分则是没有用户信息查看,而是是直接进入到读者管理中去。
整体代码如下:
html
<!DOCTYPE html>
<html lang="en">
<head>
    <meta charset="UTF-8">
    <meta name="viewport" content="width=device-width, initial-scale=1.0">
    <title>管理员系统</title>
    <link rel="stylesheet" href="./css/Admin.css">
    <script src="./js/jQuery.js"></script>
</head>
<body>
    <div class="container">
        <div class="nav">
            <div class="nav-header">
                <img src="./img/Admin1.png" alt=""><h3>管理员系统</h3>
            </div>
            <div class="nav-menu">
                <ul>
                    <li><a href="#">读者管理</a></li>
                    <li><a href="Admin-books.html">图书管理</a></li>
                    <li><a href="borrow.html">图书借阅</a></li>
                    <li><a href="repaid.html">图书还回</a></li>
                </ul>
            </div>
        </div>
        <div class="header">
            <input type="search" placeholder="请输入电话号码查询" ><button class="btn_search" id="btn_search">搜索</button>
        </div>
        <div class="content">
            <table>
                <thead>
                    <tr>
                        <th>读者号</th>
                        <th>类型</th>
                        <th>姓名</th>
                        <th>电话</th>
                        <th>账户名</th>
                        <th>密码</th>
                    </tr>
                </thead>
                <tbody>
                </tbody>
            </table>
        </div>
    </div>
    <div class="search">
        <h3>搜索列表</h3>
        <ul id="search_list">

        </ul>
    </div>
    <script src="./js/Admin.js"></script>
</body>
</html>
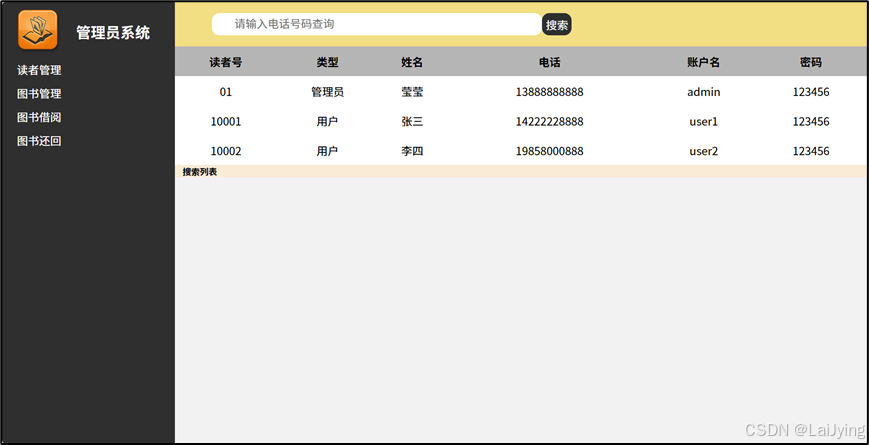
这里与用户系统相比不一样的点就是有个搜索功能,搜索列表包含一个搜索输入框和搜索按钮,用户可以输入电话号码进行查询。这里还有一个表格结构,用于展示读者的相关信息,包括读者号、类型、姓名、电话、账户名和密码。

3.3.2 页面样式设置
该部分就是构建一个管理员系统的样式,这部分基本样式总体也是和用户系统差不多的,整体代码如下:
css
* {
    margin: 0;
    padding: 0;
}
body {
    background-color: #f2f2f2;
    margin: 0 auto;
}
.container {
    width: 100%;
    margin: 0 auto;
}
.nav {
    background-color: #2f2f2f;
    width: 20%;
    height: 100vh;
    float: left;
}
.nav-header {
    height: 6rem;
    display: flex;
}
.nav-header img {
    width: 6rem;
    height: 6rem;
    margin: 1rem 2rem;
}
.nav-header h3 {
    color: #fff;
    font-size: 2rem;
    margin-top: 1rem;
    text-align: center;
    line-height: 6rem;
}
.nav-menu {
    height: 80%;
}
.nav-menu ul {
    list-style: none;
    margin-top: 2rem;
}
.nav-menu ul li {
    margin-bottom: 1rem;
    text-indent: 2rem;
}
.nav-menu ul :hover{
    opacity: 0.9;
}
.nav-menu ul li a {
    color: #fff;
    text-decoration: none;
    font-size: 1.5rem;
}
.header {
    height: 6rem;
    background-color: #f2de83;
    padding: 0 2rem;
    display: flex;
    align-items: center;
    justify-content: space-between;
}
.header input[type="search"] {
    width: 50%;
    height: 3rem;
    border: none;
    border-radius: 1rem;
    outline: none;
    padding-left: 3rem;
    font-size: 1.5rem;
    margin-left: 3rem;
}
.btn_search {
    width: 4rem;
    height: 3rem;
    border: none;
    border-radius: 1rem;
    margin-right: 38rem;
    background-color: #2f2f2f;
    color: #fff;
    font-size: 1.5rem;
    cursor: pointer;
}
.content {
    width: 100%;
    margin: 0 auto;
    background-color: #fff;
}
.content table {
    width: 80%;
    height: 100%;
    border-collapse: collapse;
}
.content table thead tr th {
    height: 4rem;
    background-color: #b6b5b5;
    color: #000000;
    text-align: center;
    font-size: 1.5rem;
}
.content table tbody tr td {
    height: 4rem;
    text-align: center;
    font-size: 1.5rem;
}
.search{
    width: 100%;
    background-color: antiquewhite;
    text-indent: 1em;
}
.search ul{
    list-style: none;
    font-size: 1.5rem;
}
样式设置完毕后的整体效果:
3.3.3 管理员搜索功能的实现
这里管理员功能中在该页面主要有一个搜索功能,图书管理以及借书还书则是单拿出来的部分在下面会写到。所以该部分只使用 jQuery 来处理用户数据的获取和搜索功能。
首先还是第一步把所有代码都放到$(document).ready(function() {...}):确保 DOM 元素在执行代码之前完全加载。
搜索功能中先使用$('#btn_search').click(function() {...}):为搜索按钮添加点击事件处理函数。
const content = $('input[type="search"]').val();:获取搜索框中的内容。
与之前一样,通过 AJAX 请求 user.txt 文件获取用户数据。
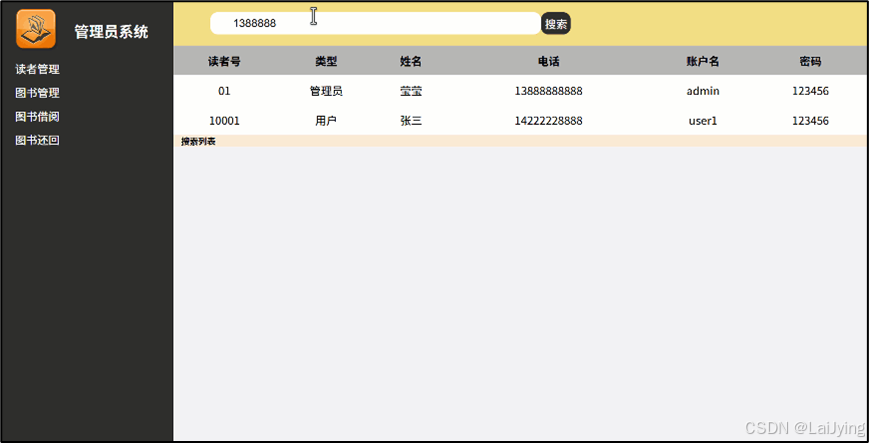
$.each(usres, function(i, user) {...}):遍历用户数据,如果用户的电话与输入的内容匹配,则将该用户的信息添加到 #search_list 列表中。
总体思路就是先从user.txt中获取到用户信息。然后通过获取搜索框内容,进行查找并显示。
JS全部代码:
javascript
$(document).ready(function(){
$.get('../user.txt',function(data){
var usres = JSON.parse(data);
$.each(usres,function(i,user){
$('tbody').append(
`
<tr>
<td>${user.userid}</td>
<td>${user.type}</td>
<td>${user.name}</td>
<td>${user.phone}</td>
<td>${user.username}</td>
<td>${user.password}</td>
</tr>
`
)
})
})
$('#btn_search').click(function(){
const content=$('input[type="search"]').val();
$.get('../user.txt',function(data){
var usres = JSON.parse(data);
var search_list=$('#search_list');
$.each(usres,function(i,user){
if(user.phone===(content)){
search_list.append(`<li>${user.userid} ${user.type} ${user.name} ${user.phone} ${user.username} ${user.password} </li>`)
}
}
)
})
})
})
到此为止已经完成了登录界面、用户系统界面、管理者界面、剩下的功能还有借书还书、图书管理功能界面、后端代码的编写等等,将在后面文章展开!!!