LinuxCNC是一款基于Linux操作系统的开源实时数控系统,可将普通计算机转变为高效的CNC(计算机数字控制)机器,本文记录xenomai下linuxcnc的构建简单记录,参考链接https://www.linuxcnc.org/docs/devel/html/code/building-linuxcnc.html。
1.环境
软硬件环境
桌面环境:Ubuntu 24.04+xenomai3.3
硬件:rk3588(nanoPi R6/T6)
对xenomai内核要求
要在使linuxcnc在xenomai上运行,内核配置Local version必须是-xenomai,即CONFIG_LOCALVERSION="-xenomai",这样linuxcnc编译配置时才能识别xenomai环境,否则不实时。
shell
General setup ---> (-xenomai) Local version - append to kernel release使用uname -a命令确认:

对xenomai库要求
如果你需要编译生成linuxcnc debian安装包,由于生成linuxcnc debian安装包过程中会处理库的安装依赖生成依赖信息,这就要求xenomai库文件libcobalt.so属于某个debian包,通俗的说要求我们的xenomai库也是通过debian包安装的,而不是直接make install这种方式直接安装的,否则会产生如下类似错误。
shell
dpkg-shlibdeps: error: no dependency information found for /usr/xenomai/lib/libcobalt.so.2 (used by debian/linuxcnc-uspace/usr/lib/libuspace-xenomai.so.0)解决方式1:xenomai通过构建debian库来安装,可以参考本博客其他文章编译构建xenomai库debian安装包
解决方式2:找到Debian/rules,打开之后找到override_dh_shlibdeps,在dpkg-shlibdeps那一行最后加上如下选项:
shell
--dpkg-shlibdeps-params=--ignore-missing-info以忽依赖信息。
安装依赖包
先安装依赖的工具和库,我遇到的有这些,不同的环境有差别,出错再对应安装不具备的即可。
shell
sudo apt install pkg-config build-essential automake libtool m4 autoconf libudev-dev libmodbus-dev libusb-1.0-0-dev libgpiod-dev libglib2.0-dev libgtk-3-dev yapps2 intltool libboost-dev python3-dev libboost-python-dev gtkwave bwidget tclx libeditreadline-dev python3-pip python3-tk libglu1-mesa-dev libxmu-dev asciidoc devscripts debhelper libtirpc-dev libtirpc-common tcl8.6-dev tk8.6-dev python3-opengl python3-full2.本地编译linuxcnc
首先需要安装该工具( sudo apt install git )然后拉取代码,如下所示:
shell
$ git clone https://github.com/LinuxCNC/linuxcnc.git linuxcnc-source-dir配置
拉代码生成配置文件
shell
$ git clone https://github.com/LinuxCNC/linuxcnc.git linuxcnc-source-dir
$ cd linuxcnc-source-dir/src
$ ./autogen.sh生成得configure,它需要许多可选参数。通过运行以下命令列出configure的所有参数:
shell
$ cd linuxcnc-source-dir/src
$ ./configure --help
最常用的参数是:
-
--with-realtime=uspace为任何实时平台或非实时平台构建。生成的 LinuxCNC 可执行文件将在带有 Preempt-RT 补丁的 Linux 内核(提供实时机器控制)和普通(未打补丁)Linux 内核(提供 G 代码模拟,但不提供实时机器控制)上运行。
如果安装了 Xenomai(通常来自 libxenomai-dev 软件包)或 RTAI(通常来自名称以 "rtai-modules "开头的软件包)的开发文件,也将启用对这些实时内核的支持。
-
--with-realtime=/usr/realtime-$VERSION使用旧的"内核实时"模型构建 RTAI 实时平台。这要求您在
/usr/realtime-$VERSION中安装 RTAI 内核和 RTAI 模块。生成的 LinuxCNC 可执行文件将仅在指定的 RTAI 内核上运行。 -
--enable-build-documentation除了可执行文件之外,还构建文档。此选项会显着增加了编译所需的时间,因为构建文档非常耗时。如果不需要构建文档,则可省略此参数。
-
--disable-build-documentation-translation禁用为所有可用语言构建翻译文档。翻译文档的构建需要花费大量时间,因此如果不是真正需要的话,建议跳过它。
shell
$ ./configure --with-realtime=uspace --enable-build-documentation
....
checking for xeno-config... /usr/bin/xeno-config
checking for realtime API(s) to use... uspace+xenomai
...
######################################################################
#                LinuxCNC - Enhanced Machine Controller              #
######################################################################
#                                                                    #
#   LinuxCNC is a software system for computer control of machine    #
#   tools such as milling machines. LinuxCNC is released under the   #
#   GPL.  Check out http://www.linuxcnc.org/ for more details.       #
#                                                                    #
#                                                                    #
#   It seems that ./configure completed successfully.                #
#   This means that RT is properly installed                         #
#   If things don't work check config.log for errors & warnings      #
#                                                                    #
#   Next compile by typing                                           #
#         make                                                       #
#         sudo make setuid                                           #
#          (if realtime behavior and hardware access are required)   #
#                                                                    #
#   Before running the software, set the environment:                #
#         . (top dir)/scripts/rip-environment                        #
#                                                                    #
#   To run the software type                                         #
#         linuxcnc                                                   #
#                                                                    #
######################################################################
配置编译
shell
$ make -j $(nproc)
...
Linking rtapi_app
Linking libuspace-xenomai.so.0
....
之后,如果只想构建 LinuxCNC 的特定部分,可以在make命令行上命名想要构建的部分。例如,正在开发名为froboz的组件,则可以通过运行以下命令来构建其可执行文件:
shell
$ cd linuxcnc-source-dir/src
$ make ../bin/froboz如果在支持实时的系统上运行(请参阅下面的实时部分),此时需要一个额外的构建步骤:
$ sudo make setuid成功构建 LinuxCNC 后,就可以运行测试了:
shell
$ source ../scripts/rip-environment
$ runtests

pi@NanoPi-R6S:~/linuxcnc-source-dir/src$ linuxcnc
LINUXCNC - 2.10.0~pre0
Machine configuration directory is '/home/pi/linuxcnc-source-dir/configs/sim/axis'
Machine configuration file is 'canterp.ini'
Starting LinuxCNC...
linuxcncsvr (61089) emcsvr: machine 'Canterp Example'  version '1.1'
linuxcnc TPMOD=tpmod HOMEMOD=homemod EMCMOT=motmod
Note: Using XENOMAI (posix-skin) realtime
milltask (61103) task: machine 'Canterp Example'  version '1.1'
halui (61105) halui: machine 'Canterp Example'  version '1.1'
Found file(LIB): /home/pi/linuxcnc-source-dir/lib/hallib/basic_sim.tcl
....这也可能会失败!阅读整个文档,尤其是设置测试环境部分。
3. 构建debian安装包
构建 Debian 软件包时,LinuxCNC 从源代码编译并包含依赖信息,同时可选地包含文档(这会增加构建时间,但可以跳过)。编译后的 LinuxCNC 存储在 .deb 文件中,该文件可安装在相同架构的任何计算机上。安装后,LinuxCNC 可在 /usr/bin 和 /usr/lib 中运行,如同其他系统软件。
此构建模式主要用于:
- 打包软件以交付给最终用户。
- 为未安装构建环境或无法访问互联网的计算机构建软件。
构建 Debian 软件包需要 dpkg-buildpackage 工具(由 dpkg-dev 提供),并确保所有必要的脚本都已安装,这通常通过安装 build-essential 虚拟包来实现。
shell
$ sudo apt-get install build-essential 构建 Debian 软件包还要求安装所有特定于软件包的构建依赖项。安装所有构建依赖项的最直接方法是执行(从同一目录):
shell
$ cd linuxcnc-source-dir
$ ./debian/configure
$ sudo apt-get build-dep .可以使用dpkg-checkbuilddeps来检查依赖是否满足 (也来自作为构建必需依赖项的一部分安装的 dpkg-dev 软件包)程序来完成其工作(请注意,它需要从linuxcnc-source-dir目录运行:
shell
$ dpkg-checkbuilddeps满足这些先决条件后,构建 Debian 软件包包括两个步骤。
第一步是通过运行以下命令从 git 存储库生成 Debian 包脚本和元数据:
shell
$ cd linuxcnc-dev
$ ./debian/configure
Note:
debian/configure根据您构建的平台接受参数,它默认在用户空间("uspace")中运行 LinuxCNC,期望 preempt_rt 内核将延迟降至最低。
no-docs:跳过构建文档。uspace:配置为 Preempt-RT 实时或非实时(兼容两者),或使用noauto禁用自动检测。
配置 Debian 软件包脚本和元数据后,通过运行dpkg-buildpackage来构建软件包:
shell
$ dpkg-buildpackage -b -uc -j$(nproc)Note:
要构建的典型 Debian 软件包,您可以运行不带任何参数的 dpkg-buildpackage。如上所述,该命令传递了两个额外的选项。与所有优秀的 Linux 工具一样,手册页包含
man dpkg-buildpackage的所有详细信息。
-uc不要对生成的二进制文件进行签名。仅当您想将软件包分发给其他人时,您才需要使用自己的 GPG 密钥对软件包进行签名。未设置该选项并且无法对包进行签名不会影响 .deb 文件。
-b这对于避免编译与硬件无关的内容非常有帮助,对于 LinuxCNC 来说就是文档。无论如何,该文档可以在线获取。
如果您在编译时遇到困难,请在线查看 LinuxCNC 论坛。目前正在出现的是对 DEB_BUILD_OPTIONS 环境变量的支持。将其设置为
nodocs要跳过构建文档,最好使用
-B标志来 dpkg-buildpackage。
nocheck跳过 LinuxCNC 构建过程的自检。这可以节省一些时间并减少对某些可能不适用于您的系统的软件包(尤其是 xvfb)的需求。您不应该设置此选项来对构建按预期执行有额外的信心,除非遇到依赖项方面的困难。
环境变量可以与命令的执行一起设置,例如
shellDEB_BUILD_OPTIONS=nocheck dpkg-buildpackage -uc -B
4.安装构建的Debian软件包
Debian 软件包可以通过其 .deb 扩展名来识别。安装它的工具dpkg是每个 Debian 安装的一部分。 dpkg-buildpackage创建的 .deb 文件可以在 linuxcnc-source-dir 上面的目录中找到,即在..中。要查看包中提供了哪些文件,请运行
shell
dpkg -c ../linuxcnc-uspace*.debLinuxCNC 的版本将是文件名的一部分,旨在与星号匹配。列出的文件可能太多,无法显示在您的屏幕上。如果您无法在终端中向上滚动,请添加| more该命令的| more是使其输出通过所谓的"寻呼机"传递。用"q"退出。
要安装软件包,请运行
shell
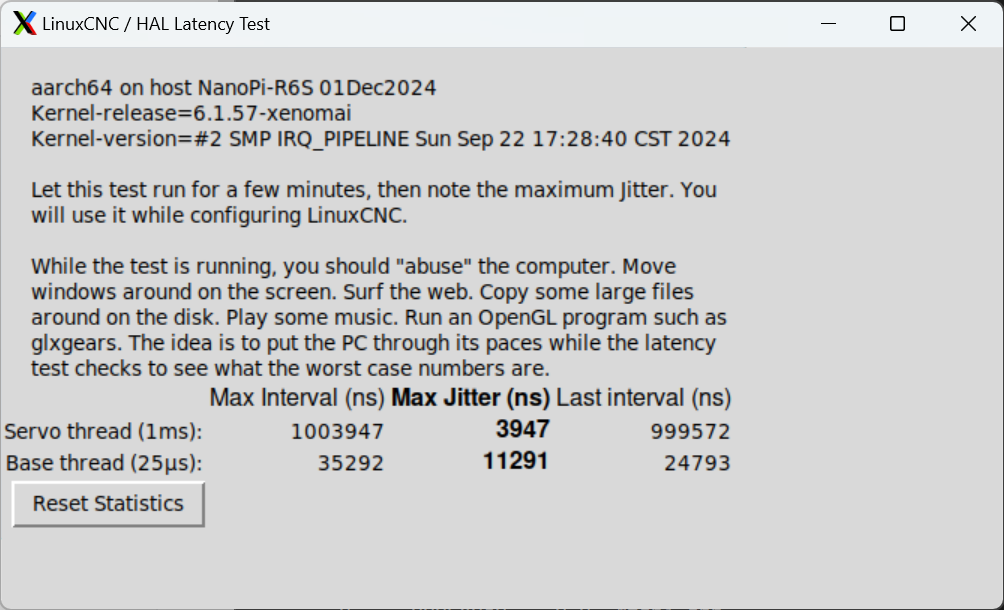
sudo dpkg -i ../linuxcnc*.deb5. latency-test
通过命令行测试
shell
pi@NanoPi-R6S:~$ latency-test
Note: Using XENOMAI (posix-skin) realtime
测试的是cpu0的实时性,会差一些,以隔离的cpu核latency测试为准。此时可以通过cat /proc/xenomai/sched/threads确认已经在xenomai内核调度运行。
shell
pi@NanoPi-R6S:~$ cat /proc/xenomai/sched/threads
CPU  PID    CLASS  TYPE      PRI   TIMEOUT       STAT       NAME
  0  0      idle   core       -1   -             R          [ROOT/0]
  1  0      idle   core       -1   -             R          [ROOT/1]
  2  0      idle   core       -1   -             R          [ROOT/2]
  3  0      idle   core       -1   -             R          [ROOT/3]
  4  0      idle   core       -1   -             R          [ROOT/4]
  5  0      idle   core       -1   -             R          [ROOT/5]
  6  0      idle   core       -1   -             R          [ROOT/6]
  7  0      idle   core       -1   -             R          [ROOT/7]
  0  126087 rt     cobalt      0   -             X          rtapi_app
  0  126090 rt     cobalt     98   43us          D          rtapi_app
  0  126091 rt     cobalt     97   255us         D          rtapi_app
pi@NanoPi-R6S:~$ cat /proc/xenomai/sched/stat
CPU  PID    MSW        CSW        XSC        PF    STAT       %CPU  NAME
  0  0      0          2971573    0          0     00018008   83.6  [ROOT/0]
  1  0      0          0          0          0     00018000  100.0  [ROOT/1]
  2  0      0          0          0          0     00018000  100.0  [ROOT/2]
  3  0      0          0          0          0     00018000  100.0  [ROOT/3]
  4  0      0          0          0          0     00018000  100.0  [ROOT/4]
  5  0      0          0          0          0     00018000  100.0  [ROOT/5]
  6  0      0          0          0          0     00018000  100.0  [ROOT/6]
  7  0      0          0          0          0     00018000  100.0  [ROOT/7]
  0  126087 1          1          5          0     000680c0    0.0  rtapi_app
  0  126090 1          1759321    1759322    0     00048044   16.0  rtapi_app
  0  126091 1          43964      43964      0     00048044    0.4  rtapi_app