快速构建springboot+java+mongodb新闻发布系统简单Demo!这是建立在你已经本地安装好了mongodb数据库,并且启动了服务进程的前提下。
1. 环境准备
确保以下环境已准备好:
- 已安装并启动 MongoDB 服务。
- 已安装 Java 和 Maven。
- 创建一个 Spring Boot 项目,使用 Maven 或 Gradle 进行构建。
在 pom.xml 中添加 MongoDB 和 Spring Data MongoDB 的依赖:
<dependencies>
    <dependency>
        <groupId>org.springframework.boot</groupId>
        <artifactId>spring-boot-starter-data-mongodb</artifactId>
    </dependency>
    <dependency>
        <groupId>org.springframework.boot</groupId>
        <artifactId>spring-boot-starter-web</artifactId>
    </dependency>
    <dependency>
        <groupId>org.springframework.boot</groupId>
        <artifactId>spring-boot-starter-validation</artifactId>
    </dependency>
    <dependency>
        <groupId>org.springframework.boot</groupId>
        <artifactId>spring-boot-starter-logging</artifactId>
    </dependency>
</dependencies>
2. 配置 MongoDB
在 src/main/resources/application.properties 中配置 MongoDB 的连接:
spring.data.mongodb.uri=mongodb://localhost:27017/newsDB
spring.data.mongodb.database=newsDB
3. 创建实体类 News
News 类表示新闻实体,并将其映射为 MongoDB 文档。
package com.example.newsapp.model;

import org.springframework.data.annotation.Id;
import org.springframework.data.mongodb.core.mapping.Document;

import javax.validation.constraints.NotBlank;

@Document(collection = "news")
public class News {

    @Id
    private String id;

    @NotBlank(message = "标题不能为空")
    private String title;

    @NotBlank(message = "内容不能为空")
    private String content;

    private String author;
    private String date;

    // Getters and Setters
    public String getId() {
        return id;
    }

    public void setId(String id) {
        this.id = id;
    }

    public String getTitle() {
        return title;
    }

    public void setTitle(String title) {
        this.title = title;
    }

    public String getContent() {
        return content;
    }

    public void setContent(String content) {
        this.content = content;
    }

    public String getAuthor() {
        return author;
    }

    public void setAuthor(String author) {
        this.author = author;
    }

    public String getDate() {
        return date;
    }

    public void setDate(String date) {
        this.date = date;
    }
}
4. 创建 NewsRepository 接口
NewsRepository 继承 MongoRepository,提供基本的 CRUD 操作。
package com.example.newsapp.repository;

import com.example.newsapp.model.News;
import org.springframework.data.mongodb.repository.MongoRepository;
import org.springframework.stereotype.Repository;

@Repository
public interface NewsRepository extends MongoRepository<News, String> {
    // 可以在这里定义自定义查询方法
}
5. 创建 NewsService 服务类
在 NewsService 类中实现增、删、改、查的逻辑。
package com.example.newsapp.service;

import com.example.newsapp.model.News;
import com.example.newsapp.repository.NewsRepository;
import org.springframework.beans.factory.annotation.Autowired;
import org.springframework.stereotype.Service;

import java.util.List;
import java.util.Optional;

@Service
public class NewsService {

    @Autowired
    private NewsRepository newsRepository;

    // 创建/发布新闻
    public News createNews(News news) {
        return newsRepository.save(news);
    }

    // 获取所有新闻
    public List<News> getAllNews() {
        return newsRepository.findAll();
    }

    // 获取新闻 by ID
    public Optional<News> getNewsById(String id) {
        return newsRepository.findById(id);
    }

    // 更新新闻
    public News updateNews(String id, News newsDetails) {
        Optional<News> optionalNews = newsRepository.findById(id);
        if (optionalNews.isPresent()) {
            News existingNews = optionalNews.get();
            existingNews.setTitle(newsDetails.getTitle());
            existingNews.setContent(newsDetails.getContent());
            existingNews.setAuthor(newsDetails.getAuthor());
            existingNews.setDate(newsDetails.getDate());
            return newsRepository.save(existingNews);
        }
        return null; // 如果没有找到对应的新闻ID
    }

    // 删除新闻
    public boolean deleteNews(String id) {
        Optional<News> optionalNews = newsRepository.findById(id);
        if (optionalNews.isPresent()) {
            newsRepository.delete(optionalNews.get());
            return true;
        }
        return false;
    }
}
6. 创建 NewsController 控制器
NewsController 类处理所有 HTTP 请求,并将请求映射到相应的服务方法。
package com.example.newsapp.controller;

import com.example.newsapp.model.News;
import com.example.newsapp.service.NewsService;
import org.springframework.beans.factory.annotation.Autowired;
import org.springframework.http.HttpStatus;
import org.springframework.http.ResponseEntity;
import org.springframework.web.bind.annotation.*;

import javax.validation.Valid;
import java.util.List;
import java.util.Optional;

@RestController
@RequestMapping("/api/news")
public class NewsController {

    @Autowired
    private NewsService newsService;

    // 发布新闻
    @PostMapping
    public ResponseEntity<News> createNews(@Valid @RequestBody News news) {
        News createdNews = newsService.createNews(news);
        return new ResponseEntity<>(createdNews, HttpStatus.CREATED);
    }

    // 获取所有新闻
    @GetMapping
    public List<News> getAllNews() {
        return newsService.getAllNews();
    }

    // 获取新闻 by ID
    @GetMapping("/{id}")
    public ResponseEntity<News> getNewsById(@PathVariable String id) {
        Optional<News> news = newsService.getNewsById(id);
        return news.map(ResponseEntity::ok).orElseGet(() -> ResponseEntity.notFound().build());
    }

    // 更新新闻
    @PutMapping("/{id}")
    public ResponseEntity<News> updateNews(@PathVariable String id, @Valid @RequestBody News newsDetails) {
        News updatedNews = newsService.updateNews(id, newsDetails);
        return updatedNews != null ? ResponseEntity.ok(updatedNews) : ResponseEntity.notFound().build();
    }

    // 删除新闻
    @DeleteMapping("/{id}")
    public ResponseEntity<Void> deleteNews(@PathVariable String id) {
        boolean isDeleted = newsService.deleteNews(id);
        return isDeleted ? ResponseEntity.noContent().build() : ResponseEntity.notFound().build();
    }
}
7. 启动 Spring Boot 应用
在 src/main/java/com/example/newsapp 下创建 NewsAppApplication 类,启动 Spring Boot 应用。
package com.example.newsapp;

import org.springframework.boot.SpringApplication;
import org.springframework.boot.autoconfigure.SpringBootApplication;

@SpringBootApplication
public class NewsAppApplication {
    public static void main(String[] args) {
        SpringApplication.run(NewsAppApplication.class, args);
    }
}
这个是入口文件,启动类,你根据个人情况,做决定。不一定非得按照我这个写。启动成功即可。
8. 测试
启动 Spring Boot 应用后,您可以使用 Postman 或类似工具测试 API。
1. 发布新闻(POST)
URL: http://localhost:8080/api/news
请求体(JSON):
{
  "title": "Java 17 发布",
  "content": "Java 17 是一个长期支持版本。",
  "author": "开发者",
  "date": "2025-01-24"
}
2. 获取所有新闻(GET)
URL: http://localhost:8080/api/news
3. 根据 ID 获取新闻(GET)
URL: http://localhost:8080/api/news/{id}
4. 更新新闻(PUT)
URL: http://localhost:8080/api/news/{id}
请求体(JSON):
{
  "title": "Java 17 更新",
  "content": "Java 17 已发布,包含许多新特性。",
  "author": "开发者",
  "date": "2025-01-25"
}
5. 删除新闻(DELETE)
URL: http://localhost:8080/api/news/{id}
9. 总结
这个简单的新闻发布系统实现了以下功能:
- 使用 MongoDB 存储新闻数据。
- 提供了增、删、改、查的 RESTful API。
- 使用 Spring Boot + Spring Data MongoDB 构建的后端应用。
通过 Spring Data MongoDB,MongoDB 操作变得非常简便,不需要写太多的 SQL 语句,直接使用面向对象的方式操作数据。
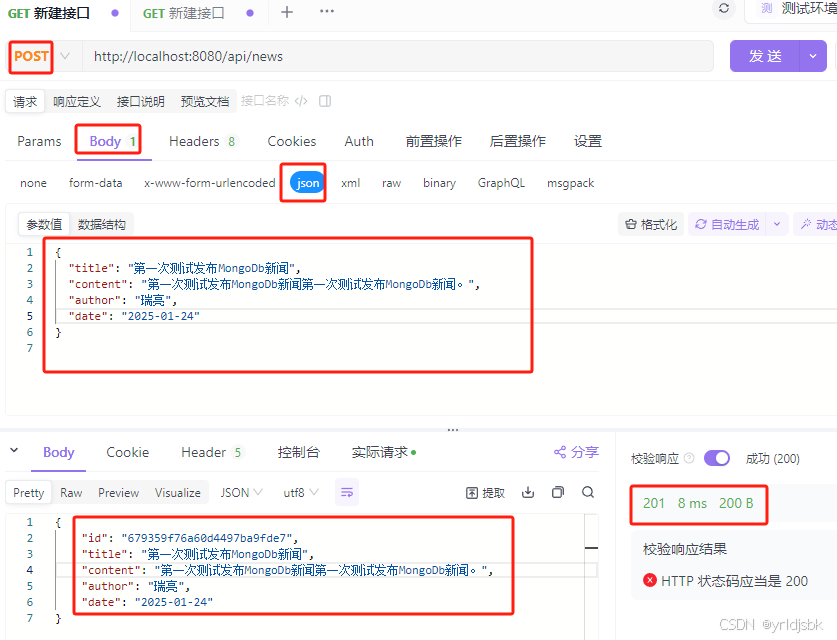
亲测,效果是可以的,注意,这个新增新闻,是POST请求类型。
我使用传递了JSON格式封装进入了Body参数内。传递给后端接口使用。
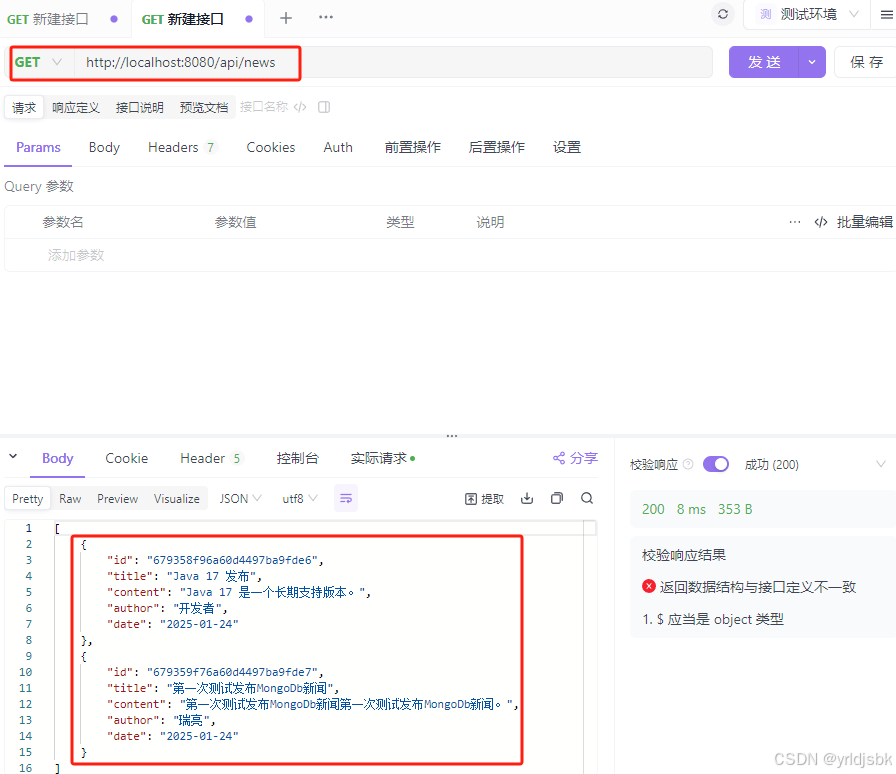
如图,亲测,查询所有新闻,也是正常的。目前我就植入了2篇,都查询出来了。大家可以自己测试一下。