温馨提示:安装过程耗时且会有各种意想不到的BUG,可能需要反复的烧写系统,一定要保持耐心!
一、工具
(1)树莓派4B(带SD卡)
(2)格式化工具:SD card Formatter
官方下载链接:SD Memory Card Formatter for Windows Download | SD Association (sdcard.org)
(3)烧录工具:
Win32DiskImager官方网址:Win32 Disk Imager download | SourceForge.net
Raspberry Pi Imager官方网址:Raspberry Pi OS -- Raspberry Pi
(4)Ubuntu 20.04镜像:Ubuntu 20.04.5 LTS (Focal Fossa)
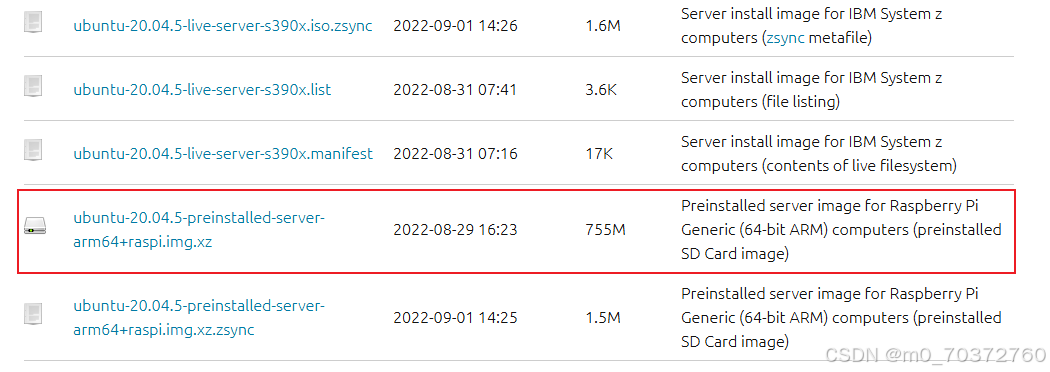
选择ubuntu-20.04.5-preinstalled-server-arm64+raspi.img.xz版本。
二、安装流程
(一)格式化SD卡
利用格式化工具SD card Formatter将SD卡格式化,步骤如下:
1、选择要格式化的SD卡
2、点击Format

(二)烧录ubuntu镜像
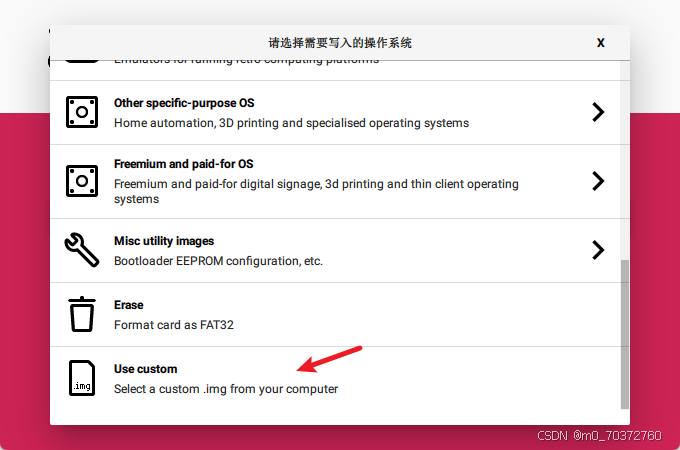
利用烧录工具Raspberry Pi Imager烧录Ubuntu 20.04镜像系统,步骤如下:
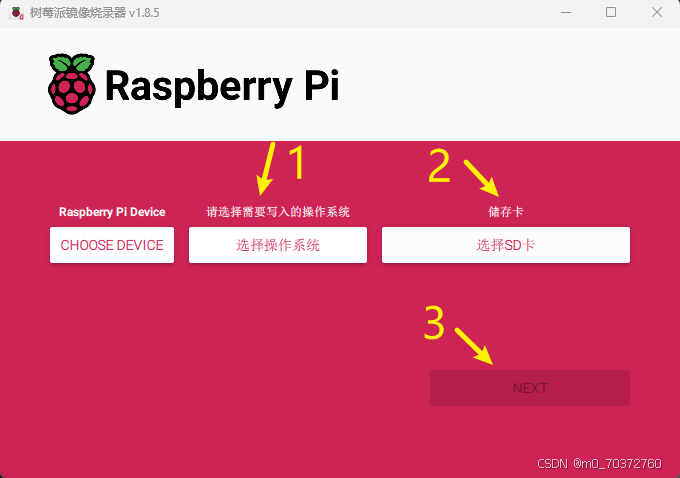
(1)点击选择操作系统,下拉到最下面,选择自己下载的系统镜像
(2)选择要烧录的SD卡
(3)点击NEXT
等待烧录。。。
烧录成功以后,将SD卡插回到树莓派4B。
(三)配置WIFI
1、无显示器版
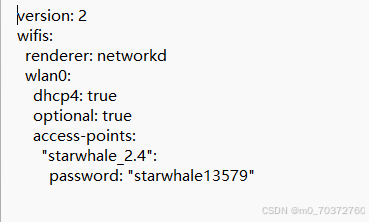
可以通过读卡器将SD卡插回电脑修改network-config文件,配置wifi:
wifi名称和密码格式注意:
- 在填写wifi名字时,如果wifi名字中没有空格,填写时无需加双引号;如果wifi名字中有空格,一定要加上加英文双引号。
- wifi名字最后的冒号后面要留有空格。
- 每行的缩进为两个空格,不能用tab代替
注意:第一次开机可能会连接不上网络,如设置没问题,通过重启之后便可以自动连接。
之后通过登录WiFi管理界面查看Ubuntu的ip地址通常为192.168.x.xxx。再利用远程连接工具finalshell、MobaXterm、Nomachine等与其远程连接,再进行后续的安装步骤。
2、带显示器版
将树莓派直接与显示器连接。进入命令行界面,输入初始账号:ubuntu,密码:ubuntu。
在命令行界面输入:
XML
sudo vim /etc/netplan/50-cloud-init.yaml通过编辑50-cloud-init.yaml文件配置WiFi,注意格式
XML
network:
  version: 2
  wifis:
    wlan0:
      dhcp4: true
      optional: true
      access-points:
        "你的wifi名称":
          password: "wifi密码"
补充:vim的简单使用
输入命令之后会弹出编辑界面,按i进行编辑,编辑好以后先按esc,再输入:wq进行保存并退出
接着输入命令:
XML
sudo netplan generate
sudo netplan apply
使得配置的WiFi生效,并连接上所配置的wifi。
输入命令ifconfig查看ip地址,可以使用远程工具连接操作,也可以在显示器上操作,建议使用远程工具连接操作,因为可以复制粘贴windows上的内容,在显示器上操作的话只能手敲命令,后续换源会很痛苦!
(四)换国内源
输入命令:
XML
sudo vim /etc/apt/sources.list将sources.list文件中的内容换成以下的国内源。
中科大镜像源
XML
deb https://mirrors.ustc.edu.cn/ubuntu-ports/ focal main restricted universe multiverse
deb-src https://mirrors.ustc.edu.cn/ubuntu-ports/ focal main main restricted universe multiverse
deb https://mirrors.ustc.edu.cn/ubuntu-ports/ focal-updates main restricted universe multiverse
deb-src https://mirrors.ustc.edu.cn/ubuntu-ports/ focal-updates main restricted universe multiverse
deb https://mirrors.ustc.edu.cn/ubuntu-ports/ focal-backports main restricted universe multiverse
deb-src https://mirrors.ustc.edu.cn/ubuntu-ports/ focal-backports main restricted universe multiverse
deb https://mirrors.ustc.edu.cn/ubuntu-ports/ focal-security main restricted universe multiverse
deb-src https://mirrors.ustc.edu.cn/ubuntu-ports/ focal-security main restricted universe multiverse
# deb https://mirrors.ustc.edu.cn/ubuntu-ports/ focal-proposed main restricted universe multiverse
# deb-src https://mirrors.ustc.edu.cn/ubuntu-ports/ focal-proposed main restricted universe multiverse
清华镜像源
XML
########   Ubuntu20.04LTS 清华镜像源   ###############
# 默认注释了源码镜像以提高 apt update 速度,如有需要可自行取消注释
deb https://mirrors.tuna.tsinghua.edu.cn/ubuntu/ focal main restricted universe multiverse
# deb-src https://mirrors.tuna.tsinghua.edu.cn/ubuntu/ focal main restricted universe multiverse
deb https://mirrors.tuna.tsinghua.edu.cn/ubuntu/ focal-updates main restricted universe multiverse
# deb-src https://mirrors.tuna.tsinghua.edu.cn/ubuntu/ focal-updates main restricted universe multiverse
deb https://mirrors.tuna.tsinghua.edu.cn/ubuntu/ focal-backports main restricted universe multiverse
# deb-src https://mirrors.tuna.tsinghua.edu.cn/ubuntu/ focal-backports main restricted universe multiverse
deb https://mirrors.tuna.tsinghua.edu.cn/ubuntu/ focal-security main restricted universe multiverse
# deb-src https://mirrors.tuna.tsinghua.edu.cn/ubuntu/ focal-security main restricted universe multiverse

# 预发布软件源,不建议启用
# deb https://mirrors.tuna.tsinghua.edu.cn/ubuntu/ focal-proposed main restricted universe multiverse
# deb-src https://mirrors.tuna.tsinghua.edu.cn/ubuntu/ focal-proposed main restricted universe multiverse
阿里镜像源
XML
########   Ubuntu20.04 阿里云镜像源   ###############
deb https://mirrors.aliyun.com/ubuntu/ focal main restricted universe multiverse
deb-src https://mirrors.aliyun.com/ubuntu/ focal main restricted universe multiverse
deb https://mirrors.aliyun.com/ubuntu/ focal-security main restricted universe multiverse
deb-src https://mirrors.aliyun.com/ubuntu/ focal-security main restricted universe multiverse
deb https://mirrors.aliyun.com/ubuntu/ focal-updates main restricted universe multiverse
deb-src https://mirrors.aliyun.com/ubuntu/ focal-updates main restricted universe multiverse
# deb https://mirrors.aliyun.com/ubuntu/ focal-proposed main restricted universe multiverse
# deb-src https://mirrors.aliyun.com/ubuntu/ focal-proposed main restricted universe multiverse
deb https://mirrors.aliyun.com/ubuntu/ focal-backports main restricted universe multiverse
deb-src https://mirrors.aliyun.com/ubuntu/ focal-backports main restricted universe multiverse
随便选一个镜像源都可以,换国内源的目的是为了后面装ubuntu 20.04桌面时,下载速度能提高。
输入以下命令进行更新:
XML
sudo apt-get update
sudo apt-get upgrade
(五)安装Ubuntu 20.04可视化桌面
输入命令:
XML
sudo apt install ubuntu-desktop
sudo apt install xrdp
比较耗时,需要耐心等待。
安装好以后,重启树莓派,便能在显示器看到ubuntu20.04可视化桌面
至此,树莓派4B安装ubuntu 20.04全部完成!!!