WSL2通过 Hyper-V 技术创建了一个轻量级的虚拟机(VM),在这个虚拟机之上可以运行一个真正的 Linux 内核,这给希望同时使用 Windows 和 Linux 的开发人员提供了无缝高效的体验。本文会介绍一些使用WSL的知识,帮助你更好地使用WSL。
1 WSL的优点与缺点
1.1 优点
-
相较于使用类似VirtualBox的虚拟机,WSL有着更低的内存占用和更快的启动速度。
-
相较于双系统,WSL可以让你在使用Linux的同时使用Windows,而不需要通过重启切换环境。
1.2 缺点
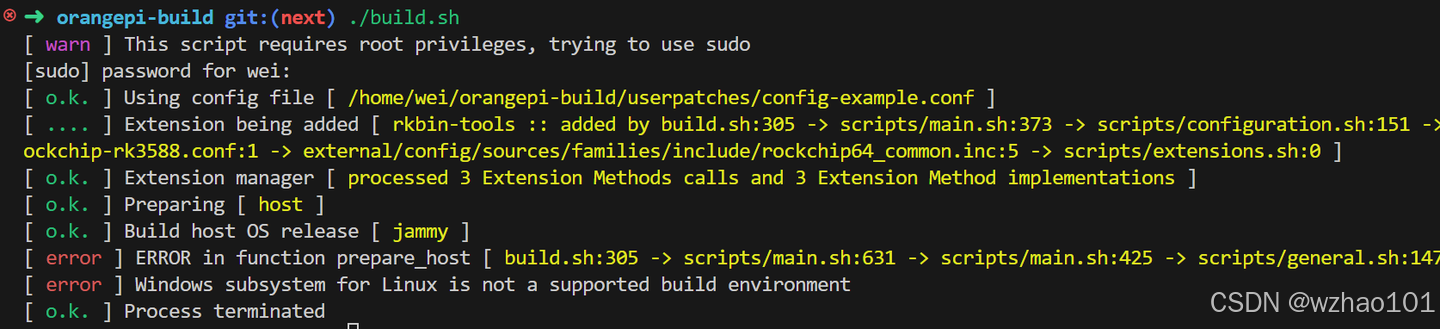
有时会存在一些兼容性问题,比如有些软件不支持WSL环境,就像我下面这样(orangepi的编译脚本不支持WSL环境):
如果想在WSL中访问U盘之类的存储设备还需要专门的配置(本文第三节中会介绍),此外如果你想要测试一些软件的性能的话,不建议在WSL上测试。
2 WSL配置文件
2.1 配置文件的类型
有两种类型的配置文件:.wslconfig和wsl.conf
(1).wslconfig是全局配置,会影响在WSL 2上运行的所有的发行版。它通常在这里C:\Users\wei\.wslconfig(在Windows的文件系统里,wei是我的用户名)
(2)wsl.conf是局部配置,会影响在WSL 1或WSL 2上运行的指定的Linux发行版。通常来说每个LInux发行版都有一个/etc/wsl.conf文件(在Linux发行版的文件系统里),这个文件里的配置会影响对应的Linux发行版。
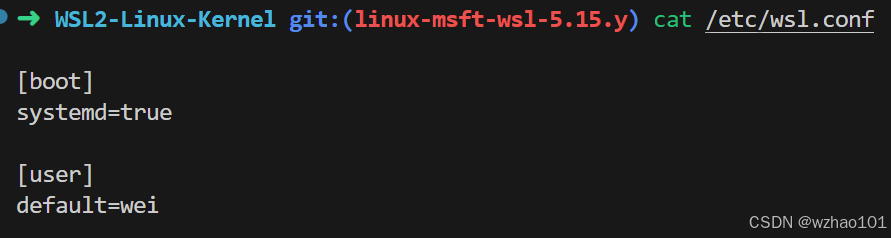
下面是我的Ubuntu22.04的配置。
boot systemd=true意味着该发行版会使用systemd作为init程序(linux第一个启动的用户程序),然后systemd会启动一些其他程序。
2.2 如何使配置生效
在修改完配置文件后,可以使用wsl --shutdown关闭所有正在运行的Linux发行版,或者使用wsl --terminate <distroName>关闭某个指定的Linux发行版,只有关闭后重启修改的配置才会生效。
PS:可以使用wsl --list --running检查是否有正在运行的Linux发行版:

2.3 可配置的参数
这部分详细的内容可以看官方文档:
2.3.1 wsl.conf
(1)在wsl.conf中可使用的标签:automount。

简单来说这个配置与文件系统的挂载有关。如果不进行任何修改的话,你可以看到在wsl的/mnt目录下有几个目录,它们就是Windows的那几个盘,比如说我分了三个盘C、D、E,这下面就有c、d、e三个目录,你可以在wsl中通过这些目录访问Windows上的文件。

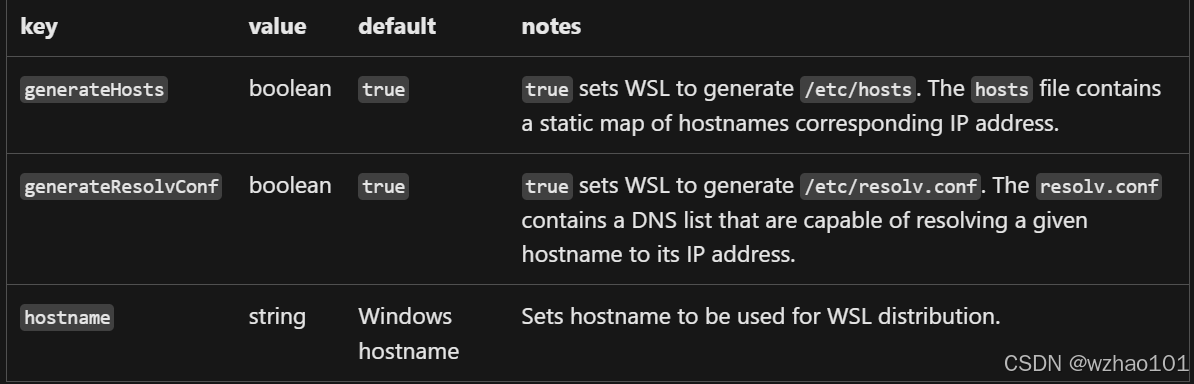
(2)在wsl.conf中可使用的标签:network
(3)在wsl.conf中可使用的标签:interop
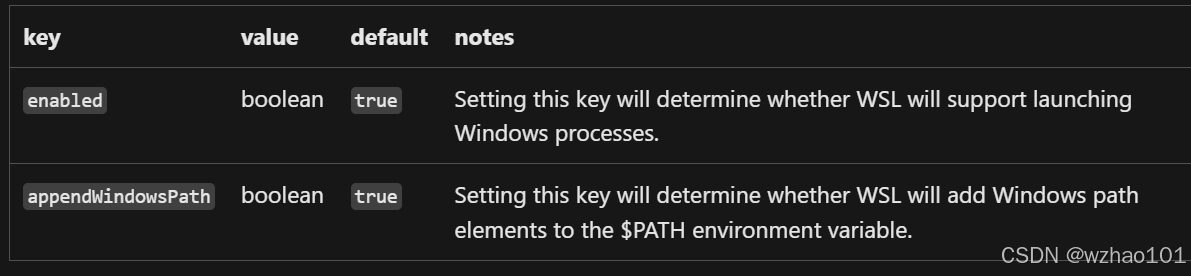
这个是控制是否能够在WSL中执行Windows程序的。如果开启的话,就可以在WSL中执行Windows程序。比如可以使用/mnt/c/Windows/notepad.exe 打开记事本。
(4)在wsl.conf中可使用的标签:user

(5)在wsl.conf中可使用的标签:boot

下面是官方给出的一个wsl.conf文件配置样例:
# Automatically mount Windows drive when the distribution is launched
[automount]

# Set to true will automount fixed drives (C:/ or D:/) with DrvFs under the root directory set above. Set to false means drives won't be mounted automatically, but need to be mounted manually or with fstab.
enabled = true

# Sets the directory where fixed drives will be automatically mounted. This example changes the mount location, so your C-drive would be /c, rather than the default /mnt/c.
root = /

# DrvFs-specific options can be specified.
options = "metadata,uid=1003,gid=1003,umask=077,fmask=11,case=off"

# Sets the `/etc/fstab` file to be processed when a WSL distribution is launched.
mountFsTab = true

# Network host settings that enable the DNS server used by WSL 2. This example changes the hostname, sets generateHosts to false, preventing WSL from the default behavior of auto-generating /etc/hosts, and sets generateResolvConf to false, preventing WSL from auto-generating /etc/resolv.conf, so that you can create your own (ie. nameserver 1.1.1.1).
[network]
hostname = DemoHost
generateHosts = false
generateResolvConf = false

# Set whether WSL supports interop processes like launching Windows apps and adding path variables. Setting these to false will block the launch of Windows processes and block adding $PATH environment variables.
[interop]
enabled = false
appendWindowsPath = false

# Set the user when launching a distribution with WSL.
[user]
default = DemoUser

# Set a command to run when a new WSL instance launches. This example starts the Docker container service.
[boot]
command = service docker start
2.3.2 .wslconfig
这一部分可以配置的东西比较多,建议直接看官方文档,这里只给出官方文档配置的样例:
# Settings apply across all Linux distros running on WSL 2
[wsl2]

# Limits VM memory to use no more than 4 GB, this can be set as whole numbers using GB or MB
memory=4GB

# Sets the VM to use two virtual processors
processors=2

# Specify a custom Linux kernel to use with your installed distros. The default kernel used can be found at https://github.com/microsoft/WSL2-Linux-Kernel
kernel=C:\\temp\\myCustomKernel

# Sets additional kernel parameters, in this case enabling older Linux base images such as Centos 6
kernelCommandLine = vsyscall=emulate

# Sets amount of swap storage space to 8GB, default is 25% of available RAM
swap=8GB

# Sets swapfile path location, default is %USERPROFILE%\AppData\Local\Temp\swap.vhdx
swapfile=C:\\temp\\wsl-swap.vhdx

# Disable page reporting so WSL retains all allocated memory claimed from Windows and releases none back when free
pageReporting=false

# Turn on default connection to bind WSL 2 localhost to Windows localhost. Setting is ignored when networkingMode=mirrored
localhostforwarding=true

# Disables nested virtualization
nestedVirtualization=false

# Turns on output console showing contents of dmesg when opening a WSL 2 distro for debugging
debugConsole=true

# Enable experimental features
[experimental]
sparseVhd=true
一些补充:
-
如果你在编译程序时遇到了OOM(内存不够用),可以把memory和swap调大点,这样你的WSL就有更多可以使用的内存了。
-
如果想要在WSL里使用代理可以像我下面这样配置。起作用的主要是这三个:autoProxy=true dnsTunneling=true networkingMode=mirrored。
-
使用kernel参数可以使用自己编译的Linux内核。
下面是我目前的配置:
[wsl2]
memory=24GB
swap=32GB
autoProxy=true
dnsTunneling=true
networkingMode=mirrored
[experimental]
autoMemoryReclaim=gradual
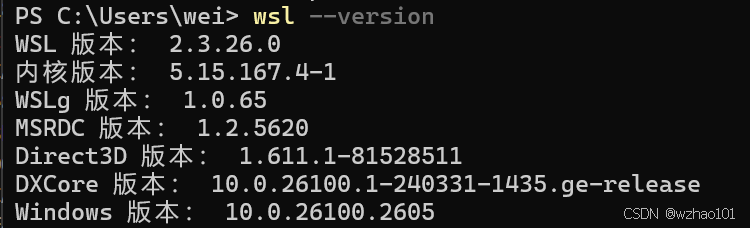
sparseVhd=true 此外如果遇到一些问题的话,建议升级一下WSL再试,可以使用winget upgrade Microsoft.WSL来更新WSL,下面是我的WSL相关内容的版本信息:
3 在WSL中使用自己编译的内核
在WSL中使用的是微软修改过的内核,下面是它的代码仓库:
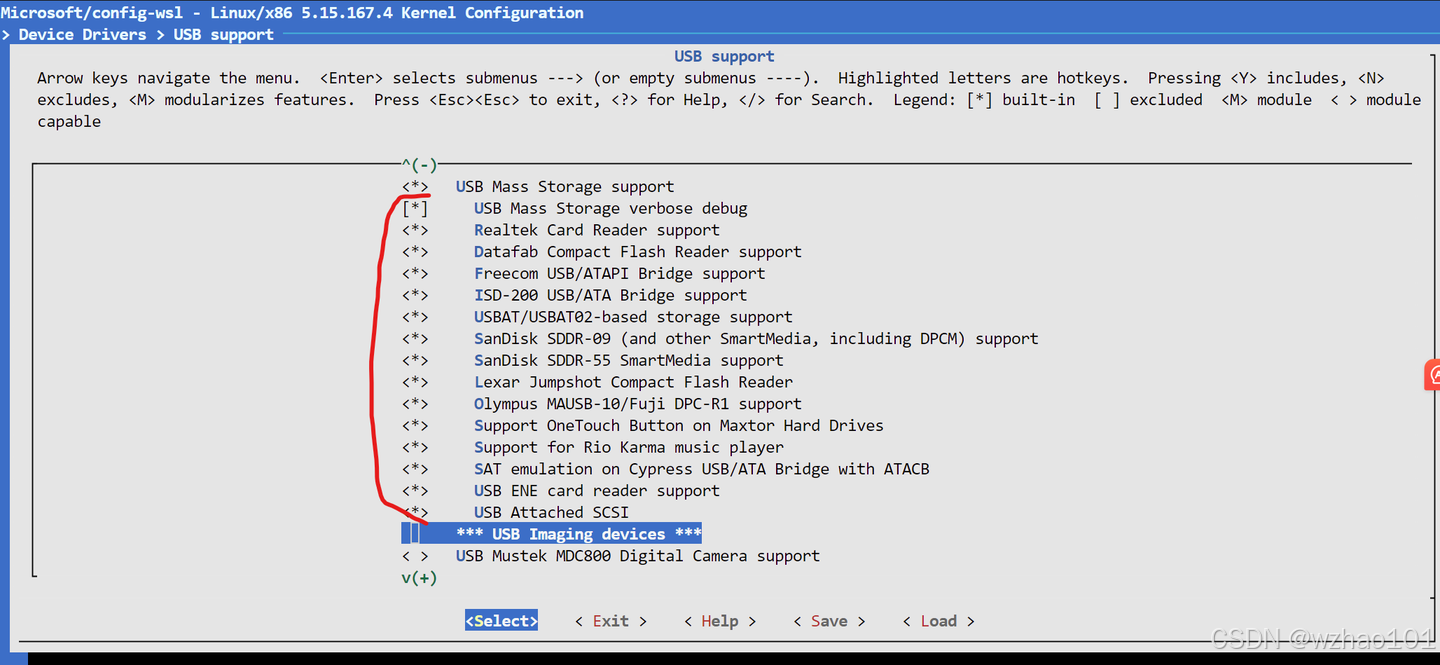
为什么需要自己重新编译内核?这是因为默认的Linux内核中有些功能并没有启用,比如USB Mass Storage Support,这导致你即使使用usbipd将usb设备(比如说U盘)连接到了WSL,也没法在WSL里访问U盘,因为没有对应的驱动,所以这时候就得自己编译内核把USB Mass Storage Support启用。
3.1 编译内核
记得下载与自己Linux发行版对应的内核版本,uname -r可以查看当前内核的版本:

修改配置命令:
bash
make menuconfig KCONFIG_CONFIG=Microsoft/config-wslUSB Mass Storage Support在Device Drivers> USB support下,建议把这些全部勾上。
编译内核:
bash
make -j$(nproc) bzImage KCONFIG_CONFIG=Microsoft/config-wsl编译并安装内核模块(这里默认你在需要更换内核的WSL中执行内核模块安装的命令):
bash
make modules_install KCONFIG_CONFIG=Microsoft/config-wsl
sudo make modules_install KCONFIG_CONFIG=Microsoft/config-wsl
最终产物是arch/x86/boot/bzImage,如果上面的步骤遇到了问题,请根据提示安装需要的依赖。
得到产物后我们可以修改.wslconfig中的kernel参数,使其指向我们的编译产物。我的参数是这样kernel=D:\\wsl-ubuntu22.04\\bzImage,当然你可以根据自己的喜好把bzImage放在某个地方。设置完成后重启WSL使设置生效。
3.2 使用usbipd将usb设备连接到WSL
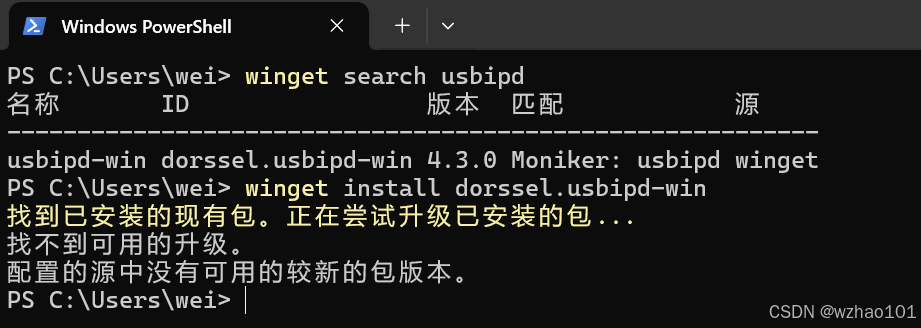
只开启USB Mass Storage Support是不够的,我们还需要usbipd工具才能使WSL访问到U盘。可以在Windows的powershell里使用winget search usbipd寻找usbipd,然后使用ID值安装usbipd(winget install dorssel.usbipd-win)。
安装完成后先使用usbipd list查看所有连接到Windows上的usb设备:
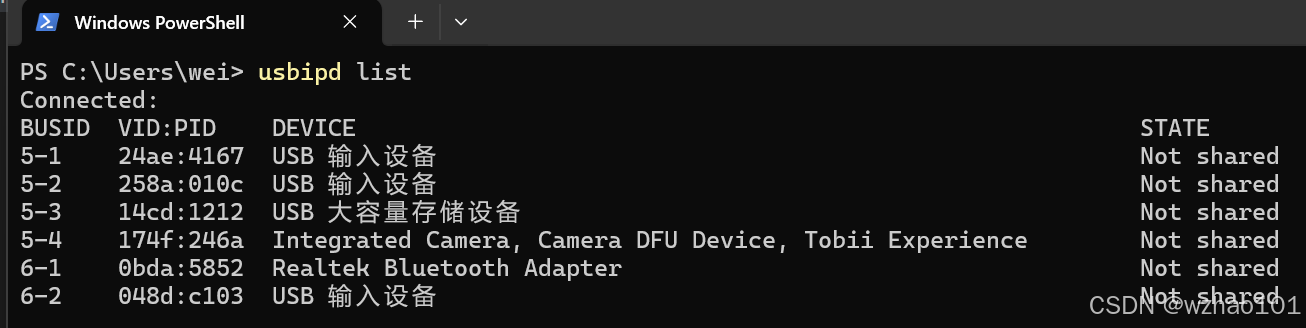
之后找到U盘对应的BUSID(我这里是5-3),使用sudo usbipd bind --busid 5-3将U盘的状态设置为shared(这里需要使用管理员权限,因为我是最新的Windows 11版本,所以可以使用Windows新加的sudo功能,如果不是最新版本的话,可以以管理员权限运行终端)
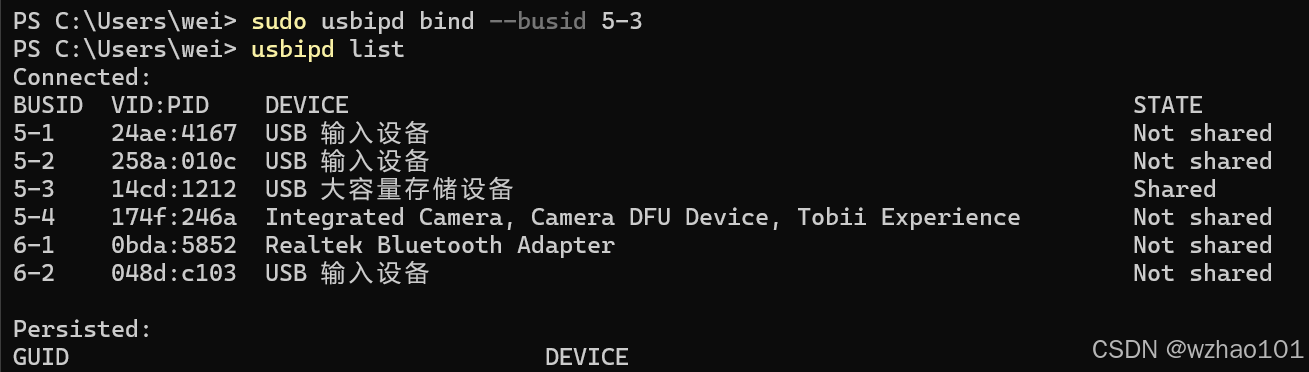
最后使用usbipd attach --wsl --busid 5-3,让WSL连接上U盘。

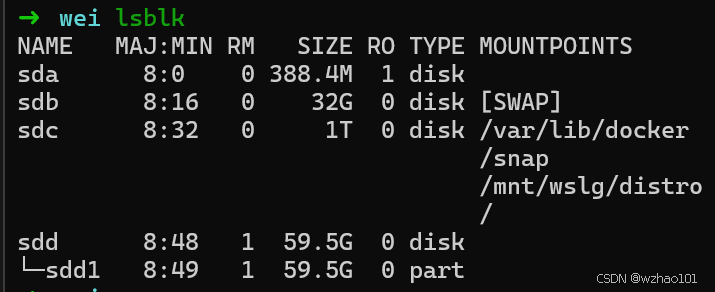
这时WSL就可以识别U盘了(sdd就是U盘)。
PS:嵌入式设备的串口也可以通过usbipd连接到WSL,从而能够使用minicom之类的工具接收串口发送的数据,或向串口发送数据。