基于Windows11的Xinference安装方法简介
快速启动命令:
conda activate D:\cwgis_AI\xinference
xinference-local --host 192.168.1.82 --port 9997
bash
conda activate D:\cwgis_AI\xinference
xinference-local --host 192.168.1.82 --port 9997conda deactivate
bash
conda deactivate一、基础安装
conda安装
下载anaconda 2022.10 window-x86-x64.exe
https://mirrors.tuna.tsinghua.edu.cn/anaconda/archive/?C=M&O=A
设置系统Path
bash
path+=
D:\ProgramData\Anaconda3
D:\ProgramData\Anaconda3\Scripts
D:\ProgramData\Anaconda3\Library\bin
D:\ProgramData\Anaconda3\Library\mingw-w64\bin
查看版本:
conda --version
python
bash
conda --version
pythoncuda安装
安装cuda和cudnn环境前:先要安装和升级显卡驱动程序
注意查看cuda或cudnn开发者库有没有安装,其显著特征就是:
bash
有没有目录路径 C:\Program Files\NVIDIA GPU Computing Toolkitcuda下载地址:https://developer.nvidia.com/cuda-toolkit-archive
我选择的是版本11.7版本
nvcc -V #测试是否安装成功
bash
C:\Users\Administrator>nvcc -V
nvcc: NVIDIA (R) Cuda compiler driver
Copyright (c) 2005-2022 NVIDIA Corporation
Built on Wed_Jun__8_16:59:34_Pacific_Daylight_Time_2022
Cuda compilation tools, release 11.7, V11.7.99
Build cuda_11.7.r11.7/compiler.31442593_0
检查该计算机适配的CUDA版本:向下兼容
方法一:命令行输入nvidia-smi
bash
NVIDIA-SMI 572.70                 Driver Version: 572.70         CUDA Version: 12.8
NVIDIA GeForce GTX 1080           832MiB /   8192MiB
CUDNN的安装
下载地址:
https://developer.nvidia.com/rdp/cudnn-download
必须注册后下载cuda11版本 8.9的window版本
cudnn-windows-x86_64-8.9.4.25_cuda11-archive.zip
(就是将解压后得到的的bin ,include 和lib文件夹分别复制到cuda安装路径下与cuda的bin ,include 和lib文件夹合并)
国内镜像源配置
通过win+R输入cmd进入命令行,通过输入下面命令配置为清华源:
conda config --add channels https://mirrors.tuna.tsinghua.edu.cn/anaconda/pkgs/free/
conda config --add channels https://mirrors.tuna.tsinghua.edu.cn/anaconda/pkgs/main/
conda config --add channels https://mirrors.tuna.tsinghua.edu.cn/anaconda/cloud/conda-forge/
二、xinference安装
先创建python环境
bash
conda env list
conda remove -p D:\cwgis_AI\xinference --all
创建独立python空间
D:\cwgis_AI\xinference>
bash
conda create --prefix=D:\cwgis_AI\xinference python=3.10激活环境
D:\cwgis_AI\xinference>
bash
conda activate D:\cwgis_AI\xinference安装基础库
bash
安装C++ MSVC V143 Build Tool工具 (C++桌面开发) vs2019/2022安装工具中添加/修改
conda config --add channels conda-forge
python -m pip install --upgrade pip
pip install wheel
pip install --use-pep517 vllm
安装xinference
bash
pip install "xinference[transformers]" -i https://pypi.tuna.tsinghua.edu.cn/simple
pip install sentence-transformers
更改Xinference下载模型存储目录方法
启动前添加系统变量XINFERENCE_HOME
等于下载模型另存为目录地址:
D:\cwgis_AI\XINFERENCE_HOME
bash
启动前添加系统变量  XINFERENCE_HOME
D:\cwgis_AI\XINFERENCE_HOME
启动xinference服务 Xinference启动
运行以下命令启动Xinference:
(D:\cwgis_AI\xinference) D:\cwgis_AI\xinference>
xinference-local --host 192.168.1.82 --port 9997
bash
xinference-local --host 192.168.1.82 --port 9997
xinference-local --host 127.0.0.1 --port 9997
查看运行界面:
bash
http://192.168.1.82:9997
http://127.0.0.1:9997
Xinference主界面

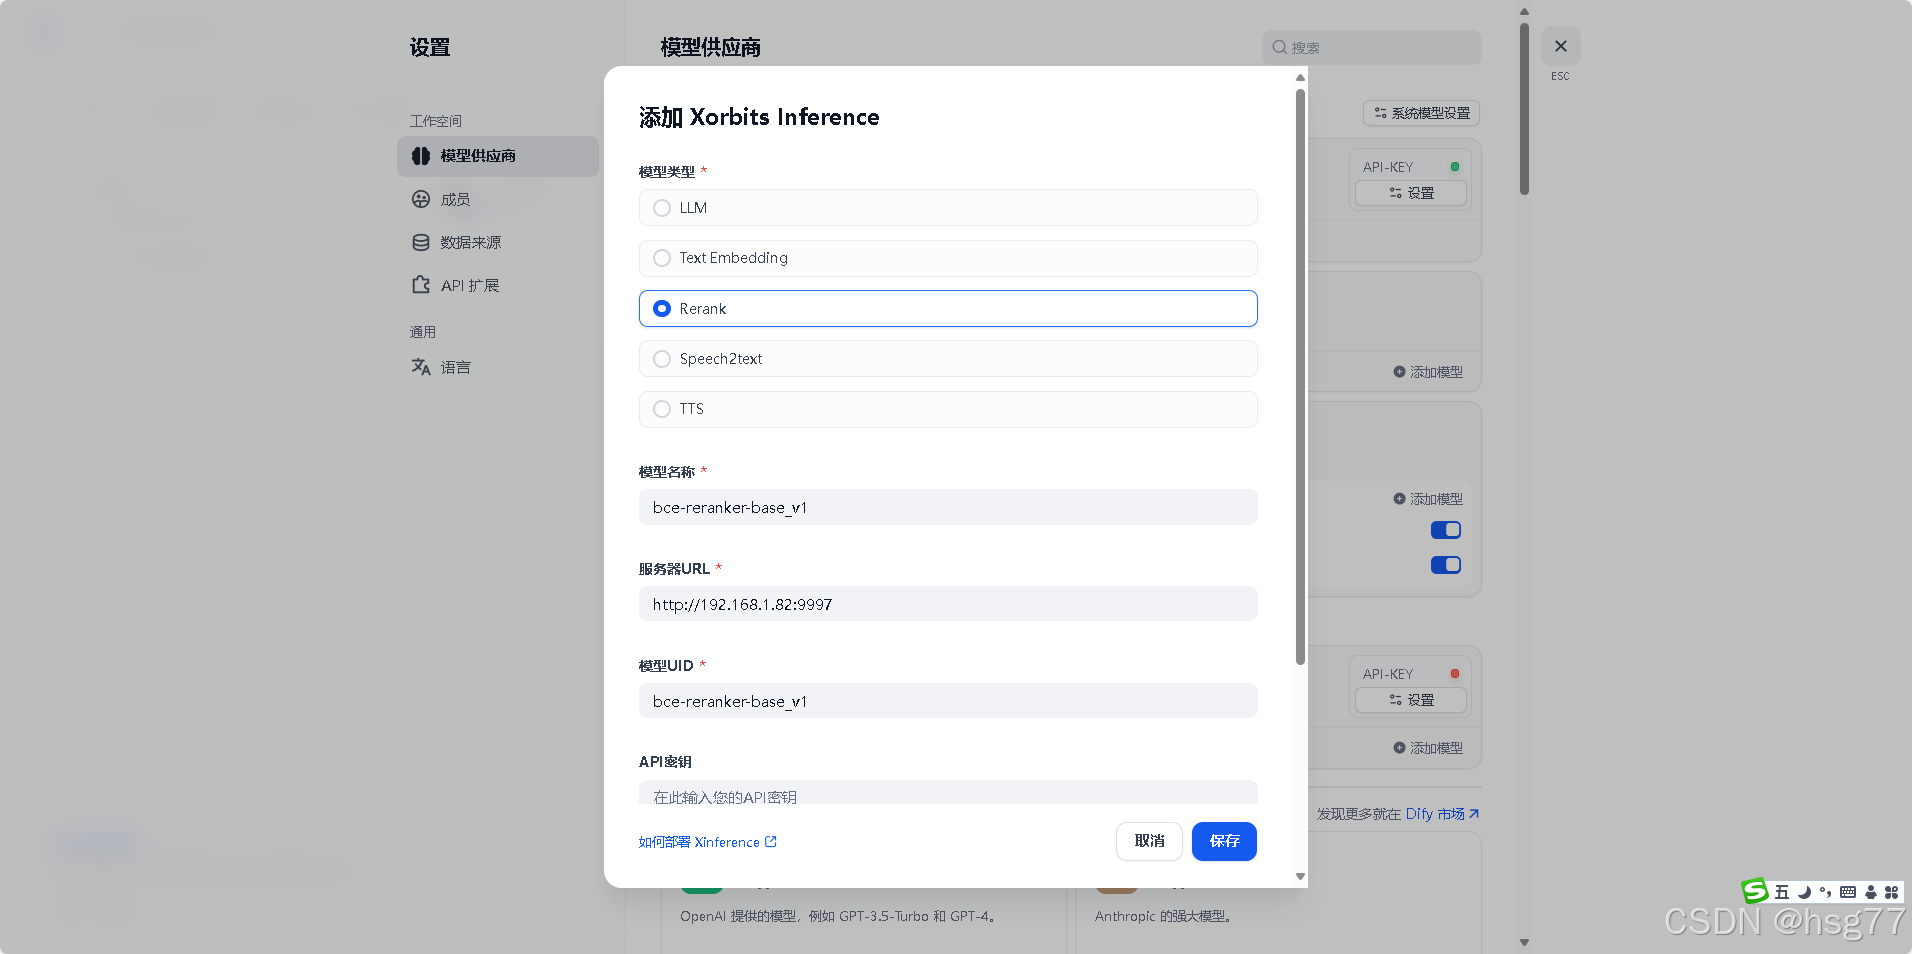
dify中添加Xinference中bce-reranker-base_v1模型方法
本blog地址:https://blog.csdn.net/hsg77