在自然语言处理领域,问答系统(QA)一直被视为衡量机器理解能力的"试金石"。自2017年Transformer架构横空出世,这一领域发生了翻天覆地的变化。本文将带您从零开始,使用PyTorch和Hugging Face生态系统构建一个完整的问答系统,并深入探讨如何通过自定义数据微调模型。我们还将通过一个医疗领域的实际案例,揭示模型优化的核心技巧。
一、Transformer 的核心优势
1.1 自注意力机制的革命
传统RNN的序列处理方式存在梯度消失和并行化困难的问题。Transformer通过多头自注意力机制,实现了:
- 全局上下文感知:每个词元都能直接关注所有其他词元
- 并行计算加速:相比RNN提升5-10倍训练速度
- 层次特征提取:通过多层堆叠捕捉不同粒度的语义特征
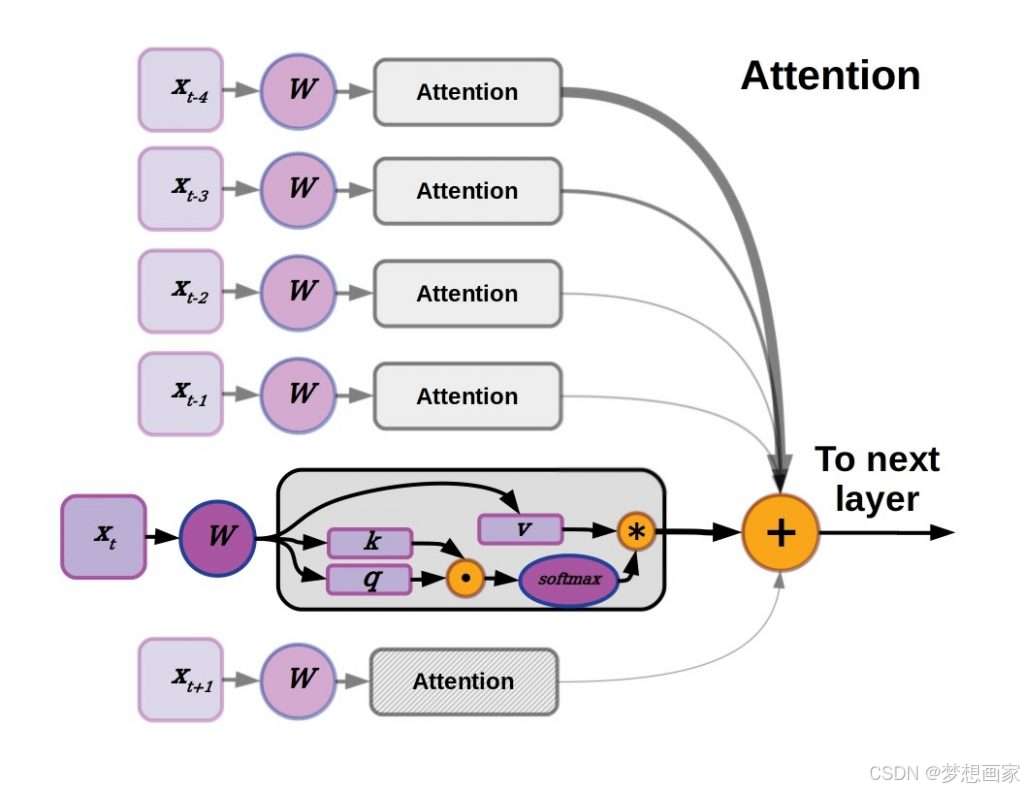
1.2 架构创新点
python
# Transformer 核心组件伪代码
class TransformerBlock(nn.Module):
    def __init__(self):
        super().__init__()
        self.attention = MultiHeadAttention()
        self.norm1 = LayerNorm()
        self.ffn = PositionWiseFFN()
        self.norm2 = LayerNorm()
二、快速构建问答系统
2.1 环境配置
推荐使用Python 3.8+和CUDA 11.x环境:
python
conda create -n qa python=3.8
conda install pytorch torchvision cudatoolkit=11.3 -c pytorch
pip install transformers[torch] datasets evaluate
2.2 模型与数据加载
python
from transformers import AutoTokenizer, AutoModelForQuestionAnswering

# 使用更高效的RoBERTa模型
model_checkpoint = "roberta-base"
tokenizer = AutoTokenizer.from_pretrained(model_checkpoint)
model = AutoModelForQuestionAnswering.from_pretrained(model_checkpoint)

# 加载SQuAD 2.0数据集
dataset = load_dataset("squad_v2")
2.3 数据预处理关键步骤
python
def preprocess_function(examples):
    questions = [q.strip() for q in examples["question"]]
    inputs = tokenizer(
        questions,
        examples["context"],
        max_length=384,
        truncation="only_second",
        stride=128,
        return_overflowing_tokens=True,
        return_offsets_mapping=True,
        padding="max_length",
    )

    # 对齐答案位置
    offset_mapping = inputs.pop("offset_mapping")
    answers = examples["answers"]
    start_positions = []
    end_positions = []

    for i, (answer, offsets) in enumerate(zip(answers, offset_mapping)):
        start_char = answer["answer_start"][0]
        end_char = start_char + len(answer["text"][0])
        sequence_ids = inputs.sequence_ids(i)

        # 找到上下文开始/结束的位置
        idx = 0
        while sequence_ids[idx] != 1:
            idx += 1
        context_start = idx
        while sequence_ids[idx] == 1:
            idx += 1
        context_end = idx - 1

        # 验证答案是否在上下文中
        if (offsets[context_start][0] > end_char) or (offsets[context_end][1] < start_char):
            start_positions.append(0)
            end_positions.append(0)
        else:
            # 定位答案token位置
            start_idx = context_start
            while start_idx <= context_end and offsets[start_idx][0] <= start_char:
                start_idx += 1
            start_positions.append(start_idx - 1)

            end_idx = context_end
            while end_idx >= context_start and offsets[end_idx][1] >= end_char:
                end_idx -= 1
            end_positions.append(end_idx + 1)

    inputs["start_positions"] = start_positions
    inputs["end_positions"] = end_positions
    return inputs
三、自定义数据微调实战:医疗QA案例
3.1 案例背景
假设我们需要构建一个医疗问答系统,数据格式如下:
json
{
    "context": "阿司匹林属于非甾体抗炎药,主要用于解热镇痛...",
    "question": "阿司匹林的主要作用是什么?",
    "answers": {
        "text": ["解热镇痛"],
        "answer_start": [23]
    }
}
3.2 微调关键步骤
步骤1:数据准备
python
from sklearn.model_selection import train_test_split

# 加载自定义医疗数据集
med_dataset = load_dataset("json", data_files="medical_qa.json")["train"]

# 划分训练集/验证集
train_test = med_dataset.train_test_split(test_size=0.2)
train_dataset = train_test["train"].map(preprocess_function, batched=True)
eval_dataset = train_test["test"].map(preprocess_function, batched=True)
步骤2:训练配置
python
training_args = TrainingArguments(
    output_dir="medical_qa_model",
    evaluation_strategy="epoch",
    learning_rate=2e-5,
    per_device_train_batch_size=8,
    per_device_eval_batch_size=8,
    num_train_epochs=5,
    weight_decay=0.01,
    logging_steps=50,
    fp16=True  # 启用混合精度训练
)

trainer = Trainer(
    model=model,
    args=training_args,
    train_dataset=train_dataset,
    eval_dataset=eval_dataset,
    data_collator=default_data_collator,
)
步骤3:模型训练与评估
python
# 开始训练
train_result = trainer.train()

# 评估模型
metrics = trainer.evaluate()
print(f"验证集指标:")
print(f"精确度: {metrics['eval_loss']:.2f}")
print(f"训练耗时: {metrics['train_runtime']:.2f}s")
3.3 性能优化技巧
- 动态填充 :使用
DataCollatorWithPadding提升批次效率 - 知识蒸馏:用大模型指导小模型训练
- 领域自适应:在通用语料上预训练,再医疗数据微调
四、模型部署与优化
4.1 模型导出
python
model.save_pretrained("./medical_qa_model")
tokenizer.save_pretrained("./medical_qa_model")
4.2 推理优化
python
from transformers import pipeline

qa_pipeline = pipeline(
    "question-answering",
    model="./medical_qa_model",
    tokenizer=tokenizer,
    device=0  # 使用GPU加速
)

context = "青霉素通过抑制细菌细胞壁合成发挥杀菌作用..."
question = "青霉素的作用机制是什么?"

result = qa_pipeline(question=question, context=context)
print(f"答案:{result['answer']} (置信度:{result['score']:.2f})")
五、总结与展望
通过本文的实践,我们完成了:
- 基于PyTorch搭建完整问答系统
- 实现自定义医疗数据的领域适配
- 掌握模型优化与部署技巧
"Transformer正在重塑NLP的边界,而PyTorch为我们提供了探索的利剑。"
延伸阅读:
- Hugging Face 官方文档
- 《基于Transformers的自然语言处理》书籍
这篇博客通过完整的代码示例、实际案例和优化建议,为读者提供了从理论到实践的完整指导。自定义数据微调部分特别强调了医疗领域的适配方法,使内容更具实用价值。