kubekey -实现懒人一键部署K8S集群
操作步骤
一、执行以下命令快速创建一个 Kubernetes 集群。
Master节点 如果您访问 GitHub/Googleapis 受限,请登录 Linux 主机,执行以下命令设置下载区域。
[root@test ~]# export KKZONE=cnMaster节点 执行以下命令安装⼯具 KubeKey。
下载完成后当前目录下将生成 KubeKey 二进制文件 kk。
[root@test ~]# curl -sfL https://get-kk.kubesphere.io | sh -每一个节点都要 执行以下命令安装依赖项。
[root@test ~]# apt install socat conntrack -yMaster节点 执行以下命令快速创建一个 Kubernetes 集群。
单节点k8s:
   [root@test ~]#./kk create cluster --with-local-storage  --with-kubernetes v1.31.0 --container-manager containerd  -y

   集群模式:
创建config模板:
   [root@test ~]# ./kk create config
   Generate KubeKey config file successfully
   [root@test ~]#
   [root@test ~]# cat config-sample.yaml
   apiVersion: kubekey.kubesphere.io/v1alpha2
   kind: Cluster
   metadata:
     name: sample
   spec:
     hosts:  		# 根据集群规模架构情况填写,我这里是 一主两从 架构
     - {name: k8s-master, address: 11.0.1.10, internalAddress: 11.0.1.10, user: root, password: "000000"}
     - {name: k8s-node01, address: 11.0.1.11, internalAddress: 11.0.1.11, user: root, password: "000000"}
     - {name: k8s-node02, address: 11.0.1.12, internalAddress: 11.0.1.12, user: root, password: "000000"}
     roleGroups:							# 填写对应的主机名称
       etcd:
       - k8s-master
       control-plane:
       - k8s-master
       worker:
       - k8s-node01
       - k8s-node02
     controlPlaneEndpoint:
       ## Internal loadbalancer for apiservers
       # internalLoadbalancer: haproxy		# 高可用架构 可以把这里打开,

       domain: lb.kubesphere.local
       address: ""
       port: 6443
     kubernetes:
       version: v1.31.0
       clusterName: cluster.local
       autoRenewCerts: true
       containerManager: docker
     etcd:
       type: kubekey
     network:
       plugin: calico
       kubePodsCIDR: 10.233.64.0/18		# 可以使用默认情况,也可以自定义,这里使用默认
       kubeServiceCIDR: 10.233.0.0/18
       ## multus support. https://github.com/k8snetworkplumbingwg/multus-cni
       multusCNI:
         enabled: false
     registry:
       privateRegistry: ""
       namespaceOverride: ""
       registryMirrors: []
       insecureRegistries: []
     addons: []
创建集群:
[root@test ~]#./kk create cluster ^C config-sample.yaml运行后会对安装依赖项进行检查
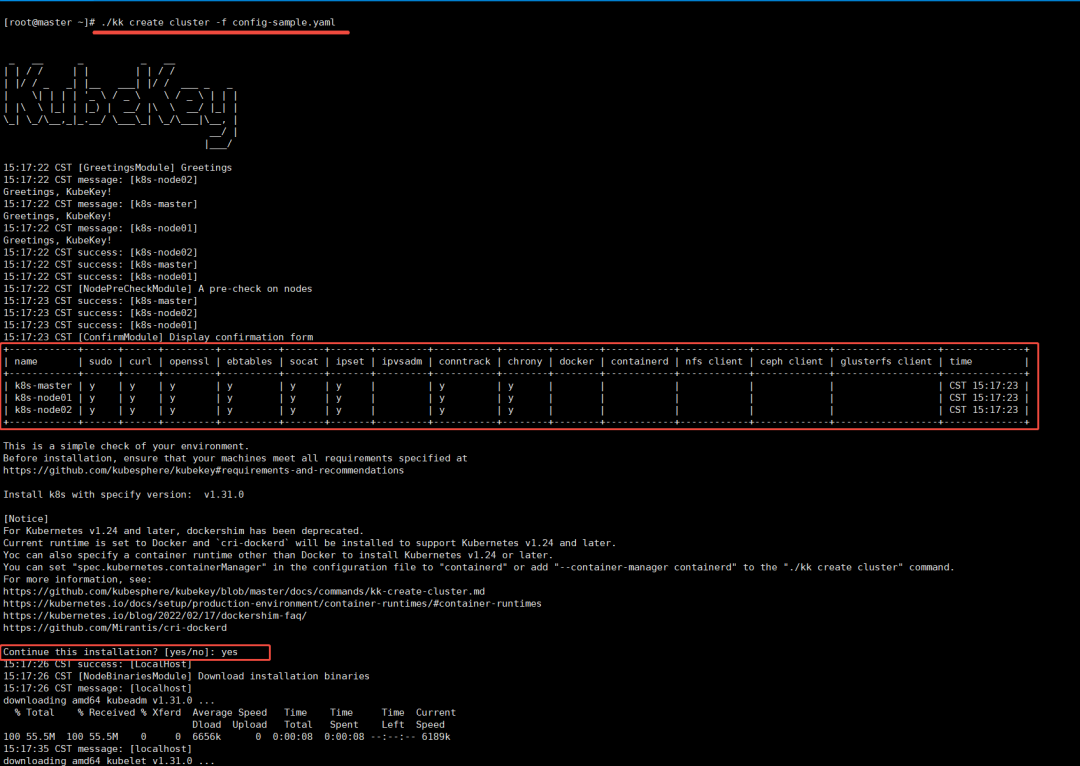
检查集群部署情况
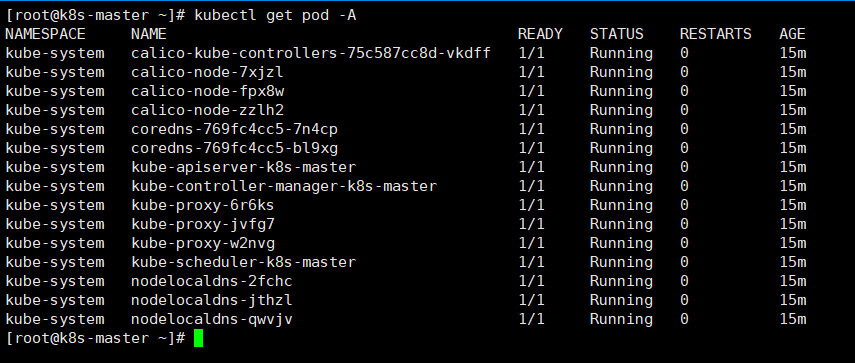
提示: kubectl get pod -A 说明集群已部署完成
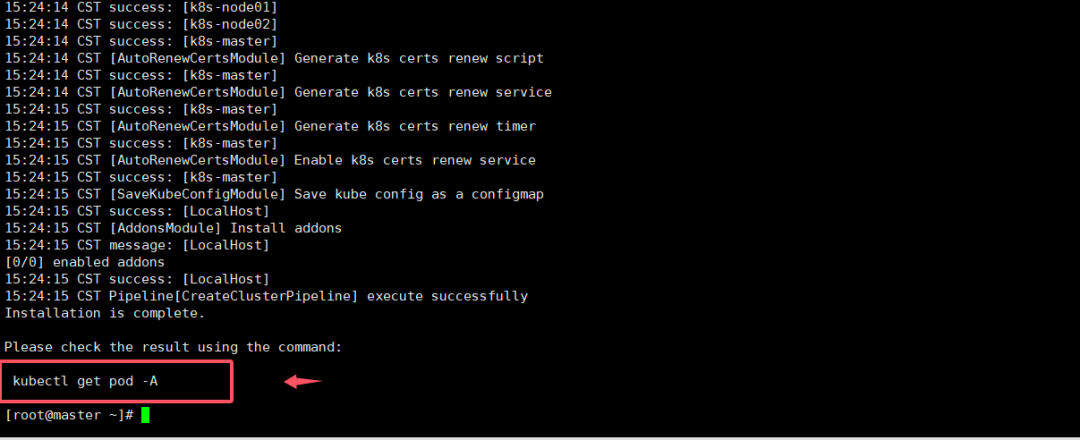
到此集群部署完毕