#作者:闫乾苓
文章目录
- [基于日志的模式(Journal-based Mode)](#基于日志的模式(Journal-based Mode))
基于日志的模式(Journal-based Mode)
工作原理
- 在这种模式下,使用RBD的日志功能来确保集群之间的点时间一致性(point-in-time, crash-consistent)复制。
- 每次对RBD镜像的写操作首先会被记录到关联的日志中,然后才会修改实际的镜像数据。
- 远程集群会从这个关联的日志中读取并重放这些更新到其本地副本。
优点:
- 一致性:由于每次写操作都会被记录到日志中,确保了数据的一致性和可靠性。
- 实时性:能够提供接近实时的复制,适合需要高一致性的应用场景。
缺点:
- 性能影响:每次写操作会导致两次写入(一次到日志,一次到实际镜像),这会使写延迟几乎翻倍。
- 资源消耗:额外的日志记录增加了存储开销和系统复杂度。
适用场景:
对数据一致性和实时性要求较高的应用,如数据库、虚拟机等。
部署步骤
-
在两个ceph集群上登录到cephadm shell
[root@ceph01 ~]# cephadm shell
[root@ceph-a ~]# cephadm shell -
在site-b集群上,在集群中ceph-b节点部署 rbd-mirror 守护进程
[ceph: root@ceph-a /]# ceph orch apply rbd-mirror ceph-b
Scheduled rbd-mirror update... -
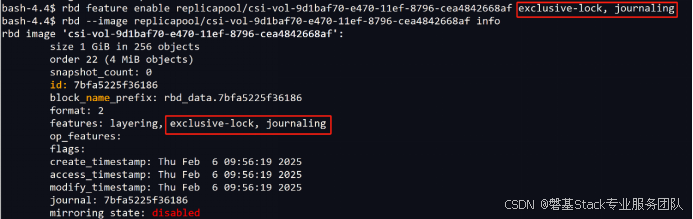
在源集群site-a新建1个存储池名为data,并启用 RBD 应用程序,在池data中创建1个名为image1的image,并同时开启exclusive-lock,journaling特性。
[ceph: root@ceph01 /]# ceph osd pool create data
pool 'data' created
[ceph: root@ceph01 /]# ceph osd pool application enable data rbd
enabled application 'rbd' on pool 'data'
[ceph: root@ceph01 /]# rbd create --size 1024 data/image1 --image-feature exclusive-lock,journaling
如果时在创建镜像时没有使用--image-feature 开启exclusive-lock,journaling,可以使用以下命令开启日志功能
rbd feature enable data/image1 exclusive-lock, journaling
要默认在所有新镜像中启用日志,请使用 ceph config set 命令设置配置参数
[ceph: root@ceph01 /]# ceph config set global rbd_default_features 125
[ceph: root@ceph01 /]# ceph config show mon.ceph01 rbd_default_features-
在目标集群site-b新建1个同名存储池data,并启用 RBD 应用程序,不用创建image
[ceph: root@ceph-a /]# ceph osd pool create data
pool 'data' created
[ceph: root@ceph-a /]# ceph osd pool application enable data rbd
enabled application 'rbd' on pool 'data' -
在site-a,site-b两个存储集群中选择 mirroring 模式为pool
[ceph: root@ceph01 /]# rbd mirror pool enable data pool
[ceph: root@ceph-a /]# rbd mirror pool enable data pool -
验证两个集群都已成功启用了镜像模式为pool
[ceph: root@ceph01 /]# rbd mirror pool info data
Mode: pool
Site Name: 0978cb18-dc68-11ef-b0d7-000c29460ffd
Peer Sites: none[ceph: root@ceph-a /]# rbd mirror pool info data
Mode: pool
Site Name: baedc6c0-e058-11ef-a23a-000c29cf8329
Peer Sites: none -
在sete-a集群创建 Ceph 用户帐户,并将存储集群对等注册到池,将 bootstrap 令牌文件复制到site-b存储集群。
[ceph: root@ceph01 /]# rbd mirror pool peer bootstrap create --site-name site-a data > /root/bootstrap_token_site-a
-
在site-b存储集群中导入bootstrap令牌
[ceph: root@ceph-a /]# rbd mirror pool peer bootstrap import --site-name site-b --direction rx-only data /root/bootstrap_token_site-a
注意:对于单向 RBD 镜像功能,必须使用--direction rx-only参数,因为在引导 对等时双向镜像是默认设置。
-
site-a集群验证镜像同步复制状态
[ceph: root@ceph01 /]# rbd mirror image status data/image1
image1:
global_id: ac758896-99ba-4f43-b225-1563ebb6b742 -
site-b集群验证镜像状态
[ceph: root@ceph-a /]# rbd mirror image status data/image1
image1:
global_id: ac758896-99ba-4f43-b225-1563ebb6b742
state: up+replaying
description: replaying, {"bytes_per_second":17.5,"entries_behind_primary":0,"entries_per_second":0.2,"non_primary_position":{"entry_tid":3,"object_number":3,"tag_tid":1},"primary_position":{"entry_tid":3,"object_number":3,"tag_tid":1}}
service: ceph-b.xyokae on ceph-b
last_update: 2025-02-06 08:01:28
同步复制测试
- 在Euler release 22.10U2 LTS,内核版本5.10.0-153.24.0.100.6.oe2203sp2,rbd版本为16.2.7,和Ubuntu24.04内核版本6.8.0-52-generic,rbd版本为19.2.0的系统中,经反复测试,使用rbd map映射rbd image均不成功。报错如下:


- 为验证是否和使用rbd命令映射方式是否有关,进一步在k8s(v1.19.12)rook部署的ceph集群(17.2.5)提供的storageclass环境中进行验证测试,发现rook部署的ceph的storageclass默认值开启了layering

手动开启exclusive-lock, journaling
Pod报错,不能挂载volume.

经以上验证,ceph rbd-mirror开启journaling功能还才能确保同步正常,但rbd kernel module目前暂不支持 journaling 高级特性,导致不能映射。所以此同步方案暂时无法使用。
S3对象异地同步复制
关键组件说明
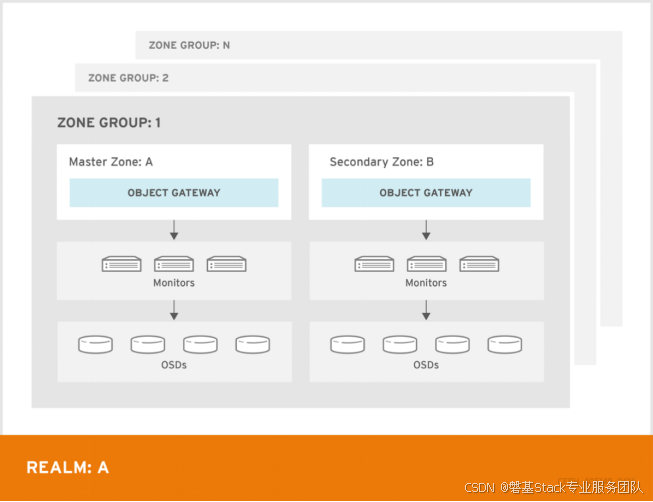
在Ceph RGW的多站点复制架构中,Realm、Zonegroup 和 Zone 是关键的组织结构,用于管理多站点的配置和数据同步
-
Realm(领域):
作用:Realm 是最高层次的逻辑容器,用于管理多个 Zonegroups 和 Zones。
特点:
- 每个 Realm 包含一个或多个 Zonegroups。
- Realm 是全局唯一的,用于标识一个独立的多站点复制环境。
- Realm 的配置(如 Zonegroup 和 Zone 的映射)在所有站点之间同步。
-
Zonegroup(区域组) :
作用:Zonegroup 是逻辑上的区域分组,通常对应一个地理区域(如一个国家或大洲)。特点:
-
每个 Zonegroup 包含一个或多个 Zones。
-
Zonegroup 可以配置为支持多站点复制。
-
一个 Zonegroup 中只能有一个 Primary Zone,其他 Zones 是 Secondary Zones。
-
Zone(区域) :
作用:Zone 是实际的存储区域,对应一个 Ceph 集群。特点:
- 每个 Zone 包含一个 RGW 实例和一个 RADOS 存储集群。
- Zone 可以是 Primary Zone(处理写请求)或 Secondary Zone(只读,同步数据)。
- 数据通过异步复制在 Zones 之间同步。
-
RGW (Rados Gateway):
作用 :RGW 是 Ceph 的 S3 兼容对象存储网关,负责处理客户端的请求。
特点:- 在 Primary Zone 中,RGW 处理写请求并生成操作日志。
- 在 Secondary Zone 中,RGW 接收并重放日志以同步数据。
-
RADOS (Ceph 存储集群) :
作用:RADOS 是 Ceph 的分布式存储核心,负责实际存储数据。特点:
-
每个 Zone 都有自己的 RADOS 集群。
-
数据在 RADOS 集群之间通过 RGW 的日志机制同步。
数据流说明
- 客户端向 Primary Zone 的 RGW 发送写请求。
- Primary Zone 的 RGW 将数据写入本地 RADOS 集群,并生成操作日志。
- 操作日志通过异步复制机制同步到 Secondary Zone 的 RGW。
- Secondary Zone 的 RGW 重放日志,将数据写入本地 RADOS 集群。
- 如果存在多个 Secondary Zones,日志会同步到所有 Secondary Zones。
部署步骤
配置主区域
-
部署rgw服务
[root@ceph01 ~]# cephadm shell
[ceph: root@ceph01 /]# ceph orch host label add ceph01 rgw
Added label rgw to host ceph01
[ceph: root@ceph01 /]# ceph orch apply rgw rgw-test --placement="label:rgw count-per-host:1" --port=80
Scheduled rgw.rgw-test update...
[ceph: root@ceph01 /]# ceph orch ps --daemon_type rgw

-
创建一个领域
ceph: root@ceph01 /# radosgw-admin realm create --rgw-realm=rgw-realm-1 --default
-
创建主区域组
一个领域必须至少有一个区域组作为该领域的主区域组
ceph: root@ceph01 /# radosgw-admin zonegroup create
--rgw-zonegroup=zonegroup1
--endpoints=http://192.168.61.11:80
--rgw-realm=rgw-realm-1
--master --default
-
创建主区域
ceph: root@ceph01 /# radosgw-admin zone create
--rgw-zonegroup=zonegroup1
--rgw-zone=zonegroup1-zone1
--master --default
--endpoints=http://192.168.61.11:80
-
删除默认区域组和区域(可选)
以下步骤假设多站点配置使用尚未存储数据的新安装系统。
如果您已使用default该区域存储数据,请勿删除该区域及其池,否则数据将被删除且无法恢复。
如果存在default区域,请删除它。首先将其从默认区域组中删除
radosgw-admin zonegroup delete --rgw-zonegroup=default --rgw-zone=default
radosgw-admin period update --commit
radosgw-admin zone delete --rgw-zone=default
radosgw-admin period update --commit
radosgw-admin zonegroup delete --rgw-zonegroup=default
radosgw-admin period update --commit
如果Ceph存储集群中存在default池,请删除它们。
开启删除开关,否则会提示无法删除
[ceph: root@ceph01 /]# ceph config set mon mon_allow_pool_delete true

ceph osd pool rm default.rgw.control default.rgw.control --yes-i-really-really-mean-it
ceph osd pool rm default.rgw.data.root default.rgw.data.root --yes-i-really-really-mean-it
ceph osd pool rm default.rgw.gc default.rgw.gc --yes-i-really-really-mean-it
ceph osd pool rm default.rgw.log default.rgw.log --yes-i-really-really-mean-it
ceph osd pool rm default.rgw.users.uid default.rgw.users.uid --yes-i-really-really-mean-it-
创建系统用户
守护ceph-radosgw进程必须在提取realm领域和period周期信息之前进行身份验证。在主区域中,创建一个"系统用户"以方便守护进程之间的身份验证。
记下access_key和secret_key。辅助区域需要它们根据主区域进行身份验证。[ceph: root@ceph01 /]# radosgw-admin user create --uid="sync-user" --display-name="Sync User" --system
{
"user_id": "sync-user",
"display_name": "Sync User","keys": [ { "user": "sync-user", "access_key": "1VJ4SIXDJ2AK1RTC2END", "secret_key": "CkfKaVFP1KFG1IE08bl6yTAbQyLqlqQTALG07Q8k", "active": true, "create_date": "2025-02-09T12:26:43.916705Z"
将系统用户添加到主区域:
ceph: root@ceph01 /# radosgw-admin zone modify
--rgw-zone=zonegroup1-zone1
--access-key=1VJ4SIXDJ2AK1RTC2END
--secret=CkfKaVFP1KFG1IE08bl6yTAbQyLqlqQTALG07Q8k
-
更新period期限
更新主区域配置后,更新周期。
ceph: root@ceph01 /# radosgw-admin period update --commit
更新周期会改变纪元,并确保其他区域将收到更新的配置。
-
更新 Ceph 配置文件
通过将配置选项rgw_zone和主区域的名称添加到实例条目来更新主区域主机上的 Ceph 配置文件
/etc/ceph/ceph.conf 增加如下内容:
[client.rgw.ceph01]
host = ceph01
rgw frontends = "ceph_rgw_web port=80"
rgw_zone=zonegroup1-zone1 -
启动网关,使配置变更生效。
在对象网关主机上(ceph01)(非cephadm shell),重启 Ceph 对象网关服务:
root@ceph01 \~# systemctl restart (systemctl list-units \|awk '/rgw/ {print 1}')
配置次要区域
区域组内的区域会复制所有数据,以确保每个区域的数据相同。
创建辅助区域时,请在指定为辅助区域提供服务的主机上运行下列操作。
要添加第二个次要区域(即,已包含次要区域的区域组中的第二个非主区域),请按照添加次要区域的相同步骤操作。请确保指定与第一个次要区域不同的区域名称。
元数据操作(例如,创建用户)必须在主区域内的主机上运行。
存储桶操作可以由主区域或辅助区域接收,但辅助区域会将存储桶操作重定向到主区域。如果主区域关闭,存储桶操作将失败。
-
部署rgw服务
[root@ceph-a ~]# cephadm shell
[ceph: root@ceph-a /]# ceph orch host label add ceph-a rgw
Added label rgw to host ceph-a
[ceph: root@ceph-a /]# ceph orch apply rgw rgw-test --placement="label:rgw count-per-host:1" --port=80
Scheduled rgw.rgw-test update...

-
拉取 Realm 配置
需指定主区域组中主区域的 URL 路径、access-key和secret-key用于将领域配置拉取到主机。
拉取非默认领域的配置时,请使用 --rgw-realm或--realm-id配置选项指定领域。
拉取领域配置还会检索远程的当时期epoch配置,并使其成为此主机上的当前时期。[ceph: root@ceph-a /]# radosgw-admin realm pull
--url=http://192.168.61.11:80 \
--access-key=1VJ4SIXDJ2AK1RTC2END
--secret-key=CkfKaVFP1KFG1IE08bl6yTAbQyLqlqQTALG07Q8k
{
"id": "609faf9b-309f-42d7-af11-f5881a869163",
"name": "rgw-realm-1",
"current_period": "826d16fc-1b21-4439-b866-6cc482497ec2",
"epoch": 2
}
2025-02-09T12:37:07.992+0000 7ff94db4a7c0 1 Set the period's master zonegroup zonegroup1 as the default
如果此领域是唯一的领域,请运行以下命令使其成为默认领域:
[ceph: root@ceph-a /]# radosgw-admin realm default --rgw-realm=rgw-realm-1-
创建辅助区域
创建区域时,它必须位于区域内的Ceph对象网关节点上
指定区域组 ID、新区域名称和区域的端点。
请勿使用--master或--default标志。
从 Kraken 开始,所有区域默认以主动-主动配置运行,这意味着网关客户端可以将数据写入任何区域,并且该区域将数据复制到区域组内的所有其他区域。
如果要阻止辅助区域接受写入操作,请--read-only在命令中包含标志,以便在主区域和辅助区域之间创建主动-被动配置。
无论如何,不要忘记提供存储在主区域组的主区域中的生成的系统用户的access_key和secret_key。[ceph: root@ceph-a /]# radosgw-admin zone create
--rgw-zonegroup=zonegroup1
--rgw-zone=zonegroup1-zone2
--access-key=1VJ4SIXDJ2AK1RTC2END
--secret=CkfKaVFP1KFG1IE08bl6yTAbQyLqlqQTALG07Q8k
--endpoints=http://192.168.61.31:80
以下步骤假设多站点配置使用新安装且尚未开始存储数据的系统。
如果您已使用该区域或其池来存储数据,请勿删除该 default 区域或其池,否则数据将不可挽回地丢失。
如果需要,删除默认区域:
[ceph: root@ceph-a /]# radosgw-admin zone delete --rgw-zone=default
2025-02-09T12:39:32.402+0000 7f23283c77c0  0 NOTICE: removed master_zone of zonegroup default
2025-02-09T12:39:32.405+0000 7f23283c77c0  0 Removed zone from zonegroup default
开启删除开关,否则会提示无法删除
[ceph: root@ceph01 /]# ceph config set mon mon_allow_pool_delete true如果需要,删除 Ceph 存储集群中的默认池:
ceph osd pool rm default.rgw.control default.rgw.control --yes-i-really-really-mean-it
ceph osd pool rm default.rgw.data.root default.rgw.data.root --yes-i-really-really-mean-it
ceph osd pool rm default.rgw.gc default.rgw.gc --yes-i-really-really-mean-it
ceph osd pool rm default.rgw.log default.rgw.log --yes-i-really-really-mean-it
ceph osd pool rm default.rgw.users.uid default.rgw.users.uid --yes-i-really-really-mean-it-
更新 Ceph 配置文件 /etc/ceph/ceph.conf
[client.rgw.ceph-a]
host = ceph-a
rgw frontends = "ceph_rgw_web port=80"
rgw_zone=zonegroup1-zone2 -
更新辅助区域配置后,更新周期:
[ceph: root@ceph-a /]# radosgw-admin period update --commit
更新周期会改变纪元,并确保其他区域将收到更新的配置
-
重启网关服务
在对象网关主机上(ceph-a)(非cephadm shell),启动并启用 Ceph 对象网关服务:[root@ceph-a ~]# systemctl restart (systemctl list-units |awk '/rgw/ {print 1}')
-
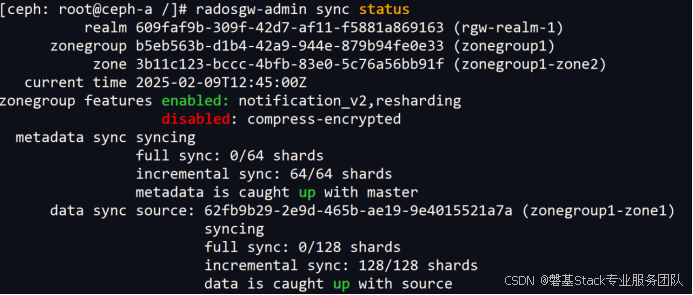
检查同步状态
[ceph: root@ceph-a /]# radosgw-admin sync status
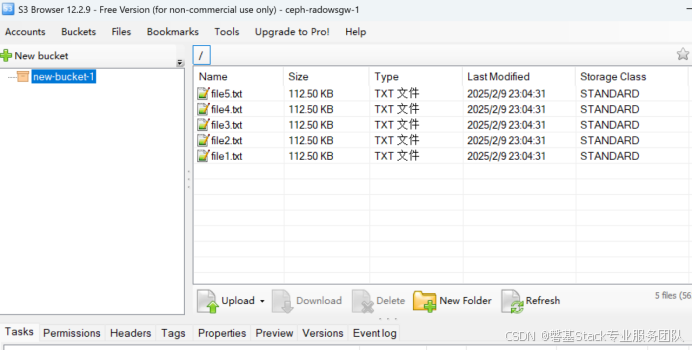
S3对象文件同步测试
使用window系统下的S3 Browser工具软件进行测试。
安装完成后打开配置账号,可以使用上面章节中创建的用于同步的账户sync-user的access_key和secret_key。
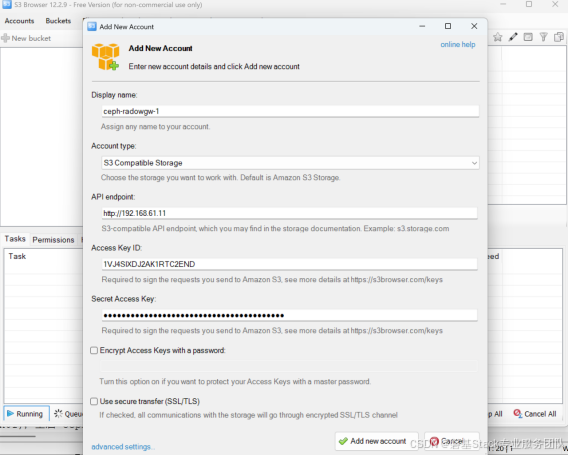
创建2个账户,对应2个ceph集群。
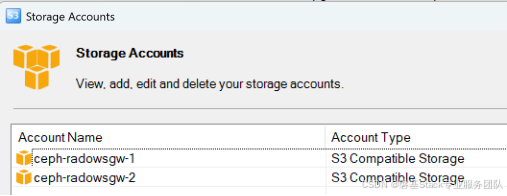
在集群1中创建bucket,上传文件,切换到集群2,可以看到bucket及文件已经同步。
在集群2中创建bucket并上传文件,切换到集群2,文件也是可以同步的。