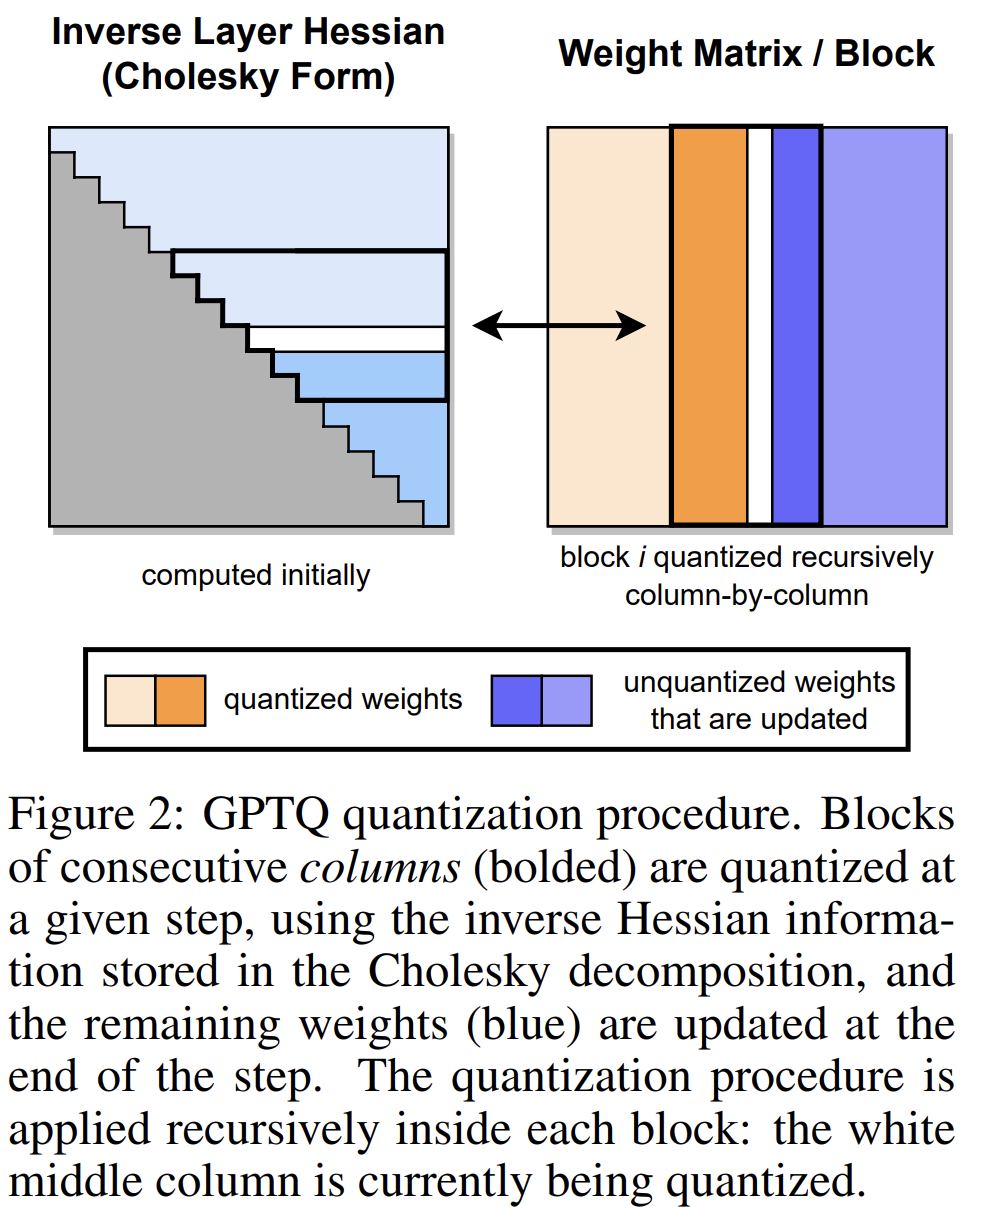
GPTQ是一种用于类GPT线性最小二乘法的量化方法,它使用基于近似二阶信息的一次加权量化。
本文中也展示了如何使用量化模型以及如何量化自己的模型AutoGPTQ。
AutoGPTQ:一个易于使用的LLM量化包,带有用户友好的API,基于GPTQ算法(仅权重量化)。
目录
[GPTQ与Hugging Face transformers的使用](#GPTQ与Hugging Face transformers的使用)
GPTQ与Hugging Face transformers的使用
注意
使用Qwen2.5 GPTQ官方型号
transformers。请确保
optimum>=1.20.0和兼容版本的transformers和auto_gptq已安装。
pip install -U "optimum>=1.20.0"
现在,transformers已经正式支持AutoGPTQ,这意味着可以通过transformers使用量化模型。对于Qwen2.5的每个尺寸,提供Int4和Int8 GPTQ量化模型。下面是一个非常简单的代码片段,展示了如何运行Qwen2.5-7B-Instruct-GPTQ-Int4:
python
from transformers import AutoModelForCausalLM, AutoTokenizer

model_name = "Qwen/Qwen2.5-7B-Instruct-GPTQ-Int4"

model = AutoModelForCausalLM.from_pretrained(
    model_name,
    device_map="auto"
)
tokenizer = AutoTokenizer.from_pretrained(model_name)

prompt = "Give me a short introduction to large language model."
messages = [
    {"role": "system", "content": "You are Qwen, created by Alibaba Cloud. You are a helpful assistant."},
    {"role": "user", "content": prompt},
]
text = tokenizer.apply_chat_template(
    messages,
    tokenize=False,
    add_generation_prompt=True,
)
model_inputs = tokenizer([text], return_tensors="pt").to(model.device)

generated_ids = model.generate(
    **model_inputs,
    max_new_tokens=512,
)
generated_ids = [
    output_ids[len(input_ids):] for input_ids, output_ids in zip(model_inputs.input_ids, generated_ids)
]

response = tokenizer.batch_decode(generated_ids, skip_special_tokens=True)[0]
结合vLLM使用GPTQ模型
vLLM支持GPTQ ,这意味着可以直接使用提供的GPTQ模型或那些用VLLM训练的模型。如果可能,它会自动使用GPTQ Marlin内核,这样效率更高。
实际上,用法与vLLM的基本用法相同。提供了一个简单的例子说明如何用vLLM和Qwen2.5-7B-Instruct-GPTQ-Int4:
在shell中运行以下命令,启动与OpenAI兼容的API服务:
python
vllm serve Qwen2.5-7B-Instruct-GPTQ-Int4然后,可以像这样调用API:
python
curl http://localhost:8000/v1/chat/completions -H "Content-Type: application/json" -d '{
  "model": "Qwen2.5-7B-Instruct-GPTQ-Int4",
  "messages": [
    {"role": "system", "content": "You are Qwen, created by Alibaba Cloud. You are a helpful assistant."},
    {"role": "user", "content": "Tell me something about large language models."}
  ],
  "temperature": 0.7,
  "top_p": 0.8,
  "repetition_penalty": 1.05,
  "max_tokens": 512
}'
或者可以使用API客户端,如下所示:
python
from openai import OpenAI

openai_api_key = "EMPTY"
openai_api_base = "http://localhost:8000/v1"

client = OpenAI(
    api_key=openai_api_key,
    base_url=openai_api_base,
)

chat_response = client.chat.completions.create(
    model="Qwen2.5-7B-Instruct-GPTQ-Int4",
    messages=[
        {"role": "system", "content": "You are Qwen, created by Alibaba Cloud. You are a helpful assistant."},
        {"role": "user", "content": "Tell me something about large language models."},
    ],
    temperature=0.7,
    top_p=0.8,
    max_tokens=512,
    extra_body={
        "repetition_penalty": 1.05,
    },
)
print("Chat response:", chat_response)
用AutoGPTQ量化自己的模型
如果需要把自己的模型量化成GPTQ量化模型,建议使用AutoGPTQ。建议通过从源代码安装来安装最新版本的软件包:
python
git clone https://github.com/AutoGPTQ/AutoGPTQ
cd AutoGPTQ
pip install -e .假设已经使用自己的数据集对模型Qwen2.5-7B进行了微调,它被命名为Qwen2.5-7B-finetuned,要构建自己的GPTQ量化模型,需要使用训练数据进行校准。下面,提供一个简单的示例。
python
from auto_gptq import AutoGPTQForCausalLM, BaseQuantizeConfig
from transformers import AutoTokenizer

# Specify paths and hyperparameters for quantization
model_path = "your_model_path"
quant_path = "your_quantized_model_path"
quantize_config = BaseQuantizeConfig(
    bits=8, # 4 or 8
    group_size=128,
    damp_percent=0.01,
    desc_act=False,  # set to False can significantly speed up inference but the perplexity may slightly bad
    static_groups=False,
    sym=True,
    true_sequential=True,
    model_name_or_path=None,
    model_file_base_name="model"
)
max_len = 8192

# Load your tokenizer and model with AutoGPTQ
# To learn about loading model to multiple GPUs,
# visit https://github.com/AutoGPTQ/AutoGPTQ/blob/main/docs/tutorial/02-Advanced-Model-Loading-and-Best-Practice.md
tokenizer = AutoTokenizer.from_pretrained(model_path)
model = AutoGPTQForCausalLM.from_pretrained(model_path, quantize_config)但是,如果想在多个GPU上加载模型,需要使用max_memory代替device_map。这里有一个例子:
python
model = AutoGPTQForCausalLM.from_pretrained(
    model_path,
    quantize_config,
    max_memory={i: "20GB" for i in range(4)}
)
然后,需要为校准准备数据。需要做的只是把样本放到一个列表中,每个样本都是一个文本。由于直接使用微调数据进行校准,首先用ChatML模板对其进行格式化。举个例子:
python
import torch

data = []
for msg in dataset:
    text = tokenizer.apply_chat_template(msg, tokenize=False, add_generation_prompt=False)
    model_inputs = tokenizer([text])
    input_ids = torch.tensor(model_inputs.input_ids[:max_len], dtype=torch.int)
data.append(dict(input_ids=input_ids, attention_mask=input_ids.ne(tokenizer.pad_token_id)))其中每个msg是一条典型的聊天消息,如下所示:
python
[
    {"role": "system", "content": "You are Qwen, created by Alibaba Cloud. You are a helpful assistant."},
    {"role": "user", "content": "Tell me who you are."},
    {"role": "assistant", "content": "I am a large language model named Qwen..."}
]
然后通过一行代码运行校准过程:
python
import logging

logging.basicConfig(
    format="%(asctime)s %(levelname)s [%(name)s] %(message)s", level=logging.INFO, datefmt="%Y-%m-%d %H:%M:%S"
)
model.quantize(data, cache_examples_on_gpu=False)
最后,保存量化模型:
python
model.save_quantized(quant_path, use_safetensors=True)
tokenizer.save_pretrained(quant_path)save_quantized方法不支持分片 。对于分片,需要加载模型并使用save_pretrained来保存和分割模型。
至此,本文的内容结束啦。