一、Configuration介绍
Configuration主要用于描述当前设备的各种配置信息,比如屏幕尺寸、方向、字体缩放、语言、UI模式等。系统会在这些配置发生变化时(比如旋转屏幕、切换语言、调整字体大小等)自动通知应用,从而触发 Activity 的 onConfigurationChanged() 或重新创建 Activity。Configuration通常作用如下:
a、描述设备当前状态,如语言、屏幕方向、密度、输入设备等; b、辅助资源选择,决定加载哪些资源(如 layout-sw600dp、values-zh-rCN 等); c、监听配置变更,当配置变化时应用可做出响应; d、设置/覆盖配置,可以用来自定义展示行为(如禁止字体跟随系统变化)。
常用字段解释(部分)
| 字段名 | 含义 |
|---|---|
| fontScale | 字体缩放比例,例如 1.0 表示正常字体,1.5 表示放大 50% |
| orientation | 屏幕方向:ORIENTATION_PORTRAIT(竖屏)、ORIENTATION_LANDSCAPE(横屏) |
| screenWidthDp | 当前屏幕的可用宽度(单位:dp) |
| screenHeightDp | 当前屏幕的可用高度(单位:dp) |
| smallestScreenWidthDp | 最小宽度(设备在任意方向下的最小宽度) |
| locale | 当前语言环境(如 zh_CN、en_US) |
| mcc | 移动网络运营商的国家代码 如:460 → 中国、310 → 美国、440 → 日本 |
| mnc | 运营商代码 如:11 代表中国电信、01 代表中国联通、00 代表中国移动 |
| screenLayout | 屏幕的尺寸、长宽比、方向等组合字段 |
| uiMode | UI 模式,如夜间模式、车载模式、电视模式等 |
| densityDpi | 屏幕的像素密度(DPI),即每英寸像素数。一些常见的DPI级别: ldpi(120dpi)、mdpi(160dpi)、hdpi(240dpi)、xhdpi(320dpi)、xxhdpi(480dpi)、xxxhdpi(640dpi) |
二、Configuration更新
2.1、getResources().updateConfiguration(configuration, displayMetrics)
updateConfiguration()方法中除了configuration,还有个displayMetrics。DisplayMetrics 用于描述屏幕显示属性(如像素宽高、密度、dpi 等)的工具类,常用于适配 UI 显示和计算尺寸。比如dp、sp和px之间的转换,就会用到DisplayMetrics:
kotlin
/**
 * 将sp值转换为px值,保证文字大小不变
 */
fun sp2px(context: Context, spValue: Float): Int {
    val fontScale = context.resources.displayMetrics.scaledDensity
    return (spValue * fontScale + 0.5f).toInt()
}

fun dp2px(context: Context, dp: Float): Int {
    val scale = context.resources.displayMetrics.density
    return (dp * scale + 0.5f).toInt()
}
sp会跟随系统字体大小设置变化,dp不会。比如现在想全局设置项目中字体不跟随系统大小设置变化,可以如下设置:
kotlin
fun unableFontSizeChange(context: Context) {
    val res = context.resources
    val configuration = res.configuration.apply {
        if (fontScale != 1.0f) {
            //强制设置文字大小不跟随系统字体变化
            fontScale = 1.0f
        }
    }
    //更新configuration
    res.updateConfiguration(configuration, res.displayMetrics)
}这样调用之后就会全局设置了。咦?等会!这里好像只改变了configuration.fontScale,而没有修改displayMetrics.scaledDensity这个值呀,难道设置configuration#fontSize也会影响displayMetrics.scaledDensity的值吗?带着这个疑问,我们看下updateConfiguration的源码。getResources().updateConfiguration()内部最终会调用到ResourcesImpl#updateConfiguration():
kotlin
//Resources.java
private ResourcesImpl mResourcesImpl;

public void updateConfiguration(Configuration config, DisplayMetrics metrics) {
    updateConfiguration(config, metrics, null);
}

public void updateConfiguration(Configuration config, DisplayMetrics metrics,
CompatibilityInfo compat) {
    mResourcesImpl.updateConfiguration(config, metrics, compat);
}
scss
//ResourcesImpl.java
public void updateConfiguration(Configuration config, DisplayMetrics metrics, CompatibilityInfo compat) {
    try {
        synchronized (mAccessLock) {
            // 更新 DisplayMetrics,会影响 dp、sp 单位的计算
            if (metrics != null) {
                mMetrics.setTo(metrics);
            }

            // 比较配置变更类型(比如 locale、fontScale、屏幕方向)
            final @Config int configChanges = calcConfigChanges(config);

            // 如果 locales 为空,设置默认 locale
            LocaleList locales = mConfiguration.getLocales();
            if (locales.isEmpty()) {
                locales = LocaleList.getDefault();
                mConfiguration.setLocales(locales);
            }

            // 1、Locale改变:重新匹配最合适的语言
            if ((configChanges & ActivityInfo.CONFIG_LOCALE) != 0) {
            // 如果 locale 数量 > 1,尝试匹配最佳可用 locale
            if (locales.size() > 1) {
                String[] availableLocales = mAssets.getNonSystemLocales();
                if (LocaleList.isPseudoLocalesOnly(availableLocales)) {
                    availableLocales = mAssets.getLocales(); // 使用系统语言列表
                }

                if (availableLocales != null) {
                    final Locale bestLocale = locales.getFirstMatchWithEnglishSupported(availableLocales);
                    if (bestLocale != null && bestLocale != locales.get(0)) {
                        mConfiguration.setLocales(new LocaleList(bestLocale, locales));
                    }
                }
            }
        }

            // 2、设置密度,影响 dp 计算
            if (mConfiguration.densityDpi != Configuration.DENSITY_DPI_UNDEFINED) {
                mMetrics.densityDpi = mConfiguration.densityDpi;
                mMetrics.density = mConfiguration.densityDpi * DisplayMetrics.DENSITY_DEFAULT_SCALE;
            }

            // 3、设置字体缩放密度 scaledDensity,影响 sp 字体大小计算
            mMetrics.scaledDensity = mMetrics.density *
                    (mConfiguration.fontScale != 0 ? mConfiguration.fontScale : 1.0f);

            // 4、设置AssetManager的配置信息(语言、方向、尺寸等)
            mAssets.setConfiguration(
                mConfiguration.mcc,
                mConfiguration.mnc,
                adjustLanguageTag(mConfiguration.getLocales().get(0).toLanguageTag()),
                mConfiguration.orientation,
                mConfiguration.touchscreen,
                mConfiguration.densityDpi,
                mConfiguration.keyboard,
                // 软键盘状态
                (mConfiguration.keyboardHidden == Configuration.KEYBOARDHIDDEN_NO &&
                        mConfiguration.hardKeyboardHidden == Configuration.HARDKEYBOARDHIDDEN_YES)
                ? Configuration.KEYBOARDHIDDEN_SOFT
            : mConfiguration.keyboardHidden,
            mConfiguration.navigation,
            // 宽高像素
            Math.max(mMetrics.widthPixels, mMetrics.heightPixels),
            Math.min(mMetrics.widthPixels, mMetrics.heightPixels),
            // 屏幕 dp 相关
            mConfiguration.smallestScreenWidthDp,
            mConfiguration.screenWidthDp,
            mConfiguration.screenHeightDp,
            mConfiguration.screenLayout,
            mConfiguration.uiMode,
            mConfiguration.colorMode,
            Build.VERSION.RESOURCES_SDK_INT
            );

            // 5、清空各种资源缓存(Drawable、颜色、动画等),确保资源按新 config 重新加载
            mDrawableCache.onConfigurationChange(configChanges);
            mColorDrawableCache.onConfigurationChange(configChanges);
            mComplexColorCache.onConfigurationChange(configChanges);
            mAnimatorCache.onConfigurationChange(configChanges);
            mStateListAnimatorCache.onConfigurationChange(configChanges);
            flushLayoutCache();
        }
    }
}
}这个ResourcesImpl通常是被全局共享,所以ResourcesImpl#updateConfiguration()会影响整个App里的资源加载、字体大小、语言环境等 。看上面3处的代码 mMetrics.scaledDensity = mMetrics.density * (mConfiguration.fontScale != 0 ? mConfiguration.fontScale : 1.0f),果然,Configuration.fontScale会影响mMetrics.scaledDensity 的最终生成,当mConfiguration.fontScale不变时,mMetrics.scaledDensity也不会发生变化了。
2.2、Context.createConfigurationContext()
createConfigurationContext(Configuration overrideConfiguration) 是基于原始 Context 创建一个带有指定Configuration的新Context 实例。这个新 Context 中的 Resources 会根据我们传入的 overrideConfiguration 生效,关键代码如下:
kotlin
//ContextImpl.java
public Context createConfigurationContext(Configuration overrideConfiguration) {
    //...省略其他部分...
    //创建新的Context
    ContextImpl context = new ContextImpl(this, mMainThread, mPackageInfo, mParams,
        mAttributionSource.getAttributionTag(),
        mAttributionSource.getNext(),
        mSplitName, mToken, mUser, mFlags, mClassLoader, null);
    context.mIsConfigurationBasedContext = true;

    final int displayId = getDisplayId();
    final Integer overrideDisplayId = mForceDisplayOverrideInResources
    ? displayId : null;

    //给Context设置Resources
    context.setResources(createResources(mToken, mPackageInfo, mSplitName, overrideDisplayId,
        overrideConfiguration, getDisplayAdjustments(displayId).getCompatibilityInfo(),
        mResources.getLoaders()));
    return context;
}
新的Context并不是修改了原来的Configuration,而是生成了一个新的带配置Configuration的上下文环境,使用示例:
kotlin
override fun attachBaseContext(newBase: Context?) {
    val config = Configuration(newBase?.resources?.configuration).apply {
        fontScale = 1.0f // 固定字体大小
    }
    val context = newBase?.createConfigurationContext(config)
    super.attachBaseContext(context)
}
createConfigurationContext() 不会影响全局 Resources,只是针对这个新 Context 的资源发生变化,是局部生效的。
2.3、两者对比
通过一个示例来看下两者的区别,先给出4个对应的中文、英文资源:


第一个页面里引用了前两个文案,代码如下:
kotlin
class MutableContextWrapperFragment : BaseFragment() {
    private val mContainer1: FrameLayout by id(R.id.fl_container1)
    private val mContainer2: FrameLayout by id(R.id.fl_container2)

    override fun getLayoutId(): Int {
        return R.layout.layout_mutable_context_fragment
    }

    override fun onViewCreated(view: View, savedInstanceState: Bundle?) {
        val context = requireContext()
        addChild(context, mContainer1, R.string.button_text_1)
        addChild(context, mContainer2, R.string.button_text_2)
    }

    private fun addChild(context: Context, parentView: ViewGroup, textId: Int) {
        val button = LayoutInflater.from(context).inflate(R.layout.layout_child_button, parentView, false)
        (button as? Button)?.run {
            setText(textId)
            setOnClickListener {
                MutableContextWrapperFragment2::class.java.canonicalName?.let {
                    CommonFragmentsActivity.start(requireActivity(), it, "MutableContextWrapper示例New")
                }
            }
        }
        parentView.addView(button)
    }
}
第一个页面执行结果如下:
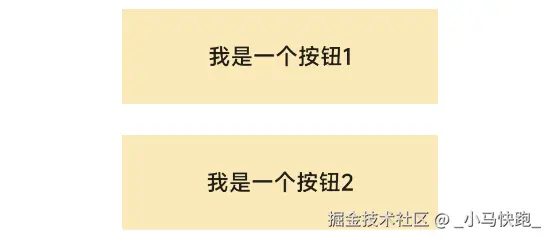
点击其中任何一个按钮会跳到第二个页面:
kotlin
class MutableContextWrapperFragment2 : BaseFragment() {
private val mContainer1: FrameLayout by id(R.id.fl_container1)
private val mContainer2: FrameLayout by id(R.id.fl_container2)
override fun getLayoutId(): Int {
return R.layout.layout_mutable_context_fragment
}
override fun onViewCreated(view: View, savedInstanceState: Bundle?) {
val context = requireContext()
addChild(context, mContainer1, R.string.button_text_3)
//通过createConfigurationContext修改Configuration
val configuration = Configuration().apply {
setLocale(Locale.ENGLISH)
}
val wrapperNew = context.createConfigurationContext(configuration)
addChild(wrapperNew, mContainer2, R.string.button_text_4)
}
private fun addChild(context: Context, parentView: ViewGroup, textId: Int) {
val button = LayoutInflater.from(context).inflate(R.layout.layout_child_button, parentView, false)
(button as? Button)?.setText(textId)
parentView.addView(button)
}
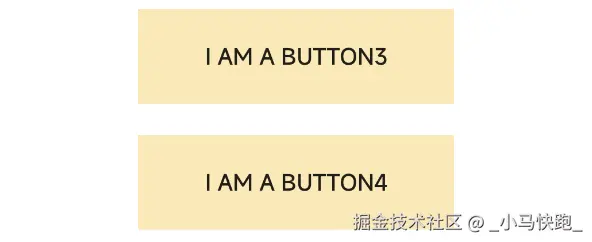
}可以看到在第二个页面中,底部这个按钮通过createConfigurationContext()修改了Configuration中的Locale.ENGLISH,让其优先加载英文资源。执行结果: 
此时退回前一个页面再重进,效果不变,说明createConfigurationContext()的修改是局部的,并不会全局App生效。重新修改一下页面2的代码:
kotlin
//...其他不变...
override fun onViewCreated(view: View, savedInstanceState: Bundle?) {
    val context = requireContext()
    addChild(context, mContainer1, R.string.button_text_3)

    //修改这里!改为updateConfiguration方式,这个会引起全局修改
    val wrapper = MutableContextWrapper(context).apply {
        val configuration = Configuration().apply {
            setLocale(Locale.ENGLISH)
        }
        resources.updateConfiguration(configuration, resources.displayMetrics)
    }
    addChild(wrapper, mContainer2, R.string.button_text_4)
}
可以看到改为updateConfiguration()方式去改变Configuration,其他不变。同样从页面2退到页面1 后再重进页面2,效果如下:
咦,怎么都变成英文了?这是因为前一次在页面2时,通过resources.updateConfiguration已经全局改变了Configuration,导致所有Button都优先去加载英文资源了。此时把页面1、页面2都退了,再重新进页面1时,会发现页面1也受到了影响:
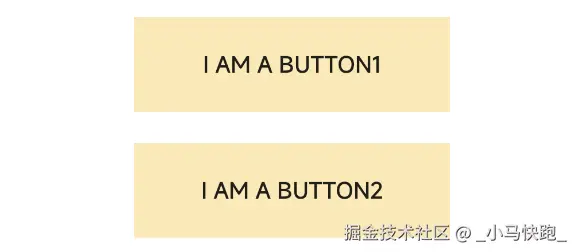
说明resources.updateConfiguration 只要设置一次就会全局更改Configuration。
三、总结
Configuration 是处理多样化设备和国际化的核心类之一。它在系统和开发者之间起到桥梁作用,帮助应用更智能地适配不同环境。更新Configuration时,如果需要更新整个App的范围,考虑使用resources.updateConfiguration()方式;如果只是局部修改,那么选择Context.createConfigurationContext()方式。