前言
这里是对 php 扩展加密的一个入门学习,参考了原作者的开源实现 github.com/lihancong/t...
该项目仅仅几百行代码,实现了 php 扩展加密的基本逻辑,通过该模块可以快速熟悉 php 基于扩展加密的整个处理流程
组件构建
本地的 php 环境是 7.4, 本地调试环境构建可以参考 这里,拉取 tonyenc 项目到本地进行编译的时候提示错误
shell
In file included from /root/develop/tonyenc/tonyenc.c:30:
/root/develop/tonyenc/core.h: In function 'cgi_compile_file':
/root/develop/tonyenc/core.h:86:30: error: 'ZEND_HANDLE_FD' undeclared (first use in this function); did you mean 'ZEND_HANDLE_FP'?
   86 |     if (file_handle->type == ZEND_HANDLE_FD) close(file_handle->handle.fd);
      |                              ^~~~~~~~~~~~~~
      |                              ZEND_HANDLE_FP
/root/develop/tonyenc/core.h:86:30: note: each undeclared identifier is reported only once for each function it appears in
/root/develop/tonyenc/core.h:86:72: error: 'union <anonymous>' has no member named 'fd'; did you mean 'fp'?
   86 |     if (file_handle->type == ZEND_HANDLE_FD) close(file_handle->handle.fd);
      |                                                                        ^~
因为 ZEND_HANDLE_FD 在 7.4 中已经被移除了,修改为如下对 ZEND_HANDLE_STREAM 的处理
diff
root@ubuntu-10-241:~/develop/tonyenc# git diff
diff --git a/core.h b/core.h
index accb22c..1adbd97 100644
--- a/core.h
+++ b/core.h
@@ -83,7 +83,8 @@ zend_op_array *cgi_compile_file(zend_file_handle *file_handle, int type)
         goto final;

     if (file_handle->type == ZEND_HANDLE_FP) fclose(file_handle->handle.fp);
-    if (file_handle->type == ZEND_HANDLE_FD) close(file_handle->handle.fd);
+    //if (file_handle->type == ZEND_HANDLE_FD) close(file_handle->handle.fd);
+    if (file_handle->type == ZEND_HANDLE_STREAM && file_handle->handle.stream.handle) php_stream_close(file_handle->handle.stream.handle);

 #ifdef PHP_WIN32
     file_handle->handle.fp = res;
编译后 make install 后将 tonyenc.so 库文件安装到 php 的 extensions 目录下,还需要修改 php.ini 文件增加 extension=tonyenc.so
加密与解密
代码的加解密函数在 core.h 文件中,完整代码如下,这个加密逻辑比较简单,使用了对称密钥加解密
1、只处理数据中的奇数下标
2、对每个待加密字节,先用一个由 tonyenc_key 派生出来的动态密钥 t 进行 XOR,然后再 NOT
3、加密后的数据直接写回原数组
c
void tonyenc_encode(char *data, size_t len)
{
    size_t i, p = 0;
    for (i = 0; i < len; ++i) {
        if (i & 1) {
            p += tonyenc_key[p] + i;
            p %= sizeof(tonyenc_key);
            u_char t = tonyenc_key[p];
            data[i] = ~(data[i] ^ t);
        }
    }
}

void tonyenc_decode(char *data, size_t len)
{
    size_t i, p = 0;
    for (i = 0; i < len; ++i) {
        if (i & 1) {
            p += tonyenc_key[p] + i;
            p %= sizeof(tonyenc_key);
            u_char t = tonyenc_key[p];
            data[i] = ~data[i] ^ t;
        }
    }
}
整个加密密钥是写在 core.h 文件中的,使用上也可以将密钥提取出来,保存到文件中或者部署到网络中,实现密钥随时替换
基于这种方式的加解密的密钥必须为同一个
待加密文件 hello.php 的代码如下,使用 php tonyenc.php hello.php 对代码进行加密,代码加密后被回写到 hello.php 中
php
<?php

echo "hello world";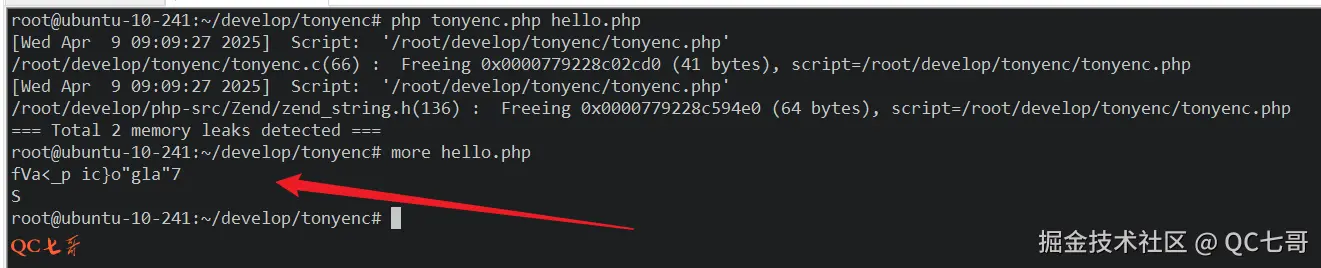
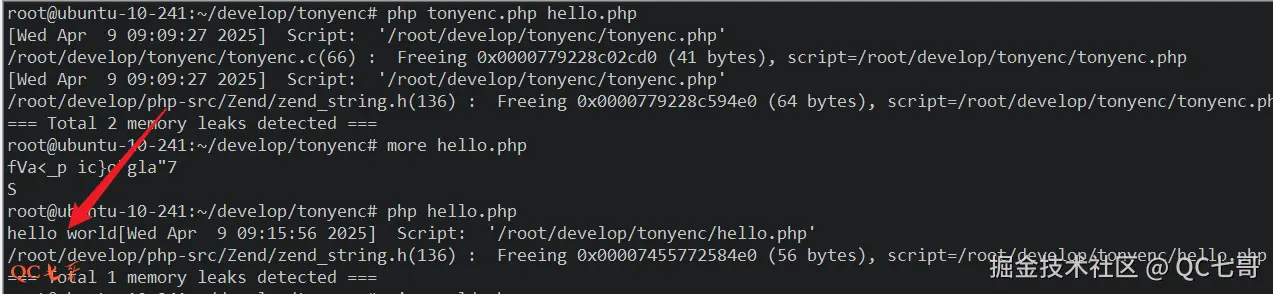
使用 php hello.php 执行加密后的代码,输出 hello world(我本地编译的 php 是调试版本,还输出了额外的调试信息)
组件原理
组件的初始化代码如下,初始化的时候劫持了 php 代码的编译过程,将 zend_compile_file 替换为自定义的 cgi_compile_file 函数
c
PHP_MINIT_FUNCTION(tonyenc)
{
    /* If you have INI entries, uncomment these lines
    REGISTER_INI_ENTRIES();
    */

    old_compile_file = zend_compile_file;
    zend_compile_file = cgi_compile_file;

    return SUCCESS;
}
/* }}} */
在 cgi_compile_file 函数内部,进行了 magic header 的判断是否经过 tonyenc 加密,未加密的交还原来的 zend_compile_file 进行处理
c
if (data_len >= sizeof(tonyenc_header)) {
    char *t = emalloc(sizeof(tonyenc_header));
    size_t read_cnt = fread(t, sizeof(tonyenc_header), 1, fp);
    if (memcmp(t, tonyenc_header, sizeof(tonyenc_header))) {
        efree(t);
        fclose(fp);
        goto final;
    }
    efree(t);
} else {
    fclose(fp);
    goto final;
}
加密的代码经过 tonyenc_ext_fopen 进行处理,在这里对代码进行解密,再将解密结果写入到临时文件中,最后交还给 zend_compile_file
c
    tonyenc_decode(p_data, data_len);

    ......

    *res = tmpfile();
    if (*res == NULL) {
        php_error_docref(NULL, E_CORE_ERROR, "tonyenc: Failed to create temp file, may be too many open files.\n");
        efree(p_data);
        return -1;
    }

    if (fwrite(p_data, data_len, 1, *res) != 1) {
        php_error_docref(NULL, E_CORE_ERROR, "tonyenc: Failed to write temp file.\n");
        efree(p_data);
        fclose(*res);
        return -2;
    }
    rewind(*res);
逆向实现
那解密思路就很清楚了,就是通过 hook 编译 php 代码的函数(zend_compile_file、zend_compile_string等)
这也是这类 php 扩展加密的常规解密思路,当然商业上成熟的 php 加密方案会更复杂,这里只是基本的使用
可以修改 php 的代码,增加 print 将这里的文件内容全部打印出来,也可以调试 php ,在这里挂上断点,将代码抓取出来
又或者使用通用组件(github也有一些开源的),hook 这里的 zend_compile_file 函数,将代码输出到文件中
使用通用组件 hook 该编译函数的话,就会出现有多个组件都 hook 了该编译函数,执行顺序就需要保证
假设有 A、B、C 三个扩展,按 A、B、C 的顺序先后加载,它们都 hook 了 zend_compile_file,代码如下
c
A_orig = zend_compile_file;
zend_compile_file = A_hook;
c
B_orig = zend_compile_file; // 此时是 A_hook
zend_compile_file = B_hook;
c
C_orig = zend_compile_file; // 此时是 B_hook
zend_compile_file = C_hook;
那么最终的调用就变成了 C_hook -> B_hook -> A_hook -> compile_file
也就是说要保证你的 hook 在解密后被调用,你的组件要被先加载,影响组件加载顺序的最简单的就是 php.ini 中的配置
pph 对组件都加载顺序是按 php.ini 文件中的 extension 顺序来处理的,因此只要将通用组件写在加密组件前就可以
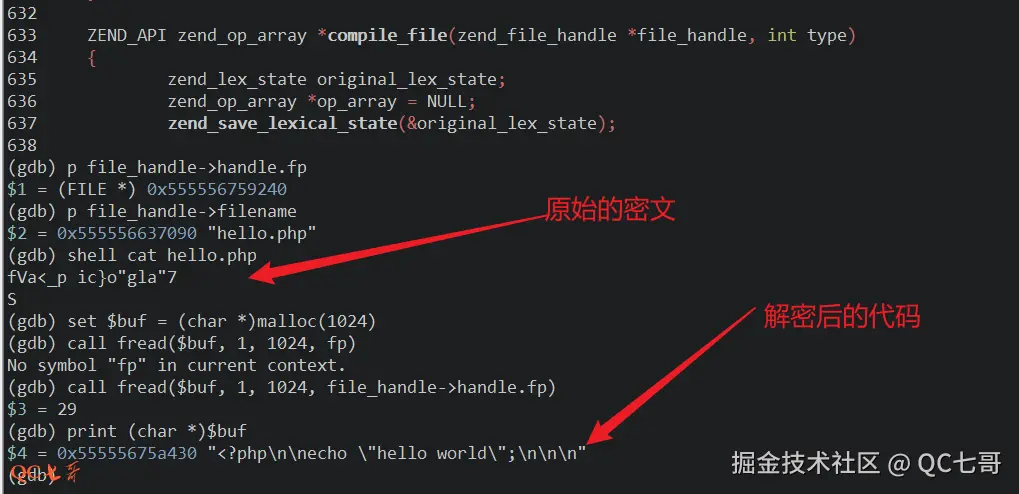
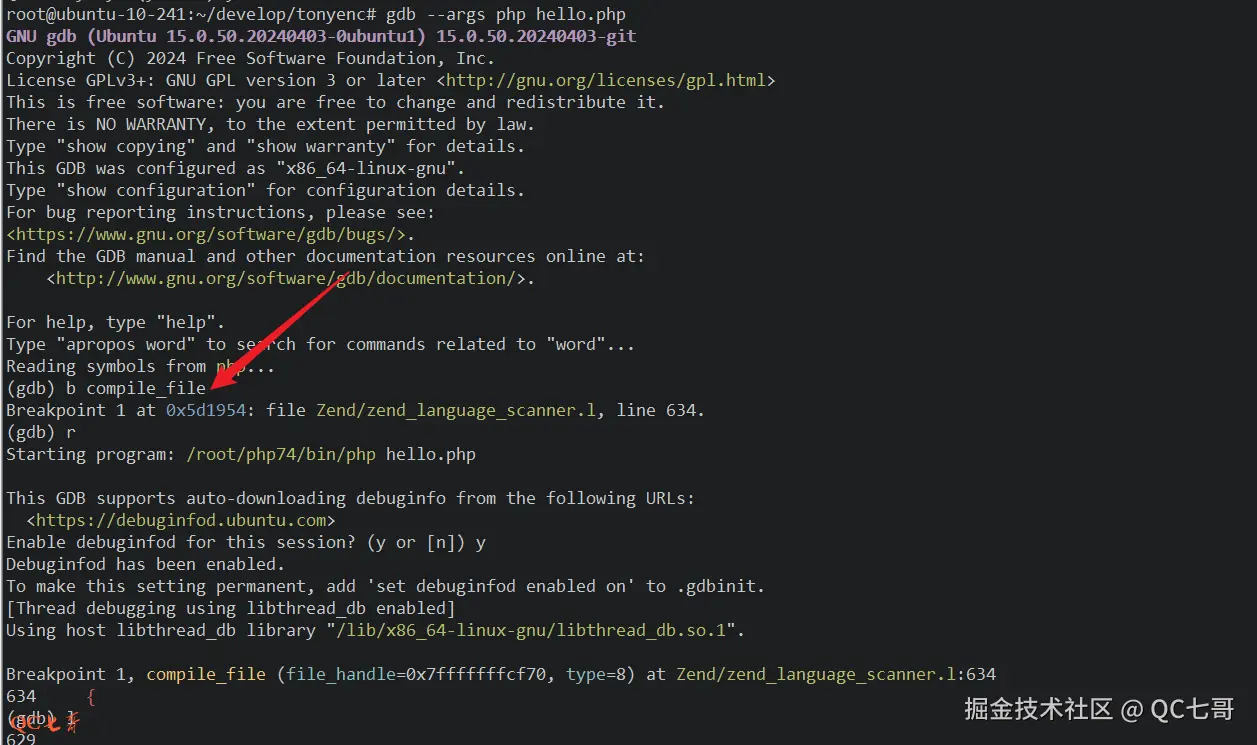
这里使用 gdb 调试的方式打印出 php 的原始代码,gdb --args php hello.php 运行脚本
b compile_file 挂上断点,这个函数已经是在解密之后的 php 逻辑中了,然后 r 运行停在断点位置
这里的 file_handle->handle.fp 就是解密后临时文件的句柄,这个必须是没问题的,不然 compile_file 就没法执行了
file_handle->filename 还是原来的文件名,可以 shell cat hello.php 查看原始文件的内容,可以看到是加密的
这时候源代码已经被解密了,解密后的代码就在 fp 指向的这个临时文件中
通过将 fp 的文件内容读取到一个 buf 缓冲中,然后将其全部打印出来,就可以看到全部的源代码了
shell
set $buf = (char *)malloc(1024)
call fread($buf, 1, 1024, file_handle->handle.fp)
print (char *)$buf