写在前面
install 在实际开发中如果你只是一个简单的业务实现者,那么大部分时间你是用不到install的,因为你用到的基本上都是别人封装好的插件、组件、方法、指令等等,但是如果你需要给公司的架构做建设,install就是你避不开的一个知识,本次我们认识一下install的作用和他的一些使用方法,下面的三个例子均可以不用install进行实现,使用instal仅仅是为了演示用,望知悉。
install 介绍
install 本身不是一个方法,他是vue挂载时约定的一个方法,可以简单的理解为当app.use的时候,那么install的方法就会被调用,这么简单直接的理解也是没错的。
install 创建一个插件
- 创建一个plugin目录
- 创建一个addOne的目录
- 创建一个index.js的文件
js
// 简单写一个加一的操作插件 没有意义 纯演示使用
const addOne = (num) => {
    if (typeof num !== 'number') {
        console.warn('请给整数谢谢🙏');
        return NaN;
    }
    return num + 1;
}

export const addOnePlugin = {
    install: (app) => {
        app.config.globalProperties.$addOne = addOne;
    }
}
install 创建一个组件
- 创建一个components文件夹
- 创建一个GlobleComponent文件夹
- 创建一个index.vue的文件
html
<template>
	<h4>GlobleComponent</h4>
</template>

<script setup>
</script>

<style>
</style>- 创建一个index.js
js
// 仅仅引入一个vue文件,没有意义,演示使用
import GlobleComponent from './index.vue'
export const GlobleComponentInstall = {
	install: (app) => {
		app.component('GlobleComponent', GlobleComponent)
	}
}
install创建一个指令
- 创建一个directives文件夹
- 创建一个CorlorCustom文件夹
- 创建一个index.js的文件
js
// 仅仅是将颜色按照传入的进行更改,没有意义,演示用
export const colorCustom = {
	install: (app) => {
		app.directive('color-custom', {
			mounted(el, binding) {
				binding.value && (el.style.color = binding.value);
			}
		})
	}
}
统一在main.js 中引入使用
js
import { createApp } from 'vue'
import App from './App.vue'
import { router } from './routers/index.js'
// 引入 自定义指令
import {colorCustom } from './directives/CorlorCustom/index.js'
// 引入 自定义插件
import {addOnePlugin} from './plugins/addOne/index.js'
// 引入自定义组件
import {GlobleComponentInstall} from './components/GlobleComponent/index.js'
const app = createApp(App);
app.use(router);
app.use(colorCustom);
app.use(addOnePlugin);
app.use(GlobleComponentInstall);
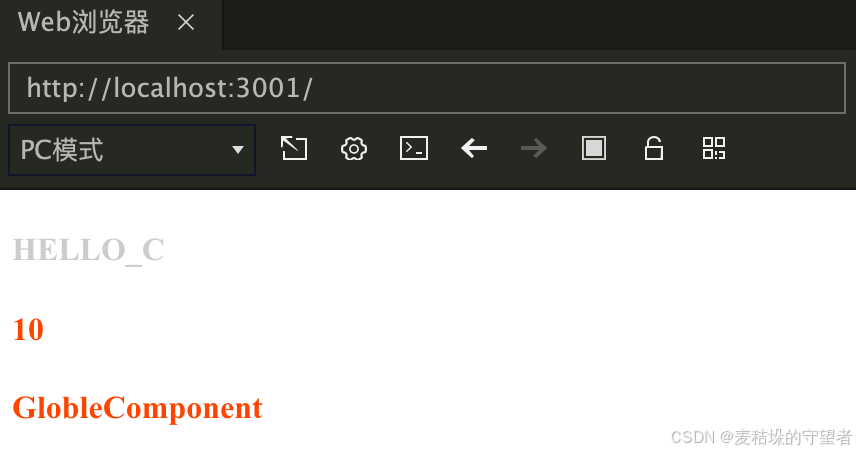
app.mount('#app')页面上使用
html
<template>
  <!-- 使用自定义指令 -->
  <h4 v-color-custom="'#ccc'">HELLO_C</h4>
  <!-- 使用自定义插件 -->
  <h4>{{ optionNum }}</h4>
  <!-- 使用自定义组件 -->
  <GlobleComponent />
</template>

<script setup>
import { onMounted,ref,getCurrentInstance } from "vue";
const { proxy } = getCurrentInstance()

const num = ref(9);
const optionNum =proxy.$addOne(num.value);

</script>

<style scoped>
h4 {
  color: #f40;
}
</style>
效果预览
整体目录结构
