1. slate 是什么
slate 是一个 完全 可定制的用于构建富文本编辑器的框架
在富文本编辑器领域,对其具体的实现方法可以大致分为三种:
- L0 编辑器:依赖 DOM 的
contenteditable属性,基于原生execCommand或者自定义扩展的execCommand去操作 DOM 实现富文内容的修改。比如 CKEditor1-4 、UEditor 、低版本的 wangEditor - L1 编辑器:对 DOM Tree 已经数据的修改操作进行了抽象,使开发者在大部分情况下,不是直接操作的 DOM,使用 L1 框架构建的模型 API 完成。比如 Quill 、ProseMirror 、Draft.js 、Slate
- L2 编辑器:不依赖浏览器的编辑能力,独立实现光标和排版。比如使用 canvas 实现的 Goole Doc 和 svg 实现的 WPS web,实现难度极高
slate 作为 L1 编辑器,提供了 Web 富文本编辑器的底层能力,基于 react 进行渲染可以免去富文本视图层实现和 react 框架之间的 diff
由于 react 的异步渲染机制,实现起来较为复杂,后续代码示例使用 slate-vue3 的实现
1.1 一个简单的例子
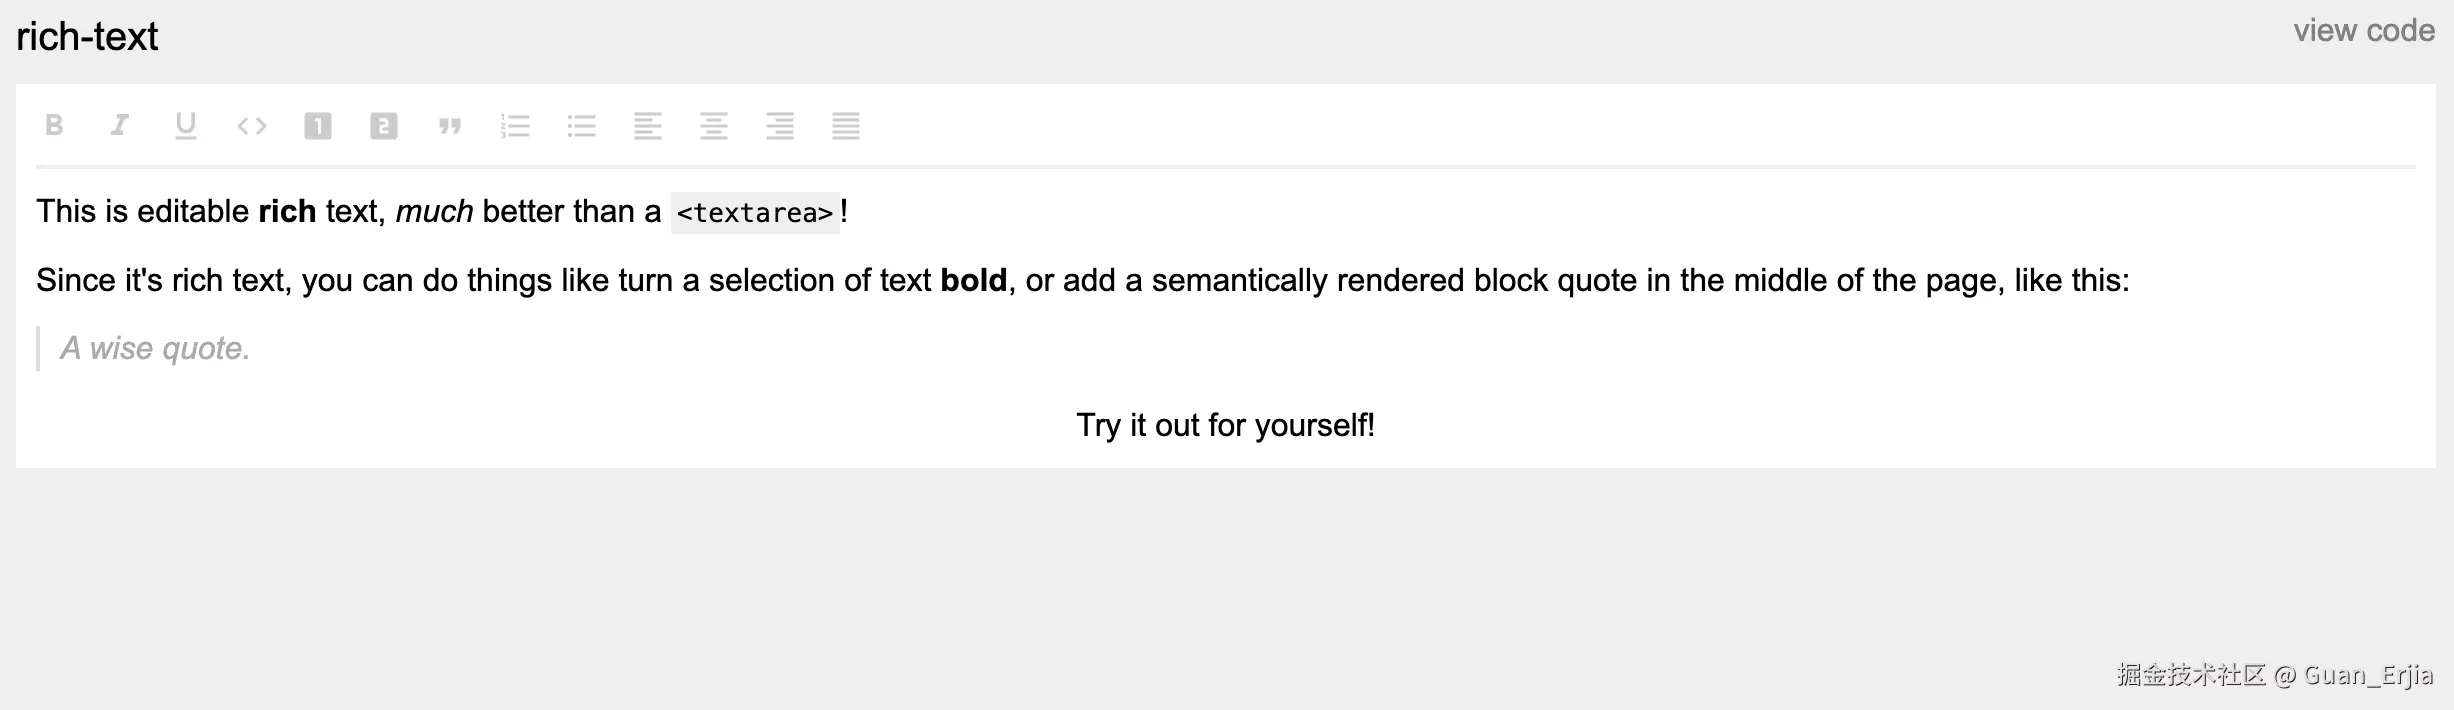
可以从富文本案例开始,先设置一个初始值
typescript
const initialValue: Descendant[] = [
  {
    type: 'paragraph',
    children: [
      { text: 'This is editable ' },
      { text: 'rich', bold: true },
      { text: ' text, ' },
      { text: 'much', italic: true },
      { text: ' better than a ' },
      { text: '<textarea>', code: true },
      { text: '!' },
    ],
  },
  {
    type: 'paragraph',
    children: [
      {text: "Since it's rich text, you can do things like turn a selection of text "},
      {text: 'bold', bold: true },
      {text: ', or add a semantically rendered block quote in the middle of the page, like this:'},
    ],
  }
]
渲染定制化富文本必要的参数:renderElement, renderLeaf
typescript
const renderElement = (props: RenderElementProps) => {
  switch (element.type) {
    case 'block-quote':
      return <blockquote {...attributes}>{children}</blockquote>
    case 'bulleted-list':
      return <ul {...attributes}>{children}</ul>
    case 'heading-one':
      return <h1 {...attributes}>{children}</h1>
    case 'heading-two':
      return <h2 {...attributes}>{children}</h2>
    case 'list-item':
      return <li {...attributes}>{children}</li>
    case 'numbered-list':
      return <ol {...attributes}>{children} </ol>
    default:
      return <p {...attributes}> {children} </p>
      }
 })

const renderLeaf = (props: RenderLeafProps) => {
 if (leaf.bold) {
    children = <strong>{children}</strong>
  }
  if (leaf.code) {
    children = <code>{children}</code>
  }
  if (leaf.italic) {
    children = <em>{children}</em>
  }
  if (leaf.underline) {
    children = <u>{children}</u>
  }
  return <span {...attributes}>{children}</span>
})
有了这两个要素,就可以使用了
html
<script>
const editor = withHistory(withDOM(createEditor()))
editor.children = initialValue
</script>
<template>
  <Slate :editor="editor" :render-element="renderElement" :render-leaf="renderLeaf"
    :render-placeholder="defaultRenderPlaceHolder">
    <Toolbar>
      <MarkButton format="bold" icon="format_bold" />
      .......
      <BlockButton format="justify" icon="format_align_justify" />
    </Toolbar>
    <Editable placeholder="Enter some rich text..." spellcheck />
  </Slate>
</template>
代码省略了一部分,按照官方案例最终渲染出来就是这个效果
可以发现 slate 并不是开箱即用的,需要自己二次开发许多内容,也正是这个特点,使得它的扩展性特别好,许多想要定制开发编辑器的,都会选择基于 slate.js 进行二次开发 (wangEditor5, 在线知识库文档...)
1.2 一个 slate 组件实例
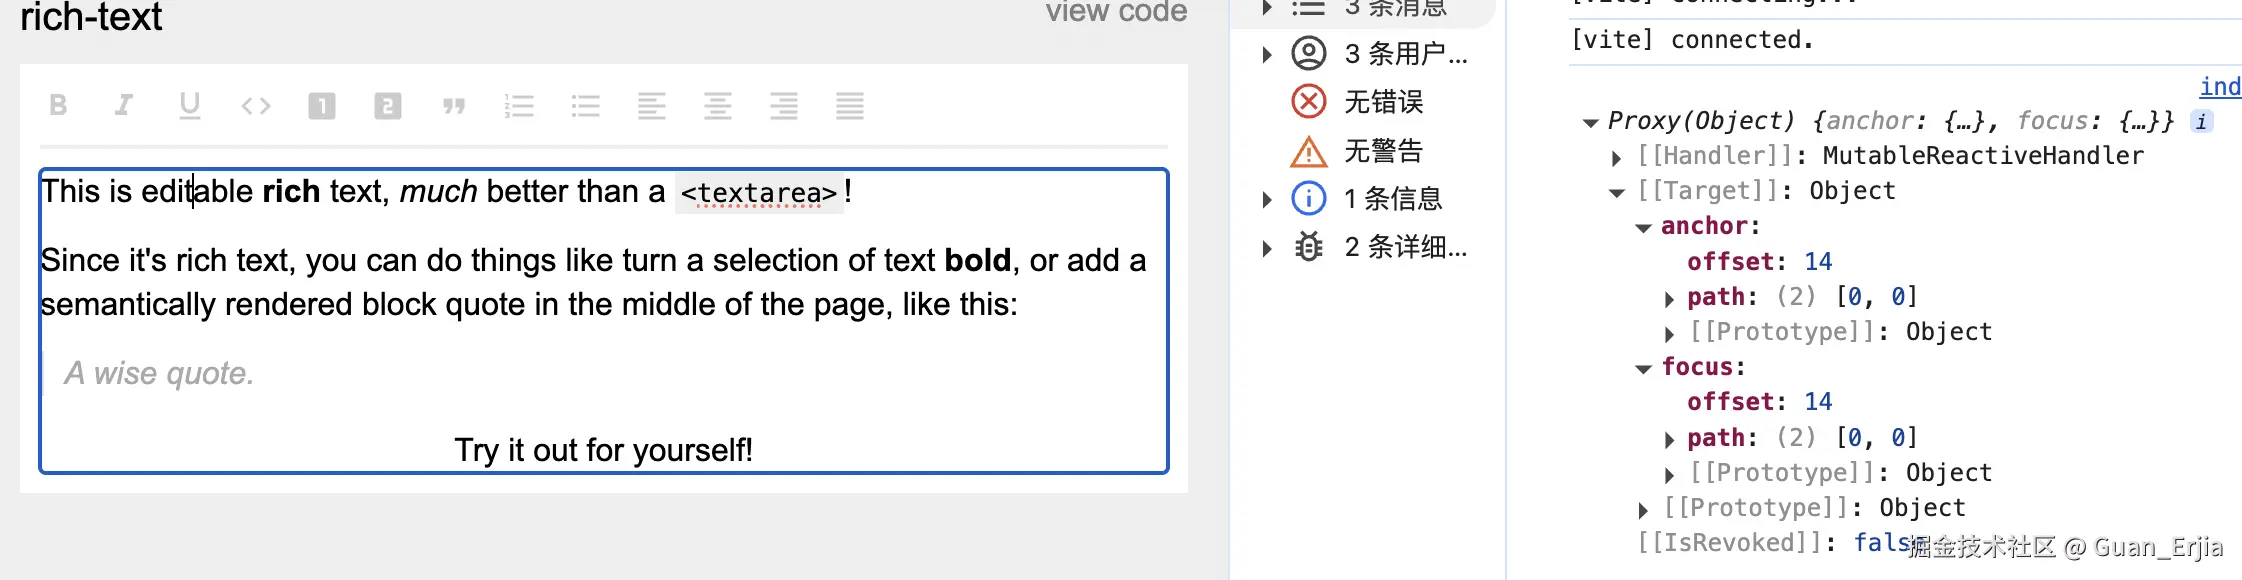
上述的 createEditor 方法返回一个 slate 实例,可以通过控制台打印的方式,将 editor 打印出来
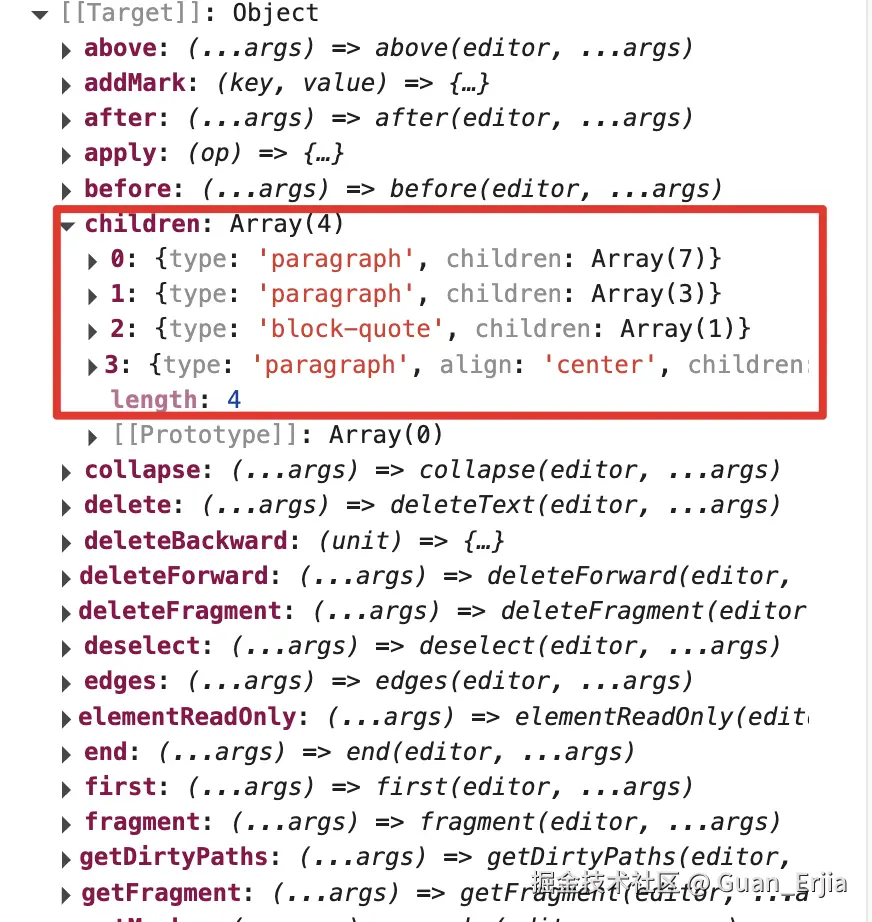
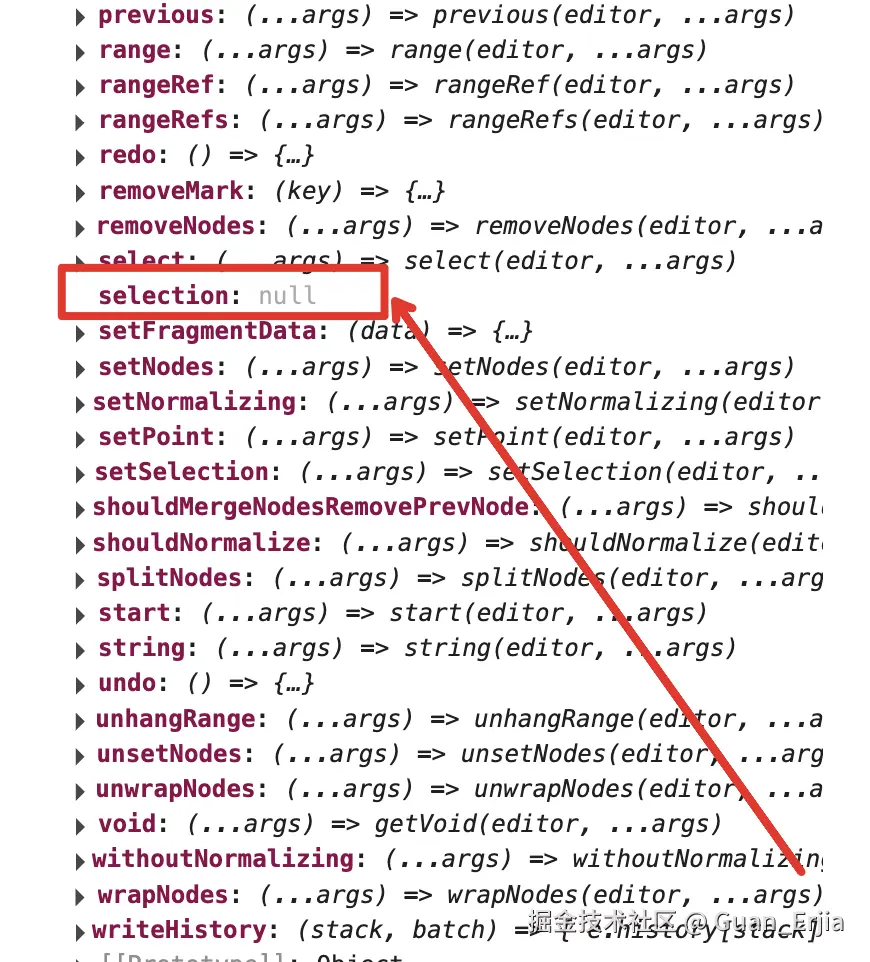
展开后,大多数都是可以直接调用的方法,有两个 key 值为对象 children 和 selection,分别控制子节点和光标
这两个变量储存了 slate 实例的状态,slate 的所有操作,也都是通过修改这两个对象实现的
2. 控制器和接口
2.1 Transform 和 Operation
slate-react 的数据结构是 immutable 的,slate 提供了 Transform 和 Operation 接口用来修改现有的数据模型
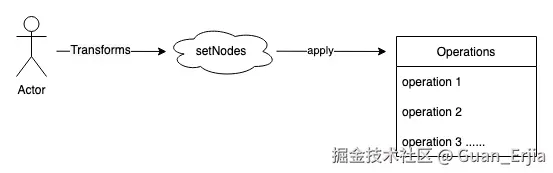
Transform 是已经定制好的一连串操作,每次执行之后会调用一个或多个 Operation,Operation 为操作 slate 状态的基本方法
共有 8 种节点操作:
| 插入节点 | 移除节点 | 插入文本 | 移除文本 | 合并节点 | 切分节点 | 移动节点 | 设置节点 |
|---|---|---|---|---|---|---|---|
| insert_node | remove_node | insert_text | remove_text | merge_node | split_node | move_node | set_node |
共有 3 种光标操作:
- 设置光标位置
- 取消光标选择
- 修改光标位置
sql
    { type: 'set_selection' properties: null newProperties: Range }
    { type: 'set_selection' properties: Partial<Range> newProperties: Partial<Range> }
    { type: 'set_selection' properties: Range newProperties: null }
具体实现可查看:
上述操作覆盖了所有用户行为,在 Transforms,对于上述行为进行组装,以 NodeTransforms.setNodes 为例
typescript
    export const setNodes: NodeTransforms['setNodes'] = (
      editor,
      props: Partial<Node>,
      options = {}
    ) => {
    for (const [node, path] of Editor.nodes(editor, {
      at, match, mode, voids,
    })) {
        const properties: Partial<Node> = {}
        const newProperties: Partial<Node> & { [key: string]: unknown } = {}
          .......
          .......
        editor.apply({
          type: 'set_node',
          path,
          properties,
          newProperties,
        })
      }
    }
经过一系列操作,最终调用 editor 的 apply 方法,设置节点信息
Transform 的操作封装在 slate package 下的 transform 目录下,主要包含了四部分内容:
GeneralTransforms:通过Operation修改编辑器内容的封装,实际上就是对 9 个Operations调用的封装;NodeTransforms:对操作Node高层次的封装;TextTransforms: 专门针对TextNode操作的封装;SelectionTransforms: 专门针对选区修改的封装。
2.2 Plugin
可以通过开发插件的方式,对现有编辑器的默认行为进行修改,或者添加新的方法,下面有两个例子
- 修改默认行为,将图片元素设置为不可编辑
typescript
const withImages = editor => {
  const { isVoid } = editor
  editor.isVoid = element => {
    return element.type === 'image' ? true : isVoid(element)
  }
  return editor
}slate-history库对于现有的编辑器新增了一些方法
typescript
export const withHistory = <T extends Editor>(editor: T) => {
  const e = editor as T & HistoryEditor
  ....
  ....
  e.writeHistory = (stack: 'undos' | 'redos', batch: any) => {
    e.history[stack].push(batch)
  }
  return e
}
这些方法本质就是一个普通函数,传入当前的编辑器实例,返回一个处理后的实例
typescript
const editor = withHistory(withShortcuts(withDOM(createEditor(initialValue))))基于这种方法,能将插件的功能更加细化,便于组合和拆分,可以对于多个插件进行嵌套使用,以上为 markdown 快捷指令官方示例的部分代码
3. 树结构渲染
3.1 节点大致结构
slate 编辑器实例的 children 如下图所示,实际项目中层级有可能多一些,从最上层实例根节点开始,到 Element 节点,然后到 Text 节点
Element子节点可能含有Element节点或Text节点Text节点再往下只能为Leaf节点,有一个或多个(自定义分词语法的情况)- 每个
Leaf节点都只含有一个String节点,这部分渲染不由用户控制,由 slate 框架实现
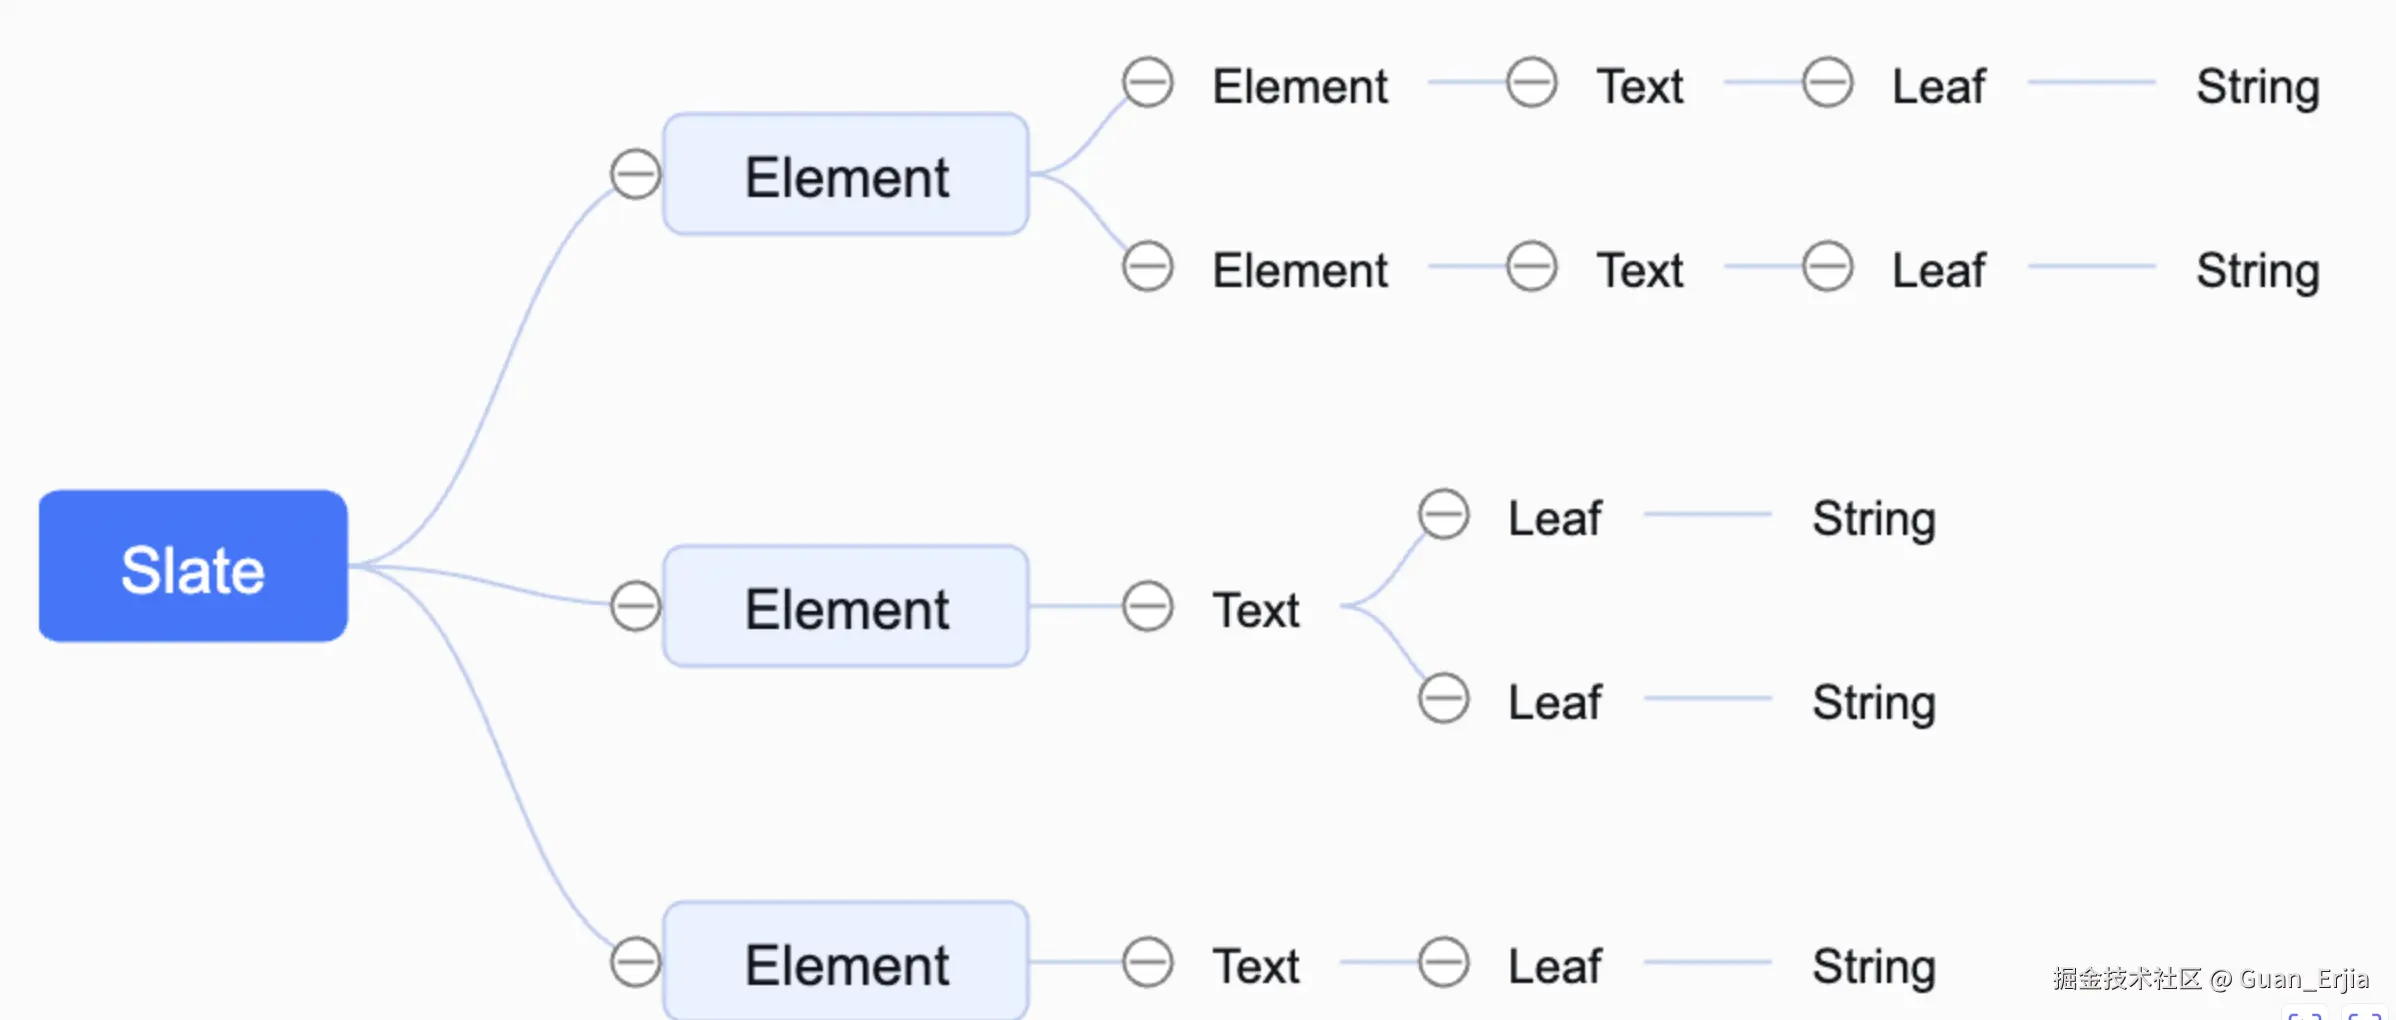
所以一般在使用的时候,只关心到 Text 层级即可:
renderElement函数控制当前Element节点的分叉decorate函数控制Text节点的分叉renderLeaf函数控制Text节点分叉出来的Leaf节点渲染String节点由 slate 框架控制
3.2 修改数据模型
用户在编辑的时候,整个树结构就会跟着发生改变,下图问删除节点示例,其他操作也大致相同 
由于每次修改都是从顶层开始的,会造成大量重复渲染更新,slate-react 使用 immer.js 进行了优化
大概原理就是从最小单元去进行拷贝,没改变的对象数据则进行复用,如果传入节点的指针不发生变化,则组件不会重新渲染
typescript
    const renderElement = ({ attributes, children, element }) => {
        switch (element.type) {
          case 'quote':
            return <blockquote {...attributes}>{children}</blockquote>
          case 'link':
            return <a {...attributes} href={element.url}>
                {children}
              </a>
          default:
            return <p {...attributes}>{children}</p>
        }
      }

    const renderLeaf = ({ attributes, children, leaf }) => {
      return <span
          {...attributes}
          style={{
            fontWeight: leaf.bold ? 'bold' : 'normal',
            fontStyle: leaf.italic ? 'italic' : 'normal',
          }}
        >
          {children}
        </span>
    }
回顾上面提到的渲染函数,都是从 element 中获取当前节点信息,最终返回 JSX.Element,有了 jsx 就可以渲染出真实节点了
3.3 decorate
这部分控制 Text 节点的分叉,如果为函数返回空数组的话,则默认一个 Leaf 节点(没有装饰器拆分区间)


以光标左右不同颜色为例: guan-erjia.github.io/slate-vue3/...
typescript
const decorate = ([node, path]: NodeEntry): DecoratedRange[] => {
  const ranges: DecoratedRange[] = []
  if (node.children.every(Text.isText) && editor.selection) {
    const offset = node.children[0].text.length
    if (Path.isCommon(path, editor.selection.focus.path)) {
      ranges.push({
        anchor: { path, offset: editor.selection.focus.offset },
        focus: { path, offset },
        highlight: true,
      })
    }
    if (Path.isAfter(path, editor.selection.focus.path)) {
      ranges.push({
        anchor: { path, offset: 0 },
        focus: { path, offset },
        highlight: true,
      })
    }
  }
  return ranges
}
与上面的
renderElement和renderLeaf不同的是,这部分返回的是个区间范围和该范围的描述 ,配合renderLeaf获取到这部分描述,即可实现最终的渲染效果
typescript
const renderLeaf = ({ attributes, children, leaf }: RenderLeafProps) =>
    createElement('span', {
      ...attributes,
      style: { backgroundColor: 'highlight' in leaf ? '#ffeeba' : undefined }
}, children)- 此部分虽然重要,但是跟数据模型关系不大,区间拆分是在
Text节点渲染时实现的,并不会影响原始数据模型 - 所以数据模型的终点就是
Text节点,可将其看作一个无状态纯函数 - 用户每次更新节点数据时,
Text节点一定会重新计算decoration,并根据结果更新子节点 - 下层的
Leaf节点和String节点同理 slate-vue3 实现源码如下:github.com/Guan-Erjia/...
typescript
const decorate = useDecorate();
const leaves = computed(() => {
  const elemPath = DOMEditor.findPath(editor, element);
  const textPath = DOMEditor.findPath(editor, text);
  const textDs = decorate([text, textPath]);
  const elemDs = decorate([element, elemPath]);
  const range = Editor.range(editor, textPath);
  elemDs.forEach((dec) => {
    textDs.push(Range.intersection(dec, range)!);
  });
  if (markPlaceholder.value) {
    textDs.unshift(markPlaceholder.value);
  }
  const filterDs = textDs.filter(Boolean);
  return Text.decorations(text, filterDs.length ? filterDs : []);
});
由于
leaves中复杂的计算过程,Text组件下层的子节点数据,和数据模型代理基本脱钩,所以每次修改节点时,Text组件必更新,可以使用函数直接返回VNode,已经没有使用状态组件的必要了
4. 光标和 selection
无论是普通输入,还是选中一片区域之后进行剪切复制等,用户所有的操作必须有作用位置,就是 selection
可以先了解一下 DOM 的 getSelection 方法 developer.mozilla.org/zh-CN/docs/...
4.1 没有选择的时候
 没什么好说的,什么信息都没有,这个时候就是空
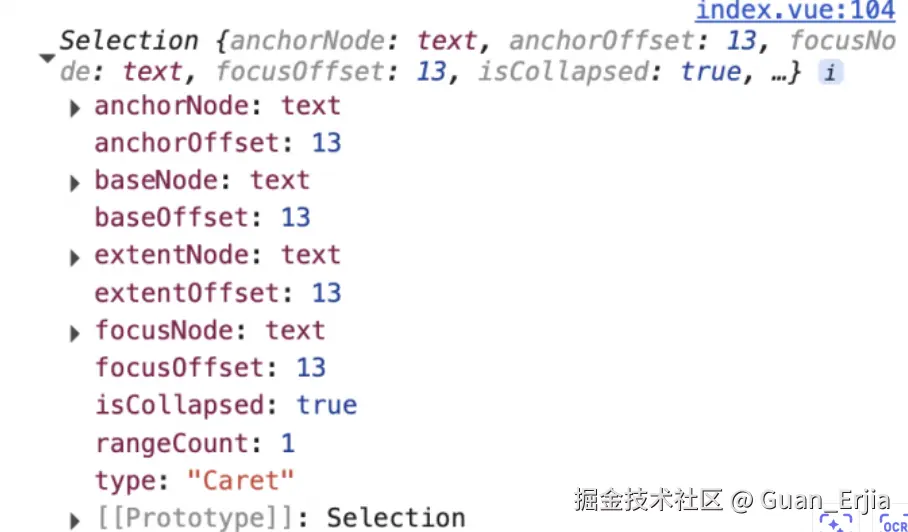
4.2 光标选中一个点
当选中一个点时,获取到的 Selection 有了变化:
anchorNode:起始节点anchorOffset:起始偏移focusNode:聚焦节点focusOffset:聚焦偏移isCollapsed:光标是否重合(很明显目前是的)
通过 getSelection 可以获取到当前选中的节点,和光标相对偏移位置,为 slate 获取虚拟 Selection 创造了可能性
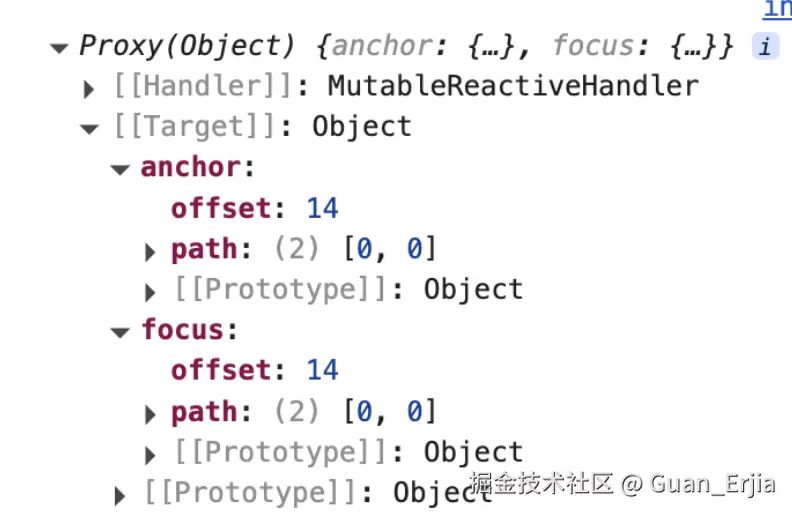
通过打印 editor.selection,可以看出 slate.selection 描述的内容,与 DOM 的 Selection 大致相同,通过 path 可以判断当前节点,offset 与 DOM selection 一致,可以通过某些方式,将 slate 的 selection 映射到真实 DOM 结构上
选中范围的过程与选中单个点类似,再次不赘述
4.3 DOM selection 映射到 slate 路径
用户直接点击某个位置,或使用键盘上下左右移动光标的时候,就需要获取当前光标的 slate 路径
offset 可以从 DOM selection 中获取,目前需要获取 path 数组,path 即当前的节点是父节点的第几个子节点
4.3.1 获取 slate 路径
slate 获取当前节点 path 的方法如下:
- 在渲染时将节点索引储存到
NODE_TO_INDEXWeakmap 中 - 子节点挂载之后,将真实节点的 ref 储存到
ELEMENT_TO_NODEWeakmap 中 - 通过事件的中的真实节点指针,获取到当前 slate 节点指针
- 通过 slate 节点指针,获取到当前索引
- 通过
NODE_TO_PARENT逐层向上递归,依次找到父节点的索引,拼接一起就是当前的 slate 路径
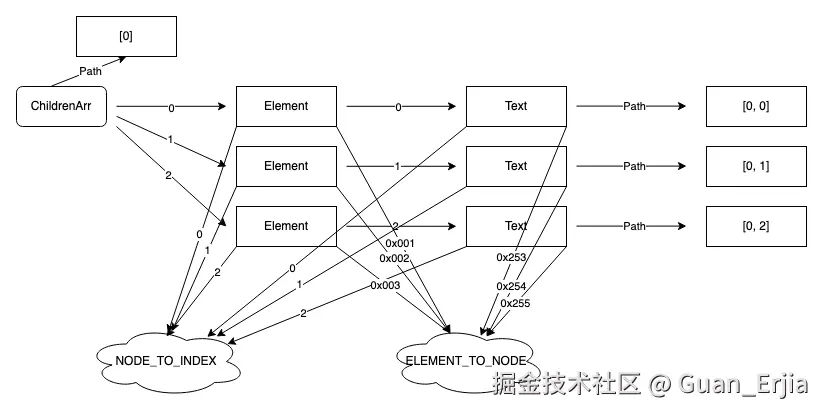
遍历数组时,将节点和索引通过 NODE_TO_INDEX 绑定 github.com/Guan-Erjia/...
typescript
export const ChildrenFC = (element: Element, editor: DOMEditor) =>
  renderList(element.children, (child, i): VNode => {
    // 这些逻辑不会触发多余渲染
    const key = DOMEditor.findKey(editor, child);
    // 组件直接传入索引将不会动态更新,必须通过 NODE_TO_INDEX 手动获取索引
    NODE_TO_INDEX.set(child, i);
    NODE_TO_PARENT.set(child, element);

    return Element.isElement(child)
      ? h(ElementComp, { element: child, key: key.id })
      : h(TextComp, { text: child, element, key: key.id });
  });
4.3.2 绑定真实节点和 slate 节点
使用回调函数的方式传入 ref,获取真实 DOM 指针并存入 ELEMENT_TO_NODE 中 github.com/Guan-Erjia/...
typescript
const elementRef = ref<HTMLElement | null>(null);
onMounted(() => {
  const key = DOMEditor.findKey(editor, element);
  const KEY_TO_ELEMENT = EDITOR_TO_KEY_TO_ELEMENT.get(editor);
  if (elementRef.value) {
    KEY_TO_ELEMENT?.set(key, elementRef.value);
    NODE_TO_ELEMENT.set(element, elementRef.value);
    ELEMENT_TO_NODE.set(elementRef.value, element);
  }
});
onUnmounted(() => {
  const key = DOMEditor.findKey(editor, element);
  const KEY_TO_ELEMENT = EDITOR_TO_KEY_TO_ELEMENT.get(editor);
  KEY_TO_ELEMENT?.delete(key);
  NODE_TO_ELEMENT.delete(element);
});
4.3.3 寻找路径
可以通过 DOM 节点指针获取到 slate 路径过程如下:  github.com/Guan-Erjia/...
typescript
findPath: (editor, node) => {
    const path: Path = []
    let child = node

    while (true) {
      const parent = NODE_TO_PARENT.get(child)
      if (parent == null) {
        if (Editor.isEditor(child)) {
          return path
        } else {
          break
        }
      }

      const i = NODE_TO_INDEX.get(child)
      if (i == null) {
        break
      }
      path.unshift(i)
      child = parent
    }
  }

toSlateNode: (editor, domNode) => {
    return domEl ? ELEMENT_TO_NODE.get(domEl as HTMLElement) : null
}

toSlatePoint: (editor: DOMEditor,domPoint: DOMPoint) => {
    const slateNode = DOMEditor.toSlateNode(editor, textNode!)
    const path = DOMEditor.findPath(editor, slateNode)
    return { path, offset }
}
4.4 slate 路径映射到 DOM Selection
这种行为一般发生在 Operation 之后(例如插入文字), slate 路径与 DOM selection 路径不一致,需要移动 DOM 光标位置,可使用浏览器提供的 setBaseAndExtent 方法
说明参考:developer.mozilla.org/zh-CN/docs/...
anchorNode:锚节点 - 选中内容的开始节点anchorOffset:选中范围内起点位置在锚节点下第几个子节点的位置focusNode:焦点节点 - 选中内容的结尾节点focusOffset:选中范围内结束位置在焦点节点下第几个子节点的位置
目前起始 offset 和焦点 offset 已经有了,只需要起始节点和聚焦节点,需要通过 slate 路径获取真实 DOM 节点

首先通过 Path 获取 slate 节点,遍历当前实例下的 children 树结构即可 github.com/Guan-Erjia/...
typescript
getIf(root: Node, path: Path): Node | undefined {
    let node = root
    for (let i = 0; i < path.length; i++) {
        const p = path[i]
        if (Text.isText(node) || !node.children[p]) {
            return
        }
        node = node.children[p]
    }
    return node
},
获取到节点之后,通过 SlateNode 指针,通过 NODE_TO_ELEMENT 获取绑定过的真实 DOM 节点,见 4.3.2
typescript
onMounted(() => {
  const key = DOMEditor.findKey(editor, element);
  const KEY_TO_ELEMENT = EDITOR_TO_KEY_TO_ELEMENT.get(editor);
  if (elementRef.value) {
    KEY_TO_ELEMENT?.set(key, elementRef.value);
    NODE_TO_ELEMENT.set(element, elementRef.value);
    ELEMENT_TO_NODE.set(elementRef.value, element);
  }
});
onUnmounted(() => {
  const key = DOMEditor.findKey(editor, element);
  const KEY_TO_ELEMENT = EDITOR_TO_KEY_TO_ELEMENT.get(editor);
  KEY_TO_ELEMENT?.delete(key);
  NODE_TO_ELEMENT.delete(element);
    });
const attributes = computed(() => {
  const attr: ElementAttributes = {
    "data-slate-node": "element",
    ref: elementRef,
  };
  ......
  return attr;
});

const renderElement = useRenderElement();
return () => renderElement({
    attributes: attributes.value,
    children: children.value,
    element,
  });
4.5 同步 selection
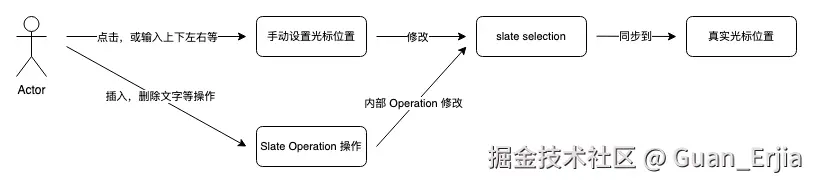
与 MVVM 渲染机制一样,slate 编辑器的光标也是单向受控的,每次 editor 实例的 selection 改变,都会通知编辑器更新光标位置
用户行为收集
5.1 输入、删除行为
通过拦截 beforeInput 事件,调用 Operation 修改数据模型并进行重新渲染
- 使用 event 上的
*preventDefault方法可以阻止用户输入的默认行为 - 根据
inputType调用不同的方法修改数据模型,除了安卓浏览器基本可以覆盖全部交互场景
typescript
const onDOMBeforeInput = (event: InputEvent) => {
  event.preventDefault()
  const { inputType: type } = event
  ......
  switch (type) {
    case 'deleteByComposition':
    case 'deleteByCut':
    case 'deleteByDrag': {
      Editor.deleteFragment(editor)
      break
    }
    ........
  }
  .......
}
剪切、粘贴,拖拽等操作:
同理,需要阻止默认行为,调用 slate 内部方法对模型进行修改,然后借助框架进行渲染更新 github.com/Guan-Erjia/...
typescript
const onCopy = (event: ClipboardEvent) => {
  if (
    DOMEditor.hasSelectableTarget(editor, event.target) &&
    !isEventHandled(event, attributes.onCopy) &&
    !isDOMEventTargetInput(event)
  ) {
    event.preventDefault();
    event.clipboardData &&
      DOMEditor.setFragmentData(editor, event.clipboardData, "copy");
  }
};

const onCut = (event: ClipboardEvent) => {
  if (
    !readOnly &&
    DOMEditor.hasSelectableTarget(editor, event.target) &&
    !isEventHandled(event, attributes.onCut) &&
    !isDOMEventTargetInput(event)
  ) {
    event.preventDefault();
    event.clipboardData &&
      DOMEditor.setFragmentData(editor, event.clipboardData, "cut");
    const selection = editor.selection;

    if (selection) {
      if (Range.isExpanded(selection)) {
        Editor.deleteFragment(editor);
      } else {
        const node = Node.parent(editor, selection.anchor.path);
        if (Editor.isVoid(editor, node)) {
          Transforms.delete(editor);
        }
      }
    }
  }
};
5.2 光标移动行为
用户移动光标时,监听 selectionchange 事件,检测当前实际光标位置与 editor.selection 是否已对应,并同步位置

typescript
  const setDomSelection = () => {
      const root = DOMEditor.findDocumentOrShadowRoot(editor);
      const domSelection = getSelection(root);
      if (!domSelection) {
        return;
      }
      const hasDomSelection = domSelection.type !== "None";

      // If the DOM selection is properly unset, we're done.
      if (!editor.selection && !hasDomSelection) {
        return;
      }

      // Get anchorNode and focusNode
      const focusNode = domSelection.focusNode;
      let anchorNode;

      // COMPAT: In firefox the normal selection way does not work
      // (https://github.com/ianstormtaylor/slate/pull/5486#issue-1820720223)
      if (IS_FIREFOX && domSelection.rangeCount > 1) {
        const firstRange = domSelection.getRangeAt(0);
        const lastRange = domSelection.getRangeAt(domSelection.rangeCount - 1);

        // Right to left
        if (firstRange.startContainer === focusNode) {
          anchorNode = lastRange.endContainer;
        } else {
          // Left to right
          anchorNode = firstRange.startContainer;
        }
      } else {
        anchorNode = domSelection.anchorNode;
      }
      // verify that the dom selection is in the editor
      const editorElement = EDITOR_TO_ELEMENT.get(editor)!;
      let hasDomSelectionInEditor = false;
      if (
        editorElement.contains(anchorNode) &&
        editorElement.contains(focusNode)
      ) {
        hasDomSelectionInEditor = true;
      }

      // If the DOM selection is in the editor and the editor selection is already correct, we're done.
      if (hasDomSelection && hasDomSelectionInEditor && editor.selection) {
        const slateRange = DOMEditor.toSlateRange(editor, domSelection, {
          exactMatch: true,

          // domSelection is not necessarily a valid Slate range
          // (e.g. when clicking on contenteditable:false element)
          suppressThrow: true,
        });

        if (slateRange && Range.equals(slateRange, editor.selection)) {
          if (!hasMarkPlaceholder.value) {
            return;
          }

          // Ensure selection is inside the mark placeholder
          if (
            anchorNode?.parentElement?.hasAttribute(
              "data-slate-mark-placeholder"
            )
          ) {
            return;
          }
        }
      }

      // when <Editable/> is being controlled through external value
      // then its children might just change - DOM responds to it on its own
      // but Slate's value is not being updated through any operation
      // and thus it doesn't transform selection on its own
      if (editor.selection && !DOMEditor.hasRange(editor, editor.selection)) {
        editor.selection = DOMEditor.toSlateRange(editor, domSelection, {
          exactMatch: false,
          suppressThrow: true,
        });
        return;
      }

      let newDomRange: globalThis.Range | null = null;

      try {
        newDomRange =
          editor.selection && DOMEditor.toDOMRange(editor, editor.selection);
      } catch (e) {
        // Ignore, dom and state might be out of sync
      }

      if (newDomRange) {
        if (DOMEditor.isComposing(editor) && !IS_ANDROID) {
          domSelection.collapseToEnd();
        } else if (Range.isBackward(editor.selection!)) {
          domSelection.setBaseAndExtent(
            newDomRange.endContainer,
            newDomRange.endOffset,
            newDomRange.startContainer,
            newDomRange.startOffset
          );
        } else {
          domSelection.setBaseAndExtent(
            newDomRange.startContainer,
            newDomRange.startOffset,
            newDomRange.endContainer,
            newDomRange.endOffset
          );
        }
        scrollSelectionIntoView(editor, newDomRange);
      } else {
        domSelection.removeAllRanges();
      }

      return newDomRange;
    };
5.3 安卓英文输入兼容
对于 proseMirror 作者专门为此写了一篇文章
discuss.prosemirror.net/t/contented...
与其他浏览器不同,在安卓浏览器中,
beforeinput事件行为怪异,表现如下:
keyCode无法从事件的inputType获取,keyCode一直是 229- 事件无法通过
preventDefault拦截 - 事件获取到的游标位置是错的
- 合成文本行为不确定,
event.data会粘连上一次输入的文本 - 原子节点删除时会收起键盘
- 不同机型、同一机型不同输入法的行为都不一致

对于 slate 这种数据模型驱动的富文本来说,这种怪异行为是致命的
slate-react 团队和 slate-angular 团队提供了一个大致的解决思路
原文链接:zhuanlan.zhihu.com/p/635801047
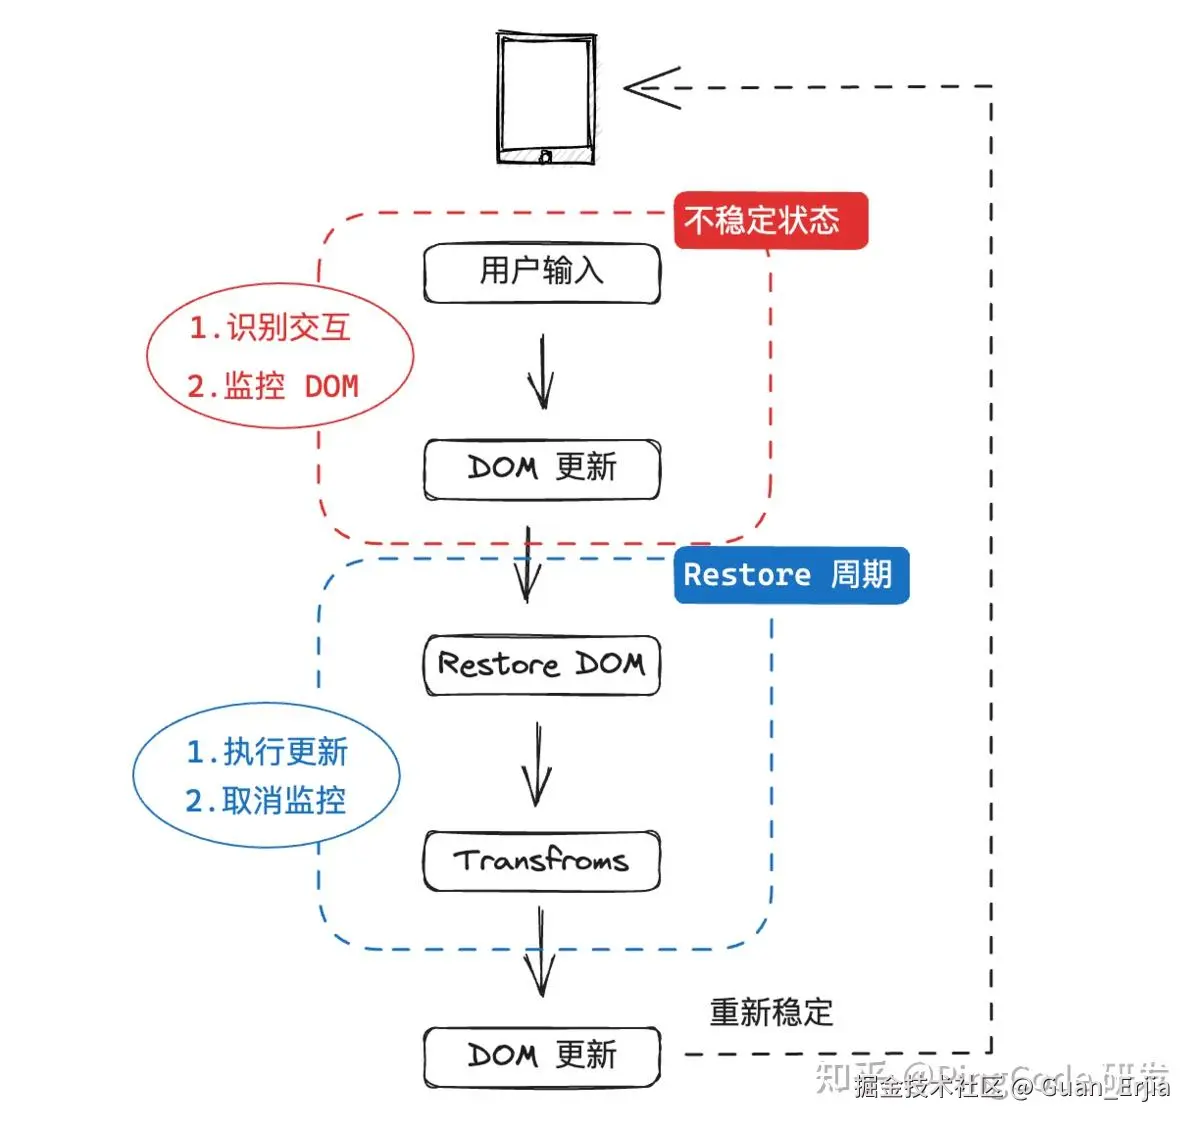
- 安卓环境下代理原有的
beforeinput逻辑 - 通过
MutationObserver监控beforeinput到 DOM 更新之间的节点信息变化 - 根据当前输入事件,判断需要进行的下一步操作,并推入调用栈中
- 节点变更说明用户已经进行了输入,回退 DOM 节点到输入前的状态,并立即执行调用栈的方法
- 数据模型驱动 DOM 更新后,编辑器重新稳定,等待用户下一次输入 github.com/Guan-Erjia/...
typescript
onMounted(() => {
    mutationObserver.value = new MutationObserver((mutations) => {
      mutationObserver.value?.disconnect();
      mutationObserver.value?.takeRecords();
      mutations.reverse().forEach((mutation) => {
        if (mutation.type === "characterData") {
          // We don't want to restore the DOM for characterData mutations
          // because this interrupts the composition.
          return;
        }
        mutation.removedNodes.forEach((node) => {
          mutation.target.insertBefore(node, mutation.nextSibling);
        });
        mutation.addedNodes.forEach((node) => {
          mutation.target.removeChild(node);
        });
      });

      schedule.value?.();
      schedule.value = undefined;
    });
});
const handleDOMBeforeInput = (event: InputEvent) => {
    mutationObserver.value?.observe(
      editableRef.value!,
      MUTATION_OBSERVER_CONFIG
    );

    const { inputType: type } = event;
    let targetRange: Range | null = null;
    const data: DataTransfer | string | undefined =
      (event as any).dataTransfer || event.data || undefined;
    .......
    switch(inputType):
        ....... //根据当前状态缓存不同的方法,在 mutationObserver 监听到 dom 更新后执行
        case "deleteEntireSoftLine": {
            return scheduleAction(() => {
              Editor.deleteBackward(editor, { unit: "line" });
              Editor.deleteForward(editor, { unit: "line" });
            }, targetRange);
              }
整个 DOM 回退的过程是在 beforeinput 完成,更新数据模型之前,中间的这段时间进行的,不会影响用户输入外的正常渲染,因为非用户输入行为不会触发 beforeinput,按非安卓的正常流程进行即可
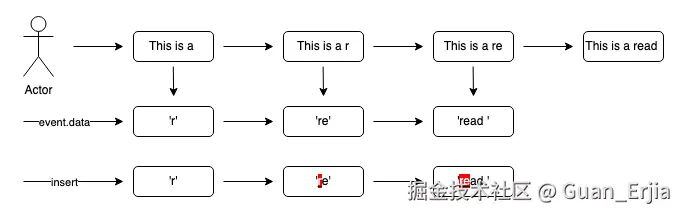
组合输入事件时的文本 diff
在输入 read 的时候,会发生下面这种情况,第二次输入 'e' 的时候,会把第一次的 'r' 带上,选择 'read' 单词的时候,行为并不是补充后面的 'ad ',而是整个 'read'
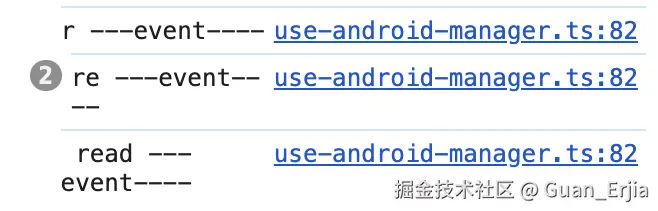
当前路径时已知的,输入前的节点信息可以通过 getNodeIf 的方式获取得到,见 4.4
整个问题变得简单了:
- 通过节点信息的计算出哪些内容是节点已经渲染出来的,移除掉这部分
- 在当前光标节点插入剩下的文本,即可实现效果
6. 使用 slate 的注意事项
至此,所有 slate 的基本功能实现介绍完毕,但是在实际项目中使用中,还是需要注意以下问题
6.1 谨慎评估使用难度
虽然官方给出的案例看起来都比较简单,但是实际在项目中使用起来完全不一样,并且在技术选型阶段很难察觉,比如官方给出的 markdown 案例
typescript
    const handleDOMBeforeInput = useCallback(
        (e: InputEvent) => {
          queueMicrotask(() => {
            const pendingDiffs = ReactEditor.androidPendingDiffs(editor)
            ......
            ......
          })
        },
        [editor]
      )
       return (
        <Slate editor={editor} initialValue={initialValue}>
          <Editable onDOMBeforeInput={handleDOMBeforeInput} renderElement={renderElement} />
        </Slate>
      )
    }
不翻源码基本不可能知道,重写 beforeInput 方法的原因是为了兼容安卓移动端
如果在项目中考虑移动端的话,则必须考虑 5.3 中提到的各种兼容问题,显然不是几天时间可以解决的
关于操作节点、路径、光标的接口非常多,但是都偏于底层且粒度比较细很多场景下需要混合使用接口
了解这些这些对于构建一个稳定的编辑器是非常必要的,这需要花大量时间
6.2 富文本协议和序列化
如果考虑序列化场景,问题将会变得更复杂,尽管已经由成熟的方案 unified.js 去解析和序列化,但是了解其中的概念依然是一件麻烦事,需要查找一系列插件
6.2.1 序列化案例
以下为一个最基本的 GFM markdown 语法解析和序列化代码
typescript
import { remarkToSlate, slateToRemark } from "remark-slate-transformer";
import { unified } from "unified";
import remarkStringify from "remark-stringify";
import remarkGfm from "remark-gfm";
import remarkParse from "remark-parse";

const resolveMarkdown = () => {
    const processor = unified().use(remarkParse).use(remarkGfm).use(remarkToSlate).use(remarkListItem);
    const slateDescendant = processor.processSync(text).result;
    return slateDescendant
}

const stringify = (descendant) => {
    const result = slateToRemark(descendant);
    const remarkString = unified().use(remarkGfm).use(remarkStringify).stringify(result);
    return remarkString
}
除非必要,尽量避免用户操作期间,进行序列化或解析的流程,这不仅会导致性能开销,在编译重新解析后的结果,也不能保证百分百相同
尽量直接保存 children 的数结构信息,避开这种序列化的问题
6.2.2 定制化解析
如果需要添加定制语法,则需要编写 unfied.js 插件,自行解析现有的 ast,短期开发的插件可靠性是有待考量的
以最简单的将列表节点直接暴露首个子节点为例:
typescript
import { visit } from "unist-util-visit";
const remarkListItem = () => (tree: Node) => {
  visit(tree, "listItem", function (node: any) {
    node.children = node.children[0].children;
  });
};
6.2.3 Descendant 结构的前期设计
在前期设计的时候,必须有一个成熟并且可拓展的富文本协议
不同于直接修改 html 字符串那么简单,slate 是基于数结构描述富文本内容的,所以当开发过一段时间之后,发现前期设计有问题,并且要修改已有的树结构数据,这将会是个惊天噩耗
6.3 版本尚未稳定
虽然迭代了 4 年多,但是没有一个稳定的 1.0 版本,后续 api 可能还会变化
应该不用过度担心,目前的产品已经相当多了,包括目前用的知识库在线文档,wangEditor5 、github books......
docs.slatejs.org/general/res...
结尾
以上就是我对 slate 框架实现和使用的一个基本总结,后续我还会继续分享 slate 相关内容,更多集中在正在开发的 slate-vue3,slate 现有的单元测试和集成测试已全部通过,希望大佬们能多提提优化意见
github.com/Guan-Erjia/...