1、Android Layout
1.1、LinearLayout
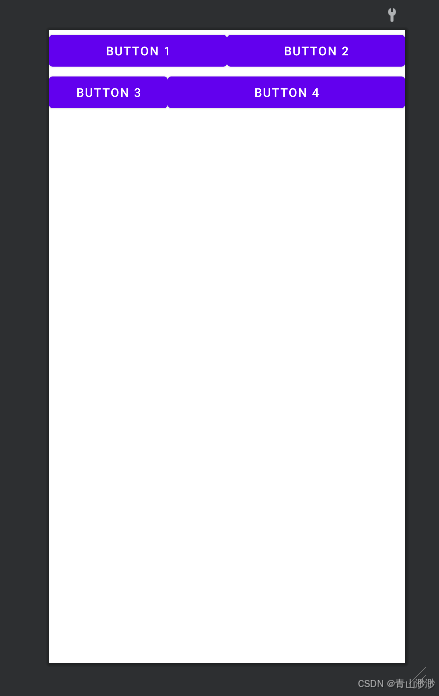
线性布局,子控件按照水平或垂直的方向依次排列,排列方向通过属性android:orientation控制,horizontal为水平排列,vertical为垂直排列。对于同一水平线上的控件,可以调整它的layout_width或者layout_height为0,然后通过layout_weight来进行比例计算。
如果想要将多个控件进行换行,可以再次添加LinearLayout,将该layout的layout_width或者layout_height设置为match_parent。
xml
<?xml version="1.0" encoding="utf-8"?>
<LinearLayout xmlns:android="http://schemas.android.com/apk/res/android"
    android:orientation="vertical"
    android:layout_width="match_parent"
    android:layout_height="match_parent">

    <LinearLayout
        android:layout_width="match_parent"
        android:layout_height="wrap_content">
        <Button
            android:layout_width="match_parent"
            android:layout_height="wrap_content"
            android:layout_weight="1"
            android:text="Button 1"/>

        <Button
            android:layout_width="match_parent"
            android:layout_height="wrap_content"
            android:layout_weight="1"
            android:text="Button 2"/>

    </LinearLayout>

    <LinearLayout
        android:layout_width="match_parent"
        android:layout_height="wrap_content">
        <Button
            android:layout_width="match_parent"
            android:layout_height="wrap_content"
            android:layout_weight="2"
            android:text="Button 3"/>

        <Button
            android:layout_width="match_parent"
            android:layout_height="wrap_content"
            android:layout_weight="1"
            android:text="Button 4"/>

    </LinearLayout>

</LinearLayout>
参考:
1.2、RelativeLayout
RelativeLayout是通过控件之间的相对位置关系来进行限制或布局的,在默认情况下,子控件出现在父容器的左上角。
相对位置关系控制分为两个方面,一个是相对于父容器布局,还有一种是相对于其他控件布局。
- 相对父容器布局,主要是限制控件在父容器边缘的位置
- android:layout_alignParentLeft
- android:layout_alignParentRight
- android:layout_centerHorizontal:水平居中
- android:layout_alignParentTop
- android:layout_alignParentBottom
- android:layout_centerVertical:垂直居中
- ndroid:layout_centerInParent:水平垂直居中
- 相对其他控件布局
- android:layout_toLeftOf
- android:layout_toRightOf
- android:layout_above
- android:layout_below
- android:layout_alignTop:顶部对齐
- android:layout_alignBottom
- android:layout_alignLeft
- android:layout_alignRight
- 边距设置:限制控件与父容器或者其他控件之间的边距,准确控制控件位置
- android:layout_marginLeft
- android:layout_marginRight
- android:layout_marginTop
- android:layout_marginBottom
参考:
xml
<?xml version="1.0" encoding="utf-8"?>
<RelativeLayout xmlns:android="http://schemas.android.com/apk/res/android"
    android:layout_width="match_parent"
    android:layout_height="match_parent">

    <Button
        android:id="@+id/button0"
        android:layout_width="wrap_content"
        android:layout_height="wrap_content"
        android:layout_alignParentRight="true"
        android:layout_alignParentBottom="true"
        android:layout_marginRight="20px"
        android:layout_marginBottom="20px"
        android:text="Button 0" />

    <Button
        android:id="@+id/button1"
        android:layout_width="wrap_content"
        android:layout_height="wrap_content"
        android:layout_marginTop="50px"
        android:layout_marginLeft="50px"
        android:text="Button 1"/>

    <Button
        android:id="@+id/button2"
        android:layout_width="wrap_content"
        android:layout_height="wrap_content"
        android:layout_alignTop="@id/button1"
        android:layout_marginLeft="30dp"
        android:layout_toRightOf="@+id/button1"
        android:text="Button 2" />

</RelativeLayout>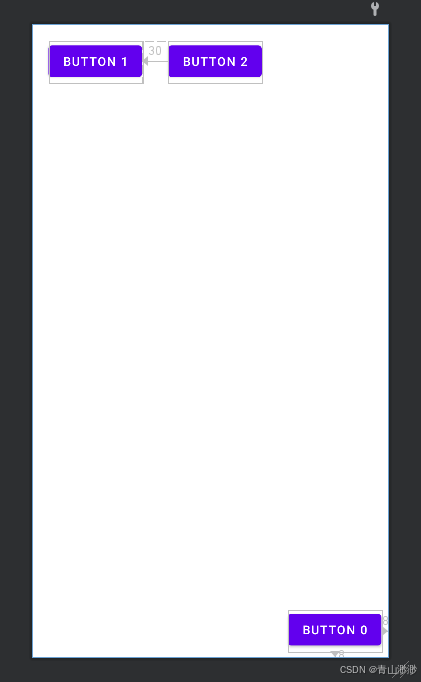
1.3、FrameLayout
FrameLayout中,不做额外设置,所有子控件会堆叠在布局左上角,后添加的控件会覆盖先添加的控件。
该布局下对控件的限制方式比较单一,先限制子控件相对父容器的对齐方式,然后具体限制位置。
- 对齐方式定位使用android:layout_gravity实现,常用取值如下:
- top
- bottom
- left
- right
- center:水平垂直居中
- center_horizontal
- center_vertical
- 边距位置调整:
- android:layout_marginLeft
- android:layout_marginRight
- android:layout_marginTop
- android:layout_marginBottom
xml
<?xml version="1.0" encoding="utf-8"?>
<FrameLayout xmlns:android="http://schemas.android.com/apk/res/android"
    android:layout_width="match_parent"
    android:layout_height="match_parent">

    <ImageView
        android:layout_width="wrap_content"
        android:layout_height="wrap_content"
        android:src="@mipmap/ic_launcher"/>

    <TextView
        android:layout_width="wrap_content"
        android:layout_height="wrap_content"
        android:layout_gravity="center"
        android:text="Hello, World!"/>

    <Button
        android:layout_width="wrap_content"
        android:layout_height="wrap_content"
        android:text="Button 0"
        android:layout_gravity="top|right"
        android:layout_marginRight="30dp"/>

</FrameLayout>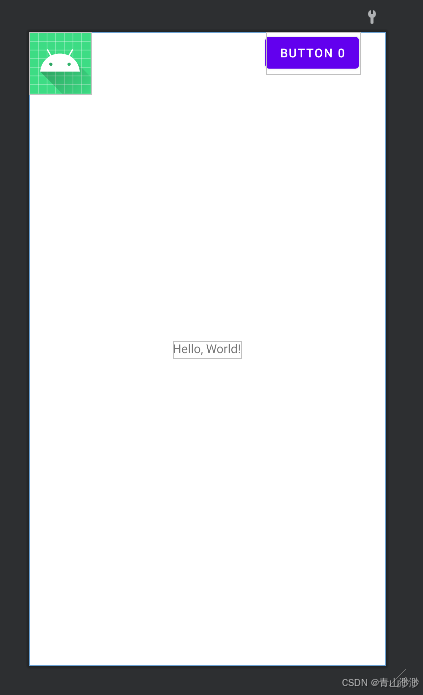
1.4、ConstraintLayout
ConstraintLayout有三种约束方式,分别为相对位置约束、居中(比例)约束、尺寸约束、链条约束
1.4.1、相对位置约束
相对位置约束指的是将控件的四个维度与其他控件对齐,至少限制两个维度才能确认这个控件的位置。相对于父容器和其他控件的常用限制方式有:
- app:layout_constraintLeft_toLeftOf
- app:layout_constraintLeft_toRightOf
- app:layout_constraintRight_toRightOf
- app:layout_constraintTop_toTopOf
- app:layout_constraintBottom_toBottomOf
名称要分为两部分看,一部分是下划线中间的部分,表示限制控件的那个维度(left、right、top、bottom);另一部分是最后边,表示如何限制(被对齐控件的维度),每个维度有两种限制方式,比如说left,可以让控件的左端对齐到其他控件或容器的右端,也可以对齐到其他控件的左端,所以说有layout_constraintLeft_toLeftOf和layout_constraintLeft_toRightOf两种约束方式。当然其他维度也是有两种约束方式。
如果要限制具体的距离大小,可以通过:
- android:layout_marginLeft
- android:layout_marginRight
- android:layout_marginTop
- android:layout_marginBottom
1.4.2、居中约束
我觉得这也可以称为比例约束,上面说至少要限制两个维度,如果既限制了控件的左边,又限制了控件的右边(同时添加layout_constraintLeft_toLeftOf和layout_constraintLeft_toRightOf),那么它会处在一个居中位置(复杂情况暂不研究)。如果想要调整左右比例,可以使用:
- app:layout_constraintHorizontal_bias
1.4.3、尺寸约束
控件的尺寸在ConstraintLayout中又如下几种限制方式:
- 固定尺寸:使用android:layout_width 和 android:layout_height 属性设置控件的固定宽度和高度。
- 根据约束调整尺寸:如果将layout_width设置为0,又同时设置了layout_constraintLeft_toLeftOf和layout_constraintLeft_toRightOf,那么这时候这个控件的宽度会自动调整为整个父容器的宽度;
- 比例尺寸:在上述条件下,自动调整尺寸时,可以设置宽高比例来调整控件的尺寸,具体是通过调整app:layout_constraintDimensionRatio来实现,比如设置1:1,那么控件宽高就是1:1。
1.4.4、链条约束
链条约束用于在一组控件之间分配空间,或者说是控制一组空间的水平或者垂直布局。要实现这样的功能需要先用相对位置约束将几个控件链接在一起,然后使用layout_constraintHorizontal_chainStyle、layout_constraintVertical_chainStyle来控制布局方式:
- spread:均匀分布
- spread_inside:两端控件固定,中间控件均匀分布
- packed:控件紧密排列
xml
<?xml version="1.0" encoding="utf-8"?>
<androidx.constraintlayout.widget.ConstraintLayout xmlns:android="http://schemas.android.com/apk/res/android"
    xmlns:app="http://schemas.android.com/apk/res-auto"
    xmlns:tools="http://schemas.android.com/tools"
    android:layout_width="match_parent"
    android:layout_height="match_parent">

    <Button
        android:id="@+id/button0"
        android:layout_width="100dp"
        android:layout_height="200dp"
        app:layout_constraintTop_toTopOf="parent"
        app:layout_constraintLeft_toLeftOf="parent"
        android:text="Button 0" />

    <Button
        android:id="@+id/button1"
        android:layout_width="wrap_content"
        android:layout_height="wrap_content"
        app:layout_constraintTop_toBottomOf="@id/button0"
        app:layout_constraintLeft_toRightOf="@id/button0"
        android:text="Button 1"/>


    <Button
        android:id="@+id/button2"
        android:layout_width="wrap_content"
        android:layout_height="wrap_content"
        app:layout_constraintLeft_toLeftOf="parent"
        app:layout_constraintRight_toRightOf="parent"
        app:layout_constraintTop_toTopOf="parent"
        app:layout_constraintBottom_toBottomOf="parent"
        app:layout_constraintHorizontal_bias="0.4"
        android:text="Button 2"/>


    <Button
        android:id="@+id/button_chain1"
        android:layout_width="wrap_content"
        android:layout_height="wrap_content"
        app:layout_constraintLeft_toLeftOf="parent"
        app:layout_constraintRight_toLeftOf="@id/button_chain2"
        app:layout_constraintBottom_toBottomOf="parent"
        app:layout_constraintHorizontal_chainStyle="spread_inside"
        android:text="Button 1" />

    <Button
        android:id="@+id/button_chain2"
        android:layout_width="wrap_content"
        android:layout_height="wrap_content"
        app:layout_constraintLeft_toRightOf="@id/button_chain1"
        app:layout_constraintRight_toLeftOf="@id/button_chain3"
        app:layout_constraintBottom_toBottomOf="parent"
        app:layout_constraintHorizontal_chainStyle="spread"
        android:text="Button 2" />

    <Button
        android:id="@+id/button_chain3"
        android:layout_width="wrap_content"
        android:layout_height="wrap_content"
        app:layout_constraintLeft_toRightOf="@id/button_chain2"
        app:layout_constraintRight_toRightOf="parent"
        app:layout_constraintBottom_toBottomOf="parent"
        android:text="Button 3" />

    <TextView
        android:layout_width="0dp"
        android:layout_height="wrap_content"
        app:layout_constraintLeft_toLeftOf="parent"
        app:layout_constraintRight_toRightOf="parent"
        app:layout_constraintTop_toTopOf="parent"
        app:layout_constraintDimensionRatio="1:1"
        android:text="This is a text view" />

</androidx.constraintlayout.widget.ConstraintLayout>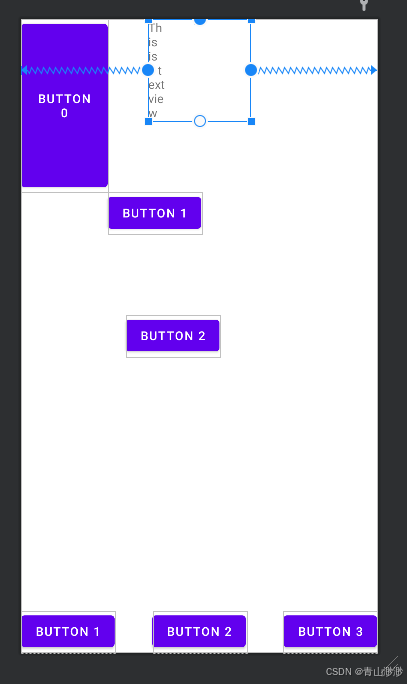
2、AndroidManifest
2.1、常见标签以及作用:
- manifest:根标签,定义了整个应用的基本信息,像包名和兼容性要求等
- application:描述应用的全局信息,比如图标、名称、主题以及包含的组件等,一个app只能包含一个
- activity:声明一个用户界面
- intent-filter:描述 Activity 能够响应的 Intent
- service:声明一个service组件
- receiver:声明应用中的一个 BroadcastReceiver 组件,BroadcastReceiver 能让应用对系统或其他应用发出的广播消息做出响应。
- provider:声明应用中的一个 ContentProvider 组件,ContentProvider 可以让应用共享数据给其他应用
- uses-permission:放在application标签外,属于应用整体需求,用于声明应用所需的系统权限
2.2、activity标签
用于声明应用中的一个 Activity 组件,它可以包含多个子标签:
- intent-filter:描述Activity可以响应的Intent,一个Activity可以有多个intent-filter
- permission:指定启动该activity需要的权限
- screenOrientation:activity标签属性,对activity的屏幕方向进行控制
- portrait:强制竖屏
- landscape:强制横屏
- sensor:根据设备的传感器自动调整屏幕方向
- launchMode:activity标签属性,用于定义 Activity 的启动模式
- standard:默认的启动模式,每次启动 Activity 都会创建一个新的实例。
- singleTop:如果 Activity 已经位于任务栈的栈顶,再次启动时不会创建新的实例
- singleTask:系统会为该 Activity 创建一个新的任务栈,并将其置于栈底,若该 Activity 已经存在于某个任务栈中,会将其之上的所有 Activity 出栈
- singleInstance:该 Activity 会独占一个任务栈,并且在系统中只有一个实例
2.3、intent-filter的过滤机制
intent-filter中可能有三个子标签:
- action:用于指定组件能够处理的操作类型,一个intent-filter可以包含多个action标签,只要匹配其中一个就满足action的过滤条件
- android.intent.action.MAIN
- android.intent.action.VIEW
- android.intent.action.SEND
- android.intent.action.EDIT
- android.intent.action.DIAL
- category:用于定义组件的类别,大多数隐式 Intent 都会默认包含这个类别,一个 intent-filter 可以包含多个 标签,Intent 必须包含 intent-filter 中定义的所有类别,才满足 category 过滤条件。
- android.intent.category.DEFAULT
- android.intent.category.LAUNCHER
- android.intent.category.BROWSABLE
- android.intent.category.APP_BROWSER
- data:用于指定组件可以处理的数据类型,包括数据的 URI 格式和 MIME 类型,同样只要满足一个就满足过滤条件。
2.4、screenOrientation
该属性指定横屏或者竖屏启动,有以下影响:
对布局的影响:系统会依据 screenOrientation 属性和设备的实际方向,来加载对应的布局文件。通常,竖屏布局文件存于 res/layout 目录下,而横屏布局文件存于 res/layout-land 目录下。
对 Activity 生命周期的影响:屏幕方向改变时,Activity 可能会经历销毁和重建的过程,通过设置screenOrientation,即使用户旋转设备,Activity 也不会因为方向改变而重建。
当把 screenOrientation 属性固定为 portrait,而屏幕物理方向变为 landscape 时,实际上就是将竖屏的布局以横屏的形式展现出来。固定screenOrientation之后,layout不会再切换,所以Activity不会销毁,引发的问题可能是layout被拉伸或者裁剪。
3、Activity
3.1、Activity的声明周期
Android声明周期可以分出三个阶段:
- 完整生命周期(Entire Lifetime):从 onCreate开始,到 onDestroy结束。onCreate开始进行初始化,加载布局、初始化视图等;onDestroy结束释放所有的资源
- 可见生命周期(Visible Lifetime):从 onStart开始,到 onStop结束。这个阶段Activity对用户是可见的。onStart会在 Activity变得可见时被调用,onStop则在 Activity不再可见时被调用。
- 前台生命周期(Foreground Lifetime):从 onResume开始,到 onPause结束。此阶段用户可以与Activity交互,onResume在Activity即将与用户交互时被调用,onPause则在 Activity 即将失去焦点但仍可见时被调用。
生命周期方法详细说明:
- onCreate:在 Activity 首次创建时调用,是 Activity 生命周期的起始点。在此方法中,一般会执行一些初始化操作,例如设置布局文件、初始化变量等
- onStart:当 Activity 变为可见时调用,此时 Activity 已经被创建,但还未出现在前台
- onResume:Activity 进入前台并开始与用户交互时调用,常用于恢复在 onPause中暂停的操作,如启动动画、开始播放音频等
- onPause:当 Activity 失去焦点但仍可见时调用,通常用于暂停一些需要及时停止的操作,如暂停动画、停止音频播放等,同时保存一些临时数据
- onStop:Activity 不再可见时调用,此时 Activity 可能被新的 Activity 完全覆盖,或者 Activity 即将被销毁,可以在此方法中释放一些占用资源较多的对象
- onDestroy:Activity 被销毁前调用,是 Activity 生命周期的最后一个方法,通常用于进行一些最终的清理工作,如关闭数据库连接、取消未完成的任务等
- onRestart:当 Activity 从停止状态重新启动时调用,接着会调用 onStart方法
常见场景:
- 首次启动 Activity:依次调用 onCreate() -> onStart() -> onResume()。
- Activity 被其他 Activity 部分覆盖或弹出对话框:调用 onPause()。
- Activity 被其他 Activity 完全覆盖:调用 onPause() -> onStop()。
- Activity 从停止状态恢复:调用 onRestart() -> onStart() -> onResume()。
- 用户按下返回键退出 Activity:调用 onPause() -> onStop() -> onDestroy()
3.2、Intent
Intent用于在不同组件之间传递信息,可以启动Activity、Service,也可以发送广播触发BroadcastReceiver。通过调用putExtra方法,可以向Intent中传递多种类型的数据。
Intent分为显示和隐式两种:
- 显示:明确指定要启动的组件类名,一般在应用内部启动组件
java
// 启动 MainActivity
Intent intent = new Intent(this, MainActivity.class);
startActivity(intent);- 隐式:不指定具体组件,而是通过action、data、category让系统寻找,常用于调用系统功能或者和其他应用交互。
startActivity有三个作用:启动新的Activity、传递数据、调用系统组件或其他应用的 Activity。
3.3、Intent
使用putExtra可以向Intent封装一些基本数据类型,如果要封装复杂数据类型,需要先将该数据类型进行序列化(实现Serializable或者Parcelable)。常用方法:
- putExtra:封装数据
- getIntent:获取Intent
- getStringExtra:获取指定类型,指定键值的数据
- getIntExtra
- getBooleanExtra
- getSerializableExtra
- getExtras:获取bundle
3.4、Activity 的状态保存与恢复
- onSaveInstanceState () 方法:当 Activity 由于某些原因(如屏幕旋转、系统内存不足等)即将被销毁时,系统会调用 onSaveInstanceState () 方法,在该方法中可以将 Activity 的重要状态数据保存到 Bundle 中。
- onRestoreInstanceState () 方法:在 Activity 重新创建后,可以通过 onRestoreInstanceState () 方法从 Bundle 中恢复之前保存的状态数据。需要注意的是,onRestoreInstanceState () 方法只有在 Activity 是由于异常情况而重新创建时才会被调用,而在正常的启动过程中不会被调用。
4、Service
Service是Android中用于后台执行长时间运行操作,且不提供用户界面的组件。Service分为两种类型:启动服务(Started Service)和绑定服务(Bound Service)。
4.1、Service 的生命周期
4.1.1、启动服务
启动服务通过StartService启动,会在后台一直运行,直到被停止。
- onCreate:服务第一次被创建时调用此方法,如果服务已经处于运行状态,再次调用StartService不会触发onCreate。onCreate主要负责初始化。
- onStartCommand(Intent intent, int flags, int startId):每次调用startService启动服务都会调用onStartCommand方法。onStartCommand主要用于执行具体的后台任务。
- 参数说明:
- intent
- flags:启动服务的额外信息,可能的值有 START_FLAG_REDELIVERY、START_FLAG_RETRY 等
- startId:表示此次启动请求的唯一ID
- 返回值:该方法需要返回一个整数,指示服务因内存不足被杀死之后的动作:
- START_STICKY:重新重建服务并调用onStartCommand,但是不传递之前的Intent
- START_NOT_STICKY:不重新创建服务
- START_REDELIVER_INTENT:重新创建服务并且传递之前的Intent
- 参数说明:
- onDestory:服务不再使用且将被销毁时调用此方法,可以通过stopService或者服务内部调用stopSelf来触发服务的销毁。onDestory主要用于释放资源。
onCreate 只会被执行一次,意味着 Service 在首次创建后,后续可以被多次启动,但不会再次执行 onCreate 方法。当使用 startService() 多次启动同一个 Service 时,onStartCommand 方法会被多次调用,这样可以让 Service 多次执行特定的任务。
当所有的 Service 都停止后,再次调用 startService() 方法启动该 Service 时,onCreate() 方法会再次执行。
在 Android 中,Service 的 onCreate 方法只被调用一次,在该方法中初始化的变量对于该 Service 实例来说是全局变量,这些变量在该 Service 实例的各个方法之间是共享的。
4.1.2、绑定服务
绑定服务运行其他组件与服务进行交互。
- onCreate:当服务第一次被创建时调用。服务通过bindService启动,只要没有服务实例,就会调用onCreate方法。
- onBind(Intent intent):当客户端调用bindService方法绑定服务时,系统调用onBind,该方法返回一个IBinder对象,客户端通过IBinder对象与服务进行通信。
- onUnbind(Intent intent):当所有客户端都调用 unbindService() 方法解除与服务的绑定后,系统会调用 onUnbind() 方法。该方法返回一个bool值,如果是false,表示有新的客户端再次绑定服务时,不会调用onRebind;如果返回true,表示服务希望在后续有新客户端绑定时能够直接通过 onRebind 方法重新绑定,而不是重新走 onBind 流程,所以bind service不会自动执行onDestroy。
- onRebind(Intent intent):当 onUnbind() 方法返回 true,并且有新的客户端再次绑定服务时,系统会调用 onRebind() 方法。(前提是服务仍然存活)
- onDestroy:在所有客户端都解除绑定后,系统会销毁服务并调用 onDestroy() 方法。 onUnbind 返回 true 时,bind service 不会自动执行 onDestroy。
由于onBind方法通常只会在首次绑定时被调用一次,因此,多次调用 bindService 得到的 IBinder 对象通常是同一个。通过IBinder获取的服务对象一般来说也是同一个。
4.2、我理解的服务的本质
无论是通过 startService() 启动的服务,还是通过 bindService() 绑定的服务,本质上它们都只是普通的 Java 对象,并且默认情况下运行在应用的主线程中。在调用startService之后,我们可以看到onCreate以及onStartCommand打印的线程号是等于主线程号的。
另外,绑定服务和启动服务,它们都是继承于Service,只不过链接的方式不一样,系统自动调用的方法不一样,对于一个绑定服务,我们覆写onStartCommand方法也是可以当成启动服务来使用的。
为何使用 ServiceConnection 来获取 Binder 进而获取服务实例:
- 启动绑定服务需要用到ServiceConnection,这是因为bindService是一个异步操作,调用此方法后,系统不会立即返回服务实例(服务可能要做促使话)。ServiceConnection会提供回调接口,在绑定成功后通知客户端。
- ServiceConnection 还可以处理服务连接状态的变化,例如服务断开连接。
- 跨进程通信支持
接下来是我想到的几个问题:
- 调用 bindService 时,传入的 ServiceConnection 是不是不能是临时变量?
- 如果将 ServiceConnection 作为临时变量,在方法执行完毕后,该变量可能会被垃圾回收机制回收。一旦发生这种情况,当服务连接状态发生变化时,系统就无法调用相应的回调方法,从而导致无法正确处理服务连接状态的变化。
- 多次调用 bindService,为什么 onBind 和 onRebind 不会被重复调用,就像 startService 多次被调用时,onStartCommand 会多次被调用
- 调用 unBindService 时是不是不能向 Service 传递信息?
- 调用 unBindService 时,通常是用于解除客户端与服务之间的绑定关系,它本身并不用于向 Service 传递信息。
- 调用者向 Service 传递信息是不是只能通过 IBinder 来实现?
- 通过 IBinder 传递信息:调用IBinder自定义的方法
- 通过 Intent 传递信息:调用bindService或者startService时通过Intent传递消息
- 通过广播机制传递信息
bindService通常回合startService搭配使用,尤其是要去报Service长期存活,并且支持多次绑定的场景。
Service有以下几种使用方式:
- 仅 bindService:临时通信(如前台界面与 Service 交互),Service对绑定共存亡
- startService + bindService:长期后台任务,Service 解绑后仍存活,支持 onRebind
- 仅 startService:无需双向通信的后台任务,无法直接调用 Service 方法
如何选择线程实现位置?
- 单次后台任务:onStartCommand,直接启动Thread
- 长期任务:onCreate + onStartCommand
耗时任务必须放在onStartCommand,或者Binder调用中。onCreatey用于初始化资源,onBind仅用于返回IBinder对象。
Service 可以通过广播或回调机制(给Service添加setCallback方法)将数据传递给 Activity。
4.3、IntentService(弃用)
之前实现的Service中,工作线程需要由我们自己实现。Android提供了一个更容易使用的版本IntentService,里面提供了简化后台任务处理的Service子类,适合执行异步、一次性、无需用户交互的耗时任务。
4.4、JobIntenService、WorkManager
4.5、跨进程访问 Service 的两种方式(暂不了解)
5、Broadcast Receiver
- 广播:广播是一种在应用组件之前传递消息的机制,可用于系统和应用、应用和应用以及应用内部组件之间的通信。
- 广播接收器:监听特定广播
- 广播类型:
- 普通广播:所有注册接收器的组件都可以收到,无法截断
- 有序广播:按优先级一次传递,前一个接收器可以截断并修改广播内容
- 粘性广播:弃用
- 本地广播:应用内部传播,安全性高
广播接收器的注册方式:
- 静态注册:在AndroidManifest中注册,应用未启动也能接收到广播( Android 8.0 及更高版本中,系统对后台运行的静态广播接收器进行了限制,)
xml
<receiver android:name=".MyBroadcastReceiver">
    <intent-filter>
        <action android:name="com.example.MY_CUSTOM_BROADCAST" />
    </intent-filter>
</receiver>- 动态注册:代码中通过registerReceiver注册,可以在需要时注册和注销。
java
MyBroadcastReceiver receiver = new MyBroadcastReceiver();
IntentFilter filter = new IntentFilter();
filter.addAction("com.example.MY_CUSTOM_BROADCAST");
registerReceiver(receiver, filter);
广播接收器的实现:继承BroadcatReceiver类,重写onReceive方法,在onReceive中获取Intent处理广播携带的数据。
广播的发送:
- 普通广播发送:
java
Intent intent = new Intent("com.example.MY_CUSTOM_BROADCAST");
sendBroadcast(intent);- 有序广播发送:
java
Intent intent = new Intent("com.example.MY_CUSTOM_BROADCAST");
sendOrderedBroadcast(intent, null);