一、背景说明
基于前一篇文章《Spring Cloud初探之nacos服务注册管理(二)》,我们已经将服务注册到nacos。接下来继续分析如何用Spring cloud的load balance做负载均衡。
load balance是客户端负载均衡组件。本质是调用方拿到所有注册的服务实例列表,然后基于一些规则选择其中的一个服务调用其提供的接口。
二、准备服务端代码
写一个简单的rest接口测试,打印输入的参数。
java
import org.apache.logging.log4j.LogManager;
import org.apache.logging.log4j.Logger;
import org.springframework.web.bind.annotation.PostMapping;
import org.springframework.web.bind.annotation.RequestBody;
import org.springframework.web.bind.annotation.RequestMapping;
import org.springframework.web.bind.annotation.RestController;

/**
 * 课程管理服务
 *
 * @author neo
 * @since 2025-02-12
 */
@RestController
@RequestMapping("/v1/lesson")
public class LessonController {
    private static final Logger LOGGER = LogManager.getLogger(LessonController.class);

    /**
     * 插入课程数据
     *
     * @return 分配的课程编码
     */
    @PostMapping("/insert-lesson")
    public String insertLesson(@RequestBody String str) {
        LOGGER.info("Insert lesson:{}", str);
        return str;
    }
}
三、准备客户端代码
1. 在pom文件中引入依赖的loadbalance包
xml
        <dependency>
            <groupId>org.springframework.cloud</groupId>
            <artifactId>spring-cloud-starter-loadbalancer</artifactId>
        </dependency>
版本在父pom的依赖管理中已指定。参考文末提供的github仓库的源码地址链接。
2. 给远程调用的restTemplate增加@LoadBalanced注解
java
import org.springframework.cloud.client.loadbalancer.LoadBalanced;
import org.springframework.context.annotation.Bean;
import org.springframework.context.annotation.Configuration;
import org.springframework.web.client.RestTemplate;

/**
 * 配置负载均衡远程调用rest模板
 *
 * @author neo
 * @since 2025/4/4
 * @version 1.0
 */
@Configuration
public class LoadBalanceConfig {
    @Bean
    @LoadBalanced
    public RestTemplate restTemplate() {
        return new RestTemplate();
    }
}
3.在客户端写一个测试接口
测试接口的逻辑是直接调用服务端提供的接口。
java
import org.apache.logging.log4j.LogManager;
import org.apache.logging.log4j.Logger;
import org.springframework.web.bind.annotation.PostMapping;
import org.springframework.web.bind.annotation.RequestBody;
import org.springframework.web.bind.annotation.RequestMapping;
import org.springframework.web.bind.annotation.RestController;
import org.springframework.web.client.RestTemplate;

import javax.annotation.Resource;

/**
 * 客户端测试接口
 *
 * @author neo
 * @since 2025/4/10
 * @version 1.0
 */
@RestController
@RequestMapping("/v1/lesson-client")
public class LessonClientController {
    private static final Logger LOGGER = LogManager.getLogger(LessonClientController.class);

    @Resource
    private RestTemplate restTemplate;

    /**
     * 插入课程数据
     *
     * @return 分配的课程编码
     */
    @PostMapping("/insert-lesson")
    public String insertLesson(@RequestBody String str)
    {
        LOGGER.info("Insert lesson:{}", str);
        return restTemplate.postForObject("http://cloud-server-one/spring-cloud-server/v1/lesson/insert-lesson", str, String.class);
    }
}
注意:调用服务端接口时使用的是服务名(cloud-server-one),没有使用具体服务的IP地址和端口。Load balance底层会从nacos获取服务名对应的所有服务实例,再根据负载均衡算法选择其中一个服务实例使用,将服务名替换为该服务实例的IP和端口去调用。
四、本地测试一下
-
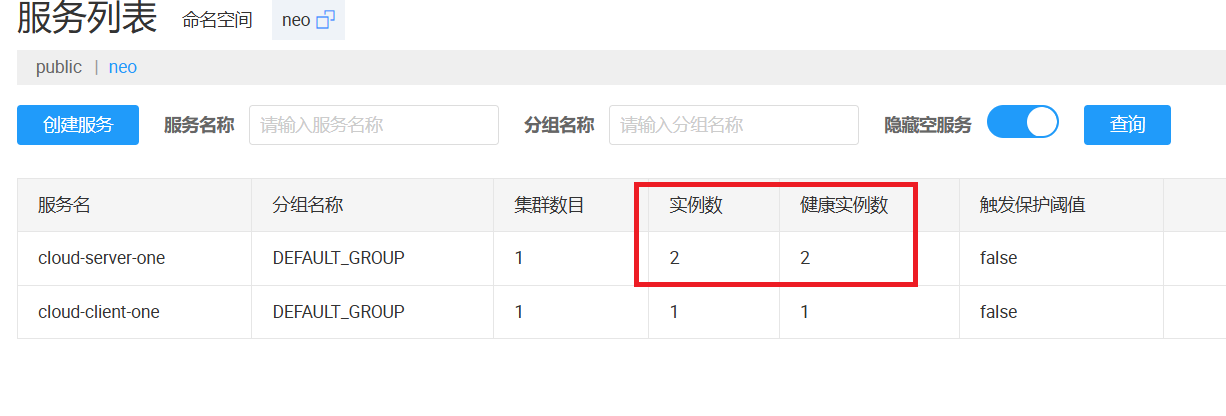
将服务端打包后,使用不同的端口在本地启动两份。启动后可以看到nacos中有两个cloud-server-one实例。
-
调用客户端提供的测试接口,分别输入数字 1、2、3、4、5、6。观察服务接口对应的结果。


可以看到其中一个服务实例打印了奇数,另一个实例打印出了偶数, 这是因为load balance默认的均衡算法是轮询。我们可以选择它提供的其它均衡策略(如随机算法),或者完全定义自己的均衡算法。这个怎么处理在后面篇章描述。
完整源码github仓库地址:https://github.com/ylforever/neo-spring-cloud-server