前言
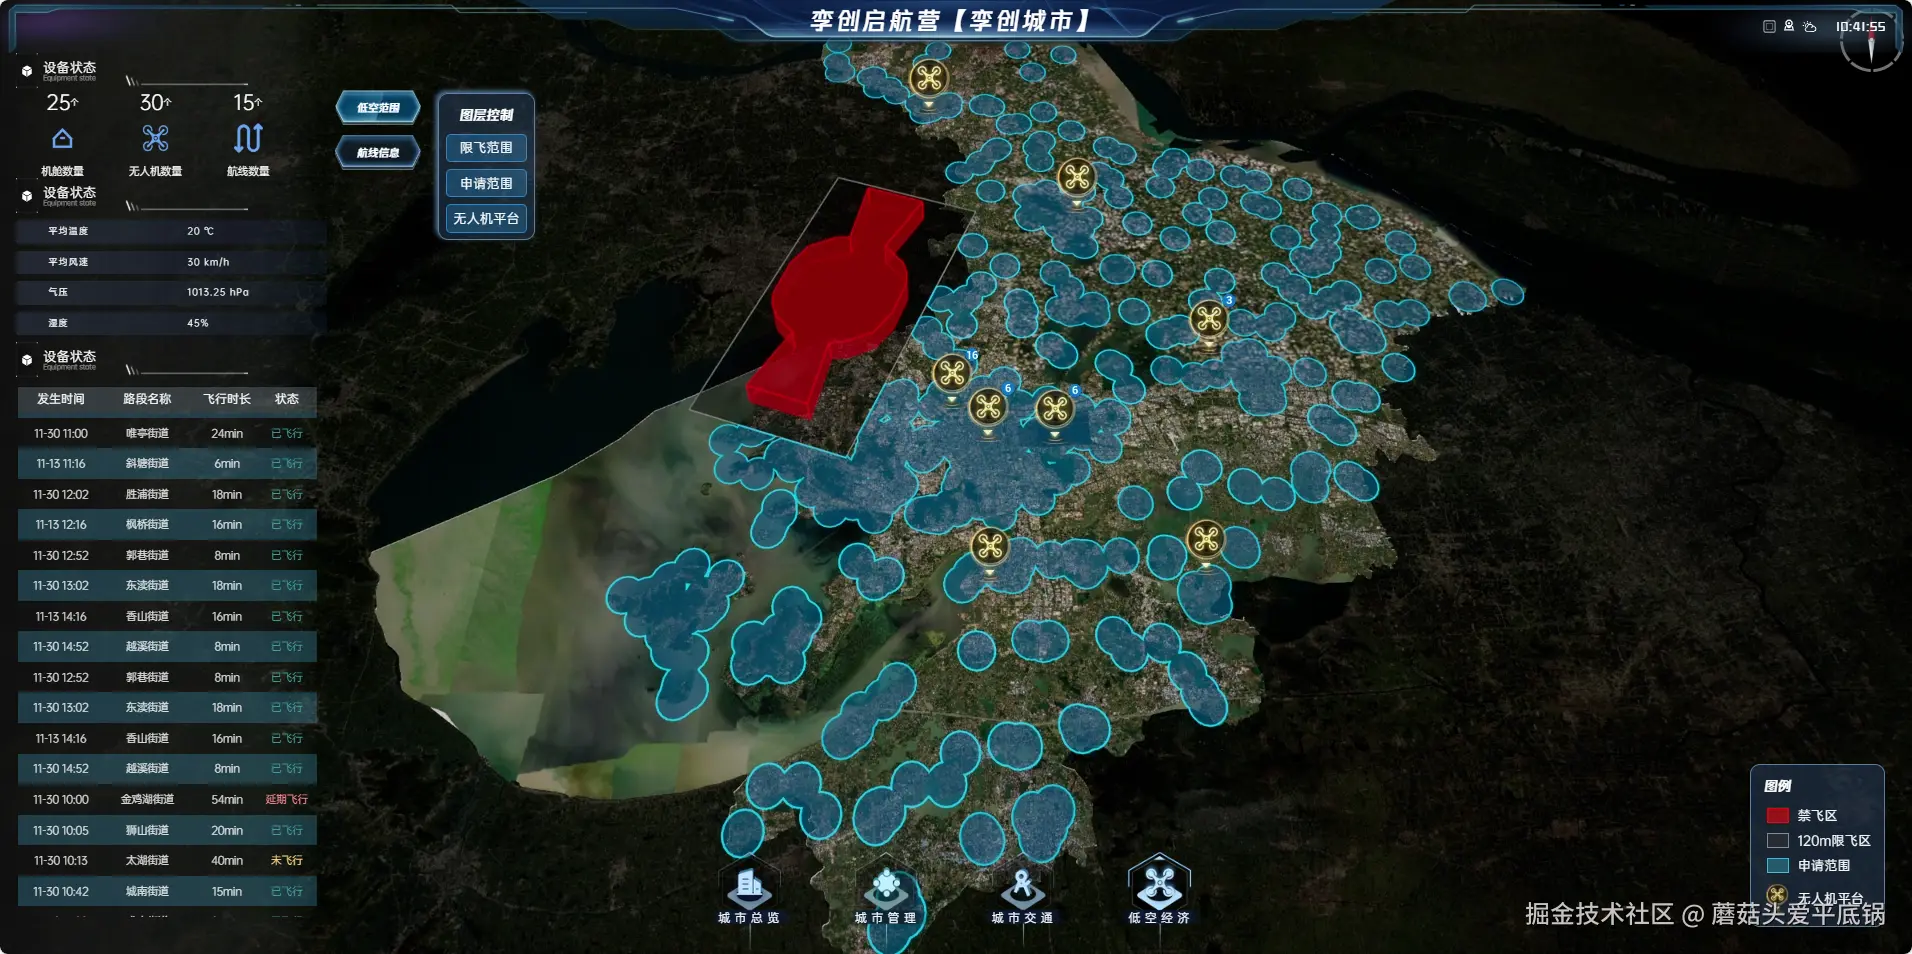
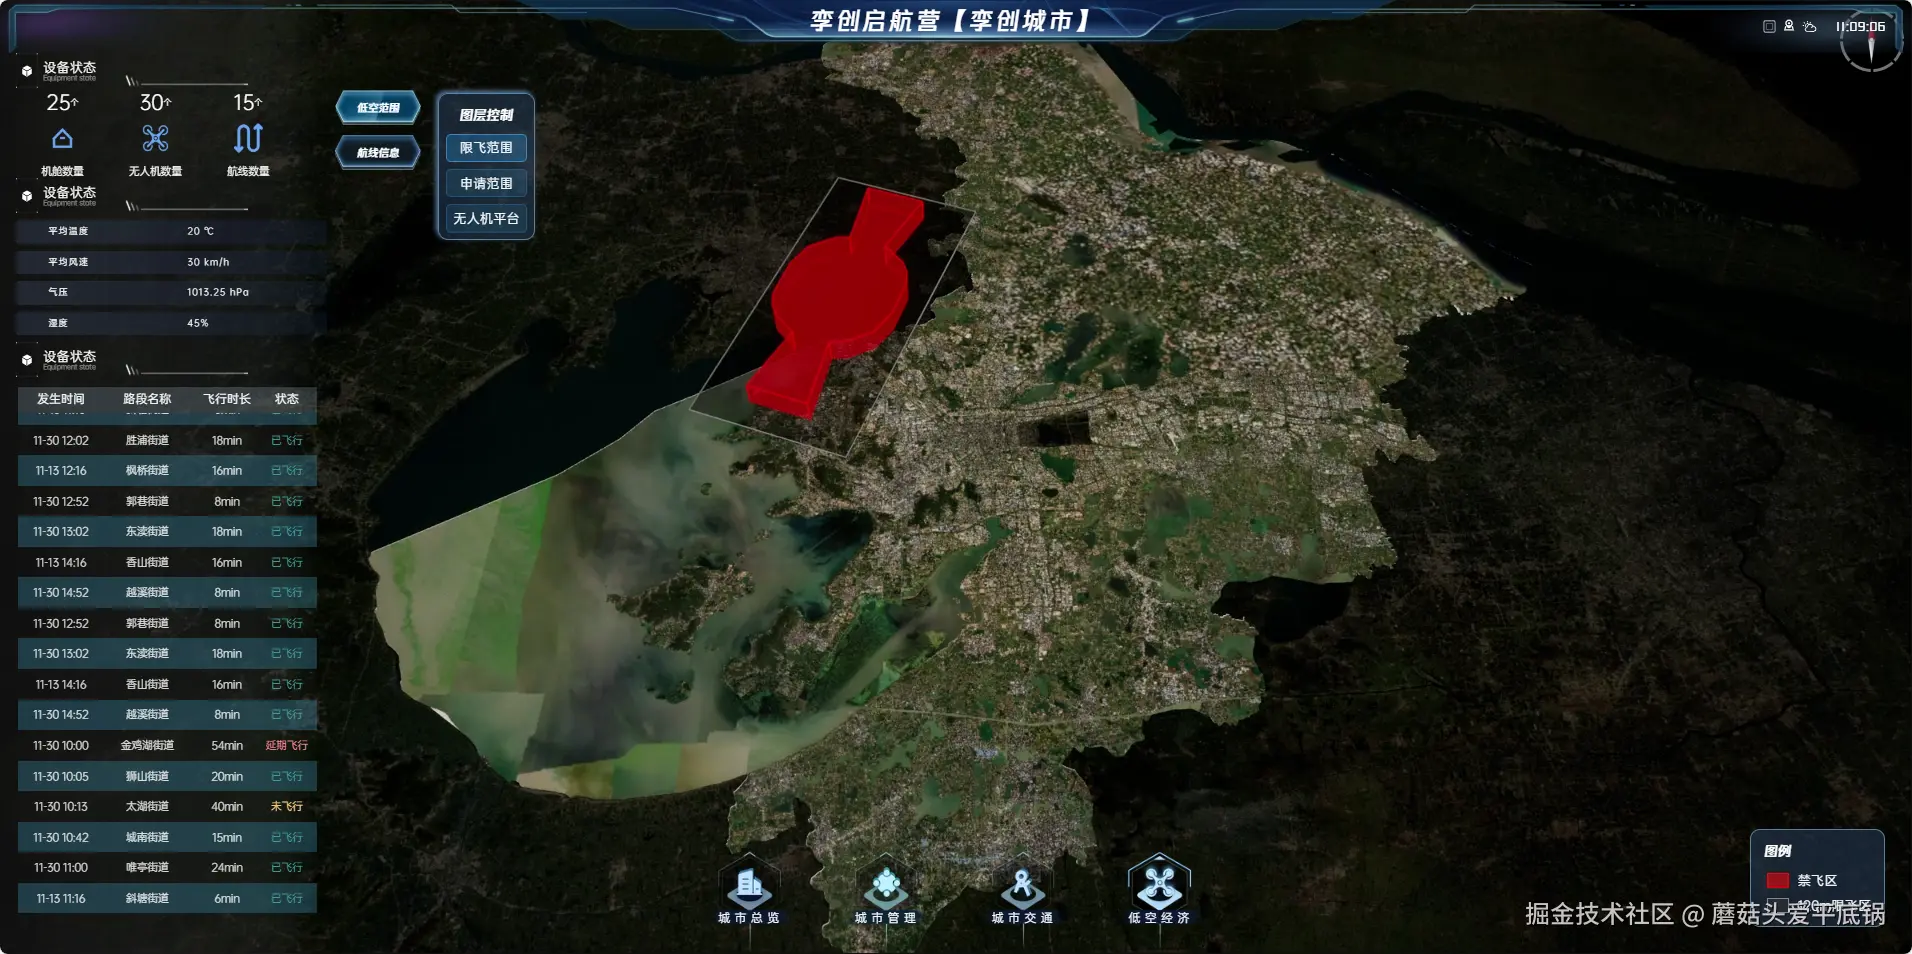
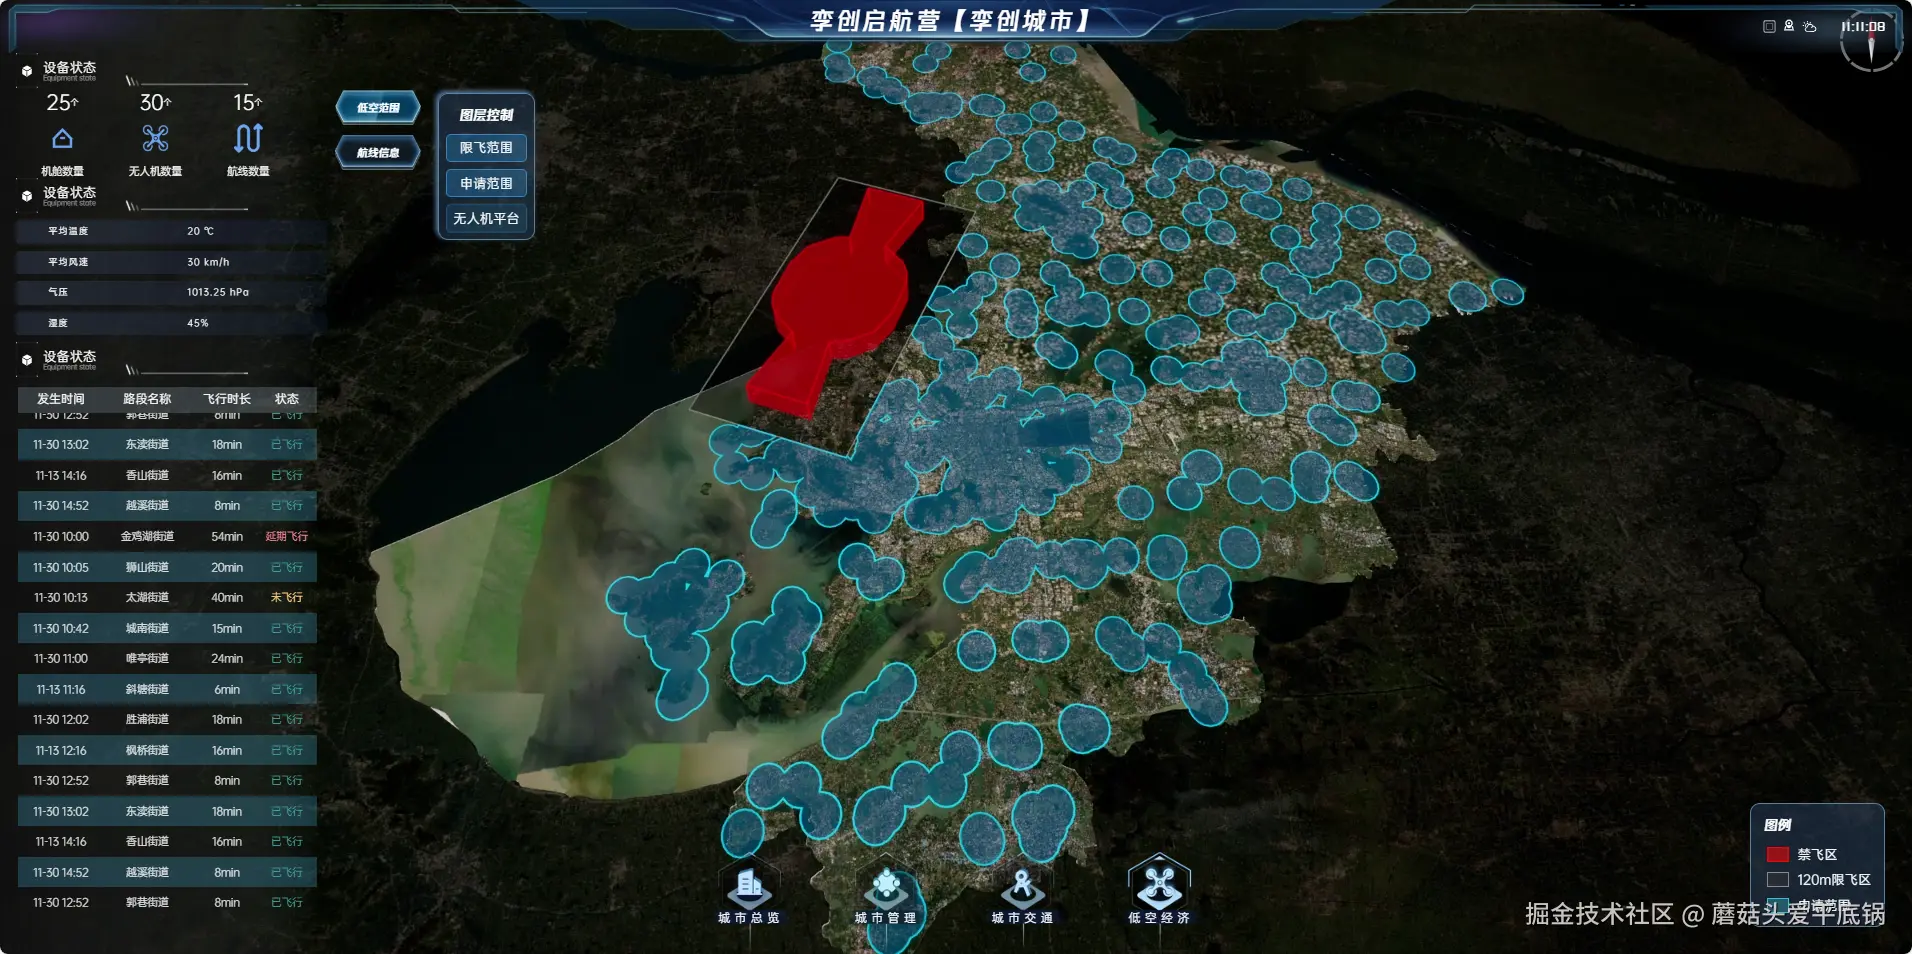
今天蘑菇头带来的是低空范围的功能实现分享,主要是当点击低空范围时会显示出所有的图层,包括限飞范围,申请范围和无人机平台,并且我们还做了一个图层控制的按钮,可以很方便的控制着三个图层的显示和隐藏,并且还做了相应的图例,快来看看是如何实现的吧。
思路
首先还是老样子,需要调整视角,设置暗黑模式这里我就不赘述了,直接看代码。
javascript
import { useDigitalTwinStore } from '@/stores/digitalTwin'
import { getForbidFlyRegion, getLimitFlyRegion, getApplyCoverage, getPlatformData } from '@/api/home'
const digitalTwinStore = useDigitalTwinStore()

const cameraParam = [554876.14875, 3386383.881719, 104995.88, -54.943035, -89.999977, 2]
const hideLayer = ['手工模型', 'cim2建筑', '苏州地形影像_Water']
const setStyles = async () => {
    //样式调整:a.打开黑暗模式  b.隐藏手工模型  c.调整地形影像的亮度
    await fdapi.camera.set(cameraParam)
    await fdapi.weather.setDarkMode(true)
    await fdapi.infoTree.hide(hideLayer.map(name => digitalTwinStore.digitalTwin[name]))
    await fdapi.tileLayer.setStyle(digitalTwinStore.digitalTwin['大地形影像'], null, null, null, 0.1)
    await fdapi.tileLayer.setStyle(digitalTwinStore.digitalTwin['苏州地形影像_Terrain'], null, null, null, 0.5)
}
然后我们分三步添加图层,分别是限飞范围,申请范围和无人机平台。
第一步添加限飞范围,限飞范围包括禁飞区和限飞区,首先我们先获取到这些区域的数据。在api下的home提供了获取这些geojson数据的接口,拿到这些数据后通过geoJSONLayer这个类进行绘制。由于返回的数据里面没有高度字段,所以我们手动添加一下,然后调整一下颜色透明度等等。
typescript
let geoJSONLayerIds: string[] = [];
// 添加禁飞区
const addForbidFlyRegion = async () => {
    const { data } = await getForbidFlyRegion()
    const feature = data.features[0]
    feature.properties.height = 3000
    console.log(data,'data');

    //分类渲染器
    let classBreaksRenderer = {
        //材质样式
        style: 16,
        //默认符号化配置
        defaultSymbol: {
            //符号化类型枚举:0 simple-marker圆形点填充  1 simple-line线填充  2 simple-fill面填充 3 polygon3d填充
            symbolType: 2,
            //填充色
            color: [1, 0, 0, 0.5],
            //轮廓线
            outline: {
                //线宽
                width: 1,
                //颜色
                color: [1, 0, 0, 1]
            }
        },
        //按field高度属性拉高面
        visualVariables: [
            {
                //控制可视化显示的类型:高度
                type: VisualType.Height,
                //属性字段名称
                field: 'height',
                //属性字段类型
                fieldType: FieldType.Number
            }
        ]
    }

    //用分类渲染器添加GeoJSONLayer
    fdapi.geoJSONLayer.add({
        id: 'forbidFlyRegion_geojson',
        visible: true, //加载后是否显示
        rotation: [0, 0, 0], //图层旋转
        offset: [0, 0, 10], //基于原始位置的偏移量
        needProject: false, //开启投影转换
        onTerrain: false, //是否贴地
        collision: true, //开启碰撞
        sourceJson: data,
        renderer: classBreaksRenderer
    })
    geoJSONLayerIds.push('forbidFlyRegion_geojson');
}
// 添加限飞区
const addLimitFlyRegion = async () => {
    const { data } = await getLimitFlyRegion()
    const feature = data.features[0]
    feature.properties.height = 120
    //分类渲染器
    let classBreaksRenderer = {
        //材质样式
        style: 16,
        //默认符号化配置
        defaultSymbol: {
            //符号化类型枚举:0 simple-marker圆形点填充  1 simple-line线填充  2 simple-fill面填充 3 polygon3d填充
            symbolType: 2,
            //填充色
            color: [0, 0, 0, 0.3],
            //轮廓线
            outline: {
                //线宽
                width: 1,
                //颜色
                color: [0.5, 0.5, 0.5, 1]
            }
        },
        //按field高度属性拉高面
        visualVariables: [
            {
                //控制可视化显示的类型:高度
                type: VisualType.Height,
                //属性字段名称
                field: 'height',
                //属性字段类型
                fieldType: FieldType.Number
            }
        ]
    }
    //用分类渲染器添加GeoJSONLayer
    fdapi.geoJSONLayer.add({
        id: 'addLimitFlyRegion_geojson',
        visible: true, //加载后是否显示
        rotation: [0, 0, 0], //图层旋转
        offset: [0, 0, 10], //基于原始位置的偏移量
        needProject: false, //开启投影转换
        onTerrain: false, //是否贴地
        collision: true, //开启碰撞
        sourceJson: data,
        renderer: classBreaksRenderer
    })
    geoJSONLayerIds.push('addLimitFlyRegion_geojson');
}
第二步添加申请范围,我们通过polygon来进行添加。
typescript
const polygonIds: string[] = []
// 添加申请范围
const addApplyCoverage = async () => {
    const { data } = await getApplyCoverage();
    const feature = data.features[0]
    const coordinates = feature.geometry.coordinates
    const polygonList: any[] = []
    coordinates.forEach((c: any, index: number) => {
        let p1 = {
            id: 'applyCoverage_' + index,
            coordinates: c,
            coordinateType: 0, //坐标系类型,取值范围:0为Projection类型,1为WGS84类型,2为火星坐标系(GCJ02),3为百度坐标系(BD09),默认值:0
            range: [0, 1000000], //可视范围:[近裁距离, 远裁距离],取值范围: [任意负值, 任意正值]
            color: [19 / 255, 103 / 255, 136 / 255, 0.5], //多边形的填充颜色
            frameColor: [0, 195 / 255, 255 / 255, 1],
            frameThickness: 200, //边框厚度
            intensity: 2, //亮度
            style: 0, //单色 请参照API开发文档选取枚举
            depthTest: false, //是否做深度检测 开启后会被地形高度遮挡
            priority: 1 //显示优先级 值越大显示越靠上
        }
        polygonList.push(p1)
        polygonIds.push(p1.id)
    })
    fdapi.polygon.add(polygonList)
}
第三步,添加无人机点位,我们通过marker添加。
typescript
// 添加无人机平台
const addPlatformLayer = async () => {
    const { data } = await getPlatformData()
    const markerList: any = []
    data.features.forEach((item: any, index: number) => {
        const coordinate = item.geometry.coordinates
        const size = 0.8
        let o1 = {
            id: 'platform_marker_' + index,
            groupId: 'platform_marker',
            coordinate: coordinate, //坐标位置
            coordinateType: 0, //默认0是投影坐标系,也可以设置为经纬度空间坐标系值为1
            anchors: [(-56 / 2) * size, 72 * size], //锚点,设置Marker的整体偏移,取值规则和imageSize设置的宽高有关,图片的左上角会对准标注点的坐标位置。示例设置规则:x=-imageSize.width/2,y=imageSize.height
            imageSize: [56 * size, 72 * size], //图片的尺寸
            range: [1, 10000000], //可视范围
            imagePath: '@path:无人机.png', //显示图片路径

            autoHidePopupWindow: true, //失去焦点后是否自动关闭弹出窗口
            autoHeight: false, // 自动判断下方是否有物体
            displayMode: 1, //智能显示模式  开发过程中请根据业务需求判断使用四种显示模式
            clusterByImage: true, // 聚合时是否根据图片路径分类,即当多个marker的imagePath路径参数相同时按路径对marker分类聚合
            priority: 0, //避让优先级
            occlusionCull: false //是否参与遮挡剔除
        }
        markerList.push(o1)
    })
    fdapi.marker.add(markerList)
}
OK,添加完这三个图层之后就是通过按钮来控制这些图层的显示和隐藏了。首先我们找到这些按钮的位置,在children下的scope.vue文件下,然后添加点击事件,在点击事件中来控制图层的显示和隐藏。我们在刚刚的init文件夹下再抛出三个方法来控制图层。
dart
//  切换显示隐藏-限飞范围
export const changeRestrictFlyLayer = async (show: boolean) => {
    if (show) {
        fdapi.geoJSONLayer.show(geoJSONLayerIds)
    } else {
        fdapi.geoJSONLayer.hide(geoJSONLayerIds)
    }
}
//  切换显示隐藏-申请范围
export const changeApplyCoverage = async (show: boolean) => {
    if (show) {
        fdapi.polygon.show(polygonIds)
    } else {
        fdapi.polygon.hide(polygonIds)
    }
}
//  切换显示隐藏-无人机平台
export const changePlatformLayer = async (show: boolean) => {
    if (show) {
        fdapi.marker.showByGroupId('platform_marker')
    } else {
        fdapi.marker.hideByGroupId('platform_marker')
    }
}
然后在scope中使用这些方法即可。
最后当组件卸载前需要做一些删除清理操作
dart
export const exitLowAltitudeRange = async () => {
    await fdapi.weather.setDarkMode(false)
    await fdapi.infoTree.show(hideLayer.map(name => digitalTwinStore.digitalTwin[name]))
    await fdapi.tileLayer.setStyle(digitalTwinStore.digitalTwin['大地形影像'], null, null, null, 0.3)
    await fdapi.tileLayer.setStyle(digitalTwinStore.digitalTwin['苏州地形影像_Terrain'], null, null, null, 1)

    fdapi.geoJSONLayer.delete(geoJSONLayerIds)
    fdapi.polygon.delete(polygonIds)
    fdapi.marker.deleteByGroupId('platform_marker')
}
涉及的飞渡api
- 通过geoJSONLayer添加面-fdapi.geoJSONLayer.add
- 显示geoJSONLayer-fdapi.geoJSONLayer.show(geoJSONLayerIds)
- 隐藏geoJSONLayer-fdapi.geoJSONLayer.hide(geoJSONLayerIds)
- 通过polygon添加面-fdapi.polygon.add()
- 显示polygon-fdapi.polygon.show(polygonIds)
- 隐藏polygon-fdapi.polygon.hide(polygonIds)
- 添加点-fdapi.marker.add()
- 显示点-fdapi.marker.showByGroupId('platform_marker')
- 隐藏点-fdapi.marker.hideByGroupId('platform_marker')