本文接上篇继续更新ArkUI中组件的使用,本文介绍的组件有TextArea组件、RichEditor组件、RichText组件、Search组件,这几个组件的使用对应特定场景,使用时更加需要注意根据需求去使用
TextArea组件
官方文档:
TextArea-文本与输入-ArkTS组件-ArkUI(方舟UI框架)-应用框架 - 华为HarmonyOS开发者
参数表:
| 名称 | 类型 | 必填 | 说明 |
|---|---|---|---|
| placeholder | ResourceStr | 否 | 设置无输入时的提示文本。输入内容后,提示文本不显示。 仅设置placeholder属性时,手柄依然跟随拖动,手柄松开后光标停留在文字开头位置。 |
| text | ResourceStr | 否 | 设置输入框当前的文本内容。 建议通过onChange事件将状态变量与文本实时绑定, 避免组件刷新时TextArea中的文本内容异常。 从API version 10开始,该参数支持[](https://developer.huawei.com/consumer/cn/doc/harmonyos-guides-V5/arkts-two-way-sync-V5 "")双向绑定变量。 |
| controller8+ | TextAreaController | 否 | 设置TextArea控制器。 |
TextArea组件多行文本输入框组件,当输入的文本内容超过组件宽度时会自动换行显示,在以下案例中,展示了三个多行文本输入框,第一个是默认的,并没有给高度,第二个给了高度,以及占位字符,第三个加上了,最大字符数,以及显示计数器,在输入时可通过onChange回调函数获取到输入框中的值
| 属性名称 | 描述 | 可选值或默认值 |
|---|---|---|
| placeholder | 设置文本框的提示文本 | 字符串值,如代码中的 '请输入内容' |
| width | 设置文本框的宽度 | 可设置为数字、百分比等,如代码中的 '100%' |
| height | 设置文本框的高度 | 可设置为像素值等,如代码中的 150 |
| maxLength | 设置文本框的最大输入长度 | 正整数,如代码中的 20 |
| showCounter | 是否显示输入计数器 | boolean 值,如代码中的 true |
代码部分:
TypeScript
@Component
export struct TextAreaCase {
  build() {
    NavDestination() {
      Column({ space: 20 }) {
        TextArea()
        TextArea({
          placeholder: '请输入内容',
        })
          .width('100%')
          .height(150)
        TextArea({
          placeholder: '请输入内容',
        })
          .width('100%')
          .height(150)
          .maxLength(20)// 设置最大长度
          .showCounter(true) // 显示计数器
      }
      .justifyContent(FlexAlign.Center)
      .height('100%')
      .width('80%')
    }.height('100%')
    .width('100%')
    .title('展示TextArea')
  }
}


@Builder
function TextAreaCaseBuilder() {
  TextAreaCase()
}
展示效果:
RichEditor组件
官方文档:
RichEditor-文本与输入-ArkTS组件-ArkUI(方舟UI框架)-应用框架 - 华为HarmonyOS开发者
支持图文混排和文本交互式编辑的组件,这个组件属于是用法·多样化,一般使用场景在,对输入内容有多中交互,以及输入内容有多样化需求的场景中
| 属性/设置 | 描述 | 可选值或默认值 |
|---|---|---|
options |
配置 RichEditor 的选项,如控制器 controller |
RichEditorOptions 对象,包含控制器等配置项 |
onReady |
组件准备就绪时的回调函数,用于注册事件或初始化操作 | 回调函数,如代码中的注册文本变化回调和设置属性字符串 |
controller |
RichEditor 的控制器,用于操作和获取组件的内容和状态 |
RichEditorController 或 RichEditorStyledStringController 对象 |
StyledString |
属性字符串,包含文本和样式信息 | 包含文本和样式范围的对象 |
MutableStyledString |
可变属性字符串,允许动态修改文本和样式 | 包含初始文本和样式范围的对象 |
这里借用官方案例做展示,这里需要关注的点在于,RichEditor({controller:控制器}),这里边的控制器,这个编辑器里的组件可以通过控制器控制其行为
代码部分:
TypeScript
import { image } from '@kit.ImageKit';
import { LengthMetrics } from '@kit.ArkUI';

@Component
export struct RichEditorCase {
  stringLength: number = 0;
  imagePixelMap: image.PixelMap | undefined = undefined;
  @State selection: string = "";
  @State content: string = "";
  @State range: string = "";
  @State replaceString: string = "";
  @State rangeBefore: string = "";
  @State rangeAfter: string = "";
  richEditorStyledString: MutableStyledString = new MutableStyledString("");
  textStyle: TextStyle = new TextStyle({
    fontWeight: FontWeight.Lighter,
    fontFamily: 'HarmonyOS Sans',
    fontColor: Color.Green,
    fontSize: LengthMetrics.vp(30),
    fontStyle: FontStyle.Normal
  })
  fontStyle1: TextStyle = new TextStyle({ fontColor: Color.Blue });
  fontStyle2: TextStyle = new TextStyle({
    fontWeight: FontWeight.Bolder,
    fontFamily: 'Arial',
    fontColor: Color.Orange,
    fontSize: LengthMetrics.vp(30),
    fontStyle: FontStyle.Italic
  })
  controller1: RichEditorController = new RichEditorController()
  options1: RichEditorOptions = { controller: this.controller1 };
  // 创建属性字符串对象
  mutableStyledString: MutableStyledString = new MutableStyledString("初始属性字符串",
    [{
      start: 0,
      length: 5,
      styledKey: StyledStringKey.FONT,
      styledValue: this.fontStyle1
    }]);
  styledString: StyledString = new StyledString("插入属性字符串",
    [{
      start: 2,
      length: 4,
      styledKey: StyledStringKey.FONT,
      styledValue: this.fontStyle2
    }]);
  controller: RichEditorStyledStringController = new RichEditorStyledStringController();
  options: RichEditorStyledStringOptions = { controller: this.controller };
  // 文本内容变化回调
  contentChangedListener: StyledStringChangedListener = {
    onWillChange: (value: StyledStringChangeValue) => {
      this.range = '[ ' + value.range.start + ' , ' + value.range.end + ' ]';
      this.replaceString = value.replacementString.getString();
      return true;
    },
    onDidChange: (rangeBefore, rangeAfter) => {
      this.rangeBefore = '[ ' + rangeBefore.start + ' , ' + rangeBefore.end + ' ]';
      this.rangeAfter = '[ ' + rangeAfter.start + ' , ' + rangeAfter.end + ' ]';
    }
  }

  async aboutToAppear() {
    console.info("aboutToAppear initial imagePixelMap");
    this.imagePixelMap = await this.getPixmapFromMedia($r('app.media.app_icon'));
  }

  build() {
    NavDestination() {
      Column({ space: 6 }) {
        Column() {
          Text("选中区信息")
            .fontSize(20)
            .width("100%")
          Text("selection range: " + this.selection).width("100%")
          Text("selection content: " + this.content).width("100%")
        }
        .width("100%")
        .height("10%")

        Column() {
          Text("onWillChange回调信息")
            .fontSize(20)
            .width("100%")
          Text("range: " + this.range).width("100%")
          Text("replacementString: " + this.replaceString).width("100%")
          Text("onWillChange回调信息")
            .fontSize(20)
            .width("100%")
          Text("rangeBefore: " + this.rangeBefore).width("100%")
          Text("rangeAfter: " + this.rangeAfter).width("100%")
        }
        .borderWidth(1)
        .borderColor(Color.Black)
        .width("100%")
        .height("20%")

        RichEditor(this.options)
          .onReady(() => {
            // 注册文本变化回调
            this.controller.onContentChanged(this.contentChangedListener);
            // 设定组件展示的属性字符串
            this.controller.setStyledString(this.mutableStyledString);
          })
          .height("20%")
          .width("100%")

        RichEditor(this.options1)
          .onReady(() => {
            this.controller1.addTextSpan("把这些文字转换成属性字符串");
          })
          .height("10%")
          .width("100%")
          .borderWidth(1)
          .borderColor(Color.Black)

        Row({ space: 2 }) {
          Button("插入图片")
            .stateEffect(true)
            .onClick(() => {
              if (this.imagePixelMap !== undefined) {
                let imageStyledString = new MutableStyledString(new ImageAttachment({
                  value: this.imagePixelMap,
                  size: { width: 50, height: 50 },
                  layoutStyle: { borderRadius: LengthMetrics.vp(10) },
                  verticalAlign: ImageSpanAlignment.BASELINE,
                  objectFit: ImageFit.Contain
                }))
                // 获取组件展示的属性字符串
                this.richEditorStyledString = this.controller.getStyledString();
                this.richEditorStyledString.appendStyledString(imageStyledString);
                // 使插入图片后的属性字符串展示在组件上
                this.controller.setStyledString(this.richEditorStyledString);
                this.controller.setCaretOffset(this.richEditorStyledString.length);
              }
            })
          Button("插入文本").onClick(() => {
            // 获取组件展示的属性字符串
            this.richEditorStyledString = this.controller.getStyledString();
            this.richEditorStyledString.appendStyledString(this.styledString);
            // 使插入文本后的属性字符串展示在组件上
            this.controller.setStyledString(this.richEditorStyledString);
            this.controller.setCaretOffset(this.richEditorStyledString.length);
          })
          Button("删除选中内容").onClick(() => {
            // 获取选中范围
            let richEditorSelection = this.controller.getSelection();
            let start = richEditorSelection.start ? richEditorSelection.start : 0;
            let end = richEditorSelection.end ? richEditorSelection.end : 0;
            if (start < 0 || end <= start) {
              return;
            }
            // 获取组件展示的属性字符串
            this.richEditorStyledString = this.controller.getStyledString();
            this.richEditorStyledString.removeString(start, end - start);
            // 使删除内容后的属性字符串展示在组件上
            this.controller.setStyledString(this.richEditorStyledString);
          })
        }

        Row({ space: 2 }) {
          Button("获取选中内容").onClick(() => {
            // 获取选中范围
            let richEditorSelection = this.controller.getSelection();
            let start = richEditorSelection.start ? richEditorSelection.start : 0;
            let end = richEditorSelection.end ? richEditorSelection.end : 0;
            // 获取组件展示的属性字符串
            this.richEditorStyledString = this.controller.getStyledString();
            this.selection = '[ ' + start + ' , ' + end + ' ]';
            if (start == end) {
              this.content = "";
            } else {
              this.content = this.richEditorStyledString.subStyledString(start, end - start).getString();
            }
          })
          Button("更新选中样式").onClick(() => {
            // 获取选中范围
            let richEditorSelection = this.controller.getSelection();
            let start = richEditorSelection.start ? richEditorSelection.start : 0;
            let end = richEditorSelection.end ? richEditorSelection.end : 0;
            if (start < 0 || end <= start) {
              return;
            }
            // 获取组件展示的属性字符串
            this.richEditorStyledString = this.controller.getStyledString();
            this.richEditorStyledString.setStyle({
              start: start,
              length: end - start,
              styledKey: StyledStringKey.FONT,
              styledValue: this.textStyle
            })
            // 使变更样式后的属性字符串展示在组件上
            this.controller.setStyledString(this.richEditorStyledString);
          })
        }

        Row({ space: 2 }) {
          //将属性字符串转换成span信息
          Button("调用fromStyledString").onClick(() => {
            this.controller1.addTextSpan("调用fromStyledString:" +
            JSON.stringify(this.controller1.fromStyledString(this.mutableStyledString)))
          })
          //将给定范围的组件内容转换成属性字符串
          Button("调用toStyledString").onClick(() => {
            this.controller.setStyledString(this.controller1.toStyledString({ start: 0, end: 13 }))
          })
        }
      }
      .justifyContent(FlexAlign.Center)
      .height('100%')
      .width('100%')
    }.height('100%')
    .width('100%')
    .title('展示RichEditor')
  }

  private async getPixmapFromMedia(resource: Resource) {
    let unit8Array = await getContext(this)?.resourceManager?.getMediaContent({
      bundleName: resource.bundleName,
      moduleName: resource.moduleName,
      id: resource.id
    })
    let imageSource = image.createImageSource(unit8Array.buffer.slice(0, unit8Array.buffer.byteLength))
    let createPixelMap: image.PixelMap = await imageSource.createPixelMap({
      desiredPixelFormat: image.PixelMapFormat.RGBA_8888
    })
    await imageSource.release()
    return createPixelMap
  }
}


@Builder
function RichEditorCaseBuilder() {
  RichEditorCase()
}
效果展示:
RichText组件
官方文档:
RichText-文本与输入-ArkTS组件-ArkUI(方舟UI框架)-应用框架 - 华为HarmonyOS开发者
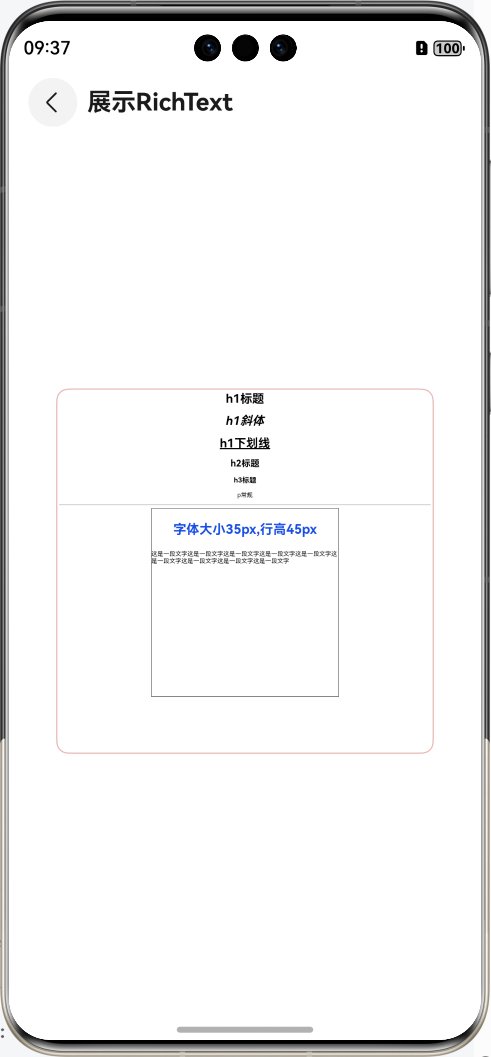
富文本组件,解析并显示HTML格式文本,可以在页面中展示HTML格式的文本,接收一个HTML格式字符串,这里的重点在于RichText("HTML格式字符串")
| 属性名称 | 描述 | 可选值或默认值 |
|---|---|---|
| width | 设置组件的宽度 | 可设置为像素值、百分比等,如代码中的 '80%' |
| height | 设置组件的高度 | 可设置为像素值等,如代码中的 300 |
| border | 设置边框属性 | 包含边框宽度、颜色、圆角等,如代码中的 .border({ width: 4 }) 等 |
| borderWidth | 设置边框宽度 | 可设置为像素值等,如代码中的 1 |
| borderColor | 设置边框颜色 | 颜色值,如代码中的 '#E6B5B2' |
| borderRadius | 设置边框圆角半径 | 可设置为像素值等,如代码中的 10 |
代码部分:
TypeScript
@Component
export struct RichTextCase {
  @State data: string = '<h1 style="text-align: center;">h1标题</h1>' +
    '<h1 style="text-align: center;"><i>h1斜体</i></h1>' +
    '<h1 style="text-align: center;"><u>h1下划线</u></h1>' +
    '<h2 style="text-align: center;">h2标题</h2>' +
    '<h3 style="text-align: center;">h3标题</h3>' +
    '<p style="text-align: center;">p常规</p><hr/>' +
    '<div style="width: 500px;height: 500px;border: 1px solid;margin: 0 auto;">' +
    '<p style="font-size: 35px;text-align: center;font-weight: bold; color: rgb(24,78,228)">字体大小35px,行高45px</p>' +
    '<p style="background-color: #e5e5e5;line-height: 45px;font-size: 35px;text-indent: 2em;">' +
    '<p>这是一段文字这是一段文字这是一段文字这是一段文字这是一段文字这是一段文字这是一段文字这是一段文字这是一段文字</p>';

  build() {
    NavDestination() {
      Column({ space: 20 }) {
        RichText(this.data)
          .width('80%')
          .height(300)
          .border({ width: 4 })
          .borderWidth(1)
          .borderColor('#E6B5B2')
          .borderRadius(10)
      }
      .justifyContent(FlexAlign.Center)
      .height('100%')
      .width('100%')
    }.height('100%')
    .width('100%')
    .title('展示RichText')
  }
}


@Builder
function RichTextCaseBuilder() {
  RichTextCase()
}
效果展示:
Search组件
官方文档:
Search-文本与输入-ArkTS组件-ArkUI(方舟UI框架)-应用框架 - 华为HarmonyOS开发者
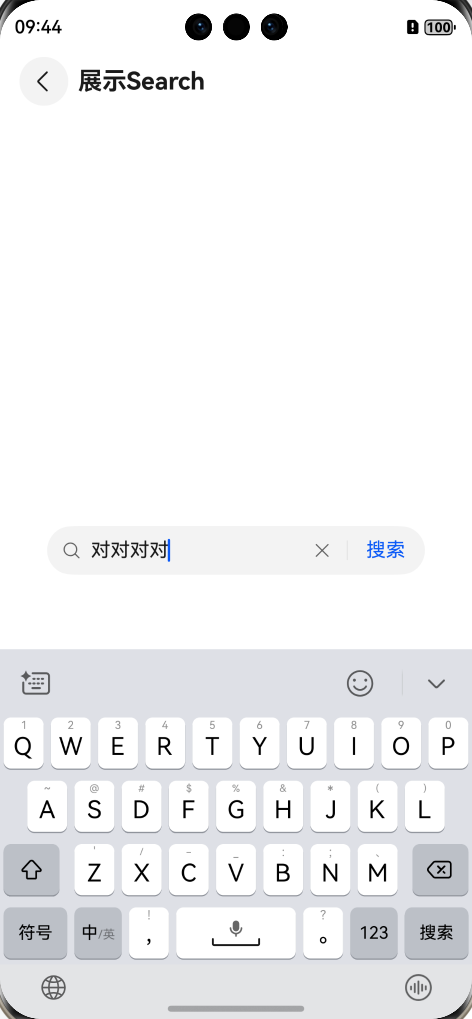
搜索框组件 ,是一个鸿蒙系统重标准的搜索框样式,可修改其参数以及属性去根据需求自定义效果,这里是参数表
| 参数名 | 类型 | 必填 | 说明 |
|---|---|---|---|
| value | string | 否 | 设置当前显示的搜索文本内容。 从API version 10开始,该参数支持[](https://developer.huawei.com/consumer/cn/doc/harmonyos-guides-V5/arkts-two-way-sync-V5 "")双向绑定变量。 |
| placeholder | ResourceStr10+ | 否 | 设置无输入时的提示文本。 |
| icon | string | 否 | 设置搜索图标路径,默认使用系统搜索图标。 说明: icon的数据源支持本地图片和网络图片。 - 支持的图片格式包括png、jpg、bmp、svg、gif、pixelmap和heif。 - 支持Base64字符串。格式data:image/png|jpeg|bmp|webp|heif;base64,base64 data, 其中base64 data为Base64字符串数据。 如果与属性searchIcon同时设置,则searchIcon优先。 |
| controller | SearchController | 否 | 设置Search组件控制器。 |
代码部分:
这里通过searchButton属性设置了搜索框尾部的按钮字样
TypeScript
@Component
export struct SearchCase {
  build() {
    NavDestination() {
      Column({ space: 20 }) {
        Search({ placeholder: '请输入内容' })
          .searchButton('搜索')
      }
      .justifyContent(FlexAlign.Center)
      .height('100%')
      .width('80%')
    }.height('100%')
    .width('100%')
    .title('展示Search')
  }
}


@Builder
function SearchCaseBuilder() {
  SearchCase()
}
效果展示:
本文就介绍到TextArea组件,RichEditor组件,RichText组件以及Search组件了,持续更新中..............