前一周完成了一个项目,体测成绩转换的工具,没做记录,。这次计划开发一个地图应用小程序,记录一下。方便给使用的人。
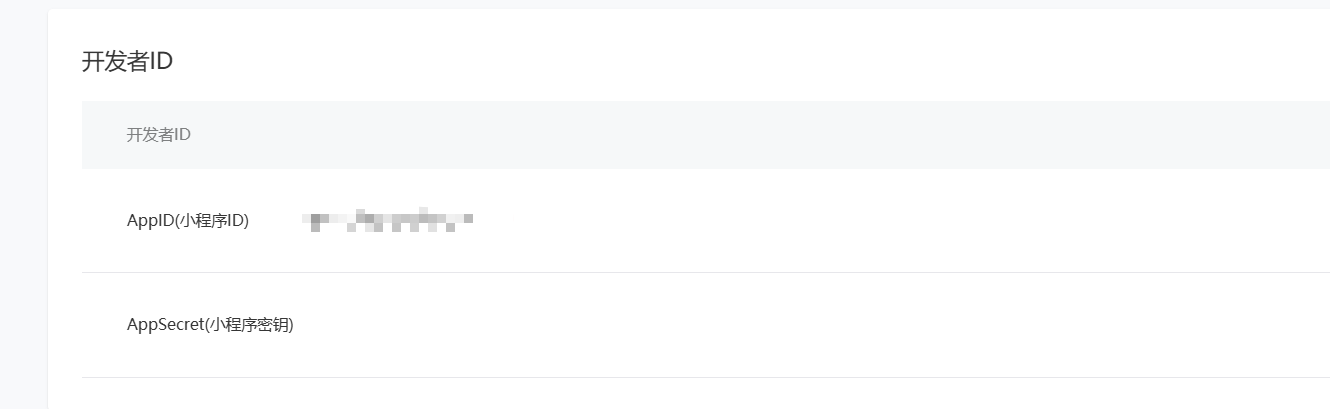
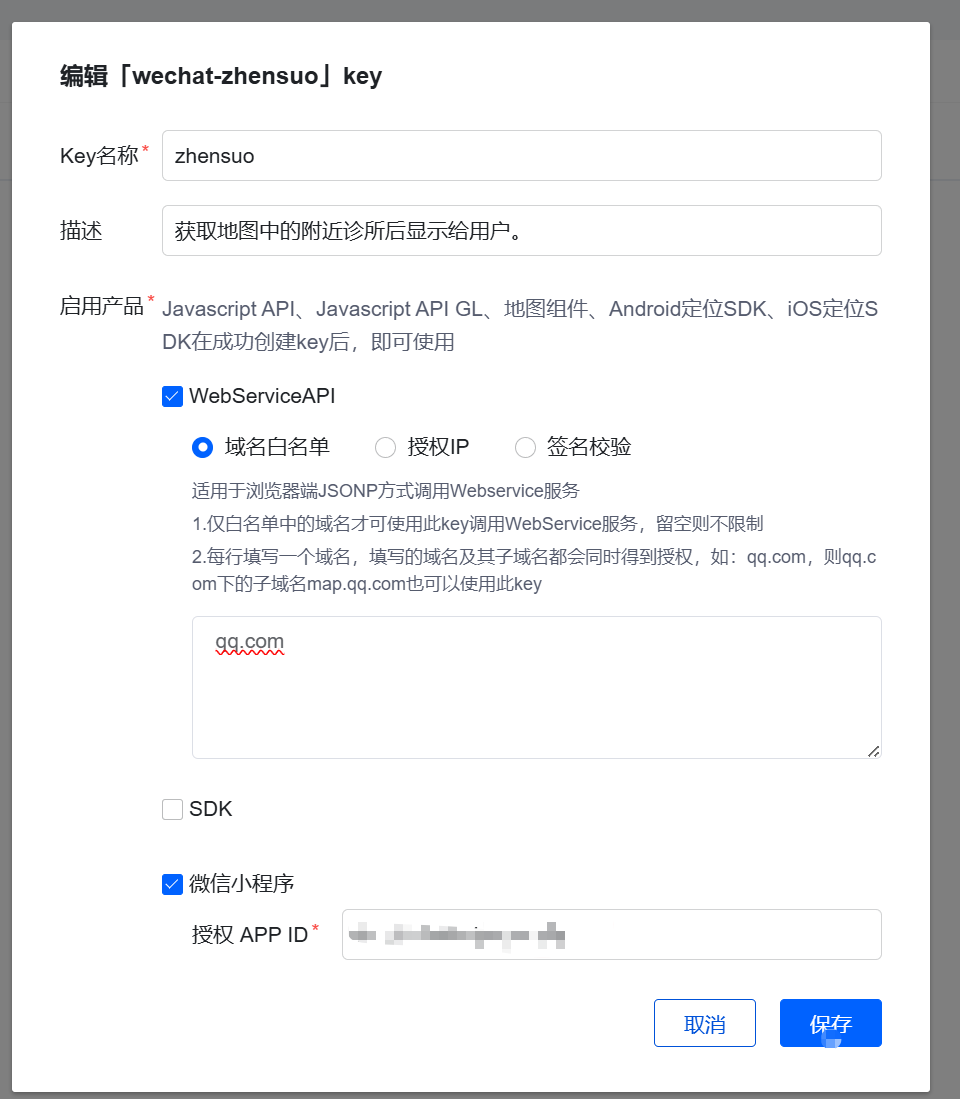
一、申请微信小程序,填写相应的信息,取得开发者ID。这个要给腾讯地图使用的。
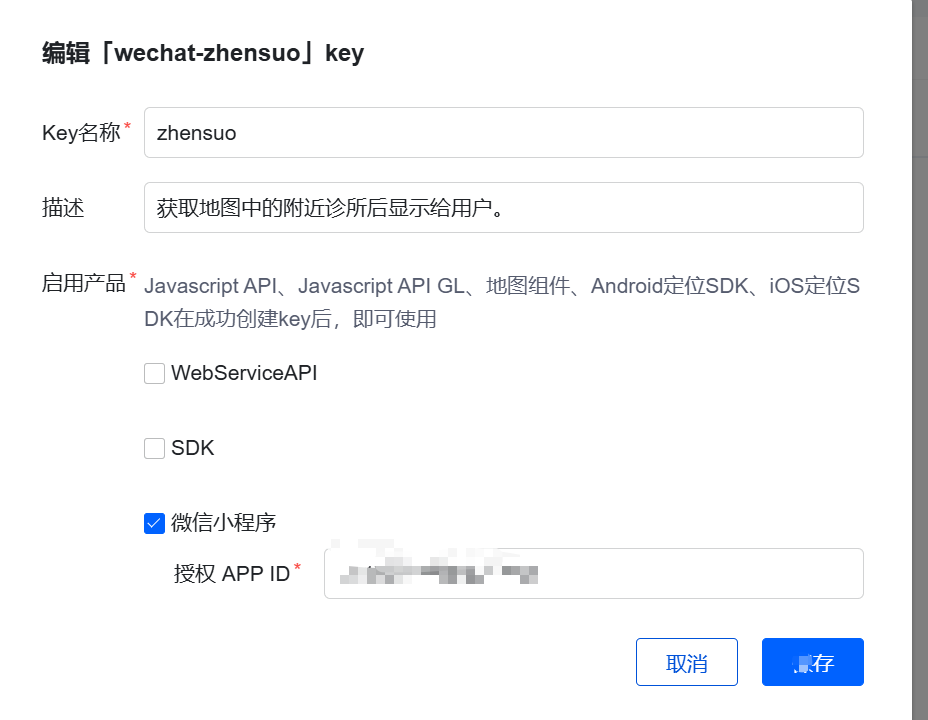
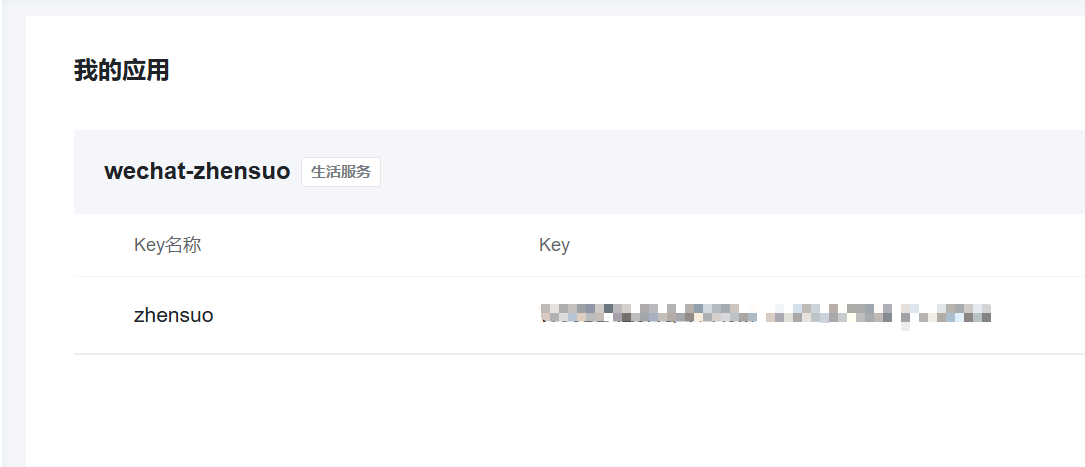
 二、申请腾讯地图API,创建应用,个人版,6500次调用 。并发5.也还行吧。
好了,我们开始。
三、新建一个文件夹,我的是win系统。
放在如下位置。D:\gitee\wechat-map
在目录处:cmd
四、创建环境相关。
我使用的是react+taro等,因为工程量小,不再搞复杂了。
参考 :安装及使用 | Taro 文档
看操作记录:
npm install -g @tarojs/cli
taro init wechat-map
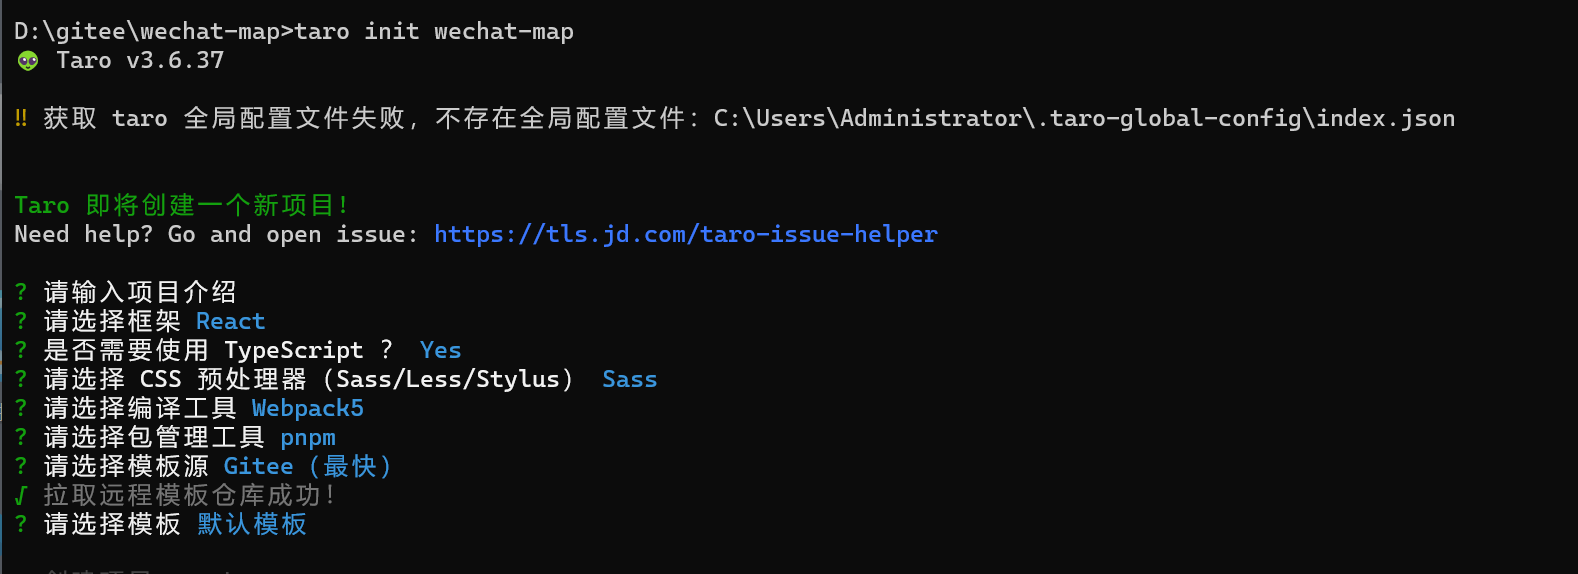
cd wechat-map
pnpm install
五、 打开vscode,编译一下。
退出当前用户,重新登录一个用户。你懂的。
打开terminal,pnpm dev:weapp
我用的是taro 3.6.37,可能有点低,再说吧。
六,打开微信开发者工具。
直接导入项目即可,找到目录。其他自动生成。
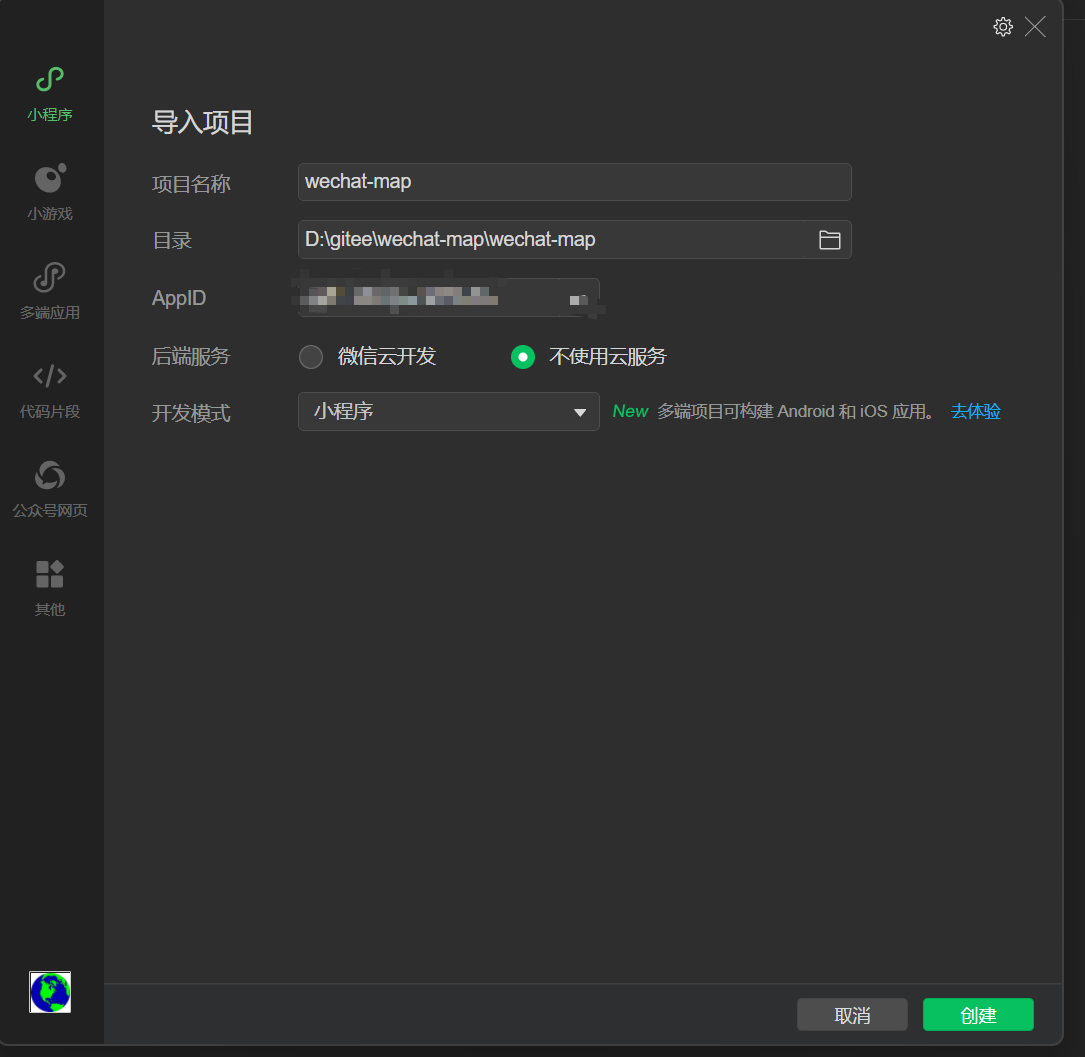
注意清缓存,编译。
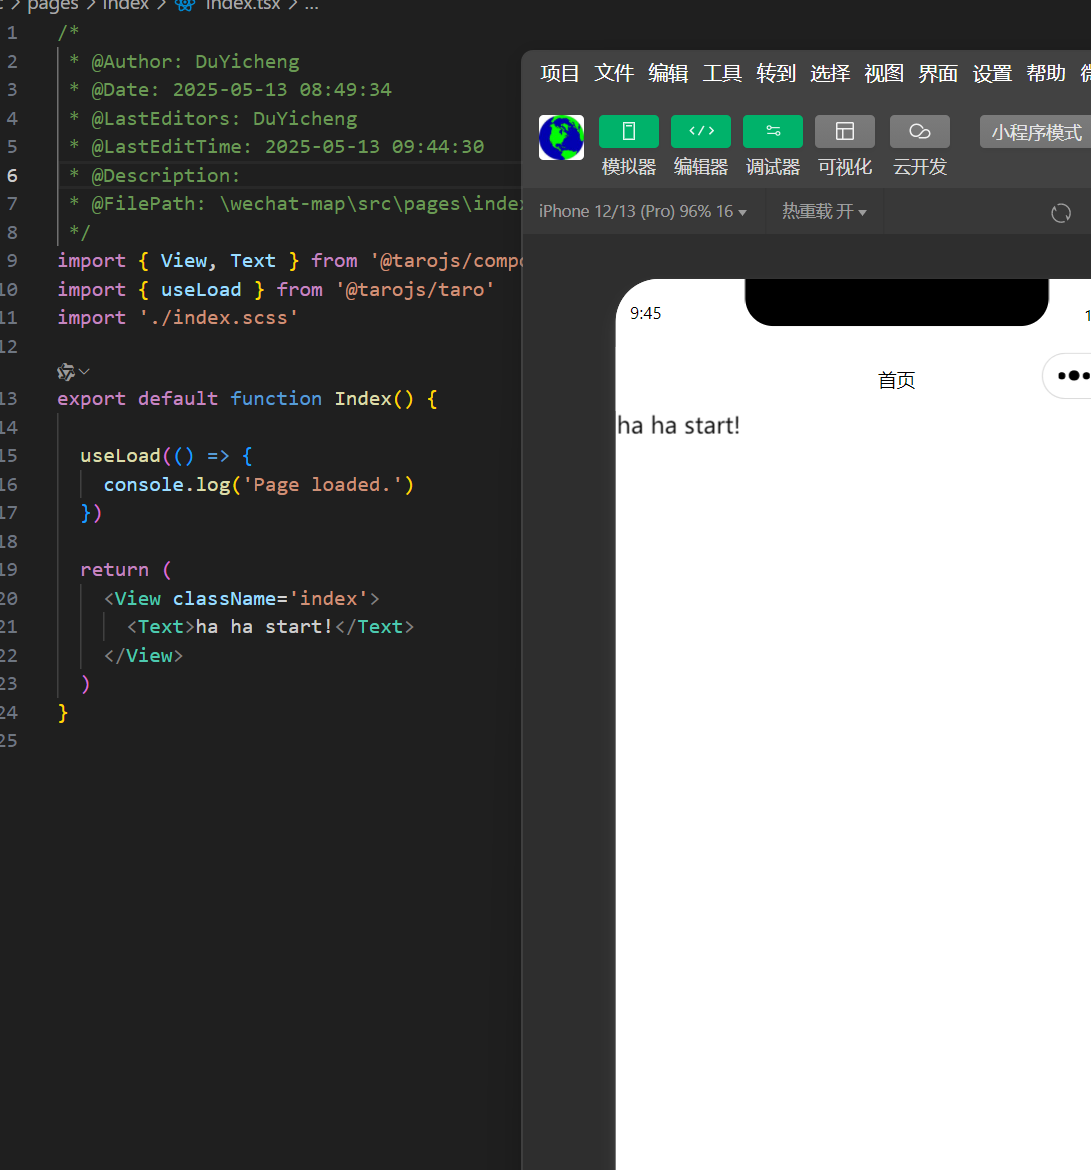
七、正式开始吧,来个首页
/*
* @Author: DuYicheng
* @Date: 2025-05-13 08:49:34
* @LastEditors: DuYicheng
* @LastEditTime: 2025-05-13 09:57:00
* @Description:
* @FilePath: \wechat-map\src\pages\index\index.tsx
*/
import { View, Text, Image } from '@tarojs/components'
import { useLoad } from '@tarojs/taro'
import './index.scss'
export default function Index() {
useLoad(() => {
console.log('Page loaded.')
})
return (
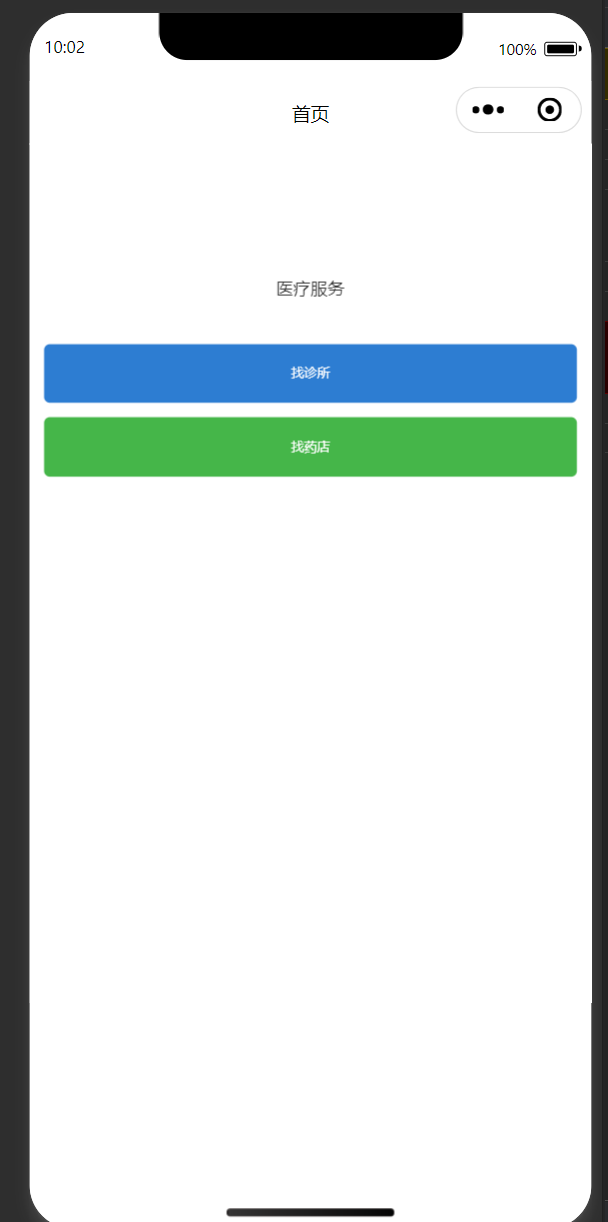
<View className='index'>
<View className='logo-container'>
<Image
className='medical-logo'
src='../../assets/images/medical-logo.png'
mode='aspectFit'
/>
<Text className='title'>医疗服务</Text>
</View>
<View className='button-container'>
<View className='find-button clinic'>
找诊所
</View>
<View className='find-button pharmacy'>
找药店
</View>
</View>
</View>
)
}
.index {
display: flex;
flex-direction: column;
align-items: center;
padding: 40px 20px;
}
.logo-container {
display: flex;
flex-direction: column;
align-items: center;
margin-bottom: 60px;
.medical-logo {
width: 120px;
height: 120px;
margin-bottom: 20px;
}
.title {
font-size: 24px;
color: #333;
}
}
.button-container {
width: 100%;
display: flex;
flex-direction: column;
gap: 20px;
padding: 0 40px; // 添加内边距使按钮更窄
}
.find-button {
width: 100%;
height: 80px; // 增加按钮高度
display: flex;
align-items: center;
justify-content: center;
border-radius: 8px;
font-size: 18px;
color: #fff;
&.clinic {
background-color: #2D7DD2;
}
&.pharmacy {
background-color: #45B649;
}
}
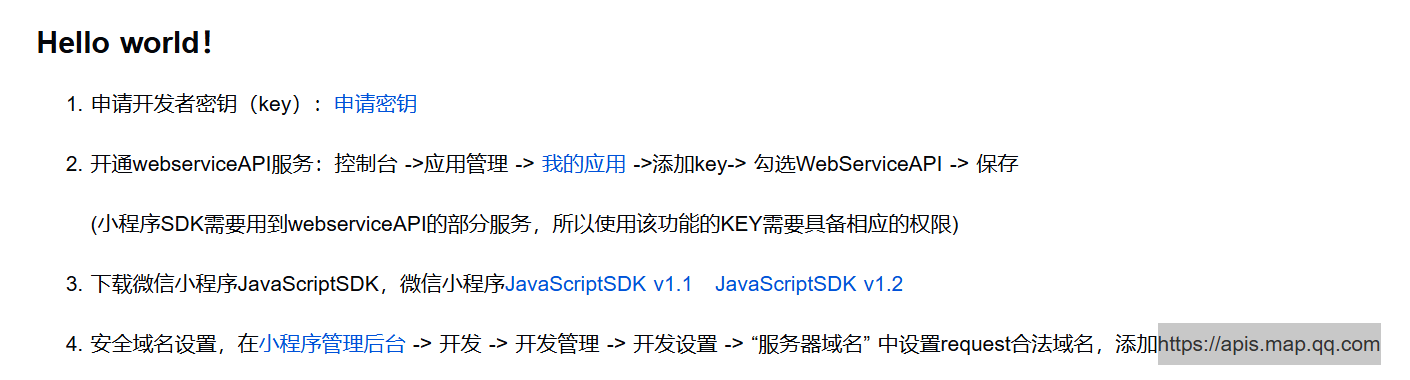
八、小程序sdk配置。
 九、实现按钮的跳转。
先实现诊所功能。
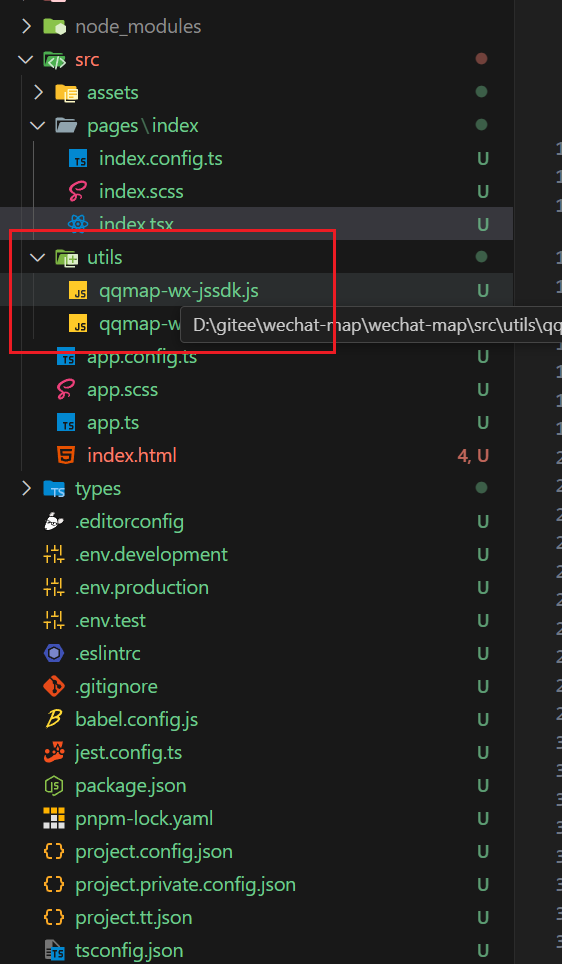
1.结构图
src/
  ├── assets/
  ├── pages/
  │   ├── index/
  │   └── clinic-map/
  │       ├── index.tsx
  │       ├── index.scss
  │       └── index.config.ts
  └── utils/
      └── qqmap-wx-jssdk.js
2.主页面调整代码如:
import { View, Text, Image } from '@tarojs/components'
import { useLoad, navigateTo } from '@tarojs/taro'
import './index.scss'

export default function Index() {
  useLoad(() => {
    console.log('Page loaded.')
  })

  const handleFindClinic = () => {
    navigateTo({
      url: '/pages/clinic-map/index'
    })
  }

  return (
    <View className='index'>
      <View className='logo-container'>
        <Image
          className='medical-logo'
          src='../../assets/medical-logo.png'
          mode='aspectFit'
        />
        <Text className='title'>医疗服务</Text>
      </View>
      <View className='button-container'>
        <View className='find-button clinic' onClick={handleFindClinic}>
          找诊所
        </View>
        <View className='find-button pharmacy'>
          找药店
        </View>
      </View>
    </View>
  )
}
3.诊所地图
import { View, Map } from '@tarojs/components'
import Taro, { useLoad } from '@tarojs/taro'
import { useState } from 'react'
import './index.scss'
const QQMapWX = require('../../utils/qqmap-wx-jssdk.js')
let qqmapsdk
export default function ClinicMap() {
const [latitude, setLatitude] = useState(0)
const [longitude, setLongitude] = useState(0)
const [clinics, setClinics] = useState([])
useLoad(() => {
// 初始化地图SDK
qqmapsdk = new QQMapWX({
key: 'YOUR_KEY_HERE' // 替换成你的腾讯地图key
})
// 获取当前位置权限
Taro.getLocation({
type: 'gcj02',
success: function(res) {
setLatitude(res.latitude)
setLongitude(res.longitude)
searchNearbyClinic(res.latitude, res.longitude)
},
fail: function() {
Taro.showToast({
title: '需要授权位置信息',
icon: 'none'
})
}
})
})
const searchNearbyClinic = (lat, lng) => {
qqmapsdk.search({
keyword: '诊所',
location: `${lat},${lng}`,
success: function(res) {
console.log(res)
setClinics(res.data)
},
fail: function(res) {
console.error(res)
Taro.showToast({
title: '搜索诊所失败',
icon: 'none'
})
}
})
}
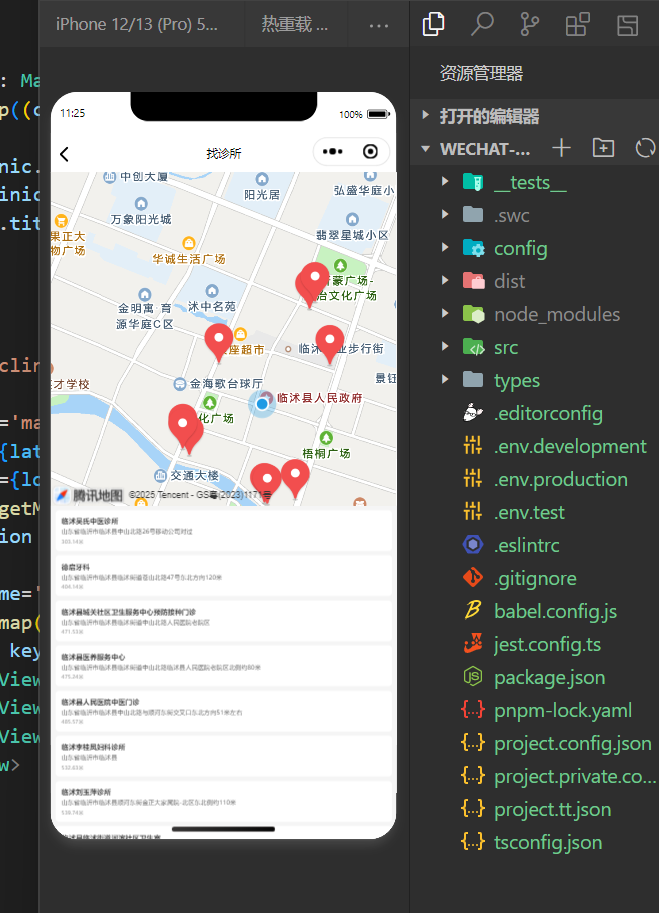
return (
<View className='clinic-map'>
<Map
className='map'
latitude={latitude}
longitude={longitude}
markers={clinics.map((clinic, index) => ({
id: index,
latitude: clinic.location.lat,
longitude: clinic.location.lng,
title: clinic.title
}))}
show-location
/>
<View className='clinic-list'>
{clinics.map((clinic, index) => (
<View key={index} className='clinic-item'>
<View className='clinic-name'>{clinic.title}</View>
<View className='clinic-address'>{clinic.address}</View>
<View className='clinic-distance'>{clinic._distance}米</View>
</View>
))}
</View>
</View>
)
}4.地图样式
.clinic-map {
  height: 100vh;
  display: flex;
  flex-direction: column;

  .map {
    width: 100%;
    height: 50vh;
  }

  .clinic-list {
    flex: 1;
    overflow-y: auto;
    padding: 10px;
    background: #f5f5f5;

    .clinic-item {
      background: #fff;
      margin-bottom: 10px;
      padding: 15px;
      border-radius: 8px;

      .clinic-name {
        font-size: 16px;
        font-weight: bold;
        color: #333;
        margin-bottom: 5px;
      }

      .clinic-address {
        font-size: 14px;
        color: #666;
        margin-bottom: 5px;
      }

      .clinic-distance {
        font-size: 12px;
        color: #999;
      }
    }
  }
}
5.创建页面配置
export default {
  navigationBarTitleText: '找诊所',
  navigationBarBackgroundColor: '#ffffff',
  navigationBarTextStyle: 'black'
}
6.修改:app.config.ts
export default defineAppConfig({
  pages: [
    'pages/index/index',
    'pages/clinic-map/index'
  ],
  window: {
    backgroundTextStyle: 'light',
    navigationBarBackgroundColor: '#fff',
    navigationBarTitleText: 'WeChat',
    navigationBarTextStyle: 'black'
  },
  permission: {
    'scope.userLocation': {
      desc: '你的位置信息将用于小程序位置接口的效果展示'
    }
  }
})
7.修改project.config.json
{
  // ...existing code...
  "permission": {
    "scope.userLocation": {
      "desc": "你的位置信息将用于小程序位置接口的效果展示"
    }
  }
  // ...existing code...
}
其他建议:
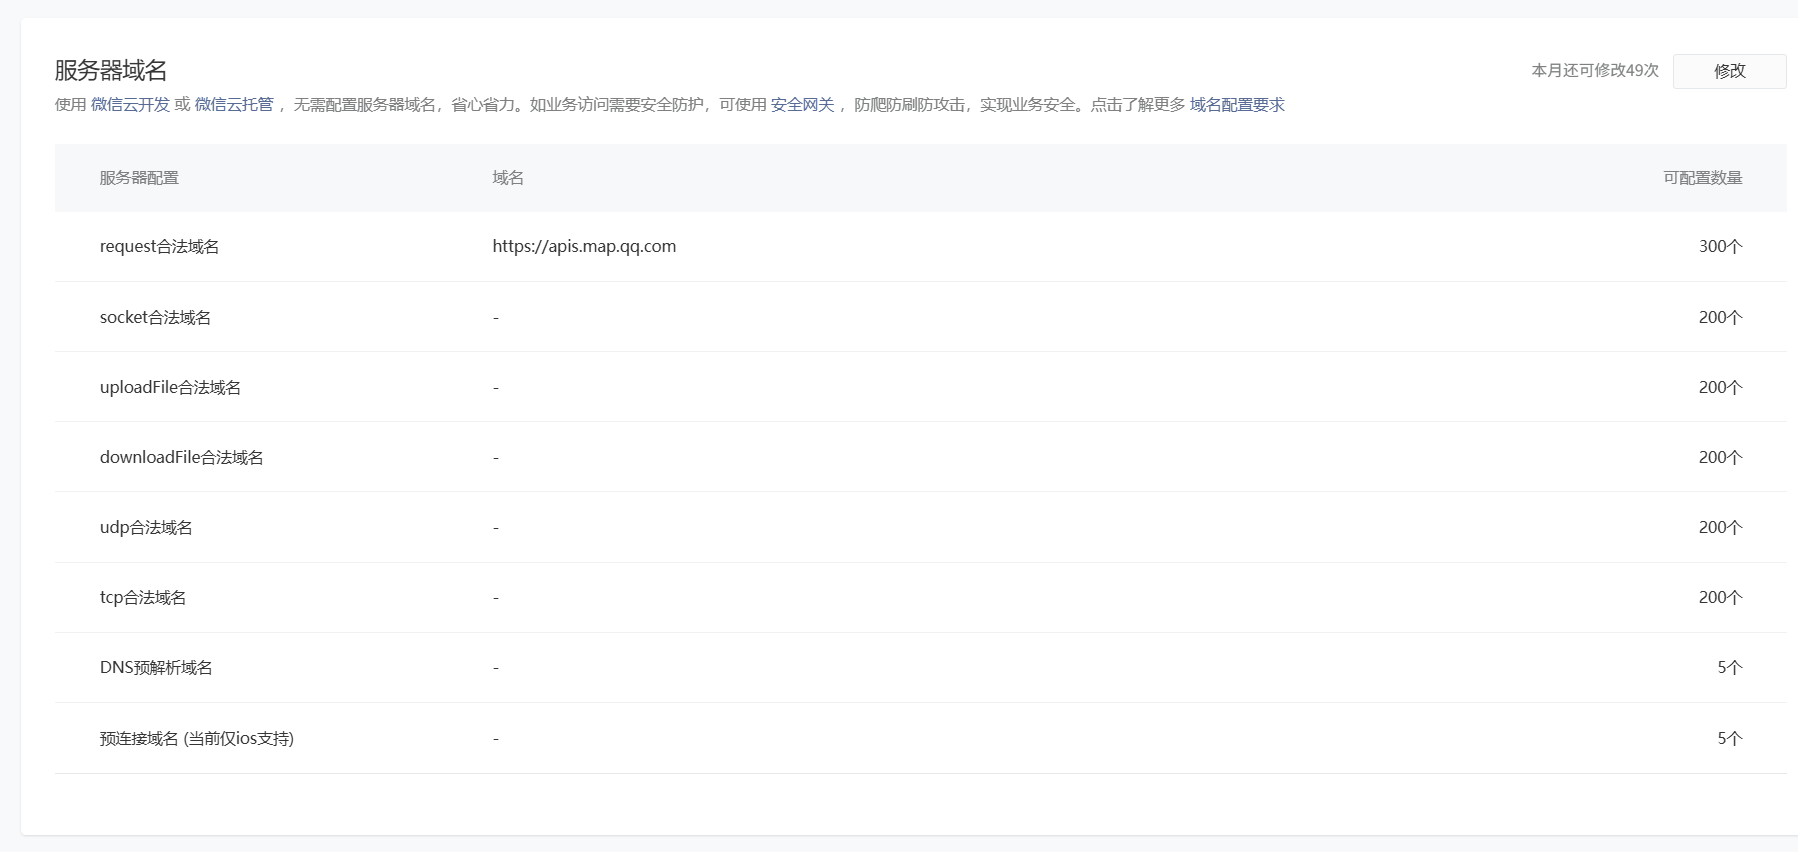
建议在开发者工具的详情设置中,确保以下设置:
- 勾选"使用增强编译"
- 勾选"不校验合法域名"(开发阶段)
- 确保在"API 权限设置"中已经开启了位置相关接口权限
测试成功,但过了一会,说用量多了。vscode,重新编译。
基本可以了,下一步就可以上传代码等待审核了。以上是一个简单的教程,你可以根据实际修改。