ES6
html
<!DOCTYPE html>
<html lang="en">
<head>
    <meta charset="UTF-8">
    <title>Title</title>
</head>
<body>


<script>


    // 变量定义
    var a=1;
    let b=5;  // 现在使用let 定义变量


    // 对象解构
    let person={
        "name":"dc",
        "age":25
    }

    console.log(person.name); // 原操作:对象.属性名
    console.log(person.age);

    let {name,age}=person; // 对象解构
    console.log(name);
    console.log(age);

    // 模板字符串
    let info=`你好,${name}。今年${age}岁`


    // promise
    function get(url) {
        return new Promise((resolve, reject) => {
            $.ajax({
                url: url,
                type: "GET",
                success(result) {
                    resolve(result);
                },
                error(error) {
                    reject(error);
                }
            });
        });
    }


    // Async函数
    async function func1() {
        // 业务、计算
        let x = 101;
        if (x % 2 === 0) {
            return x;
        } else {
            throw new Error("x不是偶数");
        }
    }

    func1().then(data => console.log("then", data)).catch(err => console.log("err", err)); // 调用func1


    // await + async
    async function func2() {
        let x = await func1(); // await同步等待func1() 结果后 结束
        console.log("x", x);
    }
    func2();


    // ES6模块化

    // user.js
    const user = {
        username: "张三",
        age: 18
    }

    function isAdult(age){
        if (age > 18) {
            console.log('成年人');
        } else {
            console.log('未成年');
        }
    }

    // main.js
    // export
    export { user, isAdult }

    import { user, isAdult } from './lib/user.js';
    isAdult(user.age);


</script>
</body>
</html>
npm 包管理工具
Vue3
bash
$ npm create vite

Need to install the following packages:
  create-vite
Ok to proceed? (y) y

✔ Project name: · vite-project
✔ Select a framework: · vue
✔ Select a variant: · vue

Scaffolding project in ./vite-project...

Done. Now run:

  cd vite-project
  npm install
  npm run dev
bash
cd vite-project
npm install
npm run dev
插值
html
<script setup>
let name = "张三"

let car = {
  brand: "小米",
  price: 999
}
</script>

<template>

 <!-- {{val}}  插值表达式,页面任何位置取值-->

  <h2>姓名:{{name}}</h2>
  <h2>品牌:{{car.brand}}</h2>
  <h2>价格:{{car.price}}</h2>
</template>

<style scoped>
</style>
常用指令
v-html
html
// 2. 指令
let msg = "<p style='color: red'>你好</p>"

<template>
  <h2>姓名:{{name}}</h2>
  <h2>品牌:{{car.brand}}</h2>
  <h2>价格:{{car.price}}</h2>
  <div v-html="msg"></div>
</template>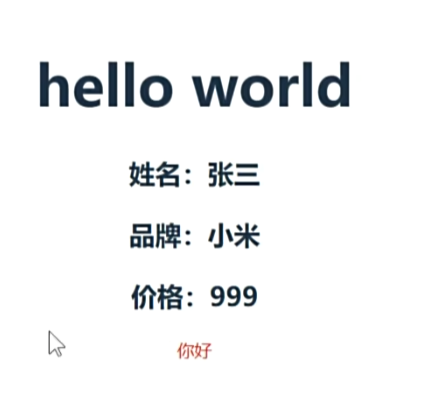
html
<script setup>

//  指令: v-xxx;
// 基础指令: v-html、v-text
// 事件指令: v-on

let msg = "<p style='color: red'>你好</p>";

function buy() {
    alert("购买成功");
}

</script>

<template>
  <h2>姓名:{{name}}</h2>
  <h2>品牌:{{car.brand}}</h2>
  <h2>价格:{{car.price}}</h2>
  <button @click="buy">购买</button>
  <div v-html="msg"></div>
  <div>{{msg}}</div>
  <div v-text="msg"></div>

</template>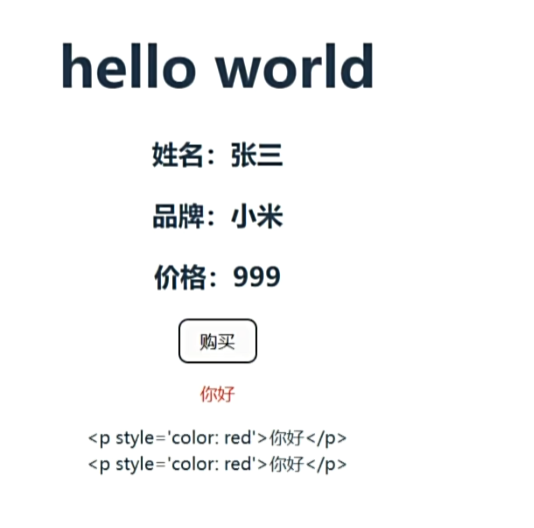
v-if 、v-for
html
<span style="color: green" v-if="car.price < 1000"> 便宜</span>
<span style="color: red" v-if="car.price >= 1000"> 太贵</span>
html
<li v-for="(f, i) in fruits">{{ f }} ==> {{ i }}</li>v-bind
html
<script>
// 3. 属性绑定:v-bind
let url = "https://www.baidu.com";
</script>

<template>
  <a v-bind:href="url">Go !</a>
</template>
响应式变化:数据的变化 可以更新到页面效果上 ref()、reactive()
html
<script>
	// 3. 属性绑定:v-bind;默认数据 不具备响应式特性
	let url = ref("https://www.example.com");

	// 响应式特性:数据的变化 可以更新到页面效果上
	function changeUrl() {
	    console.log(url);
	    // 改变的时候需要 url.value
	    url.value = "https://www.atguigu.com";
	}

	// ref():
	// 1. 把基本数据使用 ref() 包装成响应式数据
	// 2. 使用 代理对象.value = ""
	// 3. 页面取值、属性绑定 直接 {{url}}


	// 传递对象reactive()
	const money = reactive({
		 money: 1000,
		 name: "parent",
	});

</script>

<template>
  <a :href="url" :abc="url">Go ! {{ url }}</a>
  <button @click="changeUrl">改变地址</button>
</template>
表单绑定 v-model :双向绑定
html
<script setup>
import { reactive } from "vue";

const data = reactive({
  username: "zhangsan",
  agree: true,
  hobby: [],
  gender: "女",
  degree: "",
  course: []
})
</script>

<template>
	<p style="background-color: azure">
		 <label>姓名(文本框):</label>
		 <input v-model="data.username"/>
	</p>
</template>
计算属性
html
<script setup>
    import { ref, computed } from 'vue';

    // 假设 car 和 num 是已经定义的响应式对象或引用
    const car = {
        price: 10000 // 示例价格
    };
    const num = ref({ value: 1 }); // 示例数量

    // 计算总价
    const totalPrice = computed(() => car.price * num.value);


</script>

<template>
    <!-- <button v-on:click="buy">购买</button> -->
    <button @click.once="buy">购买 {{ totalPrice }}</button>
</template>
监听 watch()
html
<script>
    const num = ref({ value: 1 });
    // 监听: watch/watchEffect
    // num数字发生变化时,开启回调函数
    watch(num, (value, oldValue, onCleanup) => {
        console.log("value", value);
        console.log("oldValue", oldValue);
        if (num.value > 3) {
            alert("超出限购数量");
            num.value = 3;
        }
    });

</script>
html
<script>
    // 监听一堆事件
    watchEffect(() => {
        if (num.value > 3) {
            alert("超出限购数量");
            num.value = 3;
        }

        if (car.price > 11000) {
            alert("太贵了");
        }
    });

</script>
生命周期 mounted()
html
<script setup>
    import { ref, onMounted } from 'vue';

    // 定义一个响应式变量 count
    const count = ref(0);

    // 假设 elementId 是一个已定义的元素 ID
    const elementId = "ds";

    // onMounted 生命周期钩子
    onMounted(() => {
        console.log("挂载完成!!!")
    });
</script>
组件传值
父传子 v-bind
Son
html
<script setup>
// 1、定义属性
let props = defineProps( ['money'] );

</script>

<template>
  <div style="background-color: #646cff; color: white;">
    <h3>Son</h3>
     <!--  只读值 read only-->
    <div>账户:{{ props.money }}</div>
  </div>
</template>

<style scoped>
</style>
Father
html
<script setup>
import Son from "./Son.vue";
import { ref } from "vue";

// 1、父传子,单向数据流,子变了 父亲的不会变
const money = ref(100);

</script>

<template>
  <div style="background-color: #f9f9f9">
    <h2>Father</h2>
    <!--  属性绑定传递值-->
    <Son :money="money" />
  </div>
</template>

<style scoped>
</style>
js
let props = defineProps({
  money: {
    type: Number,
    required: true,
    default: 200
  },
  books: Array
});
子传父 emit
html
<script setup>
import Son from "./Son.vue";

// 1、父传子
const data = reactive({
  money: 1000,
  name: "parent",
});

function moneyMinis(arg) {
  // alert("感知到儿子买了棒棒糖" + arg)
    data.money += arg;
}


</script>

<template>
  <div style="background-color: #f9f9f9">
    <h2>Father</h2>
    <Son :money="data.money" @buy="moneyMinis"/>
    <!-- <Son v-bind="data"/> -->
  </div>
</template>


<style scoped>
</style>
html
<script setup>

// 1、定义属性
let props = defineProps( ['money'] );
// 2、使用 emit: 定义事件
const emits = defineEmits(['buy']);

function buy() {
  // props.money -= 5; // 这里不直接修改 props,而是通过 emit 通知父组件
  emits('buy', -5);
}
</script>

<template>
  <div style="background-color: #646cff; color: white">
    <h3>Son</h3>
    <div>账户:{{ props.money }}</div>
    <button @click="buy">买棒棒糖</button>
  </div>
</template>


<style scoped>
</style>
插槽
Father
html
<script setup>
</script>

<template>
  <div style="background-color: #f9f9f9">
    <h2>Father</h2>
    <Son >
      <template v-slot:title>
        哈哈SonSon
      </template>
    </Son>
  </div>
</template>


<style scoped>
</style>
Son
html
<script setup>
</script>

<template>
  <div style="background-color: #646cff; color: white">
    <h3>
      <slot name="title">
        哈哈Son
      </slot>
    </h3>

    <button @click="buy">
      <slot name="btn"/>
    </button>

  </div>
</template>

<style scoped>
</style>
Vue - Router
bash
npm install vue-router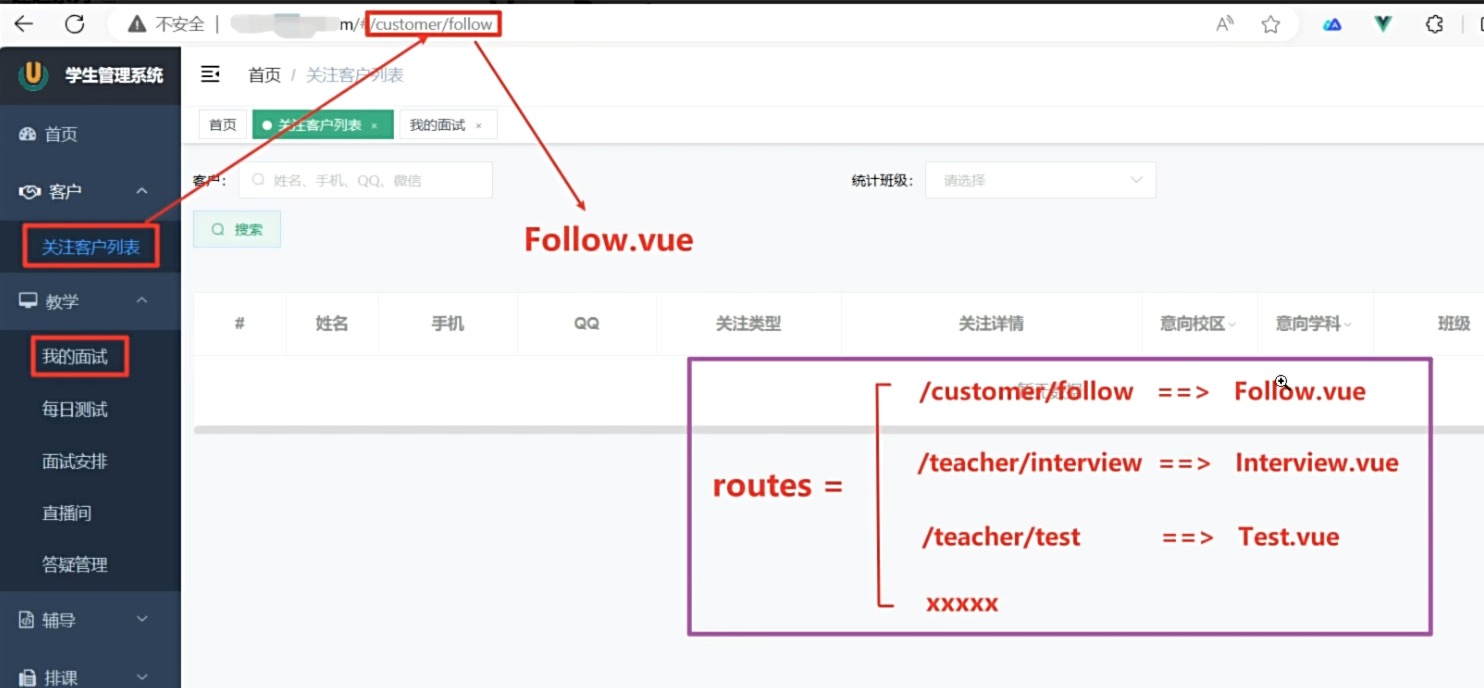
在 src/router/index.js 中配置路由:
index.js
js
// 引入必要的模块
import { createRouter, createWebHashHistory } from 'vue-router';
import Home from '../views/Home.vue'; // 假设 Home 组件位于 views 文件夹下
import Hello from '../views/Hello.vue'; // 假设 Hello 组件位于 views 文件夹下

// 定义路由规则
const routes = [
    { path: '/', component: Home },
    { path: '/hello', component: Hello },
    {
        path: '/haha',
        component: () => import('../views/Haha.vue') // 动态导入 Haha 组件
    }
];

// 创建路由器
const router = createRouter({
    history: createWebHashHistory(), // 使用 hash 模式
    routes // 路由规则
});

// 导出路由器
export default router;
在 src/main.js 中使用路由器:
main.js
js
import { createApp } from 'vue'
import './style.css'
import App from './App.vue'
import router from './router'

let app = createApp(App);

// 1、使用 router
app.use(router)
app.mount('#app');
在 App.vue 中使用 和
html
<template>
  <router-link to="/">首页</router-link>
  <router-link to="/hello">Hello</router-link>
  <router-link to="/haha">Haha</router-link>
  <!-- ... -->
  <hr />
  <router-view></router-view>
  <!-- ... -->
  <!-- 1、整合 vue-router -->
  <!-- 2、配置 vue-router -->
  <!--     配置路由表 -->
  <!--     创建路由器 -->
  <!-- 3、Vue 实例使用 router -->
  <!-- 4、配置 router-link 和 router-view -->
</template>
Axios
发送请求
App.vue
html
<script setup>
import axios from 'axios'

function getInfo() {
  axios.get("http://43.139.239.29/get").then(resp => {
    console.log(resp.data);
    // config: 请求配置
    // data: 服务器的响应数据   √√√
    // headers: 响应头
    // request: 请求对象
    // status: 响应状态码
    // statusText: 响应描述文本
  })
}

function getInfoParam() {
  axios.get("http://43.139.239.29/get", {
    params: {
      id: 1,
      username: 'zhangsan'
    }
  }).then(resp => {
    console.log(resp);
  });
}


function postInfoParam() {
  // 数据会被自动转为json
  axios.post(
      "http://43.139.239.29/post",
      {
        id: 222,
        username: 'zhangsan',
        age: 18
      }
  ).then(resp => {
    console.log(resp);
  });
}


</script>

<template>
  <button @click="getInfo">GET请求</button>
  <button @click="getInfoParam">GET请求 带参数</button>
  <button @click="postInfoParam">POST 请求</button>
</template>

<style scoped>
</style>
实例配置
index.js
js
import axios from 'axios';

const http = axios.create({
    baseURL: 'http://43.139.239.29',
    timeout: 1000,
    headers: { 'X-Custom-Header': 'foobar' }
});

export default http;
App.vue
html
<script setup>
import http from './index'

function getInfo() {
  http.get("/get").then(resp => {
    console.log(resp.data);
    // config: 请求配置
    // data: 服务器的响应数据   √√√
    // headers: 响应头
    // request: 请求对象
    // status: 响应状态码
    // statusText: 响应描述文本
  })
}


</script>

<template>
  <button @click="getInfo">GET请求</button>
</template>

<style scoped>
</style>
拦截器
index.js
js
import axios from 'axios';

// 创建自定义 Axios 实例
const http = axios.create({
  baseURL: 'http://43.139.239.29',
  timeout: 1000,
  headers: { 'X-Custom-Header': 'foobar' }
});

// 添加请求拦截器
http.interceptors.request.use(
  function (config) {
    // 在发送请求之前做些什么
    return config;
  },
  function (error) {
    // 对请求错误做些什么
    console.log("请求错误", error);
    return Promise.reject(error);
  }
);

// 添加响应拦截器
http.interceptors.response.use(
  function (response) {
    // 2xx 范围内的状态码都会触发该函数。
    // 对响应数据做点什么

    // 返回响应数据主体内容
    return response.data;
  },
  function (error) {
    // 超出 2xx 范围的状态码都会触发该函数。
    // 对响应错误做点什么
    console.log("响应错误", error);
    ElMessage.error("服务器错误" + error.message); // 使用 Element UI 的 Message 组件显示错误消息
    return Promise.reject(error);
  }
);

// 导出 http 实例
export default http;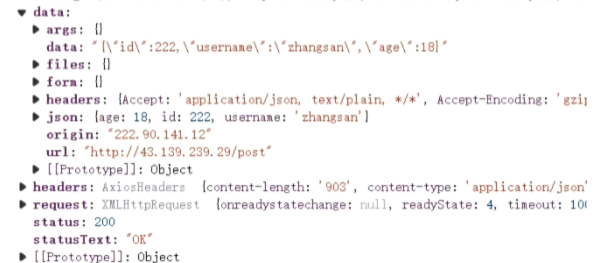
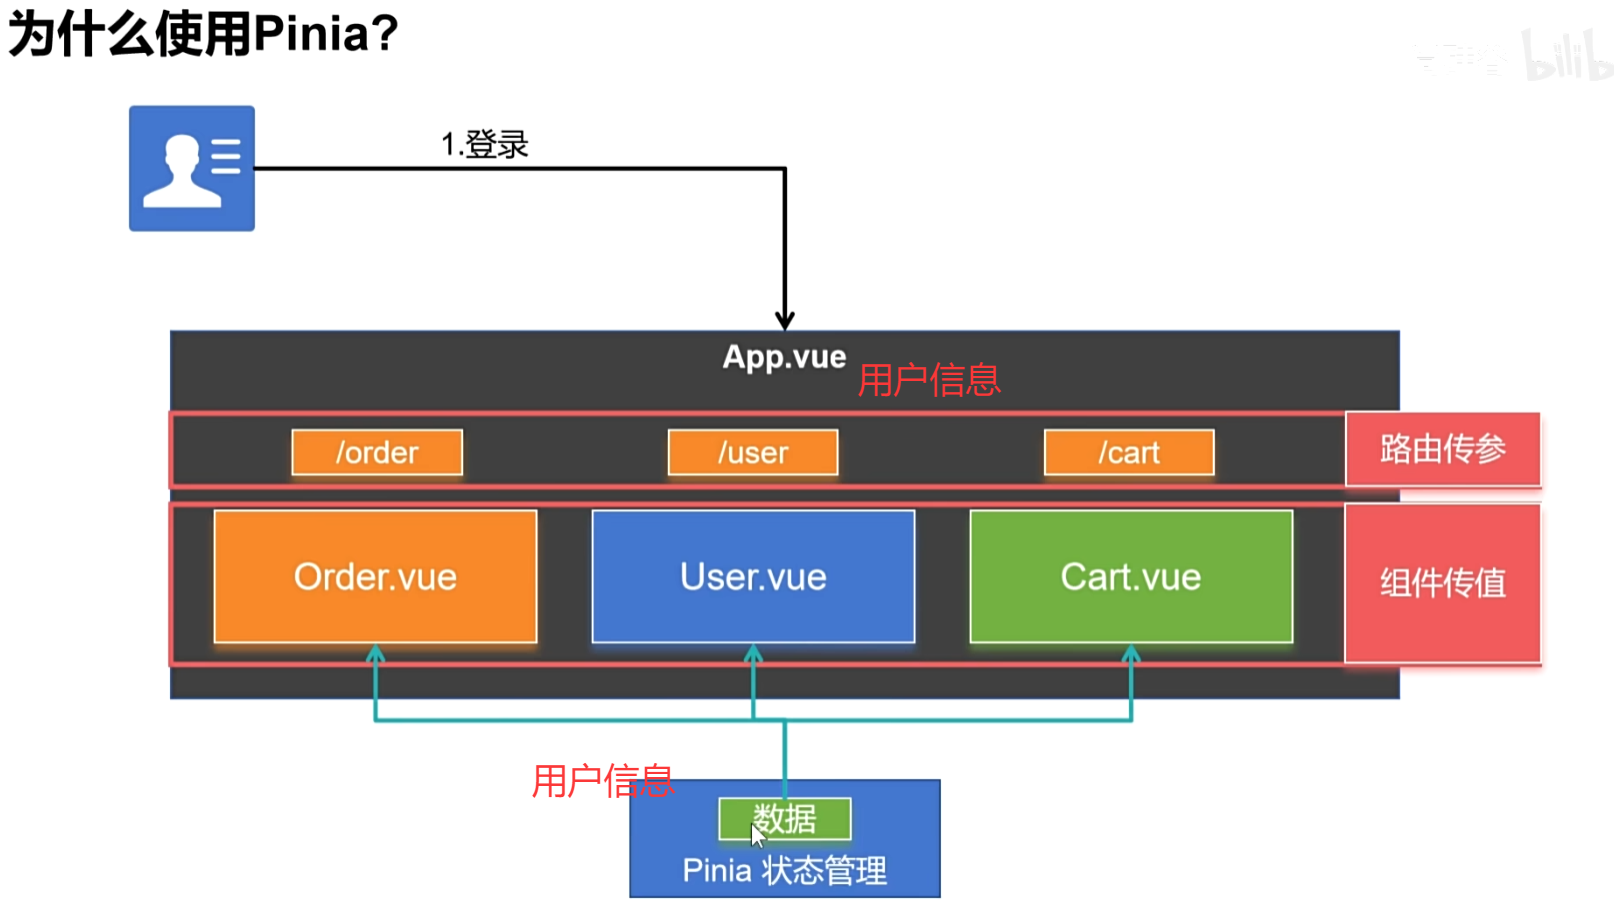
Pinia
类似后端的Redis
bash
npm install piniamoney.js
js
import { defineStore } from 'pinia';

// 定义一个 money存储单元
export const useMoneyStore = defineStore('money', {
    state: () => ({ money: 100 }),
    getters: {
        rmb: (state) => state.money,
        usd: (state) => state.money * 0.14,
        eur: (state) => state.money * 0.13,
    },
    actions: {
        win(arg) {
            this.money += arg;
        },
        pay(arg) {
            this.money -= arg;
        }
    },
});
Wallet.vue
html
<script setup>
import { useMoneyStore } from './money.js'
let moneyStore = useMoneyStore();
</script>

<template>
  <div>
    <h2>¥: {{moneyStore.rmb}}</h2>
    <h2>$: {{moneyStore.usd}}</h2>
    <h2>€: {{moneyStore.rmb}}</h2>
  </div>
</template>

<style scoped>
div {
  background-color: #f9f9f9;
}
</style>
game.vue
html
<script setup>
import { useMoneyStore } from './money.js';

let moneyStore = useMoneyStore();

function guaguale() {
  moneyStore.win(100);
}

function bangbang() {
  moneyStore.pay(5);
}
</script>

<template>
  <button @click="guaguale">刮刮乐</button>
  <button @click="bangbang">买棒棒糖</button>
</template>

<style scoped>
</style>