push 🆚 present
前言
在 iOS 开发中,push 和 present 是两种不同的视图控制器切换方式,它们有着显著的区别。
present和dismiss
特点
- 在当前控制器上方新建视图层级
- 需要手动调用dismiss
objective-c
ViewController* vc = [[ViewController alloc] init];
[self presentViewController:vc2 animated:YES completion:nil];
对应的dismiss方法:(用于关闭或取消当前显示的视图、对话框等)
objective-c
[self dismissViewControllerAnimated:YES completion:nil];- 默认从下向上滑入
- 只保留当前presented的控制器
- 可配置为全屏覆盖
代码演示
新建View02类作为视图控制器二
dimiss方法在View02文件中实现
objective-c
#import "View02.h"

@interface View02 ()

@end

@implementation View02

- (void)viewDidLoad {
    [super viewDidLoad];
    self.view.backgroundColor = [UIColor cyanColor];
}

-(void)touchesBegan:(NSSet<UITouch *> *)touches withEvent:(UIEvent *)event {
    [self dismissViewControllerAnimated:YES completion:nil];
}
作为视图控制器一
present方法在ViewController文件中实现
objective-c
#import "ViewController.h"
#import "View02.h"
@interface ViewController ()
@end
@implementation ViewController
- (void)viewDidLoad {
[super viewDidLoad];
[self creatUIRectButton];
}
- (void)creatUIRectButton {
UIButton *btn1 = [UIButton buttonWithType:UIButtonTypeRoundedRect];
btn1.frame = CGRectMake(10, 400, 120, 80);
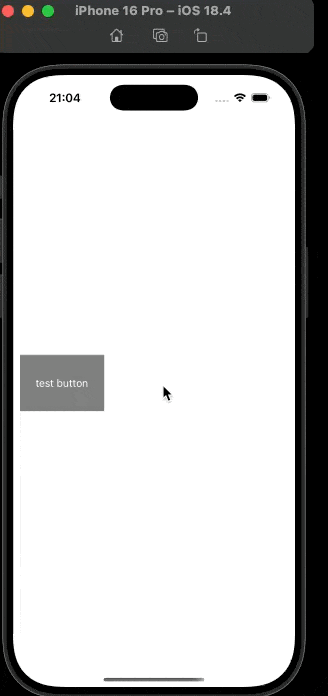
[btn1 setTitle:@"test button" forState:UIControlStateNormal];
[btn1 setTitle:@"按下时候" forState:UIControlStateHighlighted];
[btn1 addTarget:self action:@selector(press) forControlEvents:UIControlEventTouchUpInside];
[btn1 setTintColor:[UIColor whiteColor]];
btn1.backgroundColor = [UIColor grayColor];
[self.view addSubview: btn1];
}
- (void) press {
View02* vc = [[View02 alloc] init];
[self presentViewController:vc animated:YES completion: nil];
}
@end运行效果:
push和pop
特点
- 用于导航控制器堆栈中的视图控制器的界面切换。压入导航栈,成为栈顶控制器
objective-c
ViewController* vc = [[ViewController alloc] init];
[self.navigationController pushViewController:vc animated:YES];
对应的消失视图方法为:
objective-c
[self.navigationController popViewControllerAnimated:YES];- 系统自动生成返回按钮
- 新视图从右向左滑入
- 保留所有pushed的控制器
- 不能全屏覆盖
代码演示
创建一个导航控制器:
objective-c
//SceneDelegate.m
#import "SceneDelegate.h"
#import "VCRoot.h"
@interface SceneDelegate ()

@end

@implementation SceneDelegate


- (void)scene:(UIScene *)scene willConnectToSession:(UISceneSession *)session options:(UISceneConnectionOptions *)connectionOptions {
    self.window.frame = [UIScreen mainScreen].bounds;
    UINavigationController *nav = [[UINavigationController alloc] initWithRootViewController:[[VCRoot alloc] init]];
    self.window.rootViewController = nav;
    [self.window makeKeyAndVisible];
}
第一个视图控制器:
objective-c
#import "VCRoot.h"
#import "VCSecond.h"
@interface VCRoot ()
@end
@implementation VCRoot
- (void)viewDidLoad {
[super viewDidLoad];
self.navigationController.navigationBar.translucent = YES;
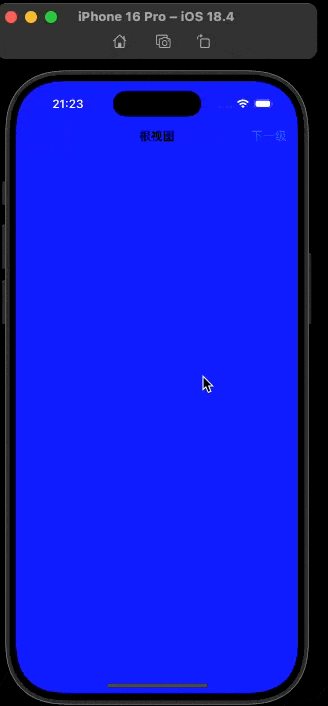
self.title = @"title";
self.navigationItem.title = @"根视图";
self.view.backgroundColor = [UIColor blueColor];
self.navigationController.navigationBar.barStyle = UIBarStyleDefault;
UIBarButtonItem *next = [[UIBarButtonItem alloc] initWithTitle:@"下一级" style:UIBarButtonItemStylePlain target:self action:@selector(pressRight)];
self.navigationItem.rightBarButtonItem = next;
}
-(void)pressRight {
VCSecond *vc2 = [[VCSecond alloc] init];
[self.navigationController pushViewController:vc2 animated:YES];
}第二个视图控制器:
objective-c
#import "VCSecond.h"
#import "VCthird.h"
@interface VCSecond ()

@end

@implementation VCSecond

- (void)viewDidLoad {
    [super viewDidLoad];
    self.view.backgroundColor = [UIColor yellowColor];
    UIBarButtonItem *btnNext = [[UIBarButtonItem alloc] initWithTitle:@"next" style:UIBarButtonItemStylePlain target:self action:@selector(press)];
    self.navigationItem.rightBarButtonItem = btnNext;
}
-(void)press {
    VCthird *vc3 = [[VCthird alloc] init];
    [self.navigationController pushViewController:vc3 animated:YES];
}
第三个视图控制器:
objective-c
#import "VCthird.h"

@interface VCthird ()

@end

@implementation VCthird

- (void)viewDidLoad {
    [super viewDidLoad];
    self.view.backgroundColor = [UIColor cyanColor];
    UIBarButtonItem *btnLeft = [[UIBarButtonItem alloc] initWithTitle:@"返回" style:UIBarButtonItemStylePlain target:self action:@selector(pressBack)];
    self.navigationItem.rightBarButtonItem = btnLeft;
}
-(void)pressBack {
    [self.navigationController popToRootViewControllerAnimated:YES];
}
运行效果: