python中学物理实验模拟:凸透镜成像和凹透镜成像
凸透镜成像
凸透镜是指中间厚、边缘薄的透镜。它对光线有会聚作用,即光线通过凸透镜后会向主光轴方向偏折。
成像原理
基于光的折射,平行于主光轴的光线经凸透镜折射后会聚于焦点(F),过光心的光线传播方向不变。
焦点 (F) 和焦距 (f): 平行于主光轴的光线经凸透镜折射后实际会聚的点称为实焦点 (在透镜的另一侧)。焦点到透镜光心的距离称为焦距 (f)。凸透镜有两个对称的实焦点(物方焦点和像方焦点)。
成像规律: 凸透镜成像的性质(大小、正倒、虚实)和位置主要取决于物体到透镜光心的距离(物距 u) 与透镜焦距 (f) 的关系。
成像规律(物距 u、像距 v、焦距 f):
| 物距u范围 | 像距 (v) 范围 | 像的性质 | 应用实例 |
|---|---|---|---|
| u > 2f | f < v < 2f | 倒立、缩小的实像 | 照相机、监控摄像头 |
| u = 2f | v = 2f | 倒立、等大的实像 | 测焦距 |
| f < u < 2f | v > 2f | 倒立、放大的实像 | 投影仪、幻灯机 |
| u = f | 不成像(光线平行射出) | - | - |
| u < f | 像与物同侧,v > u | 正立、放大的虚像 | 放大镜、老花镜 |
关键点理解:
实像: 由实际光线会聚而成,可以用光屏接收(如投影在墙上)。像与物位于透镜异侧。
虚像: 是光线反向延长线的交点,不能用光屏直接接收,只能通过透镜观察到。像与物位于透镜同侧。
像距 (v): 像到透镜光心的距离。实像时 v 为正值;虚像时 v 为负值(在公式计算中体现)。
透镜公式: 1/f = 1/u + 1/v (符号规定:实物距 u 为正,实像距 v 为正,虚像距 v 为负,凸透镜焦距 f 为正)。
放大率 (m): m = |v/u| = 像高 / 物高。m > 1 表示放大,m < 1 表示缩小。
运行截图:

源码如下:
python
import tkinter as tk
from tkinter import ttk
import matplotlib
import matplotlib.pyplot as plt
from matplotlib.backends.backend_tkagg import FigureCanvasTkAgg
import numpy as np
import matplotlib.font_manager as fm

# 配置中文字体
def find_chinese_font():
    fonts = ['SimHei', 'Microsoft YaHei', 'SimSun', 'STSong', 'KaiTi']
    existing_fonts = []
    for f in fonts:
        if any([f.lower() in font.lower() for font in fm.findSystemFonts(fontpaths=None)]):
            existing_fonts.append(f)
    return existing_fonts[0] if existing_fonts else None

chinese_font = find_chinese_font()
if chinese_font:
    matplotlib.rcParams['font.family'] = [chinese_font, 'sans-serif']
else:
    print("警告: 找不到中文字体,将使用英文")

matplotlib.rcParams['axes.unicode_minus'] = False  # 正确显示负号

class ConvexLensSimulator:
    def __init__(self, root):
        self.root = root
        self.root.title("凸透镜成像模拟器")

        # 物理常量
        self.focal_length = 4  # 默认焦距8cm
        self.object_height = 2   # 物体高度4cm

        # 设置UI
        self.setup_ui()
        self.root.update()  # 强制布局更新,处理Matplotlib 区域显示不完整

    def setup_ui(self):
        """设置用户界面"""
        # 主界面布局
        self.main_frame = ttk.Frame(self.root)
        self.main_frame.pack(fill=tk.BOTH, expand=True)

        # 控制面板
        self.control_frame = ttk.LabelFrame(self.main_frame, text="参数控制")
        self.control_frame.pack(side=tk.LEFT, padx=10, pady=5, fill=tk.Y)

        # 可视化区域
        self.viz_frame = ttk.Frame(self.main_frame)
        self.viz_frame.pack(side=tk.RIGHT, fill=tk.BOTH, expand=True)

        # 创建控制组件
        self.create_controls()

        # 初始化绘图区域
        self.init_plot()

        # 首次更新
        self.update_display()

    def create_controls(self):
        """创建控制组件"""
        # 物距滑块
        ttk.Label(self.control_frame, text="物距 u (cm):").grid(row=0, column=0, sticky="w", pady=(10,0))
        self.u_value = tk.DoubleVar(value=8)
        self.u_slider = ttk.Scale(self.control_frame, from_=5, to=30,
                                  variable=self.u_value,
                                  command=lambda _: self.update_display())
        self.u_slider.grid(row=1, column=0, sticky="ew")

        # 焦距滑块,焦距允许的范围 from_=3, to=15,
        ttk.Label(self.control_frame, text="焦距 f (cm):").grid(row=2, column=0, sticky="w", pady=(10,0))
        self.f_value = tk.DoubleVar(value=self.focal_length)
        self.f_slider = ttk.Scale(self.control_frame, from_=3, to=15,
                                  variable=self.f_value,
                                  command=lambda _: self.update_display())
        self.f_slider.grid(row=3, column=0, sticky="ew")

        # 物体高度滑块
        ttk.Label(self.control_frame, text="物体高度 (cm):").grid(row=4, column=0, sticky="w", pady=(10,0))
        self.height_value = tk.DoubleVar(value=self.object_height)
        self.height_slider = ttk.Scale(self.control_frame, from_=1, to=10,
                                      variable=self.height_value,
                                      command=lambda _: self.update_display())
        self.height_slider.grid(row=5, column=0, sticky="ew")

        # 信息显示
        self.info_text = tk.StringVar()
        ttk.Label(self.control_frame, textvariable=self.info_text, wraplength=200).grid(row=6, column=0, sticky="w", pady=10)

    def init_plot(self):
        """初始化绘图区域"""
        self.fig = plt.Figure(figsize=(10, 6))
        self.ax = self.fig.add_subplot(111)
        self.ax.set_xlim(-25, 25)
        self.ax.set_ylim(-8, 8)
        self.ax.axhline(0, color='black', lw=0.5)  # 主光轴

        # 设置固定的边距,避免tight_layout问题
        self.fig.subplots_adjust(left=0.08, right=0.95, top=0.95, bottom=0.08)

        self.canvas = FigureCanvasTkAgg(self.fig, master=self.viz_frame)
        self.canvas.get_tk_widget().pack(fill=tk.BOTH, expand=True)

    def calculate_image(self):
        """计算像的位置和性质"""
        f = self.f_value.get()
        u = self.u_value.get()

        # 特殊情况:u = f
        if abs(u - f) < 0.01:  # 使用小的容差值
            return np.inf, np.inf, "不成像"

        v = u*f/(u-f)  # 高斯成像公式 1/u + 1/v = 1/f
        magnification = -v/u  # 放大率 m = -v/u
        image_type = "实像" if v > 0 else "虚像"
        return v, magnification, image_type


    def draw_optical_elements(self, u, v):
        """绘制光学元件和光线"""
        self.ax.clear()
        self.ax.set_xlim(-25, 25)
        self.ax.set_ylim(-8, 8)
        self.ax.grid(True, linestyle='--', alpha=0.6)
        self.ax.axhline(0, color='black', lw=0.5)  # 主光轴
        self.ax.axvline(0, color='black', lw=0.5, alpha=0.3)  # 光心垂线

        # 标记焦点
        f = self.f_value.get()
        self.ax.plot([-f, f], [0, 0], 'ro', markersize=4)
        self.ax.text(-f-0.5, -0.5, 'F', fontsize=10)
        self.ax.text(f+0.5, -0.5, 'F′', fontsize=10)

        # 绘制透镜
        self.draw_lens()

        # 绘制物体
        object_height = self.height_value.get()
        self.ax.plot([-u, -u], [0, object_height], 'b-', lw=2)  # 物体
        self.ax.text(-u-0.5, object_height+0.3, 'Object', fontsize=9)

        # 绘制像 - 添加对无穷大的检查
        if v not in [np.inf, -np.inf] and v is not None and not np.isinf(v):
            image_height = object_height * (-v/u)  # 像的高度, 负号表示倒立
            style = 'r-' if v > 0 else 'r--'
            self.ax.plot([v, v], [0, image_height], style, lw=2)
            self.ax.text(v+0.5, image_height-0.3, 'Image', fontsize=9)

        # 绘制光线 - 只有当v不是无穷大时才绘制
        if v not in [np.inf, -np.inf] and not np.isinf(v):
            self.draw_rays(u, v, object_height)
        else:
            # 当u=f时,绘制特殊的平行光线
            self.draw_parallel_rays(u, object_height)

    def draw_parallel_rays(self, u, object_height):
        """绘制u=f时的平行光线"""
        f = self.f_value.get()

        # 光线1:平行于主光轴入射,经过透镜后仍然平行
        self.ax.plot([-u, 0], [object_height, object_height], 'r-', lw=1.5)
        self.ax.plot([0, 25], [object_height, object_height], 'r-', lw=1.5)

        # 光线2:通过光心,不发生偏折 - 这条光线应该是直线
        self.ax.plot([-u, 25], [object_height, object_height], 'g-', lw=1.5)

        # 光线3:从物体顶端指向左焦点,经过透镜后平行于主光轴射出
        lens_height = object_height / 2  # 当u=f时,lens_height = object_height * f / (f + u) = object_height/2
        self.ax.plot([-u, 0], [object_height, lens_height], 'b-', lw=1.5)
        self.ax.plot([0, 25], [lens_height, lens_height], 'b-', lw=1.5)

    def draw_lens(self):
        """绘制凸透镜"""
        # 垂直线
        self.ax.plot([0, 0], [-6, 6], 'black', lw=1)

        # 凸出部分
        arc_left = plt.matplotlib.patches.Arc((0, 0), 2, 12,
                                       theta1=90, theta2=270,
                                       color='black', lw=2)
        arc_right = plt.matplotlib.patches.Arc((0, 0), 2, 12,
                                       theta1=270, theta2=90,
                                       color='black', lw=2)
        self.ax.add_patch(arc_left)
        self.ax.add_patch(arc_right)

    def draw_rays(self, u, v, object_height):
        """绘制光线"""
        try:
            f = self.f_value.get()

            if v > 0:  # 实像
                image_height = -object_height * v / u

                # 光线1:平行于主光轴入射 -> 经过右焦点
                self.ax.plot([-u, 0], [object_height, object_height], 'r-', lw=1.5)
                self.ax.plot([0, v], [object_height, image_height], 'r-', lw=1.5)

                # 光线2:通过光心,不发生偏折
                self.ax.plot([-u, v], [object_height, image_height], 'g-', lw=1.5)

                # 光线3:【修正】从物体顶端经过左焦点到透镜,然后平行射出
                # 第一段:从物体顶端(-u, object_height)经过左焦点(-f, 0)到透镜(0, y)
                # 计算这条直线与透镜的交点
                # 直线斜率 = (0 - object_height) / (-f - (-u)) = -object_height / (u - f)
                # 从左焦点到透镜的延伸:y = 0 + 斜率 * (0 - (-f)) = 斜率 * f
                lens_y = -object_height * f / (u - f)

                # 绘制:物体顶端 -> 左焦点 -> 透镜
                self.ax.plot([-u, -f, 0], [object_height, 0, lens_y], 'b-', lw=1.5)
                # 从透镜平行于主光轴射出到像点
                self.ax.plot([0, v], [lens_y, image_height], 'b-', lw=1.5)

            else:  # 虚像 (u < f)
                image_height = -object_height * v / u  # 虚像高度(正值,正立)

                # 光线1:平行于主光轴入射 -> 折射后反向延长经过右焦点
                self.ax.plot([-u, 0], [object_height, object_height], 'r-', lw=1.5)
                self.ax.plot([0, 25], [object_height, object_height - (object_height/f)*25], 'r-', lw=1.5)
                self.ax.plot([0, v], [object_height, image_height], 'r--', lw=1.5, alpha=0.7)

                # 光线2:通过光心,不发生偏折
                self.ax.plot([-u, 25], [object_height, object_height], 'g-', lw=1.5)
                self.ax.plot([0, v], [object_height, image_height], 'g--', lw=1.5, alpha=0.7)

                # 光线3:【修正】从物体顶端指向右焦点到透镜,然后平行射出
                # 第一段:从物体顶端(-u, object_height)指向右焦点(f, 0),延伸到透镜(0, y)
                # 直线斜率 = (0 - object_height) / (f - (-u)) = -object_height / (f + u)
                # 从物体到透镜:y = object_height + 斜率 * (0 - (-u)) = object_height + 斜率 * u
                lens_y = object_height - object_height * u / (f + u)

                # 绘制:物体顶端 -> 透镜(指向右焦点方向)
                self.ax.plot([-u, 0], [object_height, lens_y], 'b-', lw=1.5)
                # 从透镜平行于主光轴射出
                self.ax.plot([0, 25], [lens_y, lens_y], 'b-', lw=1.5)
                # 反向延长线到虚像
                self.ax.plot([0, v], [lens_y, image_height], 'b--', lw=1.5, alpha=0.7)

        except Exception as e:
            print(f"绘制光线错误: {str(e)}")
            import traceback
            traceback.print_exc()

    def update_display(self, event=None):
        """更新整个界面"""
        try:
            self.focal_length = self.f_value.get()
            self.object_height = self.height_value.get()
            u = self.u_value.get()

            v, magnification, image_type = self.calculate_image()

            # 更新信息显示
            info = f"物距 u = {u:.1f} cm\n"
            info += f"焦距 f = {self.focal_length:.1f} cm\n"

            if v is not None:
                if not np.isinf(v):
                    info += f"像距 v = {v:.1f} cm\n"
                else:
                    info += "像距 v = ∞\n"

                if not np.isinf(magnification):
                    info += f"放大率 m = {magnification:.2f}\n"
                else:
                    info += "放大率 m = ∞\n"

                info += f"像类型:{image_type}"

                # 改进的成像规律判断 - 使用统一的容差值
                tolerance = 0.05   # 合适的容差值
                if abs(u - self.focal_length) < tolerance:  # u ≈ f
                    info += "\n不成像"
                elif u > 2*self.focal_length + tolerance:
                    info += "\n倒立缩小实像"
                elif abs(u - 2*self.focal_length) < tolerance:  # u ≈ 2f
                    info += "\n倒立等大实像"
                elif u > self.focal_length + tolerance and u < 2*self.focal_length - tolerance:
                    info += "\n倒立放大实像"
                elif u < self.focal_length - tolerance:
                    info += "\n正立放大虚像"
                else:
                    # 边界情况,根据image_type来判断
                    if image_type == "不成像":
                        info += "\n不成像"
                    elif image_type == "实像":
                        if abs(magnification) > 1:
                            info += "\n倒立放大实像"
                        elif abs(magnification) < 1:
                            info += "\n倒立缩小实像"
                        else:
                            info += "\n倒立等大实像"
                    else:  # 虚像
                        info += "\n正立放大虚像"

                self.info_text.set(info)

                # 重绘光学元件
                self.draw_optical_elements(u, v)
                self.canvas.draw()

        except Exception as e:
            import traceback
            traceback.print_exc()
            self.info_text.set(f"更新错误: {str(e)}")
            return

if __name__ == "__main__":
    root = tk.Tk()
    app = ConvexLensSimulator(root)
    root.geometry("1200x700")  # 增大窗口尺寸
    root.mainloop()
凹透镜成像
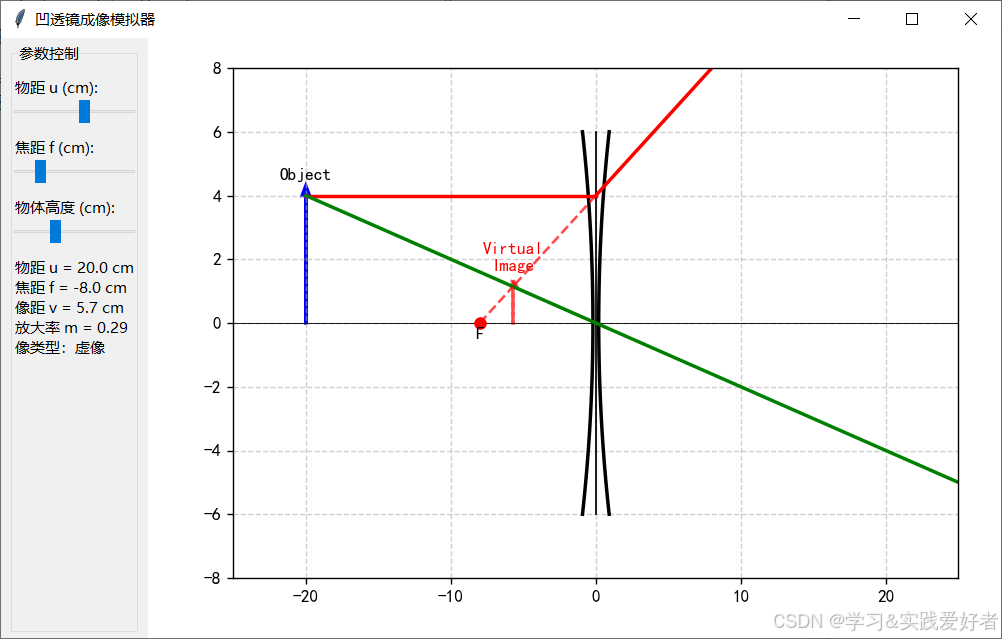
凹透镜是指中间薄、边缘厚的透镜。它对光线有发散作用,即光线通过凹透镜后会远离主光轴方向偏折。
成像原理
凹透镜成像也是基于光线的折射。光线通过凹透镜时,由于透镜的形状,光线会被发散。发散光线的反向延长线会交于一点,形成虚像。
凹透镜成像规律:
• 物距 u > 0(任意正值)
• 像距 v < 0(负值,表示虚像)
• 焦距 f < 0(负值)
• 像的性质:正立、缩小、虚像
• 数学关系:f < v < 0,即 |v| < |f| < u
透镜公式: 同样适用 1/f = 1/u + 1/v (凹透镜焦距 f 为负值,实物距 u 为正,虚像距 v 为负)。
应用
近视眼镜:矫正近视眼时,利用凹透镜的发散作用,使远处物体的像成在视网膜上。
门镜(猫眼):由凹透镜和凸透镜组合而成,凹透镜在外,使室外物体成缩小虚像,便于室内观察。
运行截图:
源码如下:
python
import tkinter as tk
from tkinter import ttk
import matplotlib
import matplotlib.pyplot as plt
from matplotlib.backends.backend_tkagg import FigureCanvasTkAgg
import numpy as np
import matplotlib.font_manager as fm

# 配置中文字体
def find_chinese_font():
    fonts = ['SimHei', 'Microsoft YaHei', 'SimSun', 'STSong', 'KaiTi']
    existing_fonts = []
    for f in fonts:
        if any([f.lower() in font.lower() for font in fm.findSystemFonts(fontpaths=None)]):
            existing_fonts.append(f)
    return existing_fonts[0] if existing_fonts else None

chinese_font = find_chinese_font()
if chinese_font:
    matplotlib.rcParams['font.family'] = [chinese_font, 'sans-serif']
else:
    print("警告: 找不到中文字体,将使用英文")

matplotlib.rcParams['axes.unicode_minus'] = False  # 正确显示负号

class ConcaveLensSimulator:
    def __init__(self, root):
        self.root = root
        self.root.title("凹透镜成像模拟器")

        # 物理常量
        self.focal_length = 8  # 凹透镜焦距为负,取绝对值,单位cm,滑块显示为正,内部转换为负
        self.object_height = 4  # 物体高度4cm

        # 设置UI
        self.setup_ui()
        self.root.update()  # 强制布局更新,处理Matplotlib 区域显示不完整


    def setup_ui(self):
        """设置用户界面"""
        self.main_frame = ttk.Frame(self.root)
        self.main_frame.pack(fill=tk.BOTH, expand=True)

        self.control_frame = ttk.LabelFrame(self.main_frame, text="参数控制")
        self.control_frame.pack(side=tk.LEFT, padx=10, pady=5, fill=tk.Y)

        self.viz_frame = ttk.Frame(self.main_frame)
        self.viz_frame.pack(side=tk.RIGHT, fill=tk.BOTH, expand=True)

        self.create_controls()
        self.init_plot()
        self.update_display()

    def create_controls(self):
        """创建控制组件"""
        # 物距滑块
        ttk.Label(self.control_frame, text="物距 u (cm):").grid(row=0, column=0, sticky="w", pady=(10, 0))
        self.u_value = tk.DoubleVar(value=20)
        self.u_slider = ttk.Scale(self.control_frame, from_=5, to=30,
                                  variable=self.u_value,
                                  command=lambda _: self.update_display())
        self.u_slider.grid(row=1, column=0, sticky="ew")

        # 焦距滑块(显示正值,内部取负值)
        ttk.Label(self.control_frame, text="焦距 f (cm):").grid(row=2, column=0, sticky="w", pady=(10, 0))
        self.f_value = tk.DoubleVar(value=self.focal_length)
        self.f_slider = ttk.Scale(self.control_frame, from_=5, to=20,
                                  variable=self.f_value,
                                  command=lambda _: self.update_display())
        self.f_slider.grid(row=3, column=0, sticky="ew")

        # 物体高度滑块
        ttk.Label(self.control_frame, text="物体高度 (cm):").grid(row=4, column=0, sticky="w", pady=(10, 0))
        self.height_value = tk.DoubleVar(value=self.object_height)
        self.height_slider = ttk.Scale(self.control_frame, from_=1, to=10,
                                       variable=self.height_value,
                                       command=lambda _: self.update_display())
        self.height_slider.grid(row=5, column=0, sticky="ew")

        # 信息显示
        self.info_text = tk.StringVar()
        ttk.Label(self.control_frame, textvariable=self.info_text, wraplength=200).grid(row=6, column=0, sticky="w", pady=10)

    def init_plot(self):
        """初始化绘图区域"""
        self.fig = plt.Figure(figsize=(8, 6))
        self.ax = self.fig.add_subplot(111)
        self.ax.set_xlim(-25, 25)
        self.ax.set_ylim(-8, 8)
        self.ax.axhline(0, color='black', lw=0.5)  # 主光轴

        self.fig.subplots_adjust(left=0.1, right=0.95, top=0.95, bottom=0.1)

        self.canvas = FigureCanvasTkAgg(self.fig, master=self.viz_frame)
        self.canvas.get_tk_widget().pack(fill=tk.BOTH, expand=True)

    def calculate_image(self):
        """计算像的位置和性质, 凹透镜焦距f为负"""
        f = -abs(self.f_value.get())  # 确保焦距为负值
        u = self.u_value.get()

        # 成像公式 1/v = 1/f - 1/u
        v = (u * f) / (u - f)

        # 放大率 m = -v/u
        magnification = -v / u  # 由于v是负值,所以放大率为正(正立像),但小于1(缩小像)
        image_type = "虚像"  # 凹透镜始终成虚像

        return v, magnification, image_type

    def draw_optical_elements(self, u, v):
        self.ax.clear()
        self.ax.set_xlim(-25, 25)
        self.ax.set_ylim(-8, 8)
        self.ax.grid(True, linestyle='--', alpha=0.6)
        self.ax.axhline(0, color='black', lw=0.5)  # 主光轴

        f = -abs(self.f_value.get())  # 确保焦距为负值

        # 保留焦点的红色圆点
        self.ax.plot([f, -abs(f)], [0, 0], 'ro', markersize=6)
        #self.ax.text(f, -0.5, "F'", ha='center', fontsize=10)
        self.ax.text(-abs(f), -0.5, "F", ha='center', fontsize=10)


        self.draw_lens()

        object_height = self.height_value.get()

        # 保留物体箭头
        self.ax.arrow(-u, 0, 0, object_height, head_width=0.5, head_length=0.3,
                      fc='blue', ec='blue', lw=2)
        self.ax.text(-u, object_height + 0.5, 'Object', fontsize=10, ha='center')

        # 保留虚像箭头
        if v not in [np.inf, -np.inf] and v is not None:
            magnification = -v / u
            image_height = object_height * magnification
            # 虚像用虚线箭头
            self.ax.arrow(v, 0, 0, image_height, head_width=0.5, head_length=0.2,
                          fc='red', ec='red', lw=2, linestyle='--', alpha=0.7)
            self.ax.text(v, image_height + 0.5, 'Virtual\nImage', fontsize=10, ha='center', color='red')

        self.draw_rays(u, v, object_height)

    def draw_lens(self):
        """绘制凹透镜 - 边缘厚中间薄"""
        # 凹透镜的形状 - 双曲线
        h = 6  # 透镜高度

        # 绘制两条垂直边线
        self.ax.plot([0, 0], [-h, h], 'black', lw=1)

        # 绘制透镜的边缘轮廓(双曲线形状)
        t = np.linspace(-h, h, 100)
        x_left = -0.2 - 0.02 * t**2  # 左侧曲线
        x_right = 0.2 + 0.02 * t**2  # 右侧曲线

        self.ax.plot(x_left, t, 'black', lw=2)
        self.ax.plot(x_right, t, 'black', lw=2)

    def draw_rays(self, u, v, object_height):
        """绘制凹透镜成像光路 - 去掉箭头符号版本"""
        try:
            f = -abs(self.f_value.get())  # 凹透镜焦距为负值
            left_focus = f  # 左焦点位置

            magnification = -v / u
            image_height = object_height * magnification

            # 光路1:平行于x轴的光线
            # 从Object顶点平行射到透镜中心线上的点(0, object_height)
            self.ax.plot([-u, 0], [object_height, object_height], 'r-', lw=2)

            # 折射后,反向延长线过左焦点,实际光线发散
            slope1 = object_height / (-left_focus)
            x_end = 25
            y_end = object_height + slope1 * x_end
            self.ax.plot([0, x_end], [object_height, y_end], 'r-', lw=2)

            # 光路2:从Object顶点射向透镜光心
            self.ax.plot([-u, 0], [object_height, 0], 'g-', lw=2)
            # 穿过光心后方向不变
            slope2 = object_height / u
            y_end2 = -slope2 * 25
            self.ax.plot([0, 25], [0, y_end2], 'g-', lw=2)

            # 绘制反向延长线的交点(虚像)
            # 光路1的反向延长线
            self.ax.plot([0, v], [object_height, image_height], 'r--', lw=1.5, alpha=0.7)
            # 光路2的反向延长线
            self.ax.plot([0, v], [0, image_height], 'g--', lw=1.5, alpha=0.7)

            # 添加焦点和虚像点之间的红虚线
            self.ax.plot([left_focus, v], [0, image_height], 'r--', lw=1.5, alpha=0.7)

        except Exception as e:
            print(f"绘制光线错误: {str(e)}")

    def update_display(self, event=None):
        try:
            self.focal_length = self.f_value.get()
            self.object_height = self.height_value.get()
            u = self.u_value.get()

            v, magnification, image_type = self.calculate_image()

            info = f"物距 u = {u:.1f} cm\n"
            info += f"焦距 f = {-self.focal_length:.1f} cm\n"  # 负值表示凹透镜焦距
            if v is not None:
                if abs(v) != np.inf:
                    info += f"像距 v = {abs(v):.1f} cm\n"
                else:
                    info += "像距 → ∞\n"

                if abs(magnification) != np.inf:
                    info += f"放大率 m = {magnification:.2f}\n"
                else:
                    info += "放大率 → ∞\n"

                info += f"像类型:{image_type}"
                self.info_text.set(info)

                self.draw_optical_elements(u, v)
                self.canvas.draw()

        except Exception as e:
            import traceback
            traceback.print_exc()
            self.info_text.set(f"更新错误: {str(e)}")
            return

if __name__ == "__main__":
    root = tk.Tk()
    app = ConcaveLensSimulator(root)
    root.geometry("1000x600")
    root.mainloop()
附录
关于 matplotlib更多情况 可见 https://blog.csdn.net/cnds123/article/details/148798860
关于numpy更多情况可见 https://blog.csdn.net/cnds123/article/details/135844660