使用 Cookie 实现登录登出功能案例
由于http 是一种无状态协议,请求一次和百次的内容都一致 ,*无状态是指协议本身不会保留客户端与服务器之间的交互状态信息*,每个HTTP请求都是独立的,服务器不会默认记录之前的请求内容或上下文。
Cookie 正是为了解决这个问题而诞生的,它在 HTTP 协议的框架下实现了"有状态"的通信。它通过在HTTP报文头部添加特定字段,实现状态保持。
一、前期准备
-
初始化项目
bashmkdir cookie-demo cd cookie-demo npm init -y npm install express cookie-parser body-parser -
创建并配置服务
jsconst express = require("express"); const cookieParser = require('cookie-parser'); // 引入 const bodyParser = require('body-parser'); // 解析post请求参数 const PORT = 3000; const app = express(); // 使用中间件 app.use(bodyParser.urlencoded({ extended: true })); app.use(cookieParser()); // 模拟用户数据库 const users = [ { id: 1, username: 'admin', password: 'admin123' }, { id: 2, username: 'user', password: 'user123' } ]; // 定义端口 app.listen(PORT, () => { console.log(`服务启动成功 http://localhost:${PORT}`); });二、创建路由
-
首页
访问
http://localhost:3000当cookie中没有用户数据进入登录页,若有数据则进入用户信息页这里模拟的是cookie记录之前的登录信息
js// 首页路由 app.get("/", (req, res) => { if (req.cookies.userId) { // 若cookie中有用户数据 则转跳到用户信息页 res.redirect("/userIndex"); } else { // 否则进入登录界面 res.redirect("/login"); } }); -
登录路由
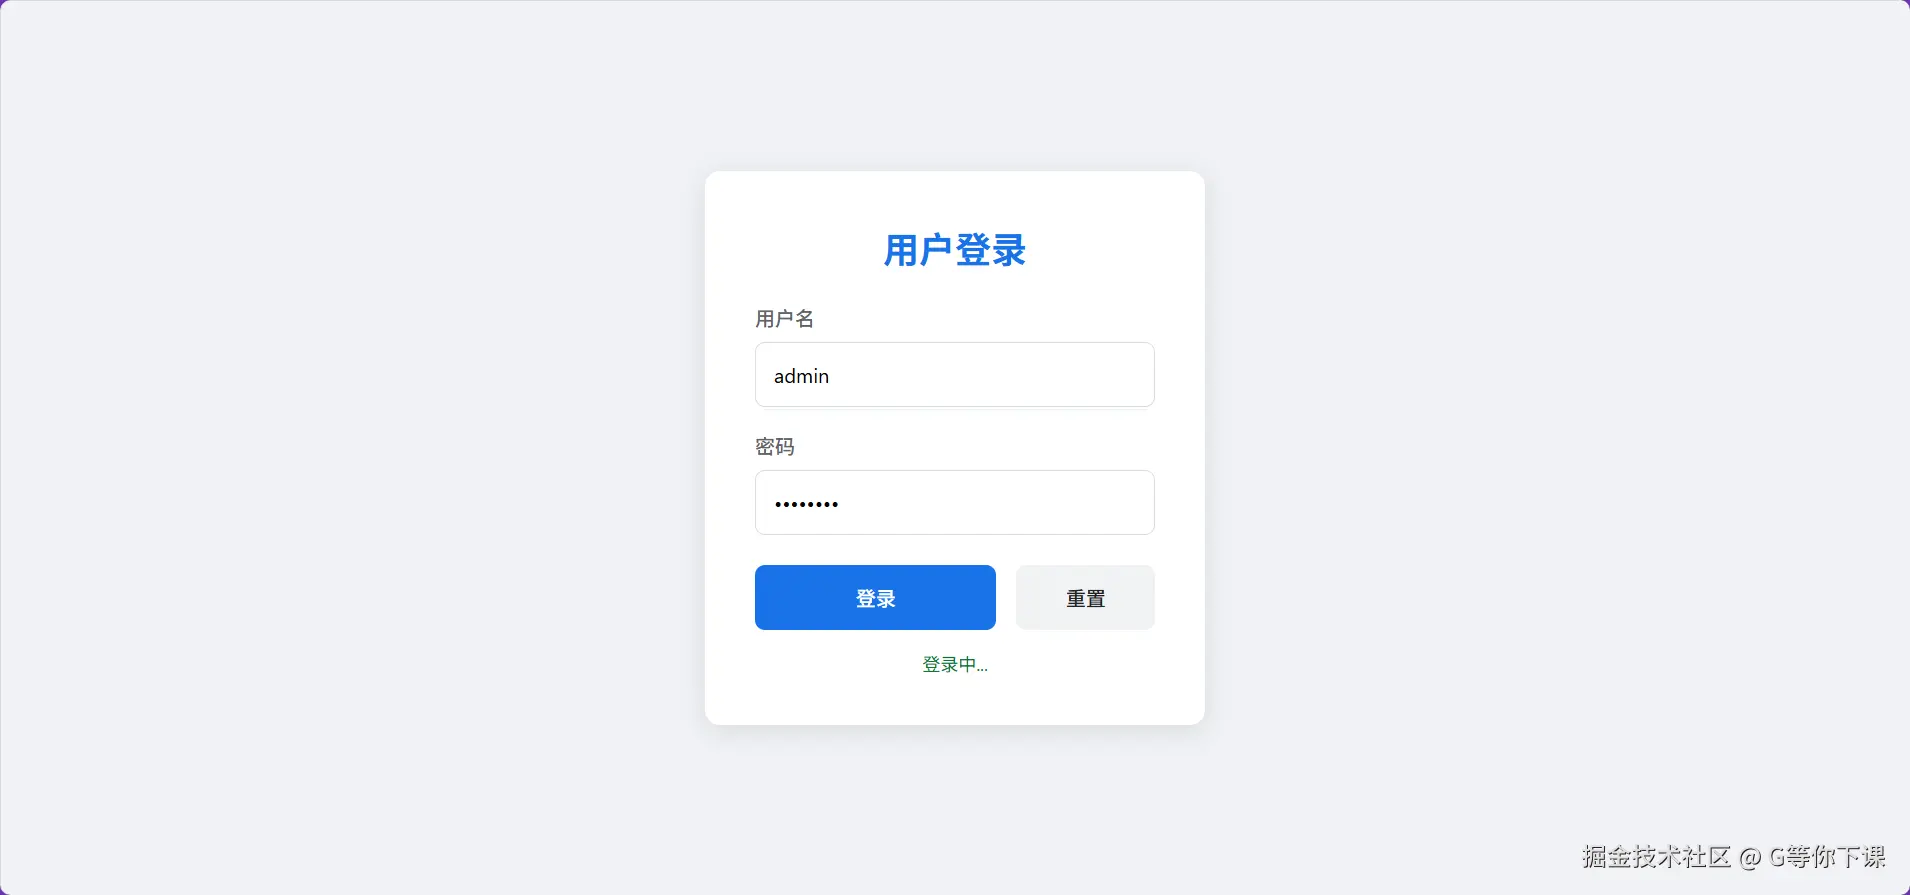
js// 获取登录界面 app.get("/login", (req, res) => { res.sendFile(__dirname + "/login.html"); }); // 登录处理 app.post("/login", (req, res) => { const { username, password } = req.body; // 模拟数据库查找 const user = users.find( (u) => u.username === username && u.password === password ); if (user) { res.cookie("userId", user.id, { maxAge: 24 * 60 * 60 * 1000, httpOnly: true, sameSite: "strict", }); // 发送请求成功 res.send({ code: 0, msg: "登录成功" }); } else { res.status(401).send("用户名或密码错误"); } });登录界面:
-
用户路由
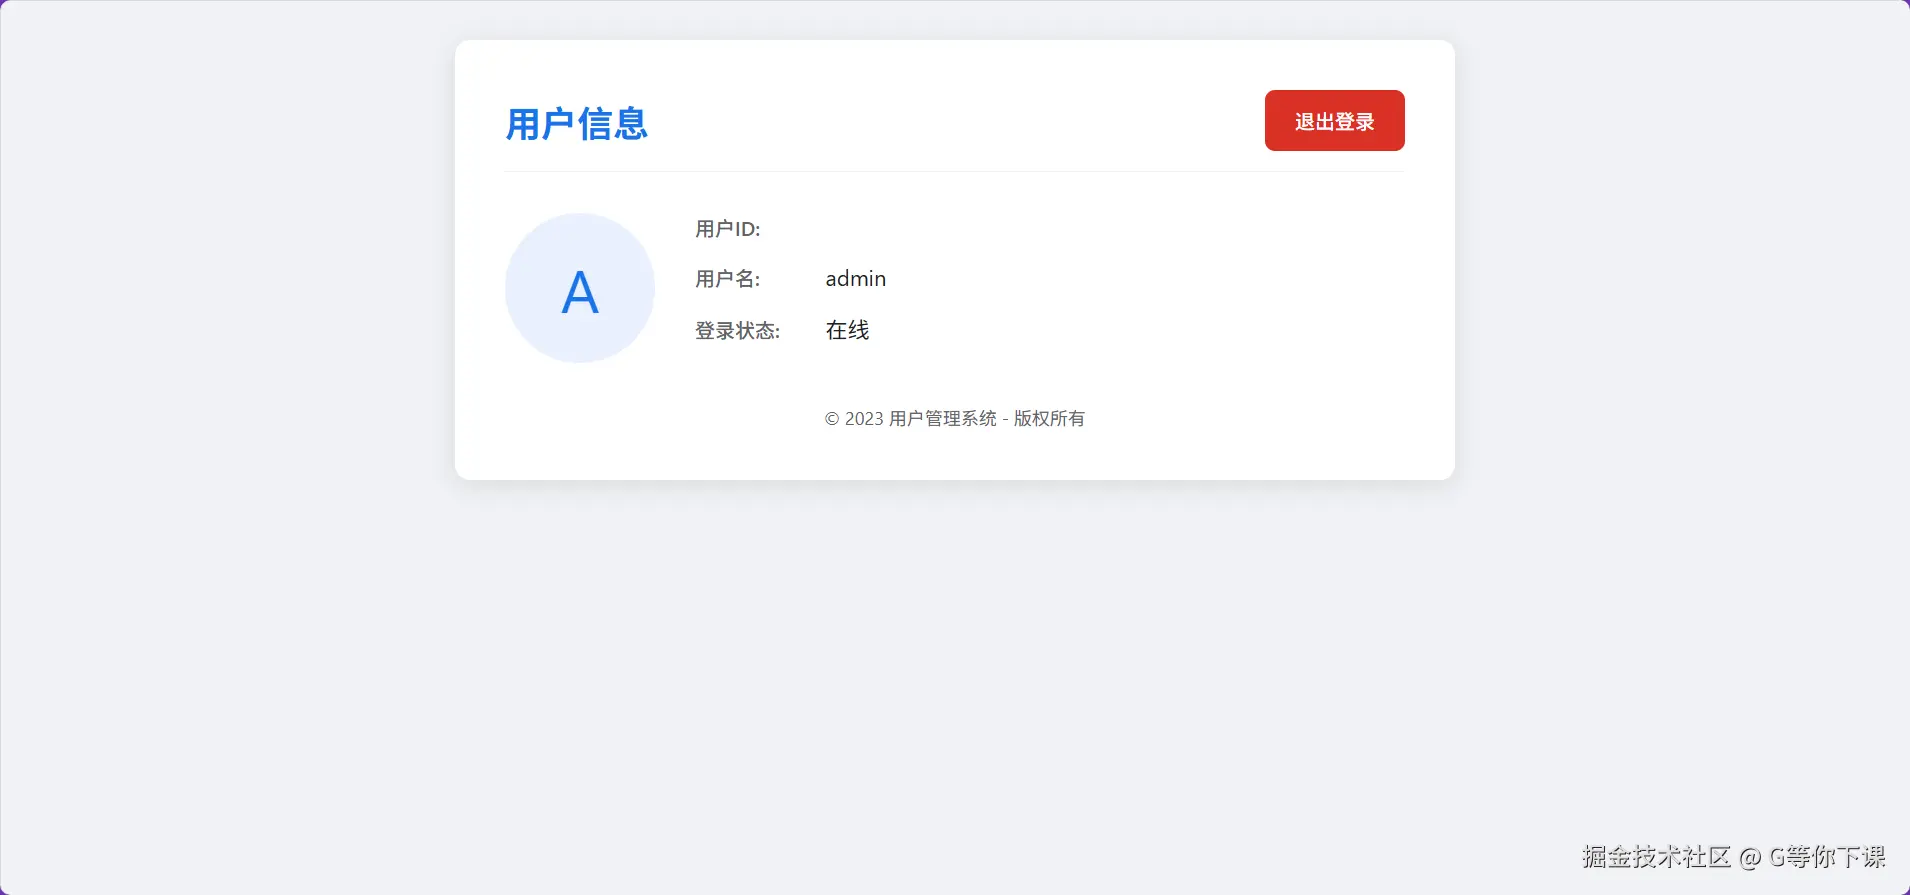
js// 获取用户界面 app.get("/userIndex", (req, res) => { res.sendFile(__dirname + "/user.html"); }); // 获取用户资料 app.get("/user", (req, res) => { const userId = parseInt(req.cookies.userId); // 查询数据库 const user = users.find((u) => u.id === userId); // 返回数据 res.send({username:user.username,id:user.id}); });用户信息页:
-
登出
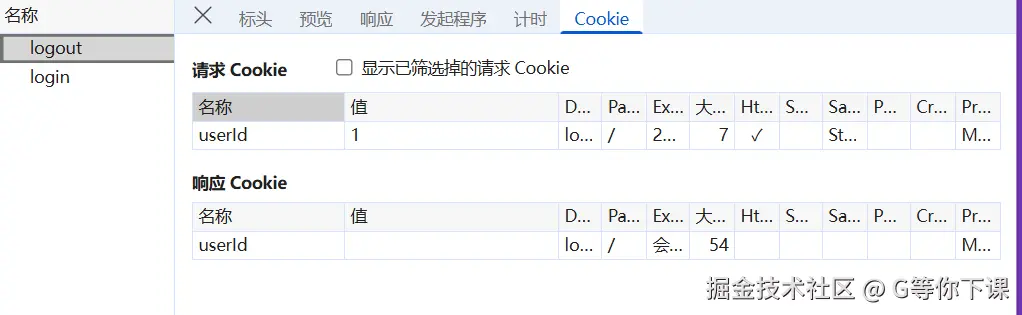
登出后转跳到登录页
js// 登出 app.get('/logout',(req,res)=>{ res.clearCookie('userId') res.redirect('/login') })
三、操作流程
-
访问
http://localhost:3000会自动跳转到登录页 -
使用以下凭证登录:
- 用户名:
admin,密码:admin123 - 或 用户名:
user,密码:user123
- 用户名:
-
登录成功后进入用户信息页(如上所示)
-
上述操作过后,cookie已经保存在浏览器中了,下次访问
http://localhost:3000后端校验cookie后会直接转跳到用户信息页
-
点击 Logout 退出登录会删除浏览器中的cookie
四、代码
-
servlet.js 后端服务
jsconst express = require("express"); const cookieParser = require("cookie-parser"); // 引入 const bodyParser = require("body-parser"); // 解析post请求参数 const PORT = 3000; const app = express(); app.use(express.json()); app.use(express.urlencoded({ extended: true })); // 使用中间件 app.use(bodyParser.urlencoded({ extended: true })); app.use(cookieParser()); // 模拟用户数据库 const users = [ { id: 1, username: "admin", password: "admin123" }, { id: 2, username: "user", password: "user123" }, ]; // 定义端口 app.listen(PORT, () => { console.log(`服务启动成功 http://localhost:${PORT}`); }); // 首页路由 app.get("/", (req, res) => { if (req.cookies.userId) { // 若cookie中有用户数据 则转跳到用户页面 res.redirect("/userIndex"); } else { // 否则进入登录界面 res.redirect("/login"); } }); // 获取登录界面 app.get("/login", (req, res) => { res.sendFile(__dirname + "/login.html"); }); // 获取用户界面 app.get("/userIndex", (req, res) => { res.sendFile(__dirname + "/user.html"); }); // 登录处理 app.post("/login", (req, res) => { const { username, password } = req.body; // 模拟数据库查找 const user = users.find( (u) => u.username === username && u.password === password ); if (user) { res.cookie("userId", user.id, { maxAge: 24 * 60 * 60 * 1000, httpOnly: true, sameSite: "strict", }); // 发送请求成功 res.send({ code: 0, msg: "登录成功" }); } else { res.status(401).send("用户名或密码错误"); } }); // 用户资料 app.get("/user", (req, res) => { const userId = parseInt(req.cookies.userId); if (!userId) { // 页面转跳 res.redirect('/login') return } // 查询数据库 const user = users.find((u) => u.id === userId); // 返回数据 res.send({username:user.username,id:user.id}); }); // 登出 app.get('/logout',(req,res)=>{ res.clearCookie('userId') res.redirect('/login') }) -
登录页login.html
html<body> <div class="login-container"> <h1 class="login-title">用户登录</h1> <form id="loginForm" class="login-form"> <div class="form-group"> <label for="username" class="form-label">用户名</label> <input type="text" id="username" name="username" class="form-input" placeholder="请输入用户名" required /> </div> <div class="form-group"> <label for="password" class="form-label">密码</label> <input type="password" id="password" name="password" class="form-input" placeholder="请输入密码" required /> </div> <div class="form-actions"> <button type="submit" class="btn-login">登录</button> <button type="reset" class="btn-reset">重置</button> </div> <div id="error-message" class="error-message"></div> </form> </div> <script> // 简单的表单提交处理 document .getElementById("loginForm") .addEventListener("submit", async (e) => { e.preventDefault(); const username = document.getElementById("username").value; const password = document.getElementById("password").value; const errorElement = document.getElementById("error-message"); // 这里可以添加实际的登录验证逻辑 if (username && password) { errorElement.textContent = "登录中..."; errorElement.style.color = "#137333"; // 模拟登录请求 const res = await fetch("http://localhost:3000/login", { method: "POST", headers: { "Content-Type": "application/json", }, body: JSON.stringify({ username: username, password: password, }), }); const data = await res.json(); console.log(data); if (data.code === 0) { // 登录成功后,跳转到用户界面 window.location.href = "http://localhost:3000/userIndex"; } } else { errorElement.textContent = "请输入用户名和密码"; } }); </script> </body> -
用户信息页
html<body> <div class="container"> <div class="header"> <h1 class="title">用户信息</h1> <button class="btn-logout" id="logoutBtn">退出登录</button> </div> <div class="user-card"> <div class="avatar"> <span id="avatarInitial">A</span> </div> <div class="user-info"> <div class="info-item"> <span class="info-label">用户ID:</span> <span class="info-value" id="userId">--</span> </div> <div class="info-item"> <span class="info-label">用户名:</span> <span class="info-value" id="username">--</span> </div> <div class="info-item"> <span class="info-label">登录状态:</span> <span class="info-value" id="loginStatus">在线</span> </div> </div> </div> <div class="footer"> <p>© 2023 用户管理系统 - 版权所有</p> </div> </div> <script> // 从Cookie中获取用户信息 function getCookie(name) { const cookies = document.cookie.split(";"); for (let cookie of cookies) { const [cookieName, cookieValue] = cookie.trim().split("="); if (cookieName === name) { return decodeURIComponent(cookieValue); } } return null; } // 检查用户是否已登录 function checkLogin() { const userId = getCookie("userId"); if (!userId) { // window.location.href = 'login.html'; return false; } return true; } // 加载用户信息 async function loadUserInfo() { // if (!checkLogin()) return; // 在实际应用中,这里应该从服务器获取完整用户信息 const res = await fetch("/user", { method: "GET", headers: { 'Content-Type': 'application/json' } }); const data = await res.json(); console.log(data) // 这里为了演示,使用预设数据 const userData = { id: getCookie("userId"), username: data.username, }; console.log(userData) // 更新页面显示 document.getElementById("userId").textContent = userData.id; document.getElementById("username").textContent = userData.username; document.getElementById("avatarInitial").textContent = userData.username .charAt(0) .toUpperCase(); } // 退出登录 async function logout() { // // 清除Cookie // document.cookie = // "userId=; expires=Thu, 01 Jan 1970 00:00:00 UTC; path=/;"; // // 重定向到登录页 // window.location.href = "login.html"; const res = await fetch('/logout',{ method:'GET', headers: { 'Content-Type': 'application/json' } }) } // 页面加载完成后执行 document.addEventListener("DOMContentLoaded", function () { loadUserInfo(); document.getElementById("logoutBtn").addEventListener("click", logout); }); </script> </body>
-