作者:SkyXZ
CSDN:SkyXZ~-CSDN博客
博客园:SkyXZ - 博客园
宿主机环境:Ubuntu22.04(192x CPU 8x NVIDIA GeForce RTX 4090)、D-Robotics-OE 3.2.0、Ubuntu22.04 GPU Docker
端侧设备环境:RDKS100-RDK OS 4.0.2-Beta
买了RDK S100还只停留在RDKX5的使用思想?想部署模型但对着全新的工具链不知从何下手?好不容易学会X5上的HB_DNN结果面对S100的UCP只能一脸懵?我知道你很急,但你先别急!跟着这篇学妹吵着要学的模型量化部署教程包你30Min告别RDKS100模型量化部署小白!!!本篇文章为万字长文,学弟一看就会的RDKX5模型转换及部署,你确定不学?的姐妹篇 ,本篇侧重于基础模型的部署,后续会更新VLA等具身智能模型在RDKS100的部署教程,首先介绍一下我们本篇教程的参考资料:
- RDKS100用户手册:https://developer.d-robotics.cc/rdk_doc/rdk_s/RDK/
- RDKS100 OpenExplorer®算法工具链:https://toolchain.d-robotics.cc/
- RDKS100---ModelZoo:https://github.com/D-Robotics/rdk_model_zoo_s/tree/s100
一、算法工具链介绍及环境安装
目前,我们在GPU上训练的模型通常采用浮点数格式,因为浮点类型能够提供较高的计算精度和灵活性,但是对于边缘式设备来说浮点类型模型所需的算力和存储资源远超其承载能力,因此一般边缘式设备上的AI加速芯片基本都只支持INT8(业内处理器的通用精度)定点模型,我们S100的BPU也不例外,因此我们需要将我们训练出来的浮点模型转化为定点模型,这一过程便叫做模型的量化,而我们要下载的OE包是Open Explorer的缩写简称,中文名为天工开物(以下简称OE),它是基于地平线自研计算平台打造的全生命周期开发平台, 主要包括模型编译优化工具集、算法仓库和应用开发SDK三大功能模块。下面我们介绍该如何安装算法工具链:
由于算法工具链暂时只能在Linux环境运行,因此大家首先先确保自己的开发机满足以下要求并且安装了WSL2-Ubuntu(具体可参阅:告别虚拟机!WSL2安装配置教程!!! - SkyXZ - 博客园)或者是虚拟机里的Ubuntu亦或者在自己的Linux服务器,由于官方有给我们工具链的docker镜像因此Ubuntu的系统版本不是很重要,以下为官方建议的系统配置:
| 硬件/操作系统 | 要求 |
|---|---|
| CPU | CPU I3以上或者同级别E3/E5的处理器 |
| 内存 | 16G或以上级别 |
| GPU | CUDA11.8、驱动版本Linux:>= 510.39.01* (推荐驱动版本Linux:520.61.05) 适配显卡包括但不限于: 1. GeForce RTX 3090 2. GeForce RTX 2080 Ti 3. NVIDIA TITAN V 4. Tesla V100S-PCIE-32GB 5. A100 |
| 系统 | 原生Ubuntu 22.04 |
S100的工具链手册中有详细的环境部署教程https://toolchain.d-robotics.cc/guide/env_install.html,我们这里仅介绍最通用最便捷的Docker容器部署的方法:
(1)安装Docker及NVIDIA Container Toolkit
我们在Ubuntu中安装Docker(官方要求20.10.10或更高版本,安装详见:Get Docker | Docker Docs)及NVIDIA Container Toolkit(官方建议1.13.5或更高版本,建议安装1.15.0,安装详见:NVIDIA Container Toolkit安装手册),接着我将从头带着大家走一遍这个过程,首先便是安装Docker,我们先卸载系统默认安装的docker并安装一些必要支持:
bash
#如果有便删,报错说没有那就无所谓不用管
sudo apt-get remove docker docker-engine docker.io containerd runc
#下载必要依赖
sudo apt install apt-transport-https ca-certificates curl software-properties-common gnupg lsb-release
我们默认大家不会使用代理,因此我们所有的源均使用国内源,我们添加阿里的GPG KEY以及阿里的APT源后便可以直接APT安装Docker的最新版本啦
bash
# step 1 添加阿里GPG Key
curl -fsSL https://mirrors.aliyun.com/docker-ce/linux/ubuntu/gpg | sudo gpg --dearmor -o /usr/share/keyrings/docker-archive-keyring.gpg

# step 2 添加阿里Docker APT源
echo "deb [arch=$(dpkg --print-architecture) signed-by=/usr/share/keyrings/docker-archive-keyring.gpg] https://mirrors.aliyun.com/docker-ce/linux/ubuntu $(lsb_release -cs) stable" | sudo tee /etc/apt/sources.list.d/docker.list > /dev/null

# step 3 Update
sudo apt update
sudo apt-get update

# step 4 下载Docker
sudo apt install docker-ce docker-ce-cli containerd.io

# step 5 验证Docker安装
sudo docker version      #查看Docker版本
sudo systemctl status docker   #验证Docker运行状态
如果验证Docker安装均有输出且正常运行那么便代表我们的Docker安装完成啦,接着我们将无root权限的用户添加到Docker用户组中,这样我们便可以让当前用户在不切root,或者不加sudo 的情况下正常使用 docker 命令:
bash
  sudo groupadd docker
  sudo gpasswd -a ${USER} docker
sudo service docker restart但是到这里还没有结束,因为大概率大家运行docker run hello-world是会一直报如下网络错误:

这是因为国内暂时无法直接访问Docker源镜像,我们需要使用第三方Docker源,我在这里帮大家已经整理好了一些常见的Docker源,大家只需要添加进/etc/docker/daemon.json文件即可:
shell
# step 1 创建 or 编辑 /etc/docker/daemon.json
sudo nano /etc/docker/daemon.json
# step 2 复制粘贴进入文件
{
    "registry-mirrors": [
        "https://dockerproxy.com",
        "https://docker.m.daocloud.io",
        "https://cr.console.aliyun.com",
        "https://ccr.ccs.tencentyun.com",
        "https://hub-mirror.c.163.com",
        "https://mirror.baidubce.com",
        "https://docker.nju.edu.cn",
        "https://docker.mirrors.sjtug.sjtu.edu.cn",
        "https://github.com/ustclug/mirrorrequest",
        "https://registry.docker-cn.com"
    ]
}
# step 3 重载配置文件,并重启 docker
sudo systemctl daemon-reload
sudo systemctl restart docker
# step 4 查看Docker配置检查是否配置成功
sudo docker info 
可以看到运行了docker info命令后终端输出了我们之前添加进去的docker源地址,这时候我们再次运行docker run hello-world便可以看到docker成功下载了对应的镜像并打印输出了**"Hello from Docker!"**

安装完docker,接着我们来安装NVIDIA Container Toolkit (电脑没有GPU或者是使用的VM等虚拟机的同学可以跳过这一步了,由于你们无法访问到GPU所以这步不需要安装),这个工具链组件是一个Nvidia提供的一组工具,安装了之后我们便可以在Docker中使用GPU并能够支持 GPU 加速,由于Nvidia的文档写的非常的详细,因此我们按照英伟达文档中的步骤来安装配置
类似于之前的Docker,我们需要添加Nvidia官方的源,添加了之后我们便可以直接使用APT安装啦
bash
# step 1 配置生产存储库
curl -fsSL https://nvidia.github.io/libnvidia-container/gpgkey | sudo gpg --dearmor -o /usr/share/keyrings/nvidia-container-toolkit-keyring.gpg \
  && curl -s -L https://nvidia.github.io/libnvidia-container/stable/deb/nvidia-container-toolkit.list | \
    sed 's#deb https://#deb [signed-by=/usr/share/keyrings/nvidia-container-toolkit-keyring.gpg] https://#g' | \
    sudo tee /etc/apt/sources.list.d/nvidia-container-toolkit.list
# step 2 Update
sudo apt-get update
# step 3 使用APT安装
sudo apt-get install -y nvidia-container-toolkit #如果没有代理这部分耗时会比较久
接着我们开始为Docker配置NVIDIA Container Runtime,这部分很简单只需要两行命令即可:
bash
sudo nvidia-ctk runtime configure --runtime=docker #使用nvidia-ctk命令修改/etc/docker/daemon.json 文件
sudo systemctl restart docker #重启Docker守护进程
最后输入以下命令即可验证我们的配置是否成功,如果出现下图即代表Nvidia Container Toolkit安装完成啦!!!
bash
sudo docker run --rm --runtime=nvidia --gpus all ubuntu nvidia-smi
(2)配置使用S100算法工具链
好啦,走完上述流程没有问题的话就代表我们现在已经完成了所有的前置配置啦!接着我们便可以开始配置我们的算法工具链,首先我们下载RDK的OE交付包(截止文章发布最新版本为V3.2.0)以及对应的Docker镜像
bash
# 下载OE-v1.2.8交付包
wget -c ftp://oeftp@sdk.d-robotics.cc/oe_v3.2.0/s100-3.2.0-oe-package.tgz --ftp-password=Oeftp~123$%

# 自行选择下述CPU or GPU版本的Docker镜像下载,二选一即可
#CPU Docker镜像
wget -c ftp://oeftp@sdk.d-robotics.cc/oe_v3.2.0/ai_toolchain_ubuntu_22_s100_cpu_v3.2.0.tar --ftp-password=Oeftp~123$%
#GPU Docker镜像
wget -c ftp://oeftp@sdk.d-robotics.cc/oe_v3.2.0/ai_toolchain_ubuntu_22_s100_gpu_v3.2.0.tar --ftp-password=Oeftp~123$%

#算法工具链 用户开发文档(按需下载)
wget -c ftp://oeftp@sdk.d-robotics.cc/oe_v3.2.0/s100-3.2.0-oe-doc.zip --ftp-password=Oeftp~123$%由于docker系统文件较大,所以我们需要稍等一会,下载完之后输入ls便能看到两个文件啦

我们输入以下指令进行解压:
bash
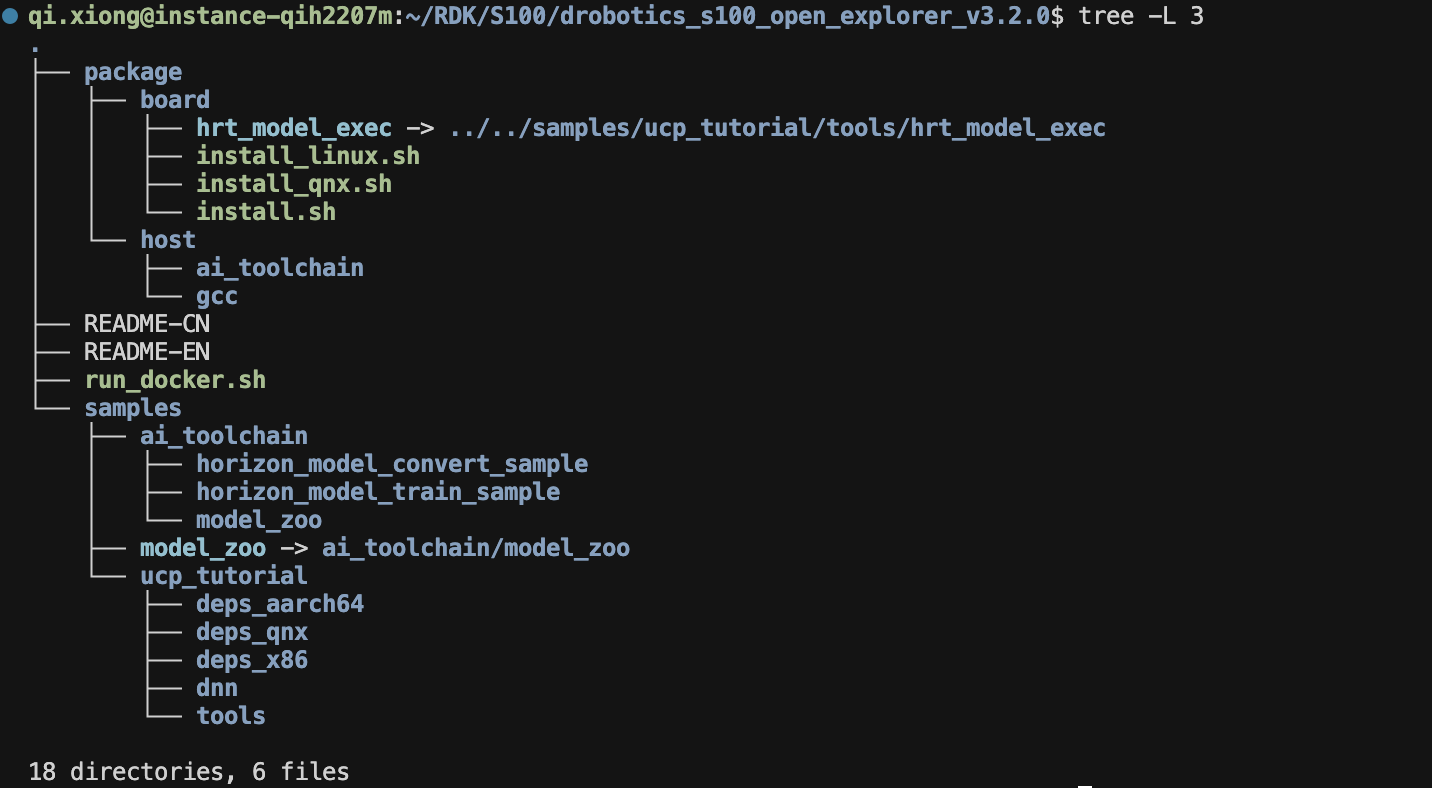
tar -xvf s100-3.2.0-oe-package.tgz #解压OE交付包解压完成后我们进入OE包,可以看到我们的OE包的结构如下,分为两个大的文件夹package和samples,package里面主要是目录下包含了发布物运行的一些基础库和组件,由于我们使用的Docker镜像因此这个文件夹我们可以不用管我们主要来看看samples包叭,samples下包含了 ai_toolchain、model_zoo和ucp_tutorial 三个交付包,其中ai_toolchain提供了一些模型算法的一系列示例。(其中horizon_model_train_samples为浮点模型训练框架示例,horizon_model_convert_sample为浮点模型转定点模型的转换示例, model_zoo是一个模型库,用于放置工具链示例模型编译的源模型和runtime模型。),ucp_tutorial为统一计算平台UCP的示例包,提供UCP必要的依赖以及相关示例,具体介绍见:https://toolchain.d-robotics.cc/guide/preface/learn_oe.html#release
看完了OE交付包接着我们开始导入Docker镜像,由于这个docker镜像和OE包相辅相成,因此我们可以设置docker的映射路径,接着我们从tar包导入docker镜像即可:
bash
#大家根据自己的路径进行修改
export S100_Model_path=/home/qi.xiong/RDK/S100/Model # Docker与开发机的交互工作空间需要在Docker中使用的文件放此文件夹
export dataset_path=/home/qi.xiong/Dataset    # 数据集存放路径(按需设置,我用来统一存放校准数据集)
#导入镜像
docker load < ai_toolchain_ubuntu_22_s100_gpu_v3.2.0.tar
由于我们的镜像比较大,所以导入的时间会比较久,大家安心等待即可,接着我们输入如下的指令即可启动docker镜像
bash
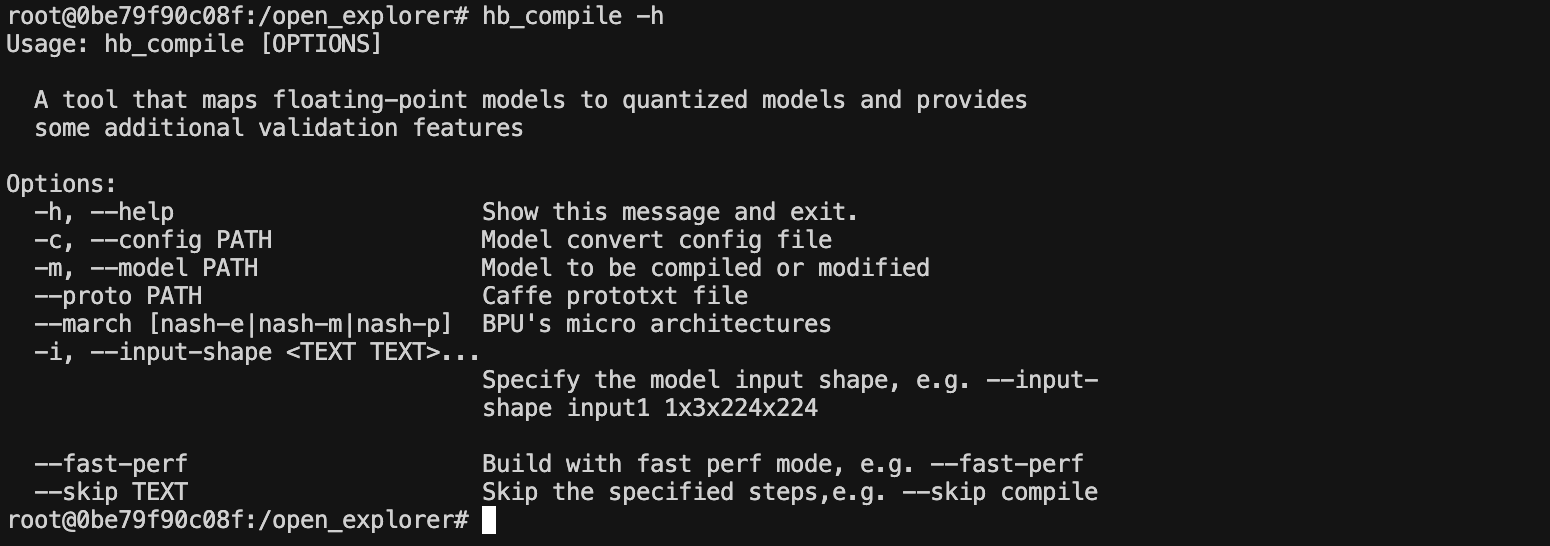
docker run -it --rm --gpus '\"device=6\"' --shm-size=32g -v "$ai_toolchain_package_path":/open_explorer -v "$dataset_path":/open_explorer/Dataset -v "$S100_Model_path":/open_explorer/Model ai_toolchain_ubuntu_22_s100_gpu:v3.2.0接着在镜像中输入命令hb_mapper有如下打印输出则代表我们环境安装完成啦~~
**小Tips:**大家可以在~/.bashrc中使用alias添加如下一行,之后便可以直接在终端输入RDK_S100DockerToolchain打开工具链啦,就不用去记那么长的指令了
bash
alias RDK_S100DockerToolchain="docker run -it --rm --gpus '\"device=6\"' --shm-size=32g -v "$ai_toolchain_package_path":/open_explorer -v "$dataset_path":/open_explorer/Dataset -v "$S100_Model_path":/open_explorer/Model ai_toolchain_ubuntu_22_s100_gpu:v3.2.0" 
至此我们的地瓜工具链的环境便全部安装配置完成啦!!!
二、Model Zoo介绍
我觉得对于刚拿到RDKS100板子的同学来说,我们无法绕开地瓜机器人最新推出的Model Zoo而直接去学习RDK的算法工具链,因此我们的X5模型量化转换部署教程便先从Model_Zoo_s开始介绍。Model Zoo,意如其名,从字面上我们便可以知道这是一个**"模型动物园"**,这是一个是一个由地瓜开发者社区在维护的一个开源社区算法案例仓库,旨在为开发者提供能直接上板部署的,丰富多样的模型案例。RDKX5有属于自己的ModelZoo,RDKS100也拥有属于他自己的ModelZoo,目前还仍在不断扩充中
那我们该如何使用这个仓库呢?我们首先从Github上将Model Zoo拉取下来,我们可以看到Model Zoo的项目结构如图所示:
bash
git clone https://github.com/D-Robotics/rdk_model_zoo_s/tree/s100 #拉取Model Zoo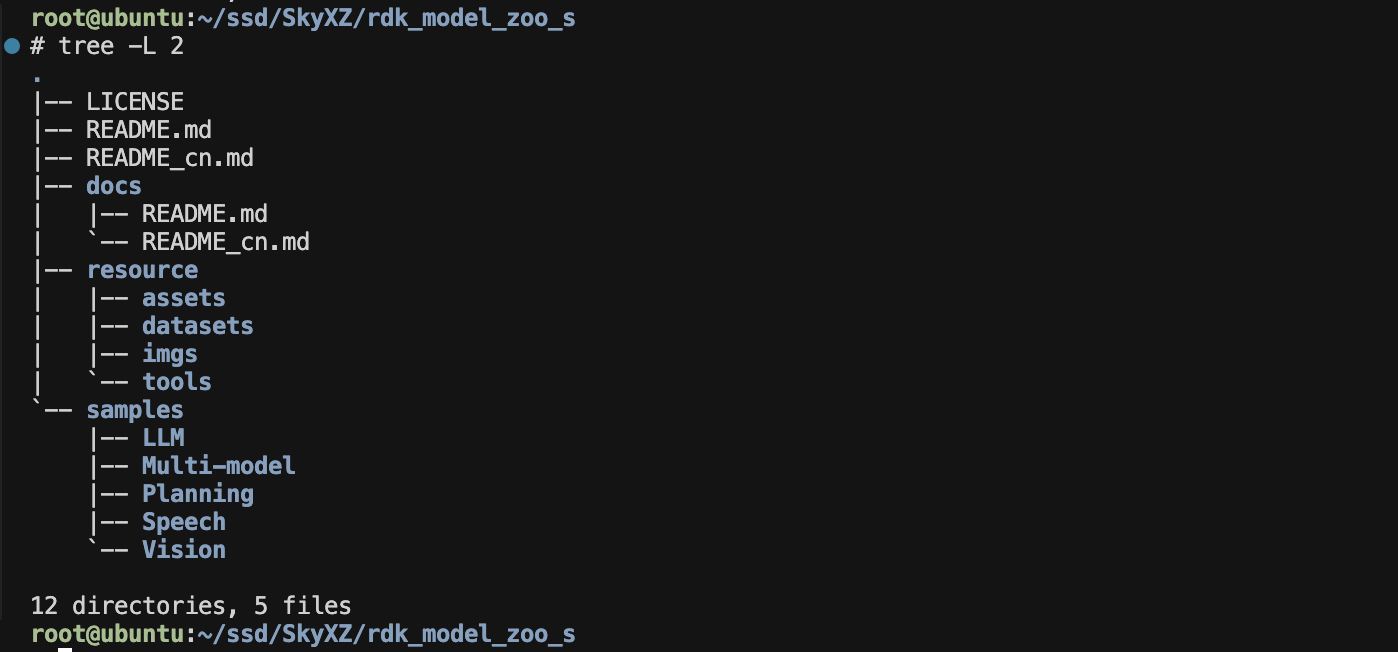
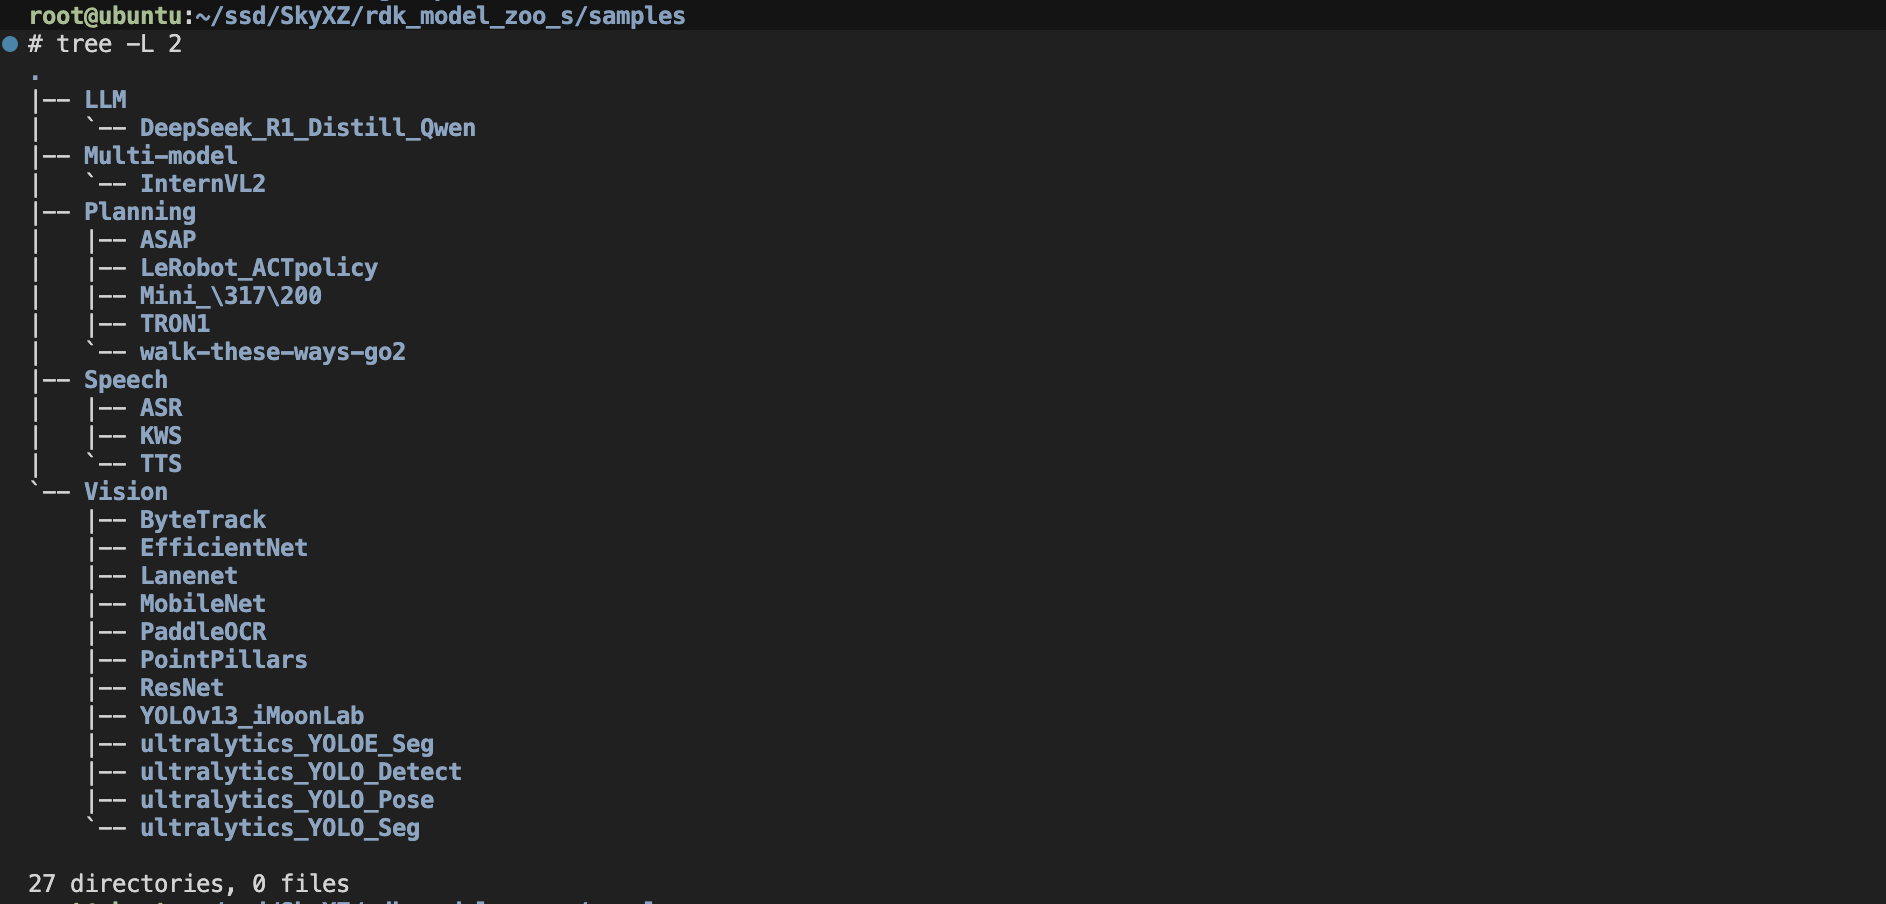
主文件夹下面有中英双语的README、README的图片资源文件夹resource以及我们最主要的sample文件夹,这里面把官方目前支持的所有模型按照视觉模型Vision、LLM大语言模型LLM、多模态模型Multi-Model、动作策略模型Planning及语音模型Speech等分为了五大类
相信到这大家应该对Model Zoo有了基本的认识,接下来我们以Yolo-Detect系列模型为例子给大家介绍如何转换模型
三、模型量化示例教程
接下来我们正式进入工具链的使用,我们以Ultralytics官方版本为示例带着大家在完成模型转化的同时简单了解其中的一些概念,本流程将基于rdk_model_zoo_s/samples/Vision/ultralytics_YOLO_Detect/README_cn.md地瓜Model Zoo中的官方文档描述的进行介绍,由于经过这套方案处理之后的模型具有相同了前处理和后处理因此本方案理论上支持Yolo全系列模型
我们首先拉取Ultralytics的源码,并配置好环境,我们这里先通过下载ultralytics包完成所有依赖的安装,然后由于我们在导出的时候需要修改输出头,因此我们安装完后需要卸载掉ultralytics包并启用可编辑开发模式安装本地源码,这样可以方便我们修改源码后立即生效,完整的流程如下:
bash
git clone https://github.com/ultralytics/ultralytics.git
conda create -n YOLO python=3.10 -y && conda activate YOLO
pip3 install ultralytics && pip uninstall ultralytics
cd ultralytics && pip3 install -e .接着我们打开ultralytics/ultralytics/nn/modules/head.py文件找到class Detect类的forward部分(大概114行),并修改成如下形式,主要就是修改了导出时的输出头,同时添加了训练和导出模式的判定,以便我们在训练和导出的时候不需要频繁修改forward方法:
python
def forward(self, x: List[torch.Tensor]) -> Union[List[torch.Tensor], Tuple]:
    """Concatenate and return predicted bounding boxes and class probabilities."""
    if self.training:
        if self.end2end:
            return self.forward_end2end(x)

        for i in range(self.nl):
            x[i] = torch.cat((self.cv2[i](x[i]), self.cv3[i](x[i])), 1)
        if self.training:  # Training path
            return x
        y = self._inference(x)
        return y if self.export else (y, x)
    elif self.export:
        result = []
        for i in range(self.nl):
            result.append(self.cv3[i](x[i]).permute(0, 2, 3, 1).contiguous())
            result.append(self.cv2[i](x[i]).permute(0, 2, 3, 1).contiguous())
return result接着我们下载ultralytics官方预训练权重,我们这里就以YOLOv8n来演示叭
bash
wget https://github.com/ultralytics/assets/releases/download/v8.3.0/yolov8n.pt下载之后我们新建一个export.py文件,并使用以下代码导出onnx格式的模型,注意和X5不一样的地方是S100支持Opset19
python
from ultralytics import YOLO
YOLO('yolov8n.pt').export(imgsz=640, format='onnx', simplify=True, opset=19)
接着我们需要准备校准数据,这部分其实就是将我们的数据集里的图片变换成我们训练时输入的格式即可,具体代码如下不过多叙述,可以直接套用
python
import os
import numpy as np
from PIL import Image
import cv2
from tqdm import tqdm
import argparse
def preprocess_image(image_path, target_size=(640, 640), scale_value=0.003921568627451):
    image = cv2.imread(image_path)
    if image is None:
        raise ValueError(f"无法读取图片: {image_path}")
    image = cv2.cvtColor(image, cv2.COLOR_BGR2RGB)
    image = cv2.resize(image, target_size, interpolation=cv2.INTER_LINEAR)
    # 转换为float32并归一化
    image = image.astype(np.float32)
    image = image * scale_value  # 等同于 / 255
    # 转换为NCHW格式 (Batch, Channel, Height, Width)
    # 原始格式: (H, W, C) -> 目标格式: (1, C, H, W)
    image = np.transpose(image, (2, 0, 1))  # (H, W, C) -> (C, H, W)
    image = np.expand_dims(image, axis=0)   # (C, H, W) -> (1, C, H, W)
    return image
def batch_preprocess(input_dir, output_dir, target_size=(640, 640),
                    scale_value=0.003921568627451, max_images=100):
    # 创建输出目录
    os.makedirs(output_dir, exist_ok=True)
    # 获取所有jpg图片
    image_files = []
    for ext in ['*.jpg', '*.jpeg', '*.JPG', '*.JPEG']:
        image_files.extend([f for f in os.listdir(input_dir) if f.lower().endswith(('.jpg', '.jpeg'))])
    image_files = sorted(image_files)[:max_images]  # 限制数量
    print(f"找到 {len(image_files)} 张图片,将处理前 {len(image_files)} 张")
    print(f"目标尺寸: {target_size}")
    print(f"缩放因子: {scale_value}")
    print(f"输出目录: {output_dir}")
    # 批量处理
    for i, filename in enumerate(tqdm(image_files, desc="处理图片")):
        try:
            input_path = os.path.join(input_dir, filename)
            # 预处理图片
            processed_image = preprocess_image(input_path, target_size, scale_value)
            # 保存为npy文件
            output_filename = f"calibration_{i:04d}.npy"
            output_path = os.path.join(output_dir, output_filename)
            # 保存时去掉batch维度,保存为 (C, H, W) 格式
            np.save(output_path, processed_image.squeeze(0))
        except Exception as e:
            print(f"处理图片 {filename} 时出错: {e}")
            continue
    print(f"预处理完成!共生成 {len(os.listdir(output_dir))} 个校准数据文件")
    print(f"校准数据保存在: {output_dir}")
def verify_calibration_data(calibration_dir, num_samples=5):
    """
    验证校准数据格式
    """
    print("\n=== 校准数据验证 ===")
    npy_files = [f for f in os.listdir(calibration_dir) if f.endswith('.npy')]
    npy_files = sorted(npy_files)[:num_samples]
    for filename in npy_files:
        filepath = os.path.join(calibration_dir, filename)
        data = np.load(filepath)
        print(f"文件: {filename}")
        print(f"  形状: {data.shape}")
        print(f"  数据类型: {data.dtype}")
        print(f"  数值范围: [{data.min():.6f}, {data.max():.6f}]")
        print(f"  均值: {data.mean():.6f}")
        print()
if __name__ == "__main__":
    parser = argparse.ArgumentParser(description='S100 校准数据预处理')
    parser.add_argument('--input_dir', type=str,
                       default='/home/qi.xiong/Dataset/UAV_Sheep/yolo_dataset/test/images',
                       help='输入图片目录')
    parser.add_argument('--output_dir', type=str,
                       default='/home/qi.xiong/RDK/S100/Model/calibration_data',
                       help='输出校准数据目录')
    parser.add_argument('--target_size', type=int, nargs=2, default=[640, 640],
                       help='目标图片尺寸 (width height)')
    parser.add_argument('--scale_value', type=float, default=0.003921568627451,
                       help='缩放因子 (通常是 1/255)')
    parser.add_argument('--max_images', type=int, default=100,
                       help='最大处理图片数量')
    args = parser.parse_args()
    print("=== S100 校准数据预处理 ===")
    print(f"输入目录: {args.input_dir}")
    print(f"输出目录: {args.output_dir}")
    # 检查输入目录
    if not os.path.exists(args.input_dir):
        print(f"错误: 输入目录不存在 - {args.input_dir}")
        exit(1)
    # 执行预处理
    batch_preprocess(
        input_dir=args.input_dir,
        output_dir=args.output_dir,
        target_size=tuple(args.target_size),
        scale_value=args.scale_value,
        max_images=args.max_images
    )
    # 验证结果
verify_calibration_data(args.output_dir)在准备了校准数据之后我们还需要查看一下需要移除的反量化节点名称,我们打开Netron可视化工具,将我们上一步生成的onnx模型拖入其中打开即可看到我们的这个模型的网络架构,接着我们拖动到最上方点击输入的images即可在右边弹出的界面看到我们这个模型的所有输出
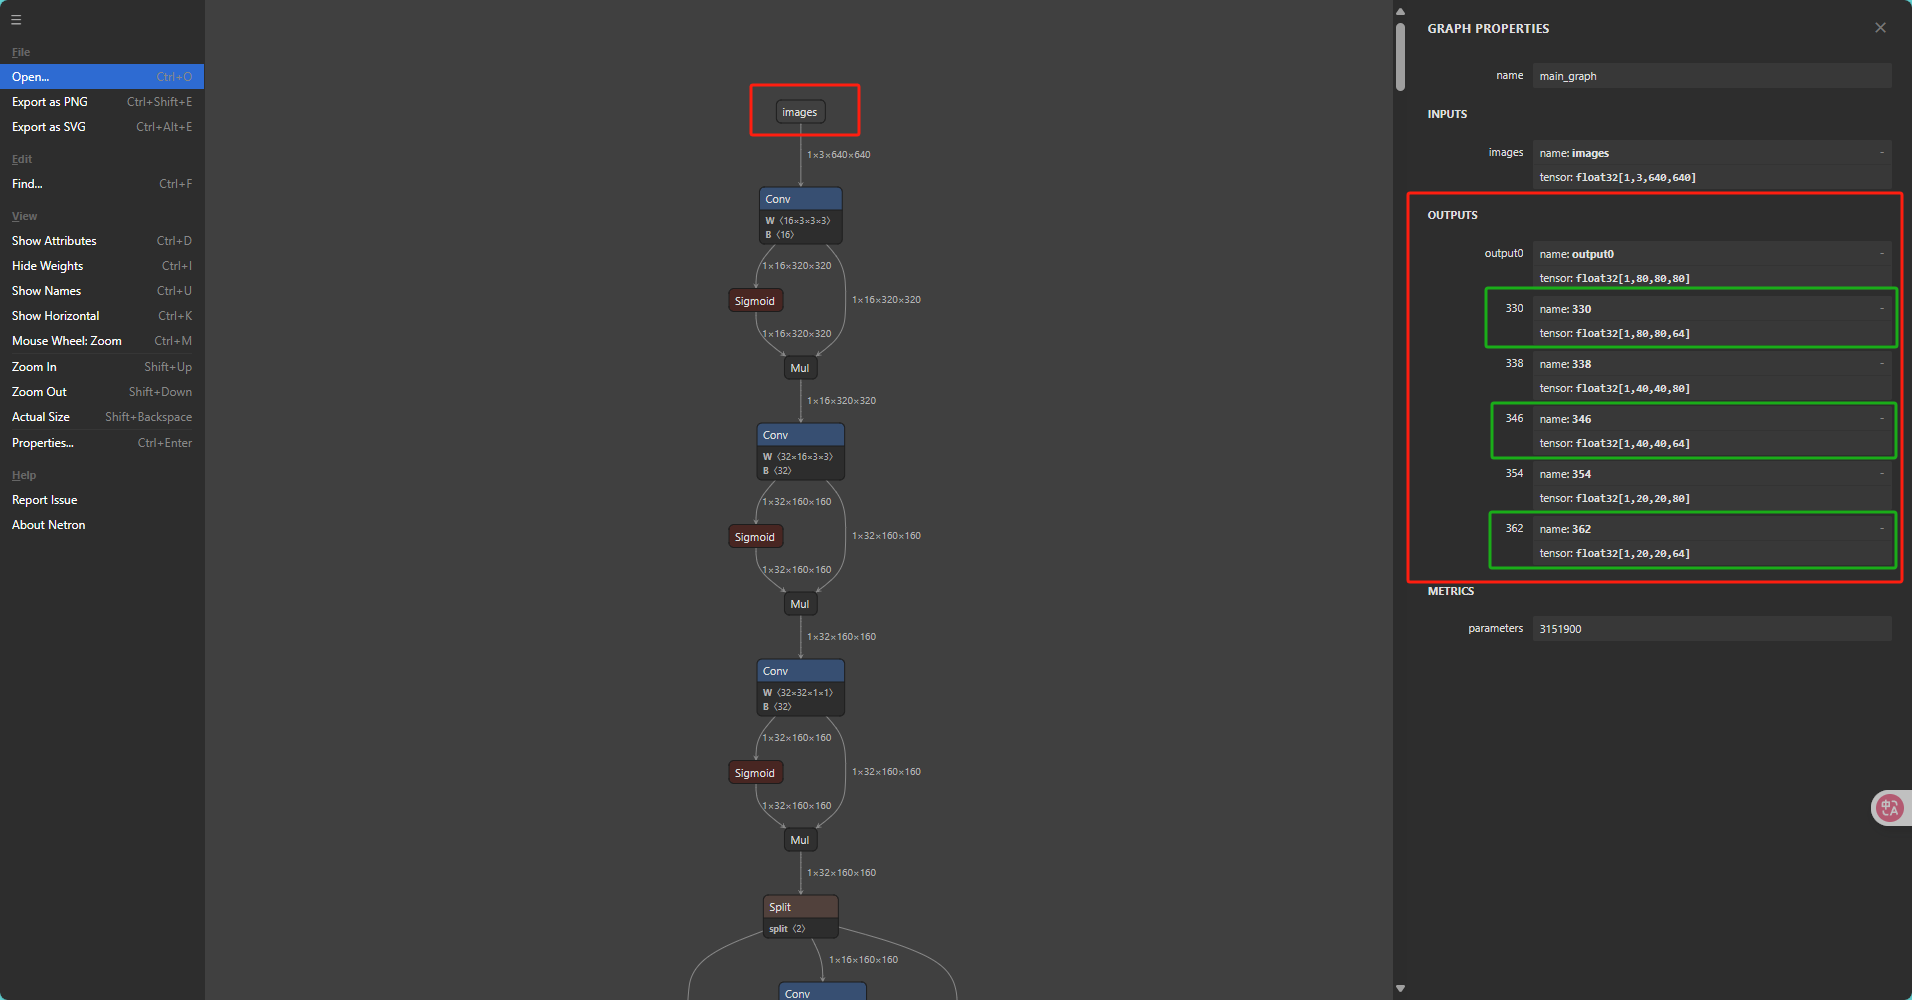
接着我们找到带有64(64 = 4 * REG, REG = 16.)的三个输出依此点击这三个输出后记录下右边的输出节点的name,不同版本的Ultralytics导出的ONNX的名称是不同的, 请勿直接套用!!!
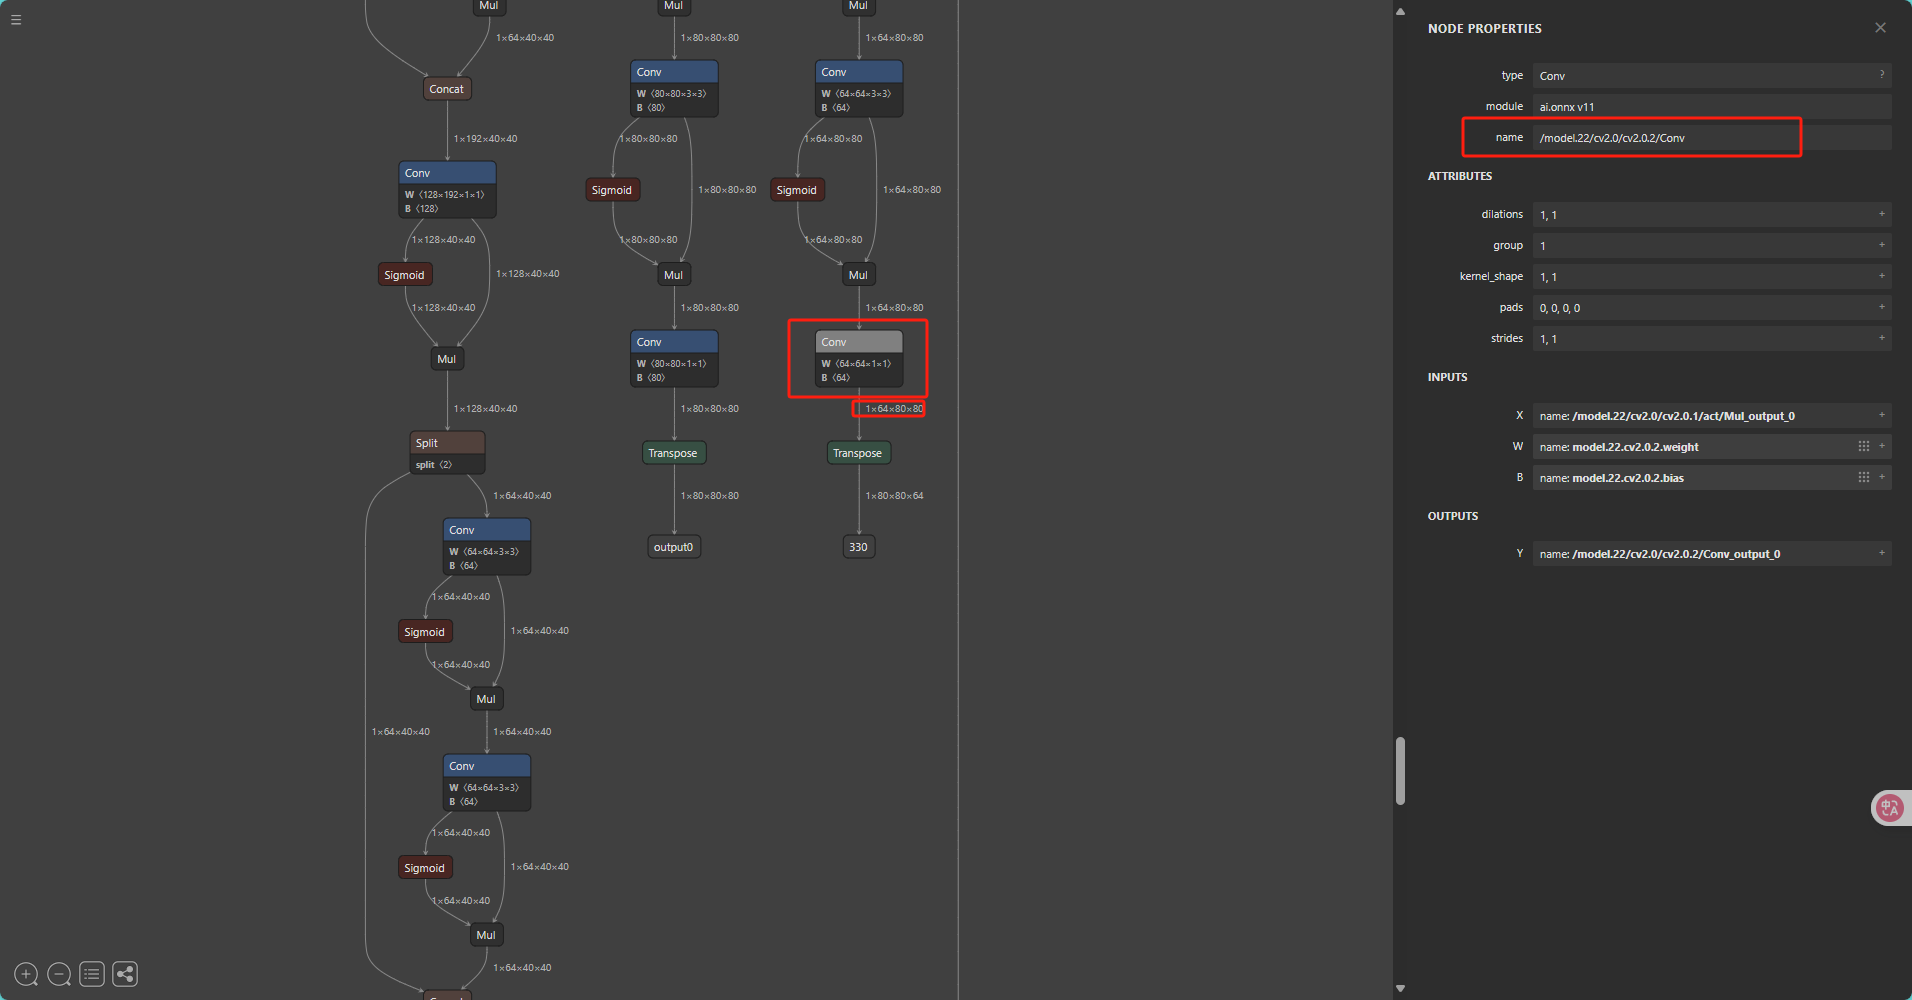
在记录下这三个反量化节点的名字后我们开始配置模型转换的Yaml,并将记录好的节点名字填入remove_node_name中并以英文的;号分割,yaml的具体介绍请见模型量化编译 - OpenExplorer的"配置文件具体参数信息"一节,接着我们将前一步生成的校准数据文件路径填入yaml的cal_data_dir一项后配置文件就完成啦!
yaml
model_parameters:
  onnx_model: 'yolov8n.onnx'
  march: nash-e  # S100: nash-e, S100P: nash-m.
  layer_out_dump: False
  working_dir: 'ultralytcs_YOLO_output'
  output_model_file_prefix: 'ultralytcs_YOLO'
  remove_node_name: ""
input_parameters:
  input_name: ''
  input_type_rt: 'nv12'
  input_type_train: 'rgb'
  input_layout_train: 'NCHW;'
  input_shape: ''
  norm_type: 'data_scale'
  mean_value: ''
  scale_value: 0.003921568627451
calibration_parameters:
  cal_data_dir: './calibration_data_rgb_f32'
  cal_data_type: 'float32'
  calibration_type: 'default'
  quant_config: {"op_config": {"softmax": {"qtype": "int8"}}}
compiler_parameters:
  extra_params: {'input_no_padding': True, 'output_no_padding': True}
  jobs: 16
  compile_mode: 'latency'
  debug: True
  advice: 1
  optimize_level: 'O2'
接着我们将配置文件以及转换之后的onnx模型放入我们之前提到的开发机与Docker文件交互文件夹中,我们便可以在Docekr中访问到我们的必要文件啦

完成了上述步骤后我们运行如下命令即可开始模型的转换
bash
hb_compile -c convert.yaml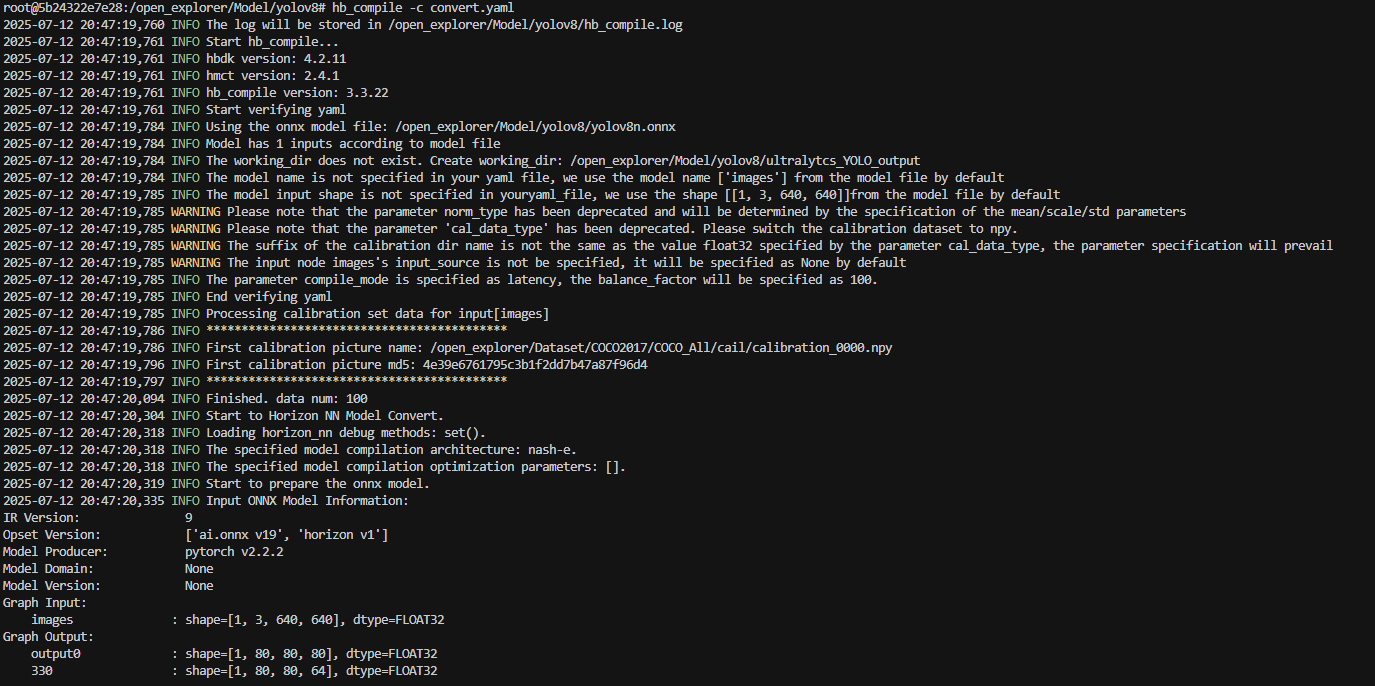
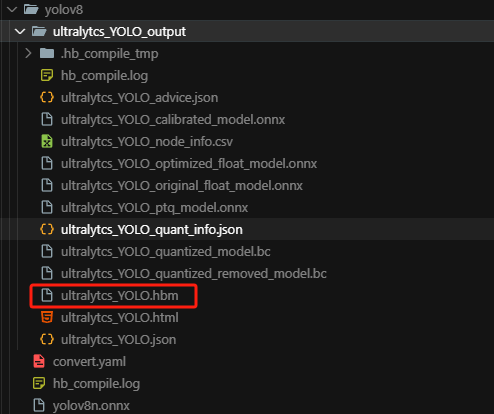
耐心等待即可,编译完成之后便会在目录下生成所需文件以及我们推理需要用到的hbm文件
四、模型部署应用实例
接下来就到了大家最关心最好奇的模型部署环节啦!!!RDKS100采用了和X5不同的异构编程接口也就是统一计算平台(Unify Compute Platform,以下简称 UCP)以实现对计算平台资源的调用,官方详细的介绍见UCP总览 - OpenExplorer ,工具链手册中已经有了详细的API介绍,但我们这篇文章中为了避免大家频繁的来回切换网页,我们对于每个新出现的API函数还是会附上对应的介绍,话不多说,我们一步一步的开始实现推理代码,完整代码已传至ModelZoo
首先我们先来完成代码的宏定义以便我们修改模型路径、类别名称等基本配置
c++
// D-Robotics S100 *.hbm 模型路径
// Path of D-Robotics S100 *.hbm model.
#define MODEL_PATH "rdk_model_zoo_s/samples/Vision/ultralytics_YOLO_Detect/source/reference_hbm_models/yolov5nu_detect_nashe_640x640_nv12.hbm"
// 推理使用的测试图片路径
// Path of the test image used for inference.
#define TEST_IMG_PATH "rdk_model_zoo_s/resource/datasets/COCO2017/assets/bus.jpg"
// 前处理方式选择, 0:Resize, 1:LetterBox
// Preprocessing method selection, 0: Resize, 1: LetterBox
#define RESIZE_TYPE 0
#define LETTERBOX_TYPE 1
#define PREPROCESS_TYPE LETTERBOX_TYPE
// 推理结果保存路径
// Path where the inference result will be saved
#define IMG_SAVE_PATH "cpp_result.jpg"
// 模型的类别数量, 默认80
// Number of classes in the model, default is 80
#define CLASSES_NUM 80
// NMS的阈值, 默认0.7
// Non-Maximum Suppression (NMS) threshold, default is 0.7
#define NMS_THRESHOLD 0.7
// 分数阈值, 默认0.25
// Score threshold, default is 0.25
#define SCORE_THRESHOLD 0.25
// 控制回归部分离散化程度的超参数, 默认16
// A hyperparameter that controls the discretization level of the regression part, default is 16
#define REG 16
// 绘制标签的字体尺寸, 默认1.0
// Font size for drawing labels, default is 1.0.
#define FONT_SIZE 1.0
// 绘制标签的字体粗细, 默认 1.0
// Font thickness for drawing labels, default is 1.0.
#define FONT_THICKNESS 1.0
// 绘制矩形框的线宽, 默认2.0
// Line width for drawing bounding boxes, default is 2.0.
#define LINE_SIZE 2.0
// API运行控制
#define RDK_CHECK_SUCCESS(value, errmsg)                                         \
    do                                                                           \
    {                                                                            \
        auto ret_code = value;                                                   \
        if (ret_code != 0)                                                       \
        {                                                                        \
            std::cout << "[ERROR] " << __FILE__ << ":" << __LINE__ << std::endl; \
            std::cout << errmsg << ", error code:" << ret_code << std::endl;     \
            return ret_code;                                                     \
        }                                                                        \
    } while (0);
// COCO Names 类别名
std::vector<std::string> object_names = {
    "person", "bicycle", "car", "motorcycle", "airplane", "bus", "train", "truck", "boat", "traffic light",
    "fire hydrant", "stop sign", "parking meter", "bench", "bird", "cat", "dog", "horse", "sheep", "cow",
    "elephant", "bear", "zebra", "giraffe", "backpack", "umbrella", "handbag", "tie", "suitcase", "frisbee",
    "skis", "snowboard", "sports ball", "kite", "baseball bat", "baseball glove", "skateboard", "surfboard",
    "tennis racket", "bottle", "wine glass", "cup", "fork", "knife", "spoon", "bowl", "banana", "apple",
    "sandwich", "orange", "broccoli", "carrot", "hot dog", "pizza", "donut", "cake", "chair", "couch",
    "potted plant", "bed", "dining table", "toilet", "tv", "laptop", "mouse", "remote", "keyboard",
    "cell phone", "microwave", "oven", "toaster", "sink", "refrigerator", "book", "clock", "vase",
    "scissors", "teddy bear", "hair drier", "toothbrush"
};
// S100定制颜色
std::vector<cv::Scalar> rdk_colors = {
    cv::Scalar(56, 56, 255), cv::Scalar(151, 157, 255), cv::Scalar(31, 112, 255), cv::Scalar(29, 178, 255),
    cv::Scalar(49, 210, 207), cv::Scalar(10, 249, 72), cv::Scalar(23, 204, 146), cv::Scalar(134, 219, 61),
    cv::Scalar(52, 147, 26), cv::Scalar(187, 212, 0), cv::Scalar(168, 153, 44), cv::Scalar(255, 194, 0),
    cv::Scalar(147, 69, 52), cv::Scalar(255, 115, 100), cv::Scalar(236, 24, 0), cv::Scalar(255, 56, 132),
    cv::Scalar(133, 0, 82), cv::Scalar(255, 56, 203), cv::Scalar(200, 149, 255), cv::Scalar(199, 55, 255)
};接着我们导入我们需要的所有头文件并手动完成softmax函数
c
// C/C++ Standard Libraries
#include <iostream>
#include <vector>
#include <algorithm>
#include <chrono>
#include <cmath>
#include <iomanip>
// Third Party Libraries
#include <opencv2/opencv.hpp>
#include <opencv2/dnn/dnn.hpp>
// RDK S100 UCP API
#include "hobot/dnn/hb_dnn.h"
#include "hobot/hb_ucp.h"
#include "hobot/hb_ucp_sys.h"
void softmax(float* input, float* output, int size) {
    float max_val = *std::max_element(input, input + size);
    float sum = 0.0f;
    for (int i = 0; i < size; i++) {
        output[i] = std::exp(input[i] - max_val);
        sum += output[i];
    }
    for (int i = 0; i < size; i++) {
        output[i] /= sum;
    }
}然后我们便可以一步一步的开始实现我们的板端推理代码啦,一切的一切首先肯定是需要加载我们的hbm模型,我们打开hb_dnn.h,和X5的SDK一样,UCP提供了两种加载模型的方式,分别是从文件加载以及从内存加载模型,这两种方式相比较来说FromFiles这一个函数由于文件I/O操作,相对较慢,代码较简单但是由于模型文件是独立存储存储的因此更加适合开发调试,而FromDDR这一个函数由于直接从内存读取,速度更快,适合嵌入式系统或需要快速加载的场景,但缺点便是代码较为复杂,比较贴近TensorRT加载模型的方式,两个API的具体介绍如下:
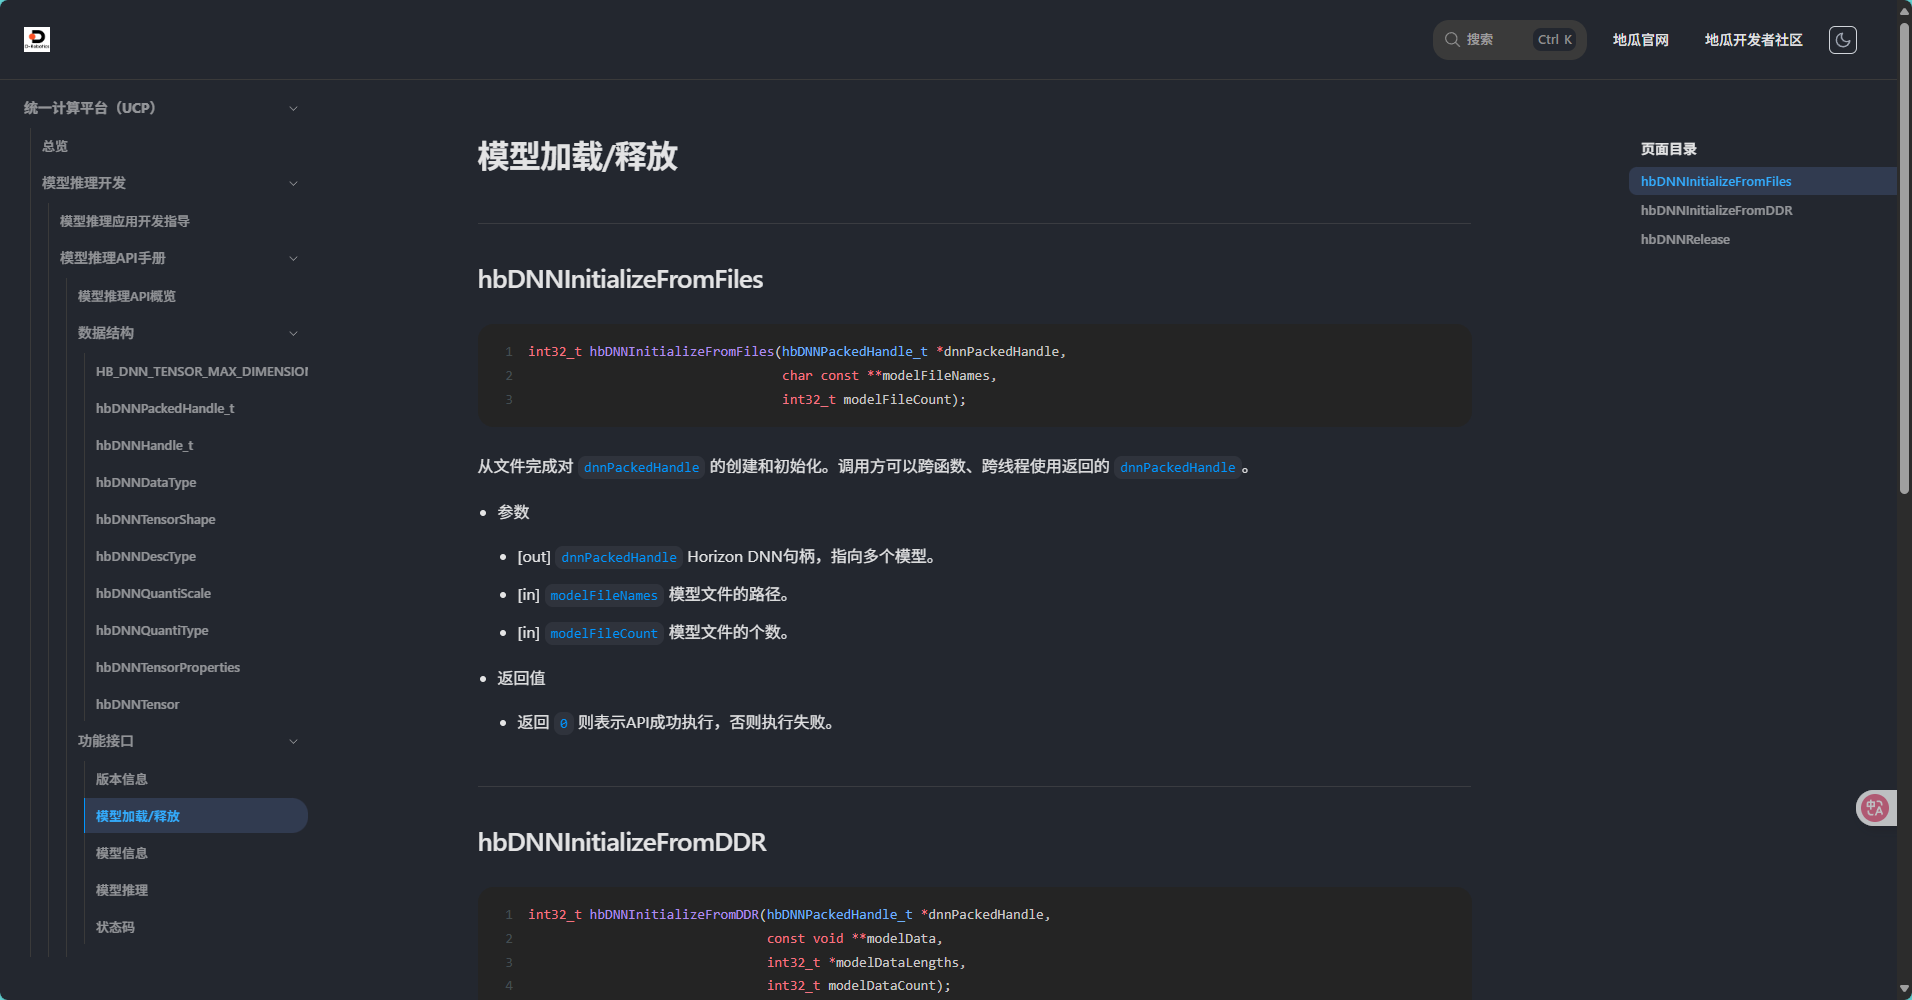
c++
/**
 * @brief Creates and initializes Horizon DNN Networks from file list
 *
 * @param[out] dnnPackedHandle Horizon DNN handle, pointing to multiple models.
 * @param[in] modelFileNames Path of the model files.
 * @param[in] modelFileCount Number of the model files.
 * @return 0 if success, return defined error code otherwise
 */
int32_t hbDNNInitializeFromFiles(hbDNNPackedHandle_t *dnnPackedHandle,
                                 char const **modelFileNames,
                                 int32_t modelFileCount);

/**
 * @brief Creates and initializes Horizon DNN Networks from memory
 *
 * @param[out] dnnPackedHandle Horizon DNN handle, pointing to multiple models.
 * @param[in] modelData Pointer to the model file
 * @param[in] modelDataLengths Length of the model data.
 * @param[in] modelDataCount Length of the model data.
 * @return 0 if success, return defined error code otherwise
 */
int32_t hbDNNInitializeFromDDR(hbDNNPackedHandle_t *dnnPackedHandle,
                               const void **modelData,
                               int32_t *modelDataLengths,
int32_t modelDataCount);我们可以看到这两个API都是传入模型然后以hbPackedDNNHandle_t结构体类型传出模型句柄,因此我们要使用这个函数的话我们首先需要用hbPackedDNNHandle_t创建一个变量packed_dnn_handle_,由于这部分和X5无差别,因此我在这里仅介绍更为常用的hbDNNInitializeFromFiles,由于我们前面利用宏定义来导入的模型路径,因此我们这里仅需要用一个字符指针变量来获取我们的模型路径地址,接着使用我们的错误检查宏来调用模型加载的API即可,具体代码如下:
c++
hbDNNPackedHandle_t packed_dnn_handle;
const char *model_file_name = MODEL_PATH;
RDK_CHECK_SUCCESS(
    hbDNNInitializeFromFiles(&packed_dnn_handle, &model_file_name, 1),
    "hbDNNInitializeFromFiles failed");
std::cout << "\033[31m Load D-Robotics S100 Quantize model time = " << std::fixed << std::setprecision(2)
          << std::chrono::duration_cast<std::chrono::microseconds>(std::chrono::system_clock::now() - begin_time).count() / 1000.0
<< " ms\033[0m" << std::endl;接着我们需要从文件中获取模型信息 包括模型的名称列表呀、模型句柄呀、输入信息呀以及输出信息等基本信息,这部分Get系的API在头文件中一共有12个函数,分别是:
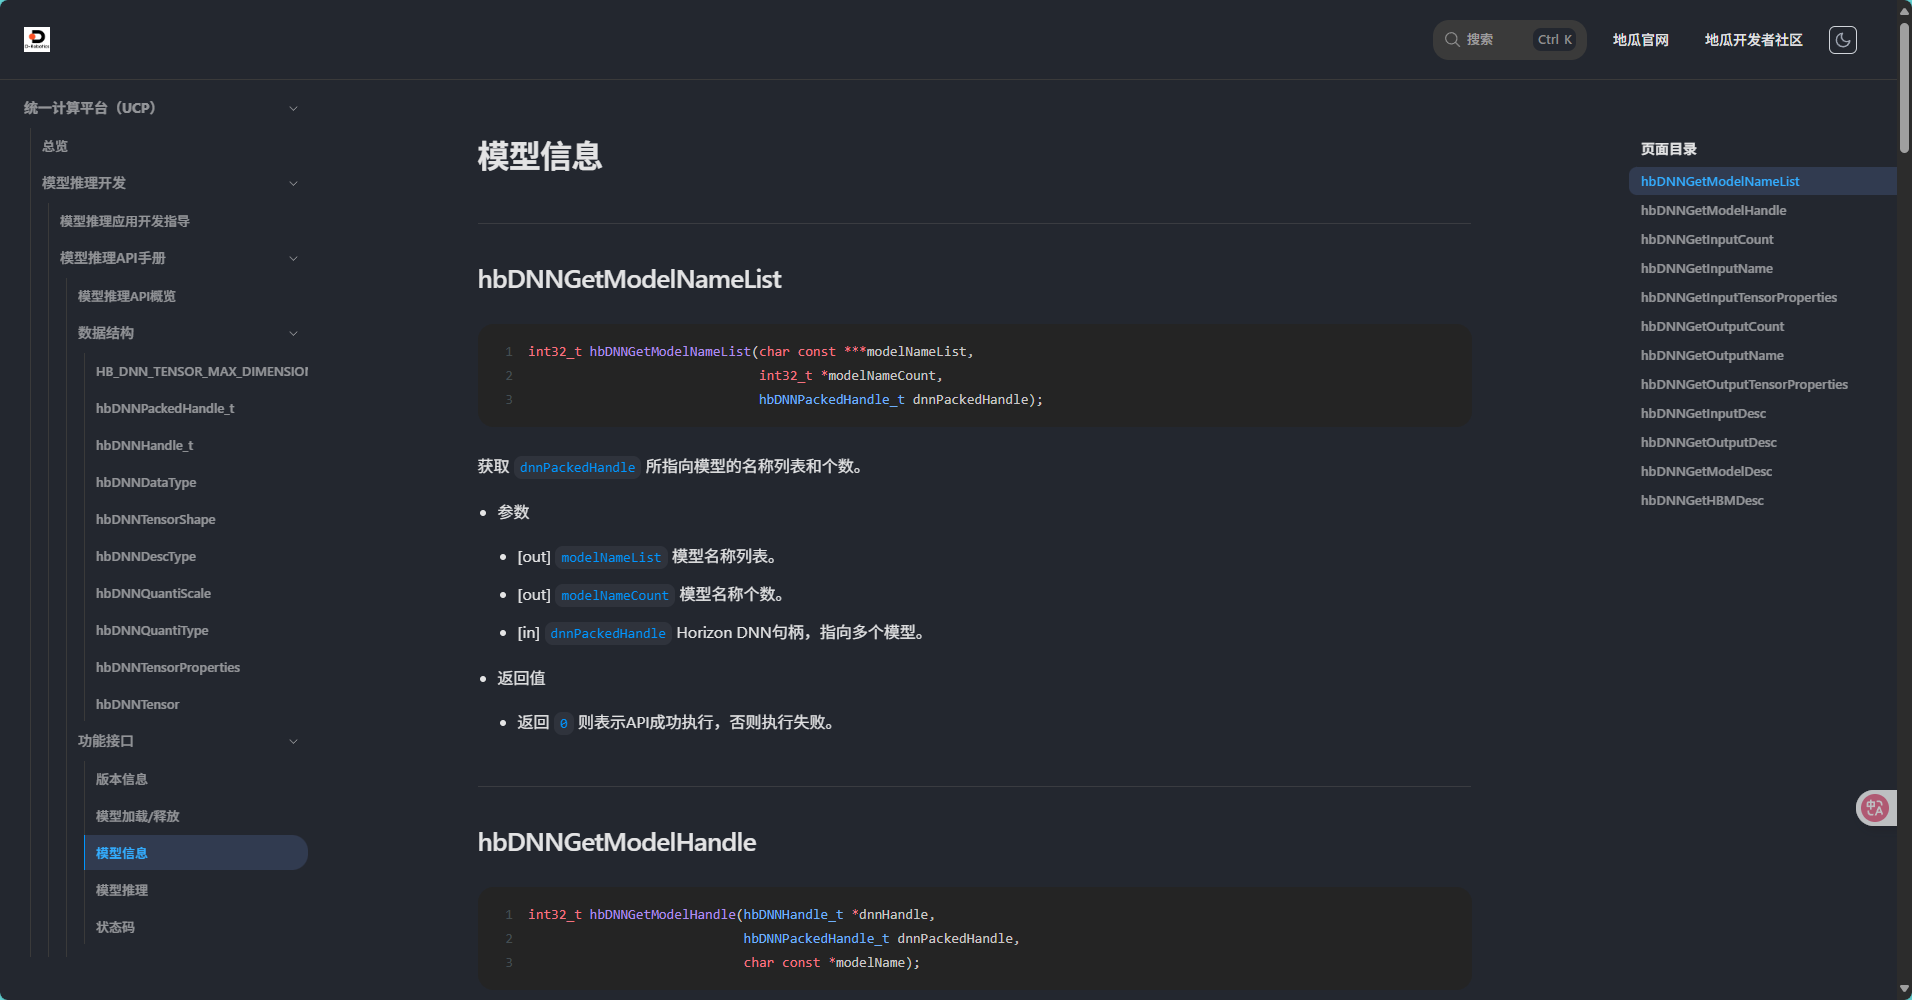
hbDNNGetModelNameList用于从hbDNNInitializeFromFiles函数加载模型文件获取的hbPackedDNNHandle_t模型句柄中提取所指向模型的名称列表和个数
c++
/**
 * @brief Get model names from given packed handle
 *
 * @param[out] modelNameList List of model names.
 * @param[out] modelNameCount Number of model names.
 * @param[in] dnnPackedHandle Horizon DNN handle, pointing to multiple models.
 * @return 0 if success, return defined error code otherwise
 */
int32_t hbDNNGetModelNameList(char const ***modelNameList,
                              int32_t *modelNameCount,
hbDNNPackedHandle_t dnnPackedHandle);hbDNNGetModelHandle()用于从packedDNNHandle所指向模型列表中获取一个模型的句柄并让调用方可以跨函数、跨线程使用返回的dnnHandle
c++
/**
 * @brief Get DNN Network handle from packed Handle with given model name
 *
 * @param[out] dnnHandle DNN handle, pointing to one model.
 * @param[in] dnnPackedHandle DNN handle, pointing to multiple models.
 * @param[in] modelName Model name.
 * @return 0 if success, return defined error code otherwise
 */
int32_t hbDNNGetModelHandle(hbDNNHandle_t *dnnHandle,
                            hbDNNPackedHandle_t dnnPackedHandle,
char const *modelName);hbDNNGetInputCount()用于获取dnnHandle所指向模型输入张量的个数
c++
/**
 * @brief Get input count
 *
 * @param[out] inputCount Number of input tensors of the model.
 * @param[in] dnnHandle DNN handle, pointing to one model.
 * @return 0 if success, return defined error code otherwise
 */
int32_t hbDNNGetInputCount(int32_t *inputCount, hbDNNHandle_t dnnHandle);hbDNNGetInputName()用于获取dnnHandle所指向模型输入张量的名称
c++
/**
 * @brief Get model input name
 *
 * @param[out] name Name of the input tensor of the model.
 * @param[in] dnnHandle DNN handle, pointing to one model.
 * @param[in] inputIndex Index of the input tensor of the model.
 * @return 0 if success, return defined error code otherwise
 */
int32_t hbDNNGetInputName(char const **name, hbDNNHandle_t dnnHandle,
int32_t inputIndex);hbDNNGetInputTensorProperties()用于获取dnnHandle所指向模型特定输入张量的属性,其中hbDNNTensorProperties内容如下
c++
/**
 * @brief Get input tensor properties
 *
 * @param[out] properties Info of the input tensor.
 * @param[in] dnnHandle DNN handle, pointing to one model.
 * @param[in] inputIndex Index of the input tensor of the model.
 * @return 0 if success, return defined error code otherwise
 */
int32_t hbDNNGetInputTensorProperties(hbDNNTensorProperties *properties,
                                      hbDNNHandle_t dnnHandle,
                                      int32_t inputIndex);

typedef struct hbDNNTensorProperties {
  hbDNNTensorShape validShape;
  int32_t tensorType;
  hbDNNQuantiScale scale;
  hbDNNQuantiType quantiType;
  int32_t quantizeAxis;
  int64_t alignedByteSize;
  int64_t stride[HB_DNN_TENSOR_MAX_DIMENSIONS];
} hbDNNTensorProperties;hbDNNGetOutputCount()用于获取dnnHandle所指向模型输出张量的个数
c++
/**
 * @brief Get output count
 *
 * @param[out] outputCount Number of the output tensors of the model.
 * @param[in] dnnHandle DNN handle, pointing to one model.
 * @return 0 if success, return defined error code otherwise
 */
int32_t hbDNNGetOutputCount(int32_t *outputCount, hbDNNHandle_t dnnHandle);hbDNNGetOutputName()用于获取dnnHandle所指向模型输出张量的名称
c
/**
 * @brief Get model output name
 *
 * @param[out] name Name of the output tensor of the model.
 * @param[in] dnnHandle DNN handle, pointing to one model.
 * @param[in] outputIndex Index of the output tensor of the model.
 * @return 0 if success, return defined error code otherwise
 */
int32_t hbDNNGetOutputName(char const **name, hbDNNHandle_t dnnHandle,
int32_t outputIndex);hbDNNGetOutputTensorProperties()用于获取dnnHandle所指向模型特定输出张量的属性
c++
/**
 * @brief Get output tensor properties
 *
 * @param[out] properties Info of the output tensor.
 * @param[in] dnnHandle DNN handle, pointing to one model.
 * @param[in] outputIndex Index of the output tensor of the model.
 * @return 0 if success, return defined error code otherwise
 */
int32_t hbDNNGetOutputTensorProperties(hbDNNTensorProperties *properties,
                                       hbDNNHandle_t dnnHandle,
int32_t outputIndex);hbDNNGetInputDesc用于获取dnnHandle指向模型特定输入所关联的描述信息
c++
/**
 * @brief Get model input description
 *
 * @param[out] desc Address of the description information.
 * @param[out] size Size of the description information.
 * @param[out] type Type of the description information, please refer to hbDNNDescType.
 * @param[in] dnnHandle DNN handle, pointing to one model.
 * @param[in] inputIndex Index of the input tensor of the model.
 * @return 0 if success, return defined error code otherwise
 */
int32_t hbDNNGetInputDesc(char const **desc, uint32_t *size, int32_t *type,
hbDNNHandle_t dnnHandle, int32_t inputIndex);hbDNNGetOutputDesc获取dnnHandle指向模型特定输出所关联的描述信息
c++
/**
 * @brief Get model output description
 *
 * @param[out] desc Address of the description information.
 * @param[out] size Size of the description information.
 * @param[out] type Type of the description information, please refer to hbDNNDescType.
 * @param[in] dnnHandle DNN handle, pointing to one model.
 * @param[in] outputIndex Index of the output tensor of the model.
 * @return 0 if success, return defined error code otherwise
 */
int32_t hbDNNGetOutputDesc(char const **desc, uint32_t *size, int32_t *type,
hbDNNHandle_t dnnHandle, int32_t outputIndex);hbDNNGetModelDesc用于获取dnnHandle指向模型所关联的描述信息
c++
/**
 * @brief Get model description
 *
 * @param[out] desc Address of the description information.
 * @param[out] size Size of the description information.
 * @param[out] type Type of the description information, please refer to hbDNNDescType.
 * @param[in] dnnHandle DNN handle, pointing to one model.
 * @return 0 if success, return defined error code otherwise
 */
int32_t hbDNNGetModelDesc(char const **desc, uint32_t *size, int32_t *type,
hbDNNHandle_t dnnHandle);hbDNNGetHBMDesc用于获取dnnPackedHandle和index指向hbm所关联的描述信息
c++
/**
 * @brief Get hbm description
 *
 * @param[out] desc Address of the description information.
 * @param[out] size Size of the description information.
 * @param[out] type Type of the description information, please refer to hbDNNDescType.
 * @param[in] dnnPackedHandle Horizon DNN handle, pointing to multiple models.
 * @param[in] index Index of multiple hbm models that are loaded through hbDNNInitializeFromFiles or hbDNNInitializeFromDDR, the index should be in the range of [0, modelFileCount) or [0, modelDataCount).
 * @return 0 if success, return defined error code otherwise
 */
int32_t hbDNNGetHBMDesc(char const **desc, uint32_t *size, int32_t *type,
hbDNNPackedHandle_t dnnPackedHandle, int32_t index);了解了模型信息相关的函数之后便可以完成对模型的加载同时在代码中对模型进行一些基本的检查以避免出错,我们首先先使用hbDNNGetModelNameList函数从我们上一步加载模型得到的packed_dnn_handle中获取我们加载的HBM模型里面的打包模型数量,因此我们根据API的要求创建model_name_list和model_count两个变量用来获取模型列表以及数量,接着我们便可以调用API并判断模型数量是否正确
c++
const char **model_name_list;
int model_count = 0;
RDK_CHECK_SUCCESS(
    hbDNNGetModelNameList(&model_name_list, &model_count, packed_dnn_handle),
    "hbDNNGetModelNameList failed");

if (model_count > 1) {
    std::cout << "This model file have more than 1 model, only use model 0." << std::endl;
}
const char *model_name = model_name_list[0];
std::cout << "[model name]: " << model_name << std::endl;
完成了对模型本身的检查无误,我们便可以获取模型的一个让调用方可以跨函数、跨线程使用返回的 dnnHandle句柄,我们首先根据API的要求利用hbDNNHandle_t创建一个hbDNNHandle_t类的dnn_handle_模型句柄,接着便可以直接调用API获取啦
c++
hbDNNHandle_t dnn_handle;
RDK_CHECK_SUCCESS(
    hbDNNGetModelHandle(&dnn_handle, packed_dnn_handle, model_name),
"hbDNNGetModelHandle failed");创建了模型句柄之后我们便可以从模型的句柄中获取我们模型的所有信息啦!比如模型输入输出个数、模型输入输出尺寸等,用到的函数也就是我们上面介绍的一些API,这部分涉及到API分别是hbDNNGetInputCount和hbDNNGetOutputCount用于获取模型网络输入输出的个数以及hbDNNGetInputTensorProperties和hbDNNGetOutputTensorProperties用来获取模型输入的张量,因此我们也可以在这里对我们模型进行新一轮的检查,我们目前已知我们YOLO系列模型都是单输入的,而且我们目标检测任务的模型应该只有六个输出,那么如果我们通过输入输出检测API得到的信息和我们已知的这些信息对不上,那就说明我们的模型出现了问题,同时我们发现hbDNNGetInputTensorPropertiesAPI输出是一个hbDNNTensorProperties类型的结构体,我们查看结构体定义可以发现这个结构体是一个嵌套结构体,里面通过嵌套hbDNNTensorShape结构体、hbDNNQuantiScale结构体、以及hbDNNQuantiType结构体能够准确的描述输入的张量信息,其结构体定义及每项成员的解释如下:
c++
typedef struct hbDNNTensorProperties {
  hbDNNTensorShape validShape;//张量的有效形状,表示张量的真实尺寸
  int32_t tensorType;//张量的类型
  hbDNNQuantiScale scale;//量化缩放量
  hbDNNQuantiType quantiType;//量化类型
  int32_t quantizeAxis;//量化轴索引,仅按per-axis量化时生效
  int64_t alignedByteSize;//张量对齐内容的内存大小
  int64_t stride[HB_DNN_TENSOR_MAX_DIMENSIONS];//张量中validShape各维度步长,字节为单位
} hbDNNTensorProperties;

typedef struct hbDNNTensorShape {
  int32_t dimensionSize[HB_DNN_TENSOR_MAX_DIMENSIONS];//张量每个维度的大小
  int32_t numDimensions;//张量的维度
} hbDNNTensorShape;//例如一个张量 numDimensions=4,其数据排布为 1x4x224x224 则 dimensionSize 数组中按顺序存储数据 dimensionSize[0]=1、 dimensionSize[1]=4、dimensionSize[2]=224、 dimensionSize[3]=224

typedef struct hbDNNQuantiScale {
  int32_t scaleLen;//缩放数据的长度
  float *scaleData;//缩放数据的首地址
  int32_t zeroPointLen;//零点偏移数据的长度
  int32_t *zeroPointData;//零点偏移数据的首地址
} hbDNNQuantiScale;

typedef enum {
  NONE,  // 没有量化
  SCALE//量化类型为 SCALE
} hbDNNQuantiType;
了解了这些结构体之后,我们便可以根据结构体参数来定义我们的一些变量,同时由于我们知道我们的模型是单输入的也知道我们输入的数据应该该是NV12,且数据排布是NCHW,同时输入Tensor数据的valid shape应为(1,3,H,W),所以我们在使用API获取了我们的输入信息之后我们还可以利用这些安全信息进行一些输入的安全检查:
c++
// Step1:首先是输入检查,对于我们的YOLO模型,输入应该仅为1
int32_t input_count = 0;
RDK_CHECK_SUCCESS(
    hbDNNGetInputCount(&input_count, dnn_handle),
    "hbDNNGetInputCount failed");

if (input_count < 1) {
    std::cout << "S100 YOLO model should have at least 1 input, but got " << input_count << std::endl;
    return -1;
} else if (input_count > 1) {
    std::cout << "S100 YOLO model has " << input_count << " inputs, using first input for inference" << std::endl;
}
// Step2:接着获取模型的输入张量信息
hbDNNTensorProperties input_properties;
RDK_CHECK_SUCCESS(
    hbDNNGetInputTensorProperties(&input_properties, dnn_handle, 0),
    "hbDNNGetInputTensorProperties failed");
std::cout << "✓ input tensor type: " << input_properties.tensorType << std::endl;// S100 UCP 模型需要检测输入格式是否支持
// Step2.1:检测模型的输入格式是否为NV12 (type 3)
if (input_properties.tensorType != 3) {
    std::cout << "[ERROR] This program only supports NV12 input (type 3), but got type: " << input_properties.tensorType << std::endl;
    return -1;
}
// Step2.2:检测输入tensor布局是否为NCHW(与我们转换模型时填入的rt有关)
if (input_properties.validShape.numDimensions == 4) {
    int32_t channels = input_properties.validShape.dimensionSize[3];// NCHW布局,H和W应该在维度1和2位置,且通道数应该为1
    if (channels != 1) {
        std::cout << "[ERROR] This program expects NCHW layout with 1 channel, but got " << channels << " channels" << std::endl;
        return -1;
    }
    std::cout << "✓ input tensor layout: NCHW (verified)" << std::endl;
} else {
    std::cout << "[ERROR] Expected 4D input tensor for NCHW layout, but got " << input_properties.validShape.numDimensions << "D" << std::endl;
    return -1;
}
// Step2.3:获取模型的输入尺寸并检查
int32_t input_H, input_W;
if (input_properties.validShape.numDimensions == 4) {
    input_H = input_properties.validShape.dimensionSize[1];
    input_W = input_properties.validShape.dimensionSize[2];
    std::cout << "✓ input tensor valid shape: ("
              << input_properties.validShape.dimensionSize[0] << ", "
              << input_H << ", " << input_W << ", "
              << input_properties.validShape.dimensionSize[3] << ")" << std::endl;
} else {
    std::cout << "S100 YOLO model input should be 4D" << std::endl;
    return -1;
}
完成了对模型的输入张量信息的检查后,我们可以同步完成对模型输出的检查,这部分的逻辑和方式与输入检查一致,只不过是API改了个名字,因此不过多赘述啦,大家直接看代码!
c++
// Step 4: 检查模型输出 - S100 YOLO 按照Readme导出后应该有6个输出
// Step 4: Check model output - S100 YOLO should have 6 outputs according to Readme
int32_t output_count = 0;
RDK_CHECK_SUCCESS(
    hbDNNGetOutputCount(&output_count, dnn_handle),
    "hbDNNGetOutputCount failed");

if (output_count != 6) {
    std::cout << "S100 YOLO model should have 6 outputs, but got " << output_count << std::endl;
    return -1;
}
std::cout << "✓ S100 YOLO model has 6 outputs" << std::endl;
// 打印输出信息并获取正确的输出顺序
std::cout << "\033[32m-> output tensors\033[0m" << std::endl;
for (int i = 0; i < 6; i++) {
    hbDNNTensorProperties output_properties;
    RDK_CHECK_SUCCESS(
        hbDNNGetOutputTensorProperties(&output_properties, dnn_handle, i),
        "hbDNNGetOutputTensorProperties failed");
    std::cout << "output[" << i << "] valid shape: ("
              << output_properties.validShape.dimensionSize[0] << ", "
              << output_properties.validShape.dimensionSize[1] << ", "
              << output_properties.validShape.dimensionSize[2] << ", "
              << output_properties.validShape.dimensionSize[3] << "), ";

    std::cout << "QuantiType: " << output_properties.quantiType << std::endl;
}在完成了安全检查之后我们便可以进入模型前处理部分啦!图像的预处理无非就是图像尺寸的转换和图像格式的转换,所以这部分比较简单我就讲的稍微快一点啦,图像尺寸的变换我们采用letterbox的方式,众所周知,OpenCV中有一个图像转换的函数叫resize这个函数可以直接实现图像尺寸的变换,但是由于这个函数的实现过于简单粗暴,因此在图像尺寸不一致的情况下会改变图像的长宽比造成图像的失真,就比如如下情况,可以看到右边图像就发生了扭曲
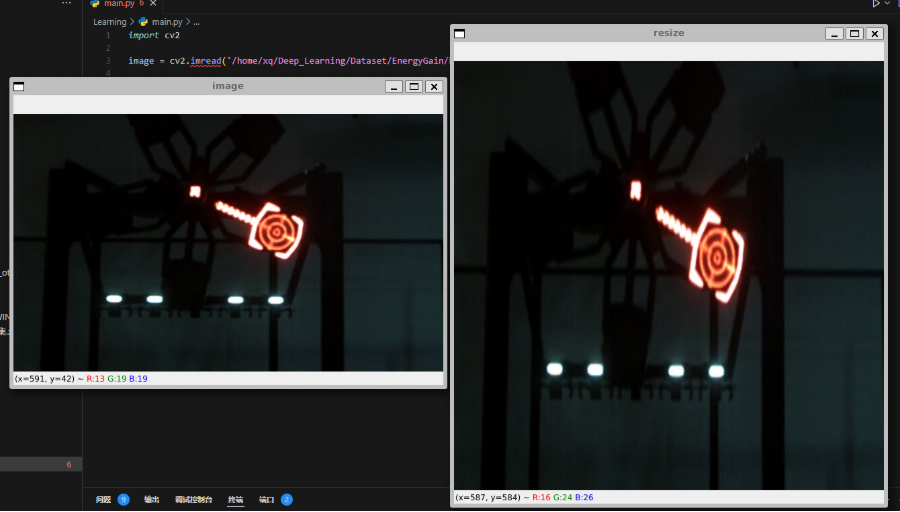
而我们使用LetterBox的方式便可以看到,画面并没有产生扭曲变形,因为LetterBox的方式在对图片进行resize时,保持了原图的长宽比进行等比例缩放,当长边 resize 到需要的长度时,短边剩下的部分便采用灰色填充,这样便保持了原始图像的长宽比不变

但由于我们现在写的是通用代码,因此接下来我们会使用LetterBox和resize两种方式实现图像的预处理,resize不过多说啦使用opencv直接调用函数即可,我们主要讲LetterBox的方式,具体代码如下,其核心思想便是其核心思想便是通过按比例缩放图像以适应目标尺寸,同时保持原始图像的纵横比,为了确保图像在目标尺寸内居中,空白区域将使用填充的方式填充,通常填充色为中性色(如127, 127, 127)。这样,我们可以避免图像在缩放时出现失真,且确保图像的宽高比保持不变
c++
// 前处理参数
float y_scale = 1.0, x_scale = 1.0;
int x_shift = 0, y_shift = 0;
cv::Mat resize_img;
begin_time = std::chrono::system_clock::now();
if (PREPROCESS_TYPE == LETTERBOX_TYPE) {
    // LetterBox前处理
    float scale = std::min(1.0f * input_H / img.rows, 1.0f * input_W / img.cols);
    int new_w = int(img.cols * scale);
    int new_h = int(img.rows * scale);
    // 确保尺寸为偶数
    new_w = (new_w / 2) * 2;
    new_h = (new_h / 2) * 2;
    // 重新计算实际的缩放因子
    x_scale = 1.0f * new_w / img.cols;
    y_scale = 1.0f * new_h / img.rows;
    x_shift = (input_W - new_w) / 2;
    int x_other = input_W - new_w - x_shift;
    y_shift = (input_H - new_h) / 2;
    int y_other = input_H - new_h - y_shift;
    cv::Size targetSize(new_w, new_h);
    cv::resize(img, resize_img, targetSize);
    cv::copyMakeBorder(resize_img, resize_img, y_shift, y_other, x_shift, x_other, cv::BORDER_CONSTANT, cv::Scalar(127, 127, 127));
} else {
    // Resize前处理
    cv::Size targetSize(input_W, input_H);
    cv::resize(img, resize_img, targetSize);
    y_scale = 1.0 * input_H / img.rows;
    x_scale = 1.0 * input_W / img.cols;
}完成了图像尺寸的缩放之后由于我们最开始编译模型的时候选择的是nv12的输入,因此我们还需要将我们输入图像从BGR格式转换为NV12格式,NV12格式是YUV420SP格式的一种,它将Y分量(亮度)和交错存储的UV分量(色度)分开存放,具体的实现代码如下:
c++
// BGR转YUV420SP (NV12)
cv::Mat img_nv12;
cv::Mat yuv_mat;
cv::cvtColor(resize_img, yuv_mat, cv::COLOR_BGR2YUV_I420);
uint8_t *yuv = yuv_mat.ptr<uint8_t>();

img_nv12 = cv::Mat(input_H * 3 / 2, input_W, CV_8UC1);
uint8_t *ynv12 = img_nv12.ptr<uint8_t>();
int uv_height = input_H / 2;
int uv_width = input_W / 2;
int y_size = input_H * input_W;

// 复制Y平面
memcpy(ynv12, yuv, y_size);

// 交错UV平面
uint8_t *nv12 = ynv12 + y_size;
uint8_t *u_data = yuv + y_size;
uint8_t *v_data = u_data + uv_height * uv_width;
for (int i = 0; i < uv_width * uv_height; i++) {
    *nv12++ = *u_data++;
    *nv12++ = *v_data++;
}完成了前面对图像的操作之后我们便要开始准备模型的输入数据啦!接下来,我们需要将处理后的图像数据转换为我们的模型可以接受的输入格式,在这个过程中,我们首先要为输入张量分配内存,并将处理后的图像数据(YUV格式)复制到内存中,以确保模型能够正确地访问和使用这些数据。其中涉及到了一个API为hbUCPMallocCached,我们查看一下他的解释以及其中涉及到的结构体定义:
c++
/**
 * @brief Allocate cacheable system memory 申请缓存的系统内存
 *
 * @param[out] mem Memory pointer.
 * @param[in] size Size of the requested memory.
 * @param[in] deviceId Reserved parameter.
 * @return 0 if success, return defined error code otherwise
*/
int32_t hbUCPMallocCached(hbUCPSysMem *mem, uint64_t size, int32_t deviceId);

typedef struct hbUCPSysMem {
  uint64_t phyAddr;
  void *virAddr;
  uint64_t memSize;
} hbUCPSysMem;

typedef struct hbDNNTensor {
  hbUCPSysMem sysMem;
  hbDNNTensorProperties properties;
} hbDNNTensor;根据API所示,我们首先要先创建一个hbUCPSysMem结构体,这个结构体用于描述内存的物理地址(phyAddr)、虚拟地址(virAddr)以及内存的大小(memSize)。接着,我们调用hbUCPMallocCached函数为输入张量分配内存,分配的内存是可缓存的,这意味着硬件可以在处理数据时直接访问此内存,而无需频繁与主内存进行交换,hbDNNTensor是用来存储整个张量信息的结构体,其中包含了多个hbSysMem结构体来描述不同部分的数据(比如输入、输出等)。而hbDNNTensorProperties则存储有关张量的属性信息,如张量的形状、数据类型、量化信息等。了解了以上信息之后我们便可以准备输入数据啦,我们需要创建一个std::vector<hbDNNTensor>类型的容器,用于存储所有的输入张量。每一个hbDNNTensor结构体代表一个输入张量,它包含了用于存储张量数据的内存信息(sysMem)以及张量的相关属性(properties)。在循环中,我们依次为每个输入张量配置其属性,并通过hbUCPMallocCached函数为其分配对应大小的缓存内存。在这个过程中,我们根据YUV格式的特点,将输入分为两个部分:第一个输入为Y分量 ,尺寸为640×640×1,对于该输入,我们按照张量格式要求设置其有效形状(validShape)为 [1, 640, 640, 1],并设置步长信息(stride),以确保内存布局与模型期望一致。然后,我们使用hbUCPMallocCached分配对应大小的内存,并将图像的Y分量数据通过memcpy函数复制到分配好的内存中。第二个输入为UV分量 ,尺寸为320×320×2(U和V分别为一个通道,尺寸为原图的一半),类似地,我们为其设置形状为 [1, 320, 320, 2],并根据通道和宽度计算正确的步长。之后,同样使用hbUCPMallocCached分配内存,并将原图中对应的UV数据区域复制到该输入张量中。完成数据复制后,为确保数据能够被设备正确读取,我们还需要调用hbUCPMemFlush函数对每块内存进行刷新操作,使用HB_SYS_MEM_CACHE_CLEAN参数以清理并同步缓存,具体代码如下:
c++
std::vector<hbDNNTensor> input_tensors(input_count);
// 分配输入内存
for (int i = 0; i < input_count; i++) {
    // 复制输入tensor属性
    input_tensors[i].properties = input_properties;
    int data_size;
    if (i == 0) {
        // 第一个输入:Y分量 640x640x1
        data_size = input_H * input_W;
        // 设置tensor的stride信息
        input_tensors[i].properties.validShape.dimensionSize[0] = 1;
        input_tensors[i].properties.validShape.dimensionSize[1] = input_H;
        input_tensors[i].properties.validShape.dimensionSize[2] = input_W;
        input_tensors[i].properties.validShape.dimensionSize[3] = 1;
        // 设置stride
        input_tensors[i].properties.stride[3] = 1;                    // 每个元素1字节
        input_tensors[i].properties.stride[2] = 1;                    // 通道步长 = stride[3] * size[3] = 1 * 1
        input_tensors[i].properties.stride[1] = input_W;              // 行步长 = stride[2] * size[2] = 1 * 640 = 640
        input_tensors[i].properties.stride[0] = input_W * input_H;    // 整个tensor = stride[1] * size[1] = 640 * 640 = 409600
    } else {
        // 第二个输入:UV分量 320x320x2 (尺寸减半,2通道)
        int uv_h = input_H / 2;  // 320
        int uv_w = input_W / 2;  // 320
        data_size = uv_h * uv_w * 2;  // UV两个通道
        // 设置tensor的stride信息
        input_tensors[i].properties.validShape.dimensionSize[0] = 1;
        input_tensors[i].properties.validShape.dimensionSize[1] = uv_h;
        input_tensors[i].properties.validShape.dimensionSize[2] = uv_w;
        input_tensors[i].properties.validShape.dimensionSize[3] = 2;
        // 设置stride
        input_tensors[i].properties.stride[3] = 1;                    // 每个元素1字节
        input_tensors[i].properties.stride[2] = 2;                    // 通道步长 = stride[3] * size[3] = 1 * 2 = 2
        input_tensors[i].properties.stride[1] = uv_w * 2;             // 行步长 = stride[2] * size[2] = 2 * 320 = 640
        input_tensors[i].properties.stride[0] = uv_w * uv_h * 2;      // 整个tensor = stride[1] * size[1] = 640 * 320 = 204800
    }
    // 分配内存
    hbUCPMallocCached(&input_tensors[i].sysMem, data_size, 0);
    std::cout << "✓ Input tensor " << i << " memory allocated: " << data_size << " bytes" << std::endl;
    // 复制数据
    if (i == 0) {
        // 第一个输入:复制Y分量
        memcpy(input_tensors[i].sysMem.virAddr, ynv12, input_H * input_W);
        std::cout << "✓ Y component data copied to tensor " << i << std::endl;
    } else {
        // 第二个输入:复制UV分量
        uint8_t *uv_src = ynv12 + input_H * input_W;  // UV数据在Y之后
        memcpy(input_tensors[i].sysMem.virAddr, uv_src, data_size);
        std::cout << "✓ UV component data copied to tensor " << i << std::endl;
    }
    // 刷新内存
    hbUCPMemFlush(&input_tensors[i].sysMem, HB_SYS_MEM_CACHE_CLEAN);
}
当然,为输入分配了内存我们肯定也要为输出分配内存,相比于输入,这部分就会简单一些,原因在于输出的形状、数据类型、内存对齐方式等信息通常是由模型结构自动决定的,我们只需根据模型输出的属性直接进行内存申请即可。在实际实现中,我们首先通过调用 hbDNNGetOutputTensorProperties 获取每一个输出张量的属性信息,并存入对应的 hbDNNTensorProperties 结构体中。该函数会从模型句柄 dnn_handle 中获取第 i 个输出的详细信息,包括张量的形状、对齐大小(alignedByteSize)、数据类型等,随后,我们从属性中读取该输出张量的对齐后内存大小 alignedByteSize,并使用 hbUCPMallocCached 函数为该输出张量分配对应大小的缓存内存。这里的 alignedByteSize 表示该输出在内存中所需的实际大小,已经根据平台的要求进行了字节对齐,确保后续在硬件访问时不会出现越界或访问异常的情况
c++
// 分配输出内存
for (int i = 0; i < output_count; i++) {
    hbDNNTensorProperties &output_properties = output_tensors[i].properties;
    hbDNNGetOutputTensorProperties(&output_properties, dnn_handle, i);
    int out_aligned_size = output_properties.alignedByteSize;
    hbUCPSysMem &mem = output_tensors[i].sysMem;
    hbUCPMallocCached(&mem, out_aligned_size, 0);
    std::cout << "✓ Output tensor " << i << " memory allocated: " << out_aligned_size << " bytes" << std::endl;
}完成了内存的分配之后,我们就可以正式开始模型推理啦!推理过程主要分为两个阶段:发起推理任务 和 等待推理结果 ,这中间涉及到几个关键API,包括 hbDNNInferV2、hbUCPSubmitTask 和 hbUCPWaitTaskDone,它们共同组成了推理执行流程
hbDNNInferV2它的作用是创建或绑定一个推理任务,并将输入张量送入模型进行处理,其中:task_handle是指向任务句柄的指针,在此可以传入空指针以使用同步方式,或者传入一个未提交的任务句柄用于异步多模型推理;output_tensors是模型输出张量数组的指针;input_tensors是输入张量数组;dnn_handle是模型的句柄,代表一个已经加载的模型,其可以运行在同步或异步模式下
c++
/**
 * @brief DNN inference
 *
 * @param[in/out] taskHandle:
 * case1: given *taskHandle is nullptr, create new task handle
 * case2: given *taskHandle is not nullptr, attach task to task handle, which represents multi model task. The given *taskHandle must be obtained through case1 and not already committed or released.
 * case3: given taskHandle is nullptr to run in sync mode with default ctrl param
 * @param[out] output Pointer to the output tensor array, the size of array should be equal to $(`hbDNNGetOutputCount`)
 * @param[in] input Input tensor array, the size of array should be equal to  $(`hbDNNGetInputCount`)
 * @param[in] dnnHandle Pointer to the dnn handle which represents model handle
 * @return 0 if success, return defined error code otherwise
 */
int32_t hbDNNInferV2(hbUCPTaskHandle_t *taskHandle, hbDNNTensor *output,
hbDNNTensor const *input, hbDNNHandle_t dnnHandle);HB_UCP_INITIALIZE_SCHED_PARAM,该宏用于快速初始化调度参数结构体hbUCPSchedParam,控制任务调度的优先级、运行设备等属性
c++
#define HB_UCP_INITIALIZE_SCHED_PARAM(param)    \
  {                                             \
    (param)->priority = HB_UCP_PRIORITY_LOWEST; \
    (param)->deviceId = 0U;                     \
    (param)->customId = 0;                      \
    (param)->backend = HB_UCP_CORE_ANY;         \
  }
typedef struct hbUCPSchedParam {
  int32_t priority;
  int64_t customId;
  uint64_t backend;
  uint32_t deviceId;
} hbUCPSchedParam;hbUCPSubmitTask,该函数将一个已经通过hbDNNInferV2创建的任务提交给计算平台调度执行,其中taskHandle:指向已创建但尚未提交的任务句柄;schedParam:指向调度参数结构体,用于指定执行优先级、运行设备等。
c++
/**
 * @brief Submit task to Unified Computing Platform with scheduling parameters
 *
 * @param[in] taskHandle pointer to the task
 * @param[in] schedParam task schedule parameter
 * @return 0 if success, return defined error code otherwise
 */
int32_t hbUCPSubmitTask(hbUCPTaskHandle_t taskHandle,
hbUCPSchedParam *schedParam);hbUCPWaitTaskDone,该函数阻塞当前线程,直到所提交的推理任务完成或超时,其中taskHandle:指向待等待的任务句柄;timeout:超时时间,单位为毫秒(ms),超时后函数返回。
c++
/**
 * @brief Wait util task completed.
 *
 * @param[in] taskHandle pointer to the task
 * @param[in] timeout timeout for waiting task, unit is milliseconds(ms)
 * @return 0 if success, return defined error code otherwise
 */
int32_t hbUCPWaitTaskDone(hbUCPTaskHandle_t taskHandle, int32_t timeout);
这四个函数组合在一起,就组成了异步推理的核心流程:先使用 hbDNNInferV2 创建任务;再初始化调度参数;接着使用 hbUCPSubmitTask 提交任务;最后使用 hbUCPWaitTaskDone 等待结果;同步模式下也可以只使用 hbDNNInferV2,传入 nullptr 作为 taskHandle 即可完成一键式推理。
之后我们便可以开始完成我们推理的代码部分啦,首先我们调用 hbDNNInferV2 发起推理请求,同时生成一个推理任务句柄(task_handle),用于后续提交与控制。注意,此时我们使用的是异步模式(传入了 task_handle 的地址),因此需要确保句柄非空,接着我们通过调用宏 HB_UCP_INITIALIZE_SCHED_PARAM 初始化调度参数结构体,设置调度优先级、设备ID、后端核心类型等信息,设置完调度参数后便可以提交推理任务啦,让统一计算平台(UCP)调度执行,最后调用 hbUCPWaitTaskDone 阻塞等待任务完成,我们将超时时间设为 10000 毫秒(即10秒),任务完成后便能安全地访问 output_tensors 中的结果,具体的代码实现如下:
c++
// Step 7: 推理
// Step 7: Inference
std::cout << "\033[32m-> Starting inference\033[0m" << std::endl;
begin_time = std::chrono::system_clock::now();
// 生成任务句柄
hbUCPTaskHandle_t task_handle = nullptr;
int infer_ret = hbDNNInferV2(&task_handle, output_tensors.data(), input_tensors.data(), dnn_handle);
if (infer_ret != 0) {
    std::cout << "[ERROR] hbDNNInferV2 failed with error code: " << infer_ret << std::endl;
    return -1;
}
//确保句柄非空
if (task_handle == nullptr) {
    std::cout << "[ERROR] task_handle is null after hbDNNInferV2" << std::endl;
    return -1;
}
std::cout << "✓ Inference task created successfully" << std::endl;
// 设置UCP调度参数
hbUCPSchedParam ctrl_param;
HB_UCP_INITIALIZE_SCHED_PARAM(&ctrl_param);
ctrl_param.backend = HB_UCP_BPU_CORE_ANY;  // 使用任意BPU核心
// 提交任务到UCP
int submit_ret = hbUCPSubmitTask(task_handle, &ctrl_param);
if (submit_ret != 0) {
    std::cout << "[ERROR] hbUCPSubmitTask failed with error code: " << submit_ret << std::endl;
    return -1;
}
std::cout << "✓ Inference task submitted successfully" << std::endl;
// 等待任务完成,设置合理的超时时间(10秒)
int wait_ret = hbUCPWaitTaskDone(task_handle, 10000);
if (wait_ret != 0) {
    std::cout << "[ERROR] hbUCPWaitTaskDone failed with error code: " << wait_ret << std::endl;
    return -1;
}
std::cout << "✓ Inference task completed successfully" << std::endl;
std::cout << "\033[31m forward time = " << std::fixed << std::setprecision(2)
          << std::chrono::duration_cast<std::chrono::microseconds>(std::chrono::system_clock::now() - begin_time).count() / 1000.0
<< " ms\033[0m" << std::endl;在这个阶段,我们的主要目标是将模型的原始输出(通常是特征图或候选框回归结果)还原为实际图像坐标系中的检测框或结果 ,也就是通常说的 目标框解析、置信度判断、NMS等处理 ,而为了正确地解码每个输出位置对应的预测框,我们首先需要为每个输出特征图预先计算锚点(anchor)坐标 ,YOLO 系列模型采用的是一种密集预测机制 ,每个输出特征图上的位置都对应着一个锚点(即一个候选框的中心),模型的输出是相对于这些锚点的偏移量(如中心坐标偏移、宽高缩放等),因此我们需要提前根据特征图的尺寸(如 80×80、40×40、20×20)和对应的 stride(如 8、16、32)计算每个位置的中心坐标 (w + 0.5, h + 0.5),为后续将偏移量还原为原图尺度下的目标框做好准备,具体的代码如下:
c++
// 预计算锚点
// s_anchor: 80x80 (stride=8)
std::vector<std::pair<float, float>> s_anchor(80 * 80);
for (int h = 0; h < 80; h++) {
    for (int w = 0; w < 80; w++) {
        s_anchor[h * 80 + w] = {w + 0.5f, h + 0.5f};
    }
}
// m_anchor: 40x40 (stride=16)
std::vector<std::pair<float, float>> m_anchor(40 * 40);
for (int h = 0; h < 40; h++) {
    for (int w = 0; w < 40; w++) {
        m_anchor[h * 40 + w] = {w + 0.5f, h + 0.5f};
    }
}
// l_anchor: 20x20 (stride=32)
std::vector<std::pair<float, float>> l_anchor(20 * 20);
for (int h = 0; h < 20; h++) {
    for (int w = 0; w < 20; w++) {
        l_anchor[h * 20 + w] = {w + 0.5f, h + 0.5f};
    }
}
然后我们便可以开始处理每个尺度的输出啦!在 YOLO 的结构中,通常会有多个输出分支,分别对应不同感受野的特征图(如 80×80、40×40、20×20),我们需要逐个处理它们,提取出有效的目标候选框。首先,我们遍历三个尺度的输出,对每个尺度,根据其在输出张量中的索引位置(例如类别分支在 0、2、4,边界框分支在 1、3、5)提取出类别预测数据和边框预测数据,并根据当前尺度确定 stride 与 grid 大小;然后,通过 hbUCPMemFlush 刷新 BPU 缓存,确保我们读取到的输出数据是最新的内容;接下来,通过指针分别获取类别预测(cls_data)和边框预测(bbox_data)的内存地址,并准备好浮点 scale 信息用于后续解码;在处理前,我们先进行第一步筛选:遍历当前尺度下所有 anchor 点(共 grid_size² 个),找出在所有类别中得分最高的类别,并判断其 raw 值是否超过设定的阈值(CONF_THRES_RAW)。如果通过筛选,就将该 anchor 的索引、预测类别和 Sigmoid 分数保存下来,供下一步做目标框的解码和拼接,通过这一轮筛选,我们从原始的密集预测中选出了可能包含目标的 anchor 点,大大减少了后续处理的数据量
接着第二步我们继续处理有效检测的边界框。首先,对于每个通过置信度阈值筛选的 anchor,我们从边框预测数据中读取对应的离散回归分布(DFL),对每个边界框的四条边分别进行 softmax 计算,得到概率分布后计算期望值以恢复真实的距离偏移。然后结合预先计算的锚点坐标和当前尺度的 stride,将偏移转换为原图尺度下的边界框左上角和右下角坐标(xyxy格式)。最后,我们判断该边界框是否有效(宽高均大于0),如果合法则将边框、对应置信度和类别 ID 分别存入 all_bboxes、all_scores 和 all_ids 三个容器中,方便后续进行非极大值抑制(NMS)和结果输出。这样,通过逐尺度处理,我们完成了模型输出的解码和有效目标框的初步筛选。
c++
// 计算置信度阈值的原始值(利用Sigmoid函数的单调性)
float CONF_THRES_RAW = -std::log(1.0f / SCORE_THRESHOLD - 1.0f);
// 处理3个特征层的输出
std::vector<cv::Rect2d> all_bboxes;
std::vector<float> all_scores;
std::vector<int> all_ids;
// 处理每个尺度
for (int scale = 0; scale < 3; scale++) {
    int cls_idx = scale * 2;     // 0, 2, 4
    int bbox_idx = scale * 2 + 1; // 1, 3, 5
    int stride = (scale == 0) ? 8 : (scale == 1) ? 16 : 32;
    int grid_size = (scale == 0) ? 80 : (scale == 1) ? 40 : 20;
    // 刷新BPU内存
    hbUCPMemFlush(&(output_tensors[cls_idx].sysMem), HB_SYS_MEM_CACHE_INVALIDATE);
    hbUCPMemFlush(&(output_tensors[bbox_idx].sysMem), HB_SYS_MEM_CACHE_INVALIDATE);
    // 获取输出数据指针
    auto *cls_data = reinterpret_cast<float *>(output_tensors[cls_idx].sysMem.virAddr);
    auto *bbox_data = reinterpret_cast<int32_t *>(output_tensors[bbox_idx].sysMem.virAddr);
    auto *bbox_scale = reinterpret_cast<float *>(output_tensors[bbox_idx].properties.scale.scaleData);
    int total_anchors = grid_size * grid_size;
    // 第一步:找到所有超过阈值的位置
    std::vector<int> valid_indices;
    std::vector<int> valid_class_ids;
    std::vector<float> valid_scores;
    for (int i = 0; i < total_anchors; i++) {
        float *cur_cls = cls_data + i * CLASSES_NUM;
        // 找到最大分数和对应类别
        int max_cls_id = 0;
        for (int c = 1; c < CLASSES_NUM; c++) {
            if (cur_cls[c] > cur_cls[max_cls_id]) {
                max_cls_id = c;
            }
        }
        // 检查是否超过阈值(raw值比较)
        if (cur_cls[max_cls_id] >= CONF_THRES_RAW) {
            valid_indices.push_back(i);
            valid_class_ids.push_back(max_cls_id);
            // 计算Sigmoid分数
            float score = 1.0f / (1.0f + std::exp(-cur_cls[max_cls_id]));
            valid_scores.push_back(score);
        }
    }
    // 第二步:处理有效检测的边界框
    for (size_t idx = 0; idx < valid_indices.size(); idx++) {
        int anchor_idx = valid_indices[idx];
        int32_t *cur_bbox = bbox_data + anchor_idx * (REG * 4);
        // DFL计算 - 对每条边进行处理
        float ltrb[4];
        for (int i = 0; i < 4; i++) {
            float dfl_values[REG];
            float softmax_values[REG];
            // 反量化DFL值
            for (int j = 0; j < REG; j++) {
                int scale_idx = i * REG + j;
                dfl_values[j] = float(cur_bbox[scale_idx]) * bbox_scale[scale_idx];
            }
            // Softmax
            softmax(dfl_values, softmax_values, REG);
            // 计算期望值(DFL到距离的转换)
            ltrb[i] = 0.0f;
            for (int j = 0; j < REG; j++) {
                ltrb[i] += softmax_values[j] * j;
            }
        }
        // 获取锚点坐标
        float anchor_x, anchor_y;
        if (scale == 0) {
            anchor_x = s_anchor[anchor_idx].first;
            anchor_y = s_anchor[anchor_idx].second;
        } else if (scale == 1) {
            anchor_x = m_anchor[anchor_idx].first;
            anchor_y = m_anchor[anchor_idx].second;
        } else {
            anchor_x = l_anchor[anchor_idx].first;
            anchor_y = l_anchor[anchor_idx].second;
        }
        // ltrb转xyxy坐标
        double x1 = (anchor_x - ltrb[0]) * stride;
        double y1 = (anchor_y - ltrb[1]) * stride;
        double x2 = (anchor_x + ltrb[2]) * stride;
        double y2 = (anchor_y + ltrb[3]) * stride;
        // 检查边界框合法性
        if (x2 > x1 && y2 > y1) {
            all_bboxes.push_back(cv::Rect2d(x1, y1, x2 - x1, y2 - y1));
            all_scores.push_back(valid_scores[idx]);
            all_ids.push_back(valid_class_ids[idx]);
        }
    }
}
后处理最后一步就是分类别的NMS啦,我们为每个类别分别创建容器,收集该类别所有的检测框和对应置信度分数,同时保存它们在全局结果中的索引。然后调用 OpenCV 提供的 cv::dnn::NMSBoxes 函数,传入该类别的边界框和分数,设置置信度阈值和重叠阈值(SCORE_THRESHOLD 和 NMS_THRESHOLD),函数返回经过 NMS 后保留的边界框索引,最后,我们将这些类别内保留的索引映射回全局检测结果的索引,并统计 NMS 后总的检测数量这样我们便得到了去重且可信的目标检测框,具体代码如下:
c++
// Step 9: 分类别NMS处理
// Step 9: Class-wise NMS processing
std::vector<std::vector<int>> nms_indices(CLASSES_NUM);
int total_detections_before_nms = all_bboxes.size();
int total_detections_after_nms = 0;

for (int cls_id = 0; cls_id < CLASSES_NUM; cls_id++) {
    // 收集该类别的所有检测
    std::vector<cv::Rect2d> class_bboxes;
    std::vector<float> class_scores;
    std::vector<int> original_indices;

    for (size_t i = 0; i < all_bboxes.size(); i++) {
        if (all_ids[i] == cls_id) {
            class_bboxes.push_back(all_bboxes[i]);
            class_scores.push_back(all_scores[i]);
            original_indices.push_back(i);
        }
    }

    if (!class_bboxes.empty()) {
        std::vector<int> class_nms_indices;
        cv::dnn::NMSBoxes(class_bboxes, class_scores,
                         SCORE_THRESHOLD, NMS_THRESHOLD, class_nms_indices);

        // 将类别内的索引转换为全局索引
        for (int idx : class_nms_indices) {
            nms_indices[cls_id].push_back(original_indices[idx]);
        }
        total_detections_after_nms += class_nms_indices.size();
    }
}
最后我们便只需要根据NMS之后的结果绘制图像和打印输出就可以啦!!!具体代码如下,主要是CV操作这里就不赘述啦!
c++
// Step 10: 绘制结果
// Step 10: Draw results
for (int cls_id = 0; cls_id < CLASSES_NUM; cls_id++) {
    for (int global_idx : nms_indices[cls_id]) {
        // 坐标转换回原图
        float x1 = (all_bboxes[global_idx].x - x_shift) / x_scale;
        float y1 = (all_bboxes[global_idx].y - y_shift) / y_scale;
        float x2 = x1 + all_bboxes[global_idx].width / x_scale;
        float y2 = y1 + all_bboxes[global_idx].height / y_scale;
        float score = all_scores[global_idx];
        // 边界检查
        x1 = std::max(0.0f, std::min((float)img.cols - 1, x1));
        y1 = std::max(0.0f, std::min((float)img.rows - 1, y1));
        x2 = std::max(0.0f, std::min((float)img.cols - 1, x2));
        y2 = std::max(0.0f, std::min((float)img.rows - 1, y2));
        // 绘制边界框
        cv::Scalar color = rdk_colors[cls_id % 20];
        cv::rectangle(img, cv::Point(x1, y1), cv::Point(x2, y2), color, LINE_SIZE);
        // 绘制标签
        std::string label = object_names[cls_id] + ": " + std::to_string(int(score * 100)) + "%";
        int baseline;
        cv::Size textSize = cv::getTextSize(label, cv::FONT_HERSHEY_SIMPLEX, FONT_SIZE, FONT_THICKNESS, &baseline);
        cv::Point label_pos(x1, y1 - 10 > textSize.height ? y1 - 10 : y1 + textSize.height + 10);
        cv::rectangle(img, label_pos + cv::Point(0, baseline),
                     label_pos + cv::Point(textSize.width, -textSize.height), color, cv::FILLED);
        cv::putText(img, label, label_pos, cv::FONT_HERSHEY_SIMPLEX, FONT_SIZE, cv::Scalar(0, 0, 0), FONT_THICKNESS);
        // 打印检测结果
        std::cout << "(" << x1 << ", " << y1 << ", " << x2 << ", " << y2 << ") -> "
                  << object_names[cls_id] << ": " << std::fixed << std::setprecision(2) << score << std::endl;
    }
}
cv::imwrite(IMG_SAVE_PATH, img);
至此我们的推理便完成了,但是在彻底结束前我们还需要对我们推理的资源进行释放,这里主要设计到了三个函数,分别用于释放任务句柄、清理内存以及释放模型句柄
c++
/**
 * @brief Release a task and its related resources.
 *
 * @param[in] taskHandle pointer to the task
 * @return 0 if success, return defined error code otherwise
 */
int32_t hbUCPReleaseTask(hbUCPTaskHandle_t taskHandle);

/**
 * @brief Free mem
 *
 * @param[in] mem Memory pointer.
 * @return 0 if success, return defined error code otherwise
 */
int32_t hbUCPFree(hbUCPSysMem *mem);

/**
 * @brief Release DNN Networks in a given packed handle
 *
 * @param[in] dnnPackedHandle Horizon DNN handle, pointing to multiple models.
 * @return 0 if success, return defined error code otherwise
 */
int32_t hbDNNRelease(hbDNNPackedHandle_t dnnPackedHandle);
释放的代码如下:
c++
// Step 12: 资源释放
// Step 12: Release resources
std::cout << "\033[32m-> Cleaning up resources\033[0m" << std::endl;

// 释放任务句柄
hbUCPReleaseTask(task_handle);

// 释放输入内存
for (int i = 0; i < input_count; i++) {
    hbUCPFree(&(input_tensors[i].sysMem));
}

// 释放输出内存
for (int i = 0; i < output_count; i++) {
    hbUCPFree(&(output_tensors[i].sysMem));
}

// 释放模型
hbDNNRelease(packed_dnn_handle);
至此推理的全流程代码我们便完成啦!!!CMakeLists及完整的代码如下:
cmake
cmake_minimum_required(VERSION 3.0)
project(rdk_s100_yolo_detect)
# 设置C++标准
set(CMAKE_CXX_STANDARD 11)
set(CMAKE_CXX_STANDARD_REQUIRED ON)
# 设置编译器标志
# libdnn.so depends on system software dynamic link library, use -Wl,-unresolved-symbols=ignore-in-shared-libs to shield during compilation
set(CMAKE_CXX_FLAGS "${CMAKE_CXX_FLAGS} -std=c++11 -Wl,-unresolved-symbols=ignore-in-shared-libs")
set(CMAKE_CXX_FLAGS_DEBUG " -Wall -Werror -g -O0 ")
set(CMAKE_C_FLAGS_DEBUG " -Wall -Werror -g -O0 ")
set(CMAKE_CXX_FLAGS_RELEASE " -Wall -Werror -O3 ")
set(CMAKE_C_FLAGS_RELEASE " -Wall -Werror -O3 ")

if (NOT CMAKE_BUILD_TYPE)
    set(CMAKE_BUILD_TYPE Release)
endif ()
message(STATUS "Build type: ${CMAKE_BUILD_TYPE}")
# 设置OpenCV包
find_package(OpenCV REQUIRED)
# S100 UCP库路径配置
set(HOBOT_INCLUDE_PATH "/usr/include")
set(HOBOT_LIB_PATH "/usr/hobot/lib")
# 包含头文件路径
include_directories(${HOBOT_INCLUDE_PATH})
include_directories(${OpenCV_INCLUDE_DIRS})
# 链接库路径
link_directories(${HOBOT_LIB_PATH})
# 添加可执行文件
add_executable(main main.cc)
# 链接所需的库
target_link_libraries(main
                      ${OpenCV_LIBS}    # OpenCV库
                      dnn               # S100 DNN推理库
                      hbucp             # S100 UCP统一计算平台库
                      pthread           # 多线程支持
                      rt                # 实时库
                      dl                # 动态链接库支持
                      m                 # 数学库
                      )
c++
/* * * * * * * * * * * * * * * * * * * * * * * * * * * * * * * * * * * * *

Copyright (c) 2025,SkyXZ D-Robotics.

Licensed under the Apache License, Version 2.0 (the "License");
you may not use this file except in compliance with the License.
You may obtain a copy of the License at

    http://www.apache.org/licenses/LICENSE-2.0

Unless required by applicable law or agreed to in writing, software
distributed under the License is distributed on an "AS IS" BASIS,
WITHOUT WARRANTIES OR CONDITIONS OF ANY KIND, either express or implied.
See the License for the specific language governing permissions and
limitations under the License.

* * * * * * * * * * * * * * * * * * * * * * * * * * * * * * * * * * * * */
// 注意: 此程序在RDK S100板端运行
// Attention: This program runs on RDK S100 board.
// D-Robotics S100 *.hbm 模型路径
// Path of D-Robotics S100 *.hbm model.
#define MODEL_PATH "rdk_model_zoo_s/samples/Vision/ultralytics_YOLO_Detect/source/reference_hbm_models/yolov5nu_detect_nashe_640x640_nv12.hbm"
// 推理使用的测试图片路径
// Path of the test image used for inference.
#define TEST_IMG_PATH "rdk_model_zoo_s/resource/datasets/COCO2017/assets/bus.jpg"
// 前处理方式选择, 0:Resize, 1:LetterBox
// Preprocessing method selection, 0: Resize, 1: LetterBox
#define RESIZE_TYPE 0
#define LETTERBOX_TYPE 1
#define PREPROCESS_TYPE LETTERBOX_TYPE
// 推理结果保存路径
// Path where the inference result will be saved
#define IMG_SAVE_PATH "cpp_result.jpg"
// 模型的类别数量, 默认80
// Number of classes in the model, default is 80
#define CLASSES_NUM 80
// NMS的阈值, 默认0.7
// Non-Maximum Suppression (NMS) threshold, default is 0.7
#define NMS_THRESHOLD 0.7
// 分数阈值, 默认0.25
// Score threshold, default is 0.25
#define SCORE_THRESHOLD 0.25
// 控制回归部分离散化程度的超参数, 默认16
// A hyperparameter that controls the discretization level of the regression part, default is 16
#define REG 16
// 绘制标签的字体尺寸, 默认1.0
// Font size for drawing labels, default is 1.0.
#define FONT_SIZE 1.0
// 绘制标签的字体粗细, 默认 1.0
// Font thickness for drawing labels, default is 1.0.
#define FONT_THICKNESS 1.0
// 绘制矩形框的线宽, 默认2.0
// Line width for drawing bounding boxes, default is 2.0.
#define LINE_SIZE 2.0
// C/C++ Standard Libraries
#include <iostream>
#include <vector>
#include <algorithm>
#include <chrono>
#include <cmath>
#include <iomanip>
// Third Party Libraries
#include <opencv2/opencv.hpp>
#include <opencv2/dnn/dnn.hpp>
// RDK S100 UCP API
#include "hobot/dnn/hb_dnn.h"
#include "hobot/hb_ucp.h"
#include "hobot/hb_ucp_sys.h"
#define RDK_CHECK_SUCCESS(value, errmsg)                                         \
    do                                                                           \
    {                                                                            \
        auto ret_code = value;                                                   \
        if (ret_code != 0)                                                       \
        {                                                                        \
            std::cout << "[ERROR] " << __FILE__ << ":" << __LINE__ << std::endl; \
            std::cout << errmsg << ", error code:" << ret_code << std::endl;     \
            return ret_code;                                                     \
        }                                                                        \
    } while (0);
// COCO Names
std::vector<std::string> object_names = {
    "person", "bicycle", "car", "motorcycle", "airplane", "bus", "train", "truck", "boat", "traffic light",
    "fire hydrant", "stop sign", "parking meter", "bench", "bird", "cat", "dog", "horse", "sheep", "cow",
    "elephant", "bear", "zebra", "giraffe", "backpack", "umbrella", "handbag", "tie", "suitcase", "frisbee",
    "skis", "snowboard", "sports ball", "kite", "baseball bat", "baseball glove", "skateboard", "surfboard",
    "tennis racket", "bottle", "wine glass", "cup", "fork", "knife", "spoon", "bowl", "banana", "apple",
    "sandwich", "orange", "broccoli", "carrot", "hot dog", "pizza", "donut", "cake", "chair", "couch",
    "potted plant", "bed", "dining table", "toilet", "tv", "laptop", "mouse", "remote", "keyboard",
    "cell phone", "microwave", "oven", "toaster", "sink", "refrigerator", "book", "clock", "vase",
    "scissors", "teddy bear", "hair drier", "toothbrush"
};
// S100定制颜色
std::vector<cv::Scalar> rdk_colors = {
    cv::Scalar(56, 56, 255), cv::Scalar(151, 157, 255), cv::Scalar(31, 112, 255), cv::Scalar(29, 178, 255),
    cv::Scalar(49, 210, 207), cv::Scalar(10, 249, 72), cv::Scalar(23, 204, 146), cv::Scalar(134, 219, 61),
    cv::Scalar(52, 147, 26), cv::Scalar(187, 212, 0), cv::Scalar(168, 153, 44), cv::Scalar(255, 194, 0),
    cv::Scalar(147, 69, 52), cv::Scalar(255, 115, 100), cv::Scalar(236, 24, 0), cv::Scalar(255, 56, 132),
    cv::Scalar(133, 0, 82), cv::Scalar(255, 56, 203), cv::Scalar(200, 149, 255), cv::Scalar(199, 55, 255)
};
// Softmax function for DFL calculation
void softmax(float* input, float* output, int size) {
    float max_val = *std::max_element(input, input + size);
    float sum = 0.0f;
    for (int i = 0; i < size; i++) {
        output[i] = std::exp(input[i] - max_val);
        sum += output[i];
    }
    for (int i = 0; i < size; i++) {
        output[i] /= sum;
    }
}
int main()
{
    // Step 0: 加载S100 hbm模型
    // Step 0: Load S100 hbm model
    auto begin_time = std::chrono::system_clock::now();
    hbDNNPackedHandle_t packed_dnn_handle;
    const char *model_file_name = MODEL_PATH;
    RDK_CHECK_SUCCESS(
        hbDNNInitializeFromFiles(&packed_dnn_handle, &model_file_name, 1),
        "hbDNNInitializeFromFiles failed");
    std::cout << "\033[31m Load D-Robotics S100 Quantize model time = " << std::fixed << std::setprecision(2)
              << std::chrono::duration_cast<std::chrono::microseconds>(std::chrono::system_clock::now() - begin_time).count() / 1000.0
              << " ms\033[0m" << std::endl;
    // Step 1: 打印基本信息
    // Step 1: Print basic information
    std::cout << "[INFO] OpenCV Version: " << CV_VERSION << std::endl;
    std::cout << "[INFO] MODEL_PATH: " << MODEL_PATH << std::endl;
    std::cout << "[INFO] CLASSES_NUM: " << CLASSES_NUM << std::endl;
    std::cout << "[INFO] NMS_THRESHOLD: " << NMS_THRESHOLD << std::endl;
    std::cout << "[INFO] SCORE_THRESHOLD: " << SCORE_THRESHOLD << std::endl;
    // Step 2: 获取模型句柄
    // Step 2: Get model handle
    const char **model_name_list;
    int model_count = 0;
    RDK_CHECK_SUCCESS(
        hbDNNGetModelNameList(&model_name_list, &model_count, packed_dnn_handle),
        "hbDNNGetModelNameList failed");
    if (model_count > 1) {
        std::cout << "This model file have more than 1 model, only use model 0." << std::endl;
    }
    const char *model_name = model_name_list[0];
    std::cout << "[model name]: " << model_name << std::endl;
    hbDNNHandle_t dnn_handle;
    RDK_CHECK_SUCCESS(
        hbDNNGetModelHandle(&dnn_handle, packed_dnn_handle, model_name),
        "hbDNNGetModelHandle failed");
    // Step 3: 检查模型输入
    // Step 3: Check model input
    int32_t input_count = 0;
    RDK_CHECK_SUCCESS(
        hbDNNGetInputCount(&input_count, dnn_handle),
        "hbDNNGetInputCount failed");
    if (input_count < 1) {
        std::cout << "S100 YOLO model should have at least 1 input, but got " << input_count << std::endl;
        return -1;
    } else if (input_count > 1) {
        std::cout << "S100 YOLO model has " << input_count << " inputs, using first input for inference" << std::endl;
    }
    hbDNNTensorProperties input_properties;
    RDK_CHECK_SUCCESS(
        hbDNNGetInputTensorProperties(&input_properties, dnn_handle, 0),
        "hbDNNGetInputTensorProperties failed");
    // S100 UCP 模型需要检测输入格式是否支持
    std::cout << "✓ input tensor type: " << input_properties.tensorType << std::endl;
    // 检测输入格式是否为NV12 (type 3)
    if (input_properties.tensorType != 3) {
        std::cout << "[ERROR] This program only supports NV12 input (type 3), but got type: " << input_properties.tensorType << std::endl;
        return -1;
    }
    // 检测输入tensor布局为NCHW
    if (input_properties.validShape.numDimensions == 4) {
        // NCHW布局,H和W应该在维度1和2位置,且通道数应该为1
        int32_t channels = input_properties.validShape.dimensionSize[3];
        if (channels != 1) {
            std::cout << "[ERROR] This program expects NCHW layout with 1 channel, but got " << channels << " channels" << std::endl;
            return -1;
        }
        std::cout << "✓ input tensor layout: NCHW (verified)" << std::endl;
    } else {
        std::cout << "[ERROR] Expected 4D input tensor for NCHW layout, but got " << input_properties.validShape.numDimensions << "D" << std::endl;
        return -1;
    }
    // 获取输入尺寸
    int32_t input_H, input_W;
    if (input_properties.validShape.numDimensions == 4) {
        input_H = input_properties.validShape.dimensionSize[1];
        input_W = input_properties.validShape.dimensionSize[2];
        std::cout << "✓ input tensor valid shape: ("
                  << input_properties.validShape.dimensionSize[0] << ", "
                  << input_H << ", " << input_W << ", "
                  << input_properties.validShape.dimensionSize[3] << ")" << std::endl;
    } else {
        std::cout << "S100 YOLO model input should be 4D" << std::endl;
        return -1;
    }
    // Step 4: 检查模型输出 - S100 YOLO 按照Readme导出后应该有6个输出
    // Step 4: Check model output - S100 YOLO should have 6 outputs according to Readme
    int32_t output_count = 0;
    RDK_CHECK_SUCCESS(
        hbDNNGetOutputCount(&output_count, dnn_handle),
        "hbDNNGetOutputCount failed");
    if (output_count != 6) {
        std::cout << "S100 YOLO model should have 6 outputs, but got " << output_count << std::endl;
        return -1;
    }
    std::cout << "✓ S100 YOLO model has 6 outputs" << std::endl;
    // 打印输出信息并获取正确的输出顺序
    std::cout << "\033[32m-> output tensors\033[0m" << std::endl;
    for (int i = 0; i < 6; i++) {
        hbDNNTensorProperties output_properties;
        RDK_CHECK_SUCCESS(
            hbDNNGetOutputTensorProperties(&output_properties, dnn_handle, i),
            "hbDNNGetOutputTensorProperties failed");
        std::cout << "output[" << i << "] valid shape: ("
                  << output_properties.validShape.dimensionSize[0] << ", "
                  << output_properties.validShape.dimensionSize[1] << ", "
                  << output_properties.validShape.dimensionSize[2] << ", "
                  << output_properties.validShape.dimensionSize[3] << "), ";
        std::cout << "QuantiType: " << output_properties.quantiType << std::endl;
    }
    // Step 5: 前处理 - 读取图像并转换为YUV420SP
    // Step 5: Preprocessing - Load image and convert to YUV420SP
    std::cout << "\033[32m-> Starting preprocessing\033[0m" << std::endl;
    cv::Mat img = cv::imread(TEST_IMG_PATH);
    if (img.empty()) {
        std::cout << "Failed to load image: " << TEST_IMG_PATH << std::endl;
        return -1;
    }
    std::cout << "✓ img path: " << TEST_IMG_PATH << std::endl;
    std::cout << "✓ img (rows, cols, channels): (" << img.rows << ", " << img.cols << ", " << img.channels() << ")" << std::endl;
    // 前处理参数
    float y_scale = 1.0, x_scale = 1.0;
    int x_shift = 0, y_shift = 0;
    cv::Mat resize_img;
    begin_time = std::chrono::system_clock::now();
    if (PREPROCESS_TYPE == LETTERBOX_TYPE) {
        // LetterBox前处理
        float scale = std::min(1.0f * input_H / img.rows, 1.0f * input_W / img.cols);
        int new_w = int(img.cols * scale);
        int new_h = int(img.rows * scale);
        // 确保尺寸为偶数
        new_w = (new_w / 2) * 2;
        new_h = (new_h / 2) * 2;
        // 重新计算实际的缩放因子
        x_scale = 1.0f * new_w / img.cols;
        y_scale = 1.0f * new_h / img.rows;
        x_shift = (input_W - new_w) / 2;
        int x_other = input_W - new_w - x_shift;
        y_shift = (input_H - new_h) / 2;
        int y_other = input_H - new_h - y_shift;
        cv::Size targetSize(new_w, new_h);
        cv::resize(img, resize_img, targetSize);
        cv::copyMakeBorder(resize_img, resize_img, y_shift, y_other, x_shift, x_other, cv::BORDER_CONSTANT, cv::Scalar(127, 127, 127));
    } else {
        // Resize前处理
        cv::Size targetSize(input_W, input_H);
        cv::resize(img, resize_img, targetSize);
        y_scale = 1.0 * input_H / img.rows;
        x_scale = 1.0 * input_W / img.cols;
    }
    std::cout << "✓ y_scale = " << y_scale << ", x_scale = " << x_scale << std::endl;
    std::cout << "✓ y_shift = " << y_shift << ", x_shift = " << x_shift << std::endl;
    // BGR转YUV420SP (NV12)
    cv::Mat img_nv12;
    cv::Mat yuv_mat;
    cv::cvtColor(resize_img, yuv_mat, cv::COLOR_BGR2YUV_I420);
    uint8_t *yuv = yuv_mat.ptr<uint8_t>();
    img_nv12 = cv::Mat(input_H * 3 / 2, input_W, CV_8UC1);
    uint8_t *ynv12 = img_nv12.ptr<uint8_t>();
    int uv_height = input_H / 2;
    int uv_width = input_W / 2;
    int y_size = input_H * input_W;
    // 复制Y平面
    memcpy(ynv12, yuv, y_size);
    // 交错UV平面
    uint8_t *nv12 = ynv12 + y_size;
    uint8_t *u_data = yuv + y_size;
    uint8_t *v_data = u_data + uv_height * uv_width;
    for (int i = 0; i < uv_width * uv_height; i++) {
        *nv12++ = *u_data++;
        *nv12++ = *v_data++;
    }
    std::cout << "\033[31m pre process time = " << std::fixed << std::setprecision(2)
              << std::chrono::duration_cast<std::chrono::microseconds>(std::chrono::system_clock::now() - begin_time).count() / 1000.0
              << " ms\033[0m" << std::endl;
    // Step 6: 准备输入tensor
    // Step 6: Prepare input tensor
    std::vector<hbDNNTensor> input_tensors(input_count);
    std::vector<hbDNNTensor> output_tensors(output_count);
    // 分配输入内存
    for (int i = 0; i < input_count; i++) {
        // 复制输入tensor属性
        input_tensors[i].properties = input_properties;
        int data_size;
        if (i == 0) {
            // 第一个输入:Y分量 640x640x1
            data_size = input_H * input_W;
            // 设置tensor的stride信息
            input_tensors[i].properties.validShape.dimensionSize[0] = 1;
            input_tensors[i].properties.validShape.dimensionSize[1] = input_H;
            input_tensors[i].properties.validShape.dimensionSize[2] = input_W;
            input_tensors[i].properties.validShape.dimensionSize[3] = 1;
            // 设置stride
            input_tensors[i].properties.stride[3] = 1;                    // 每个元素1字节
            input_tensors[i].properties.stride[2] = 1;                    // 通道步长 = stride[3] * size[3] = 1 * 1
            input_tensors[i].properties.stride[1] = input_W;              // 行步长 = stride[2] * size[2] = 1 * 640 = 640
            input_tensors[i].properties.stride[0] = input_W * input_H;    // 整个tensor = stride[1] * size[1] = 640 * 640 = 409600
        } else {
            // 第二个输入:UV分量 320x320x2 (尺寸减半,2通道)
            int uv_h = input_H / 2;  // 320
            int uv_w = input_W / 2;  // 320
            data_size = uv_h * uv_w * 2;  // UV两个通道
            // 设置tensor的stride信息
            input_tensors[i].properties.validShape.dimensionSize[0] = 1;
            input_tensors[i].properties.validShape.dimensionSize[1] = uv_h;
            input_tensors[i].properties.validShape.dimensionSize[2] = uv_w;
            input_tensors[i].properties.validShape.dimensionSize[3] = 2;
            // 设置stride
            input_tensors[i].properties.stride[3] = 1;                    // 每个元素1字节
            input_tensors[i].properties.stride[2] = 2;                    // 通道步长 = stride[3] * size[3] = 1 * 2 = 2
            input_tensors[i].properties.stride[1] = uv_w * 2;             // 行步长 = stride[2] * size[2] = 2 * 320 = 640
            input_tensors[i].properties.stride[0] = uv_w * uv_h * 2;      // 整个tensor = stride[1] * size[1] = 640 * 320 = 204800
        }
        // 分配内存
        hbUCPMallocCached(&input_tensors[i].sysMem, data_size, 0);
        std::cout << "✓ Input tensor " << i << " memory allocated: " << data_size << " bytes" << std::endl;
        // 复制数据
        if (i == 0) {
            // 第一个输入:复制Y分量
            memcpy(input_tensors[i].sysMem.virAddr, ynv12, input_H * input_W);
            std::cout << "✓ Y component data copied to tensor " << i << std::endl;
        } else {
            // 第二个输入:复制UV分量
            uint8_t *uv_src = ynv12 + input_H * input_W;  // UV数据在Y之后
            memcpy(input_tensors[i].sysMem.virAddr, uv_src, data_size);
            std::cout << "✓ UV component data copied to tensor " << i << std::endl;
        }
        // 刷新内存
        hbUCPMemFlush(&input_tensors[i].sysMem, HB_SYS_MEM_CACHE_CLEAN);
    }
    // 分配输出内存
    for (int i = 0; i < output_count; i++) {
        hbDNNTensorProperties &output_properties = output_tensors[i].properties;
        hbDNNGetOutputTensorProperties(&output_properties, dnn_handle, i);
        int out_aligned_size = output_properties.alignedByteSize;
        hbUCPSysMem &mem = output_tensors[i].sysMem;
        hbUCPMallocCached(&mem, out_aligned_size, 0);
        std::cout << "✓ Output tensor " << i << " memory allocated: " << out_aligned_size << " bytes" << std::endl;
    }
    // Step 7: 推理
    // Step 7: Inference
    std::cout << "\033[32m-> Starting inference\033[0m" << std::endl;
    begin_time = std::chrono::system_clock::now();
    // 生成任务句柄
    hbUCPTaskHandle_t task_handle = nullptr;
    int infer_ret = hbDNNInferV2(&task_handle, output_tensors.data(), input_tensors.data(), dnn_handle);
    if (infer_ret != 0) {
        std::cout << "[ERROR] hbDNNInferV2 failed with error code: " << infer_ret << std::endl;
        return -1;
    }
    if (task_handle == nullptr) {
        std::cout << "[ERROR] task_handle is null after hbDNNInferV2" << std::endl;
        return -1;
    }
    std::cout << "✓ Inference task created successfully" << std::endl;
    // 设置UCP调度参数
    hbUCPSchedParam ctrl_param;
    HB_UCP_INITIALIZE_SCHED_PARAM(&ctrl_param);
    ctrl_param.backend = HB_UCP_BPU_CORE_ANY;  // 使用任意BPU核心
    // 提交任务到UCP
    int submit_ret = hbUCPSubmitTask(task_handle, &ctrl_param);
    if (submit_ret != 0) {
        std::cout << "[ERROR] hbUCPSubmitTask failed with error code: " << submit_ret << std::endl;
        return -1;
    }
    std::cout << "✓ Inference task submitted successfully" << std::endl;
    // 等待任务完成,设置合理的超时时间(10秒)
    int wait_ret = hbUCPWaitTaskDone(task_handle, 10000);
    if (wait_ret != 0) {
        std::cout << "[ERROR] hbUCPWaitTaskDone failed with error code: " << wait_ret << std::endl;
        return -1;
    }
    std::cout << "✓ Inference task completed successfully" << std::endl;
    std::cout << "\033[31m forward time = " << std::fixed << std::setprecision(2)
              << std::chrono::duration_cast<std::chrono::microseconds>(std::chrono::system_clock::now() - begin_time).count() / 1000.0
              << " ms\033[0m" << std::endl;
    // Step 8: 后处理
    // Step 8: Post-processing
    std::cout << "\033[32m-> Starting post-processing\033[0m" << std::endl;
    begin_time = std::chrono::system_clock::now();
    // 计算置信度阈值的原始值(利用Sigmoid函数的单调性)
    float CONF_THRES_RAW = -std::log(1.0f / SCORE_THRESHOLD - 1.0f);
    // 预计算锚点
    // s_anchor: 80x80 (stride=8)
    std::vector<std::pair<float, float>> s_anchor(80 * 80);
    for (int h = 0; h < 80; h++) {
        for (int w = 0; w < 80; w++) {
            s_anchor[h * 80 + w] = {w + 0.5f, h + 0.5f};
        }
    }
    // m_anchor: 40x40 (stride=16)
    std::vector<std::pair<float, float>> m_anchor(40 * 40);
    for (int h = 0; h < 40; h++) {
        for (int w = 0; w < 40; w++) {
            m_anchor[h * 40 + w] = {w + 0.5f, h + 0.5f};
        }
    }
    // l_anchor: 20x20 (stride=32)
    std::vector<std::pair<float, float>> l_anchor(20 * 20);
    for (int h = 0; h < 20; h++) {
        for (int w = 0; w < 20; w++) {
            l_anchor[h * 20 + w] = {w + 0.5f, h + 0.5f};
        }
    }
    // 处理3个特征层的输出
    std::vector<cv::Rect2d> all_bboxes;
    std::vector<float> all_scores;
    std::vector<int> all_ids;
    // 处理每个尺度
    for (int scale = 0; scale < 3; scale++) {
        int cls_idx = scale * 2;     // 0, 2, 4
        int bbox_idx = scale * 2 + 1; // 1, 3, 5
        int stride = (scale == 0) ? 8 : (scale == 1) ? 16 : 32;
        int grid_size = (scale == 0) ? 80 : (scale == 1) ? 40 : 20;
        // 刷新BPU内存
        hbUCPMemFlush(&(output_tensors[cls_idx].sysMem), HB_SYS_MEM_CACHE_INVALIDATE);
        hbUCPMemFlush(&(output_tensors[bbox_idx].sysMem), HB_SYS_MEM_CACHE_INVALIDATE);
        // 获取输出数据指针
        auto *cls_data = reinterpret_cast<float *>(output_tensors[cls_idx].sysMem.virAddr);
        auto *bbox_data = reinterpret_cast<int32_t *>(output_tensors[bbox_idx].sysMem.virAddr);
        auto *bbox_scale = reinterpret_cast<float *>(output_tensors[bbox_idx].properties.scale.scaleData);
        int total_anchors = grid_size * grid_size;
        // 第一步:找到所有超过阈值的位置
        std::vector<int> valid_indices;
        std::vector<int> valid_class_ids;
        std::vector<float> valid_scores;
        for (int i = 0; i < total_anchors; i++) {
            float *cur_cls = cls_data + i * CLASSES_NUM;
            // 找到最大分数和对应类别
            int max_cls_id = 0;
            for (int c = 1; c < CLASSES_NUM; c++) {
                if (cur_cls[c] > cur_cls[max_cls_id]) {
                    max_cls_id = c;
                }
            }
            // 检查是否超过阈值(raw值比较)
            if (cur_cls[max_cls_id] >= CONF_THRES_RAW) {
                valid_indices.push_back(i);
                valid_class_ids.push_back(max_cls_id);
                // 计算Sigmoid分数
                float score = 1.0f / (1.0f + std::exp(-cur_cls[max_cls_id]));
                valid_scores.push_back(score);
            }
        }
        // 第二步:处理有效检测的边界框
        for (size_t idx = 0; idx < valid_indices.size(); idx++) {
            int anchor_idx = valid_indices[idx];
            int32_t *cur_bbox = bbox_data + anchor_idx * (REG * 4);
            // DFL计算 - 对每条边进行处理
            float ltrb[4];
            for (int i = 0; i < 4; i++) {
                float dfl_values[REG];
                float softmax_values[REG];
                // 反量化DFL值
                for (int j = 0; j < REG; j++) {
                    int scale_idx = i * REG + j;
                    dfl_values[j] = float(cur_bbox[scale_idx]) * bbox_scale[scale_idx];
                }
                // Softmax
                softmax(dfl_values, softmax_values, REG);
                // 计算期望值(DFL到距离的转换)
                ltrb[i] = 0.0f;
                for (int j = 0; j < REG; j++) {
                    ltrb[i] += softmax_values[j] * j;
                }
            }
            // 获取锚点坐标
            float anchor_x, anchor_y;
            if (scale == 0) {
                anchor_x = s_anchor[anchor_idx].first;
                anchor_y = s_anchor[anchor_idx].second;
            } else if (scale == 1) {
                anchor_x = m_anchor[anchor_idx].first;
                anchor_y = m_anchor[anchor_idx].second;
            } else {
                anchor_x = l_anchor[anchor_idx].first;
                anchor_y = l_anchor[anchor_idx].second;
            }
            // ltrb转xyxy坐标
            double x1 = (anchor_x - ltrb[0]) * stride;
            double y1 = (anchor_y - ltrb[1]) * stride;
            double x2 = (anchor_x + ltrb[2]) * stride;
            double y2 = (anchor_y + ltrb[3]) * stride;
            // 检查边界框合法性
            if (x2 > x1 && y2 > y1) {
                all_bboxes.push_back(cv::Rect2d(x1, y1, x2 - x1, y2 - y1));
                all_scores.push_back(valid_scores[idx]);
                all_ids.push_back(valid_class_ids[idx]);
            }
        }
    }
    // Step 9: 分类别NMS处理
    // Step 9: Class-wise NMS processing
    std::vector<std::vector<int>> nms_indices(CLASSES_NUM);
    int total_detections_before_nms = all_bboxes.size();
    int total_detections_after_nms = 0;
    for (int cls_id = 0; cls_id < CLASSES_NUM; cls_id++) {
        // 收集该类别的所有检测
        std::vector<cv::Rect2d> class_bboxes;
        std::vector<float> class_scores;
        std::vector<int> original_indices;
        for (size_t i = 0; i < all_bboxes.size(); i++) {
            if (all_ids[i] == cls_id) {
                class_bboxes.push_back(all_bboxes[i]);
                class_scores.push_back(all_scores[i]);
                original_indices.push_back(i);
            }
        }
        if (!class_bboxes.empty()) {
            std::vector<int> class_nms_indices;
            cv::dnn::NMSBoxes(class_bboxes, class_scores,
                             SCORE_THRESHOLD, NMS_THRESHOLD, class_nms_indices);
            // 将类别内的索引转换为全局索引
            for (int idx : class_nms_indices) {
                nms_indices[cls_id].push_back(original_indices[idx]);
            }
            total_detections_after_nms += class_nms_indices.size();
        }
    }
    std::cout << "✓ Detections before NMS: " << total_detections_before_nms << std::endl;
    std::cout << "✓ Detections after NMS: " << total_detections_after_nms << std::endl;
    std::cout << "\033[31m Post Process time = " << std::fixed << std::setprecision(2)
              << std::chrono::duration_cast<std::chrono::microseconds>(std::chrono::system_clock::now() - begin_time).count() / 1000.0
              << " ms\033[0m" << std::endl;
    // Step 10: 绘制结果
    // Step 10: Draw results
    std::cout << "\033[32m-> Drawing results\033[0m" << std::endl;
    begin_time = std::chrono::system_clock::now();
    for (int cls_id = 0; cls_id < CLASSES_NUM; cls_id++) {
        for (int global_idx : nms_indices[cls_id]) {
            // 坐标转换回原图
            float x1 = (all_bboxes[global_idx].x - x_shift) / x_scale;
            float y1 = (all_bboxes[global_idx].y - y_shift) / y_scale;
            float x2 = x1 + all_bboxes[global_idx].width / x_scale;
            float y2 = y1 + all_bboxes[global_idx].height / y_scale;
            float score = all_scores[global_idx];
            // 边界检查
            x1 = std::max(0.0f, std::min((float)img.cols - 1, x1));
            y1 = std::max(0.0f, std::min((float)img.rows - 1, y1));
            x2 = std::max(0.0f, std::min((float)img.cols - 1, x2));
            y2 = std::max(0.0f, std::min((float)img.rows - 1, y2));
            // 绘制边界框
            cv::Scalar color = rdk_colors[cls_id % 20];
            cv::rectangle(img, cv::Point(x1, y1), cv::Point(x2, y2), color, LINE_SIZE);
            // 绘制标签
            std::string label = object_names[cls_id] + ": " + std::to_string(int(score * 100)) + "%";
            int baseline;
            cv::Size textSize = cv::getTextSize(label, cv::FONT_HERSHEY_SIMPLEX, FONT_SIZE, FONT_THICKNESS, &baseline);
            cv::Point label_pos(x1, y1 - 10 > textSize.height ? y1 - 10 : y1 + textSize.height + 10);
            cv::rectangle(img, label_pos + cv::Point(0, baseline),
                         label_pos + cv::Point(textSize.width, -textSize.height), color, cv::FILLED);
            cv::putText(img, label, label_pos, cv::FONT_HERSHEY_SIMPLEX, FONT_SIZE, cv::Scalar(0, 0, 0), FONT_THICKNESS);
            // 打印检测结果
            std::cout << "(" << x1 << ", " << y1 << ", " << x2 << ", " << y2 << ") -> "
                      << object_names[cls_id] << ": " << std::fixed << std::setprecision(2) << score << std::endl;
        }
    }
    std::cout << "\033[31m Draw Result time = " << std::fixed << std::setprecision(2)
              << std::chrono::duration_cast<std::chrono::microseconds>(std::chrono::system_clock::now() - begin_time).count() / 1000.0
              << " ms\033[0m" << std::endl;
    // Step 11: 保存结果
    // Step 11: Save result
    cv::imwrite(IMG_SAVE_PATH, img);
    std::cout << "\033[32m✓ saved in path: \"" << IMG_SAVE_PATH << "\"\033[0m" << std::endl;
    // Step 12: 资源释放
    // Step 12: Release resources
    std::cout << "\033[32m-> Cleaning up resources\033[0m" << std::endl;
    // 释放任务句柄
    hbUCPReleaseTask(task_handle);
    // 释放输入内存
    for (int i = 0; i < input_count; i++) {
        hbUCPFree(&(input_tensors[i].sysMem));
    }
    // 释放输出内存
    for (int i = 0; i < output_count; i++) {
        hbUCPFree(&(output_tensors[i].sysMem));
    }
    // 释放模型
    hbDNNRelease(packed_dnn_handle);
    std::cout << "\033[32m✓ Program completed successfully\033[0m" << std::endl;
    return 0;
}
我们将CPP文件和CMake文件放到一个文件夹之后在宏定义部分配置好我们的模型路径、测试图片以及类别数量和类别名即可运行以下命令实现推理啦!
bash
mkdir build && cd build
cmake .. && make
./main
之后我们便可以在build文件夹下看到推理结果啦!!!
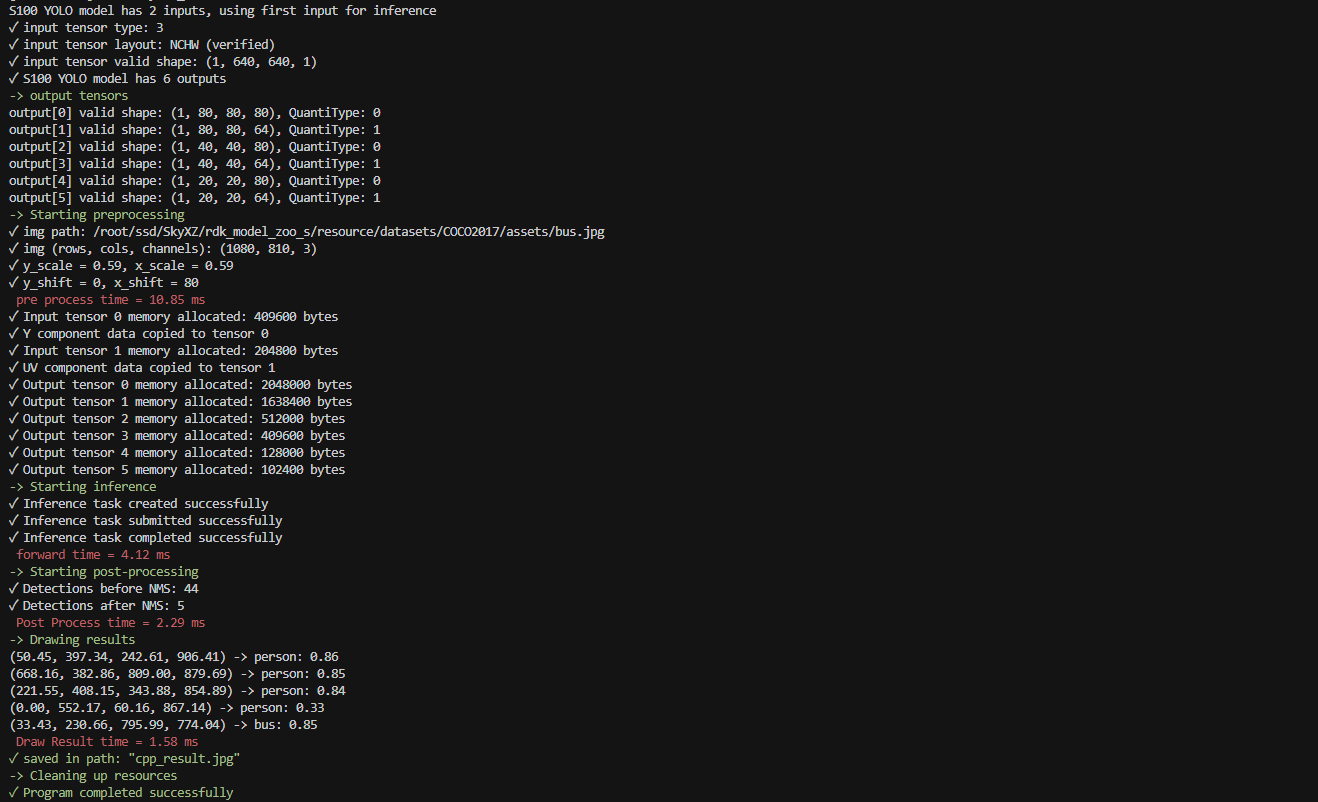
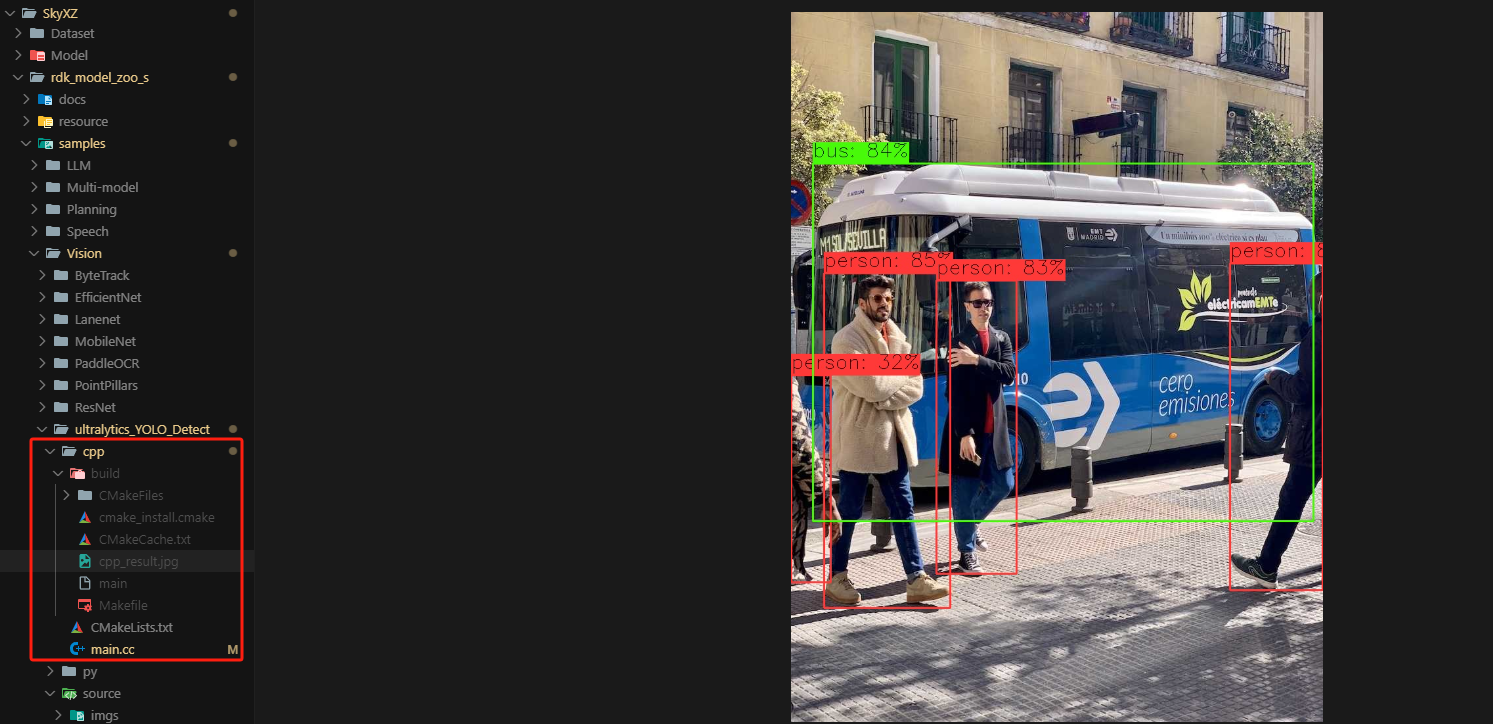
RDKS100使用的这套UCP计算接口还有很多可玩的地方,欢迎大家一起探索分享!!!这篇文章有什么错误欢迎大家在评论区指正!谢谢大家!