开发页面时,大家会不会对着浏览器里的某个组件冥思苦想:"这部分代码到底在项目的哪个文件里?"
然后在VSCode里一层层折叠文件夹寻找,浪费不少时间。 今天分享一个实用技巧:在开发环境的页面上给组件添加一个调试标签,点击就能直接用VSCode打开对应的组件文件,让你的开发效率UP UP!🚀
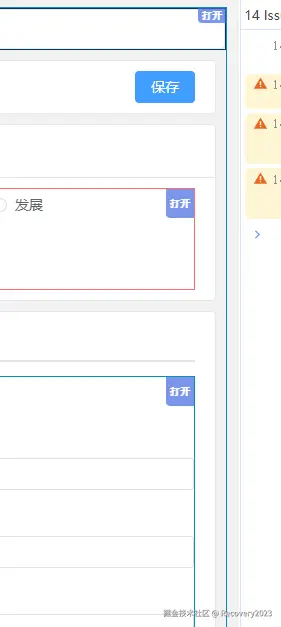
效果展示 先看效果:在开发环境的页面上,每个添加了调试指令的组件会显示一个边框和"打开"按钮,点击按钮就能直接用VSCode定位到源码文件:

实现原理
核心思路是利用:
- Vue的自定义指令,给组件添加调试标识
import.meta.url获取当前组件的文件路径- VSCode的URL协议
vscode://file/实现从浏览器打开本地文件
分步实现
第一步:在组件中使用调试指令 在需要调试的组件中添加 v-debug 指令,并传入当前文件路径:
对于JSX/TSX组件:
javascript
import { defineComponent } from "vue"
export default defineComponent({
setup() { // 通过import.meta.url获取当前文件路径
return () => <div v-debug={import.meta.url}>组件内容</div>
}
})
对于 SFC 单文件组件:
xml
<template>
<div v-debug="debugUrl"></div>
</template>
<script setup lang="ts">
// 定义调试路径
const debugUrl = import.meta.url
</script>
import.meta.url 会返回当前模块的 URL,类似 file:///project/src/components/Hello.vue,这是我们定位文件的关键。
第二步:在入口文件注册指令(仅开发环境)
为了避免生产环境暴露调试信息,我们只在开发环境注册指令:
main.ts
// 只在本地开发环境注册调试指令
const isLocal = window.location.hostname === "localhost" || window.location.hostname === "127.0.0.1"
if (process.env.NODE_ENV === "development" && isLocal) {
  app.directive("debug", debugBorder)
}
这里做了双重判断:
process.env.NODE_ENV === "development"确保是开发环境isLocal确保是本地开发(避免测试环境暴露)
第三步:实现自定义指令核心逻辑
创建 directives/debugBorder.ts 文件,实现调试指令:
typescript
import { DEBUG_BORDER, DEBUG_COLORS } from "@/config"
import { Directive, DirectiveBinding } from "vue"

// 生成随机颜色(用于边框和标签)
const getRandomColor = () => {
  return DEBUG_COLORS[Math.floor(Math.random() * DEBUG_COLORS.length)]
}

// 项目根路径(根据你的实际项目路径修改)
const projectRoot = "vscode://file/C:/Users/Administrator/Desktop/zzy/project/059/"

// 从指令值中提取相对路径
const getFilePath = (binding: DirectiveBinding) => {
  if (binding.value) {
    // 处理import.meta.url,提取项目内相对路径
    // 这里的"3002/"需要根据你的开发服务器端口或路径调整
    return binding.value.split("3002/")[1]
  }
  return ""
}

// 创建"打开"标签
const createDebugTag = (filePath: string, color: string) => {
  const tag = document.createElement("a")
  // 拼接VSCode可识别的文件路径
  tag.href = projectRoot + filePath
  tag.textContent = "打开"
  tag.style.cssText = `
    position: absolute;
    top: 0;
    right: 0;
    font-size: 10px;
    padding: 2px 4px;
    background: ${color};
    color: white;
    border-radius: 0 0 0 4px;
    z-index: 99999999;
    font-family: monospace;
    font-weight: bold;
    opacity: 0.7;
    text-decoration: none;
  `
  tag.classList.add("debug-tag")
  return tag
}

// 指令逻辑
const debugBorder: Directive = {
  mounted(el: HTMLElement, binding: DirectiveBinding) {
    if (!DEBUG_BORDER) return

    // 获取文件路径
    const filePath = getFilePath(binding)
    if (!filePath) return

    // 随机颜色
    const color = getRandomColor()

    // 添加边框样式
    el.style.border = `1px solid ${color}`
    el.style.position = "relative"

    // 创建并添加"打开"标签
    const tag = createDebugTag(filePath, color)
    el.appendChild(tag)
    el._debugTag = tag // 存储引用以便卸载时清理
  },

  unmounted(el: HTMLElement) {
    // 清理标签和样式
    if (el._debugTag && el.contains(el._debugTag)) {
      el.removeChild(el._debugTag)
      delete el._debugTag
    }
    el.style.border = ""
    el.style.position = ""
  }
}

export default debugBorder
关键代码解析
- 路径处理:
binding.value.split("3002/")[1]
这行代码用于从 import.meta.url(如 http://localhost:3002/src/components/Hello.vue)中提取相对路径 src/components/Hello.vue。注意这里的 3002 是开发服务器的端口,需要根据你项目的实际端口修改。
VSCode 协议链接:
tag.href = projectRoot + filePath
拼接后形成 vscode://file/C:/project/src/components/Hello.vue,这是 VSCode 能识别的本地文件路径协议。
- 样式处理 :
给组件添加边框和悬浮标签,既起到了视觉区分作用,又提供了操作入口。
使用注意事项
-
路径适配:
projectRoot需要替换为你的项目绝对路径split("3002/")[1]中的端口号需要与你的开发服务器一致- 如果使用 Vite,
import.meta.url格式可能略有不同,需要相应调整路径提取逻辑
-
安全性:
- 确保只在本地开发环境启用,避免生产环境泄露文件结构
- 多人协作时,路径可能因每个人的本地项目位置不同而失效,可以考虑通过环境变量配置项目根路径
-
VSCode 配置 :
确保 VSCode 已添加到系统 PATH 中,否则可能无法通过 URL 协议打开。
总结
这个小技巧通过将浏览器中的组件与本地代码文件建立直接链接,大大减少了 "找文件" 的时间成本,特别适合大型项目。核心思路可以扩展到其他 IDE(如 WebStorm 有类似的协议),也可以扩展更多功能(如打开后自动定位到组件定义行)。
希望这个技巧能帮到大家,提高开发效率!如果有更好的改进方案,欢迎在评论区分享~