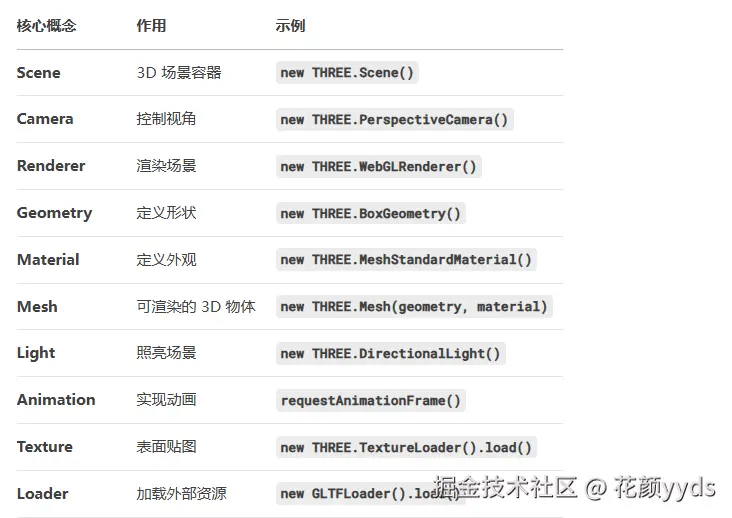
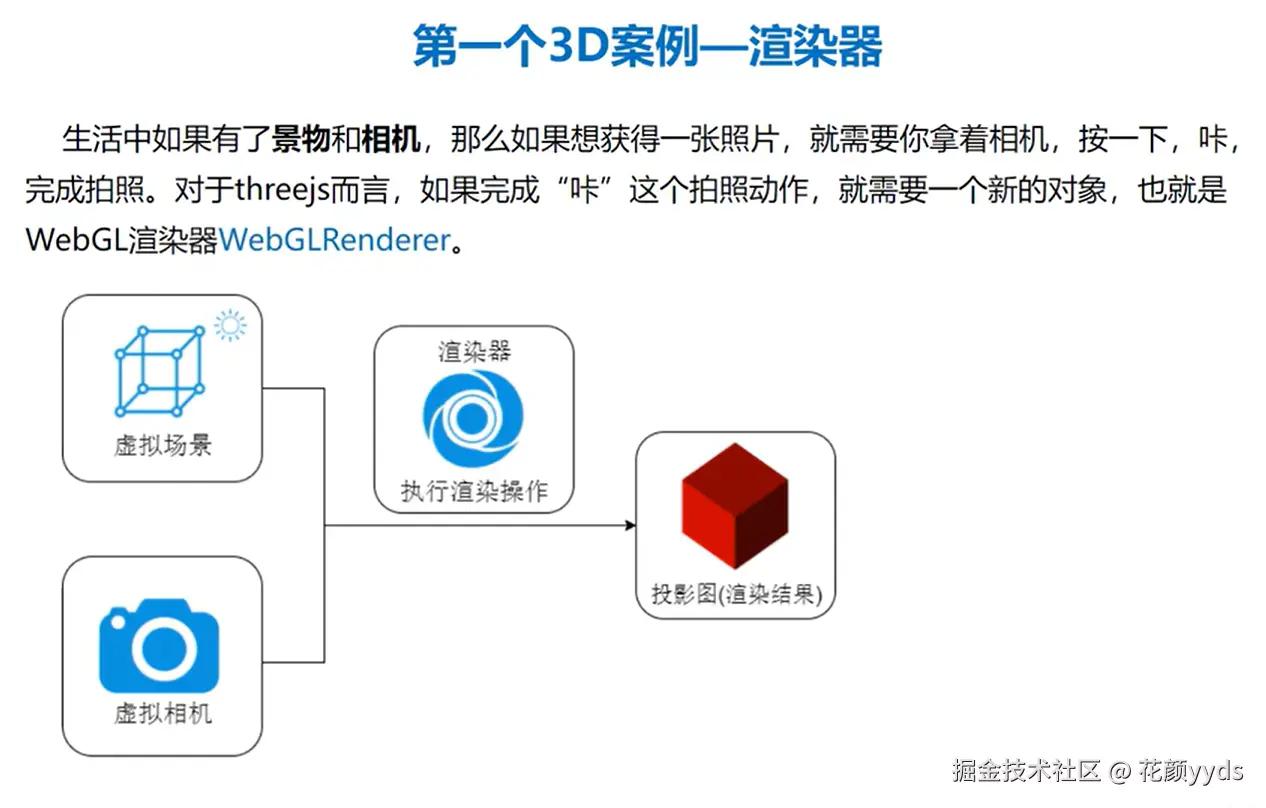
核心概念
1、创建3D场景
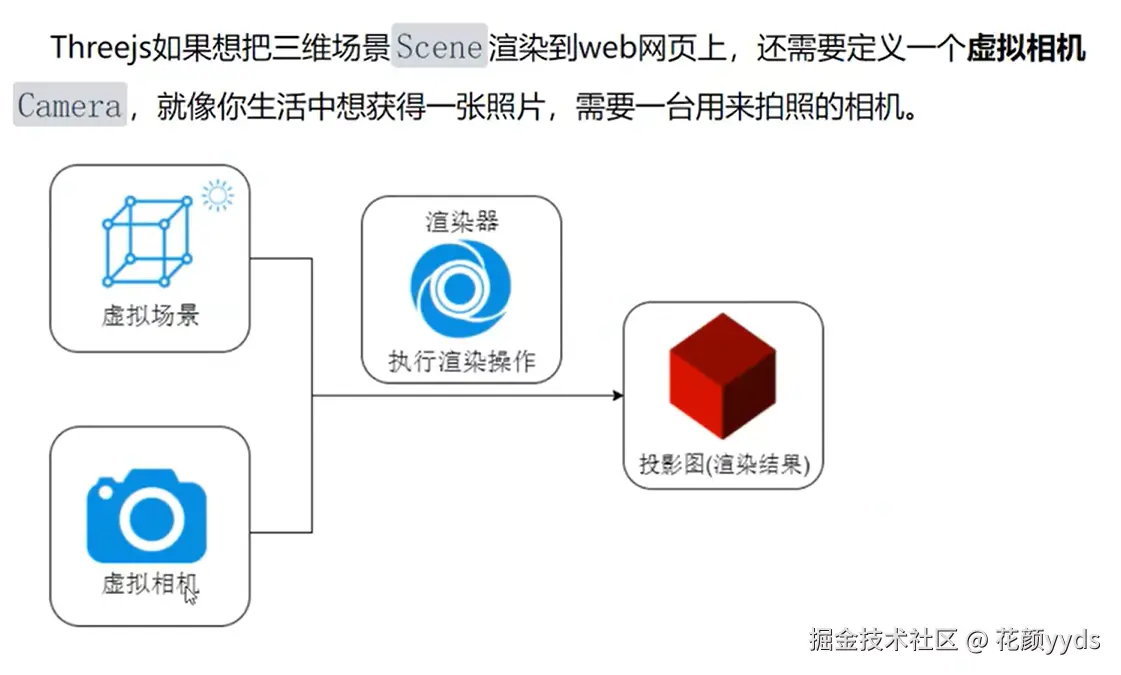
1.1 三维场景Scene
可以把三维场景Scene对象理解为虚拟的3D场景,用来表示模拟生活中的真实三维场景,或者说三维世界。
js
// 创建3D场景对象Scene
const scene = new THREE.Scene()
// 给三维场景添加物体
// 定义一个几何体 定义长宽高
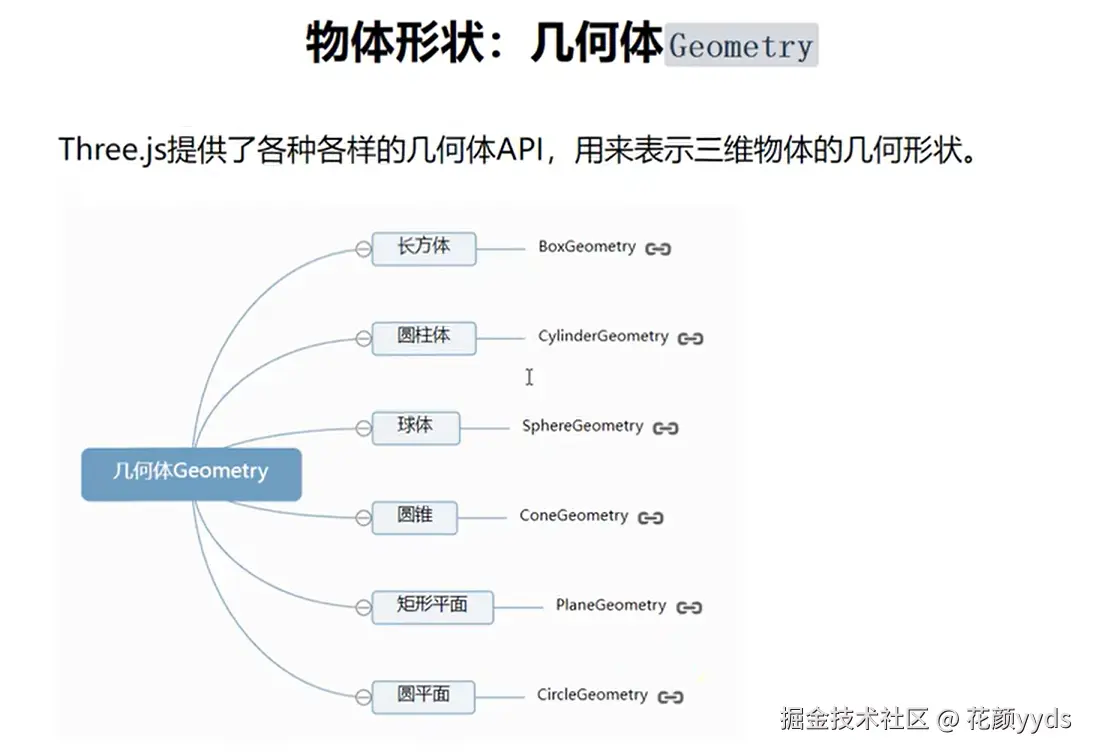
const geometry = new THREE.BoxGeometry(100, 100, 100)
// 创建一个材质对象
const meterial = new THREE.MeshBasicMaterial({ color: 0xff0000 })
// 创建一个网格模型对象:表示生活中的物体
const mesh = new THREE.Mesh(geometry, meterial)
mesh.position.set(0, 10, 0)
// 将网格模型添加到场景中
scene.add(mesh)几何体
材质
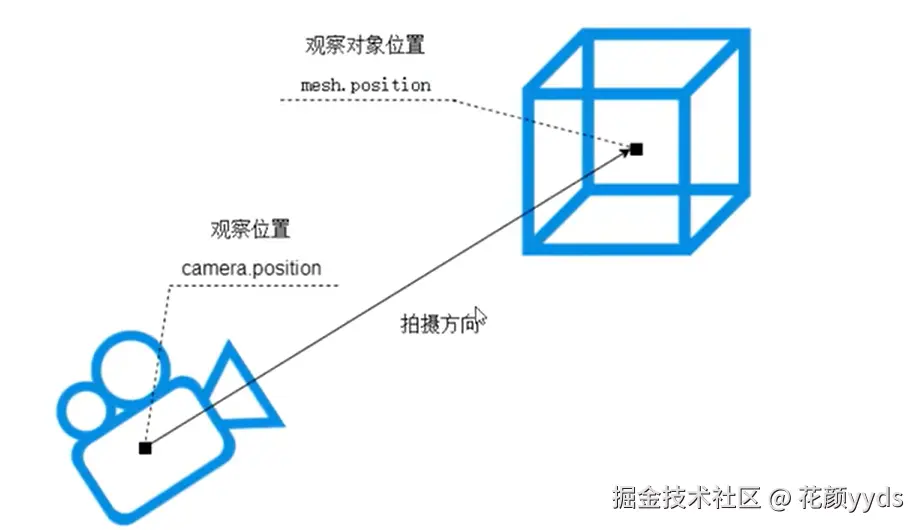
1.2 虚拟相机 Camera


js
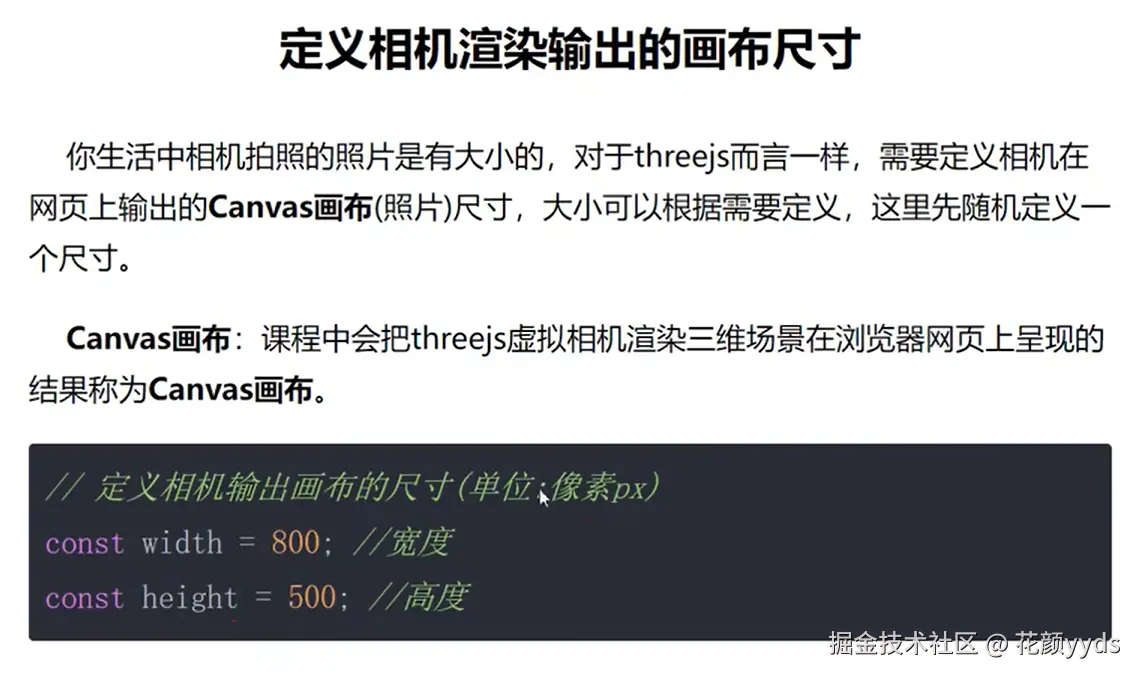
const width = 800
const height = 800
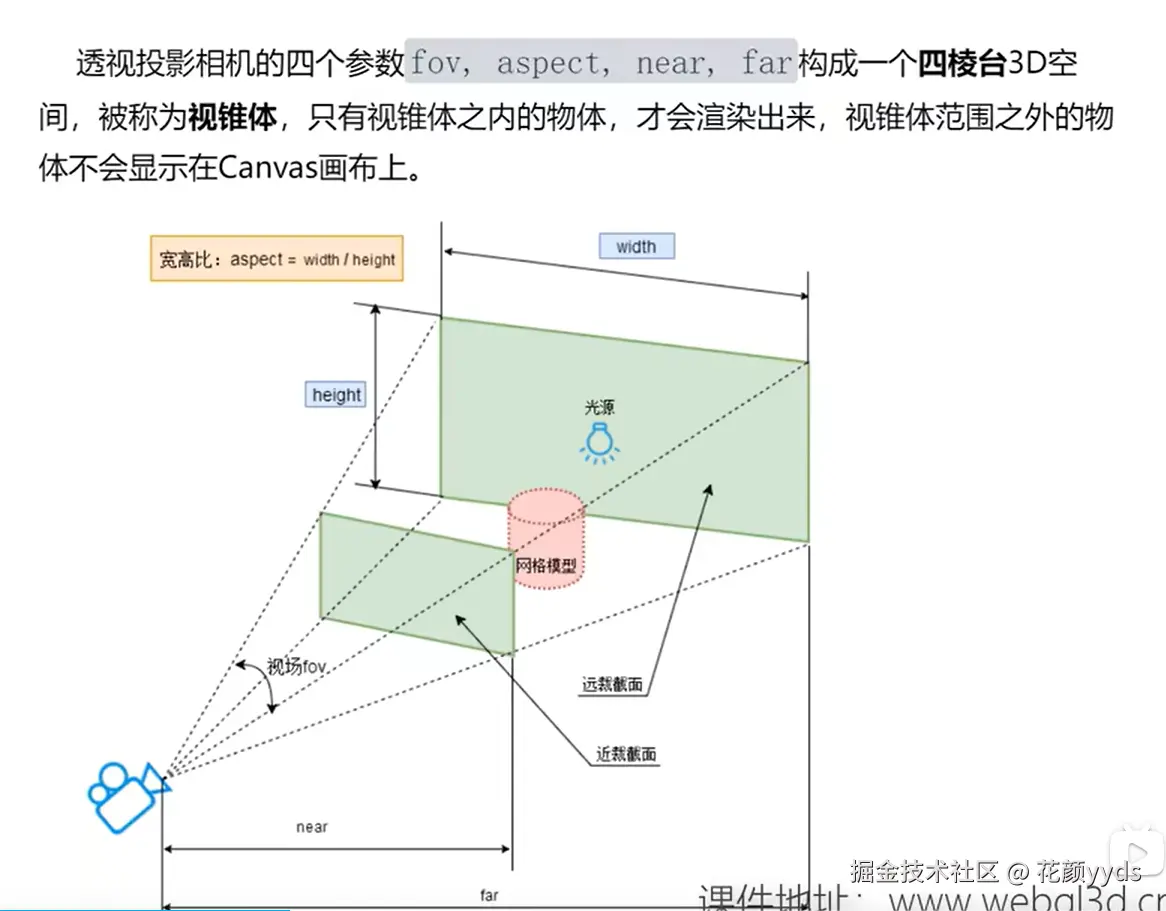
// 创建一个透视投影相机对象
const camera = new THREE.PerspectiveCamera(50, width / height, 0.1, 3000)
// 设置相机位置
camera.position.set(300, 300, 300)
// 设置相机的视线
camera.lookAt(0, 0, 0)
// camera.lookAt(mesh.position)1.3 渲染器
js
 // 创建一个WebGL渲染器
  const renderer = new THREE.WebGLRenderer()
  // 设置渲染区域尺寸
  renderer.setSize(width, height)
  // 执行渲染操作
  renderer.render(scene, camera)
  // 把渲染结果展示在canvas画布上
  canvasContainer.value.appendChild(renderer.domElement);
2、Three.js三维坐标系
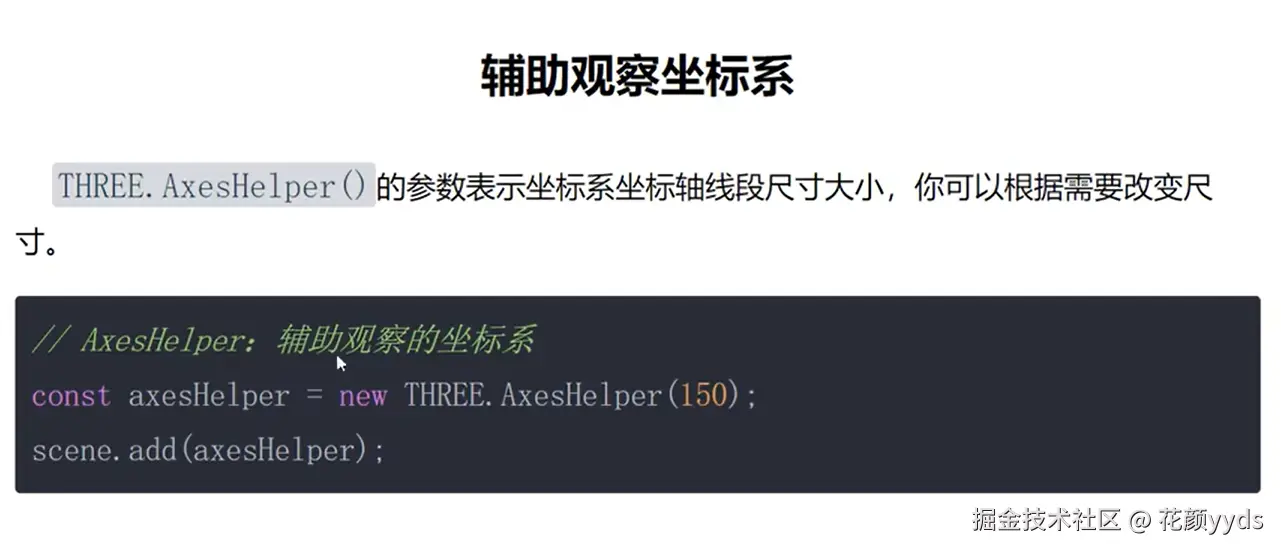
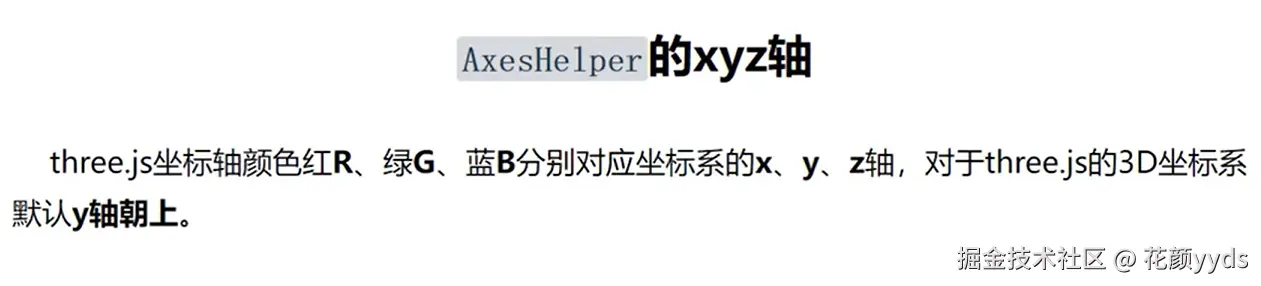
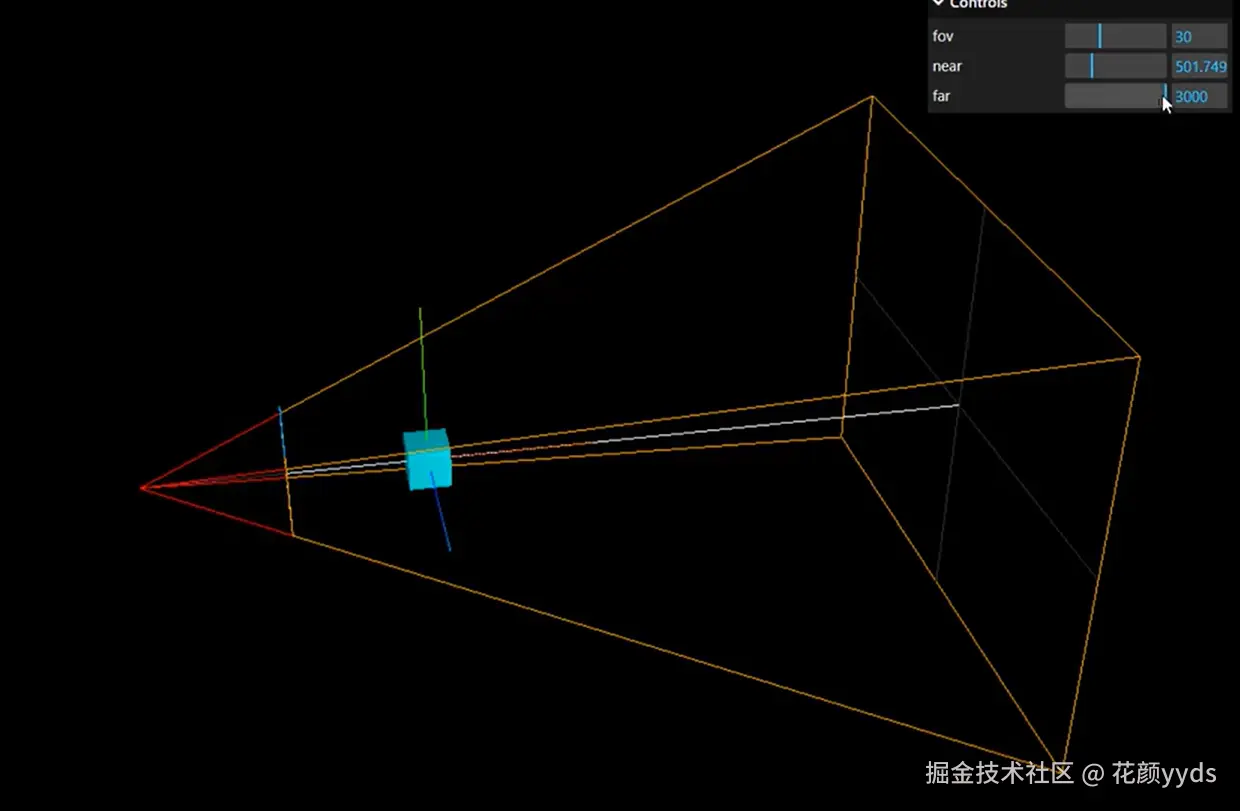
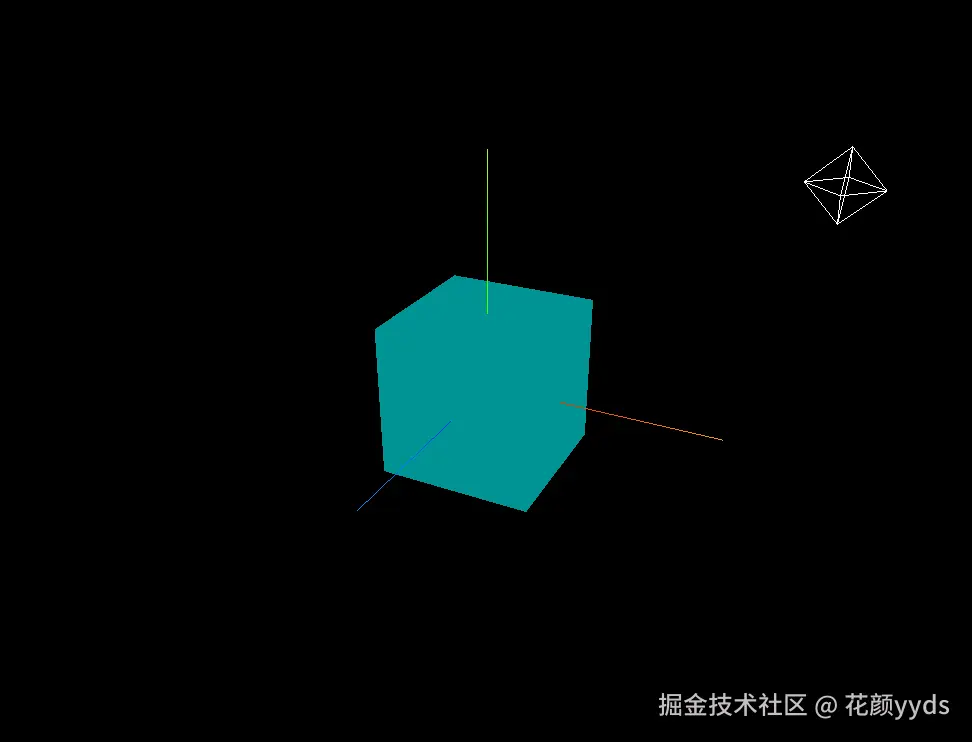
2.1 辅助观察坐标系
js
 // 辅助坐标系  参数150表示坐标系大小,可以根据场景大小去设置
  const axesHelper = new THREE.AxesHelper(150)
  // 将坐标系添加到场景中
  scene.add(axesHelper)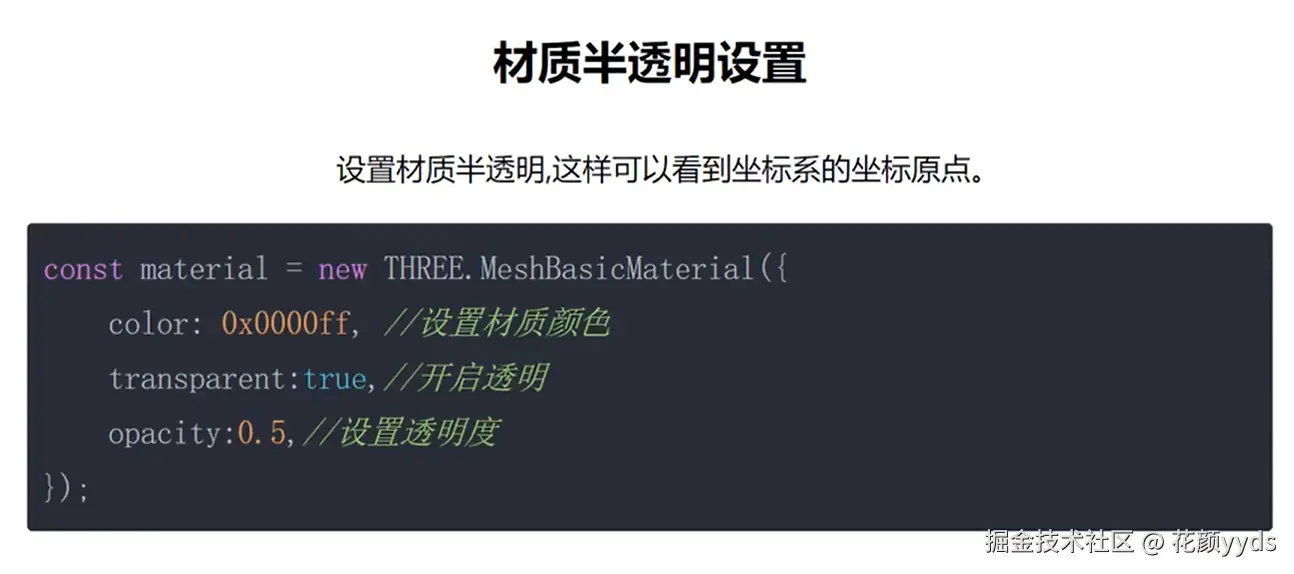
js
const meterial = new THREE.MeshBasicMaterial({
    color: 0x0000ff,
    transparent: true,
    opacity: 0.5
})
图黄色部分才是可视范围
3、光源对物体表面影响
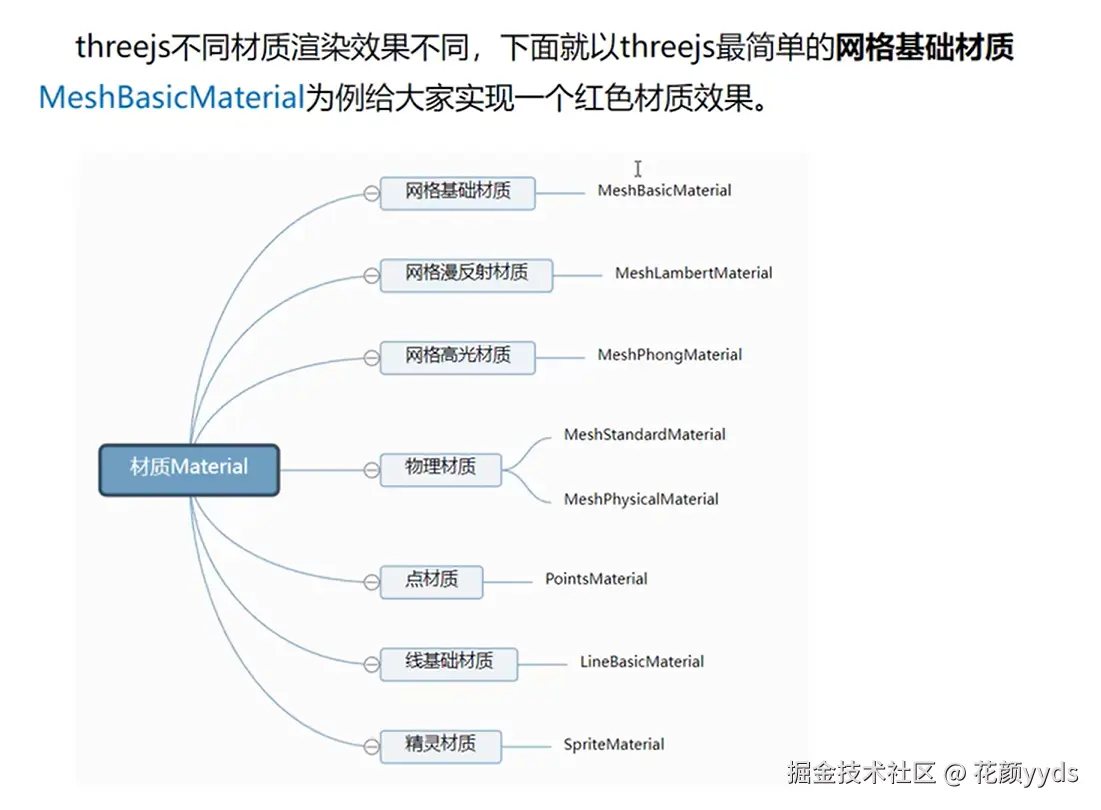
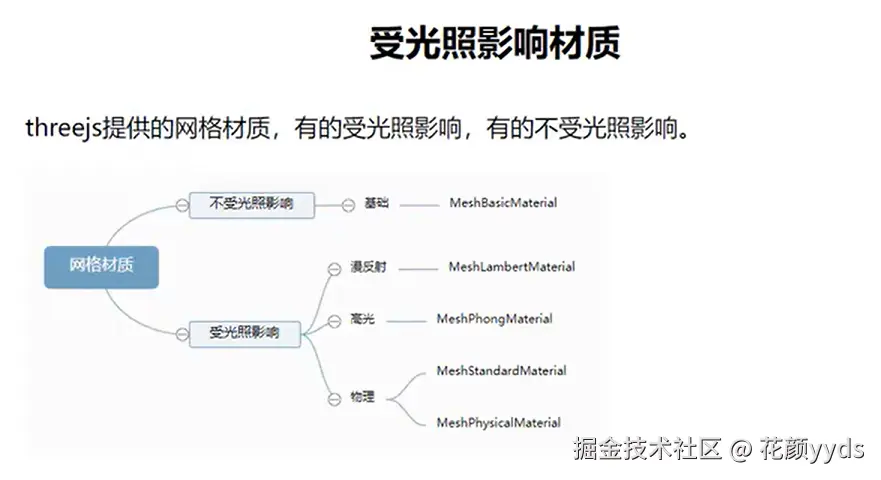 基础网格材质MeshBasicMaterial不会受到光照影响。
js
// MeshBasicMaterial不会受到光照影响
const material = new THREE.MeshBasicMaterial():
漫反射网格材质MeshLambertMaterial会受到光照影响,该材质也可以称为Lambert网格材质,音译为兰伯特网格材质。
js
// MeshLambertMaterial会受到光照影响
const meterial = new THREE.MeshLambertMaterial()
3.1 光源介绍
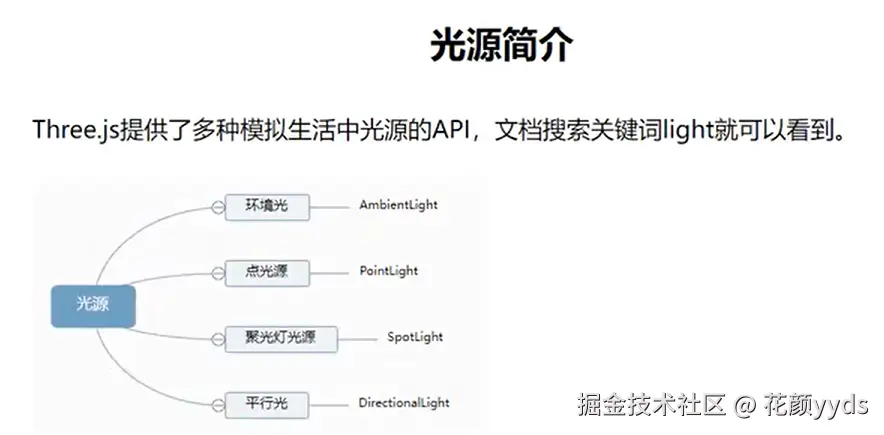
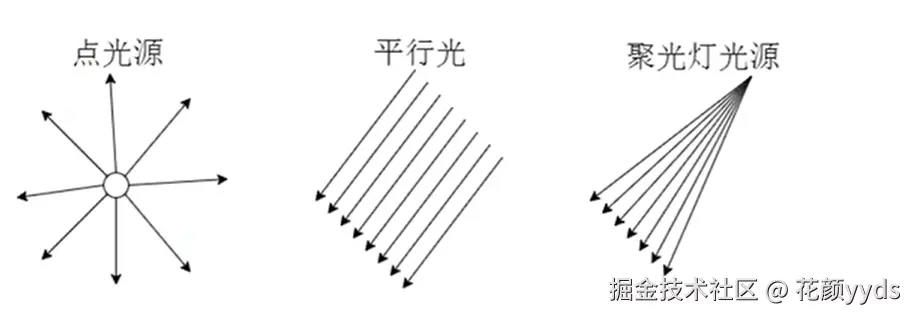
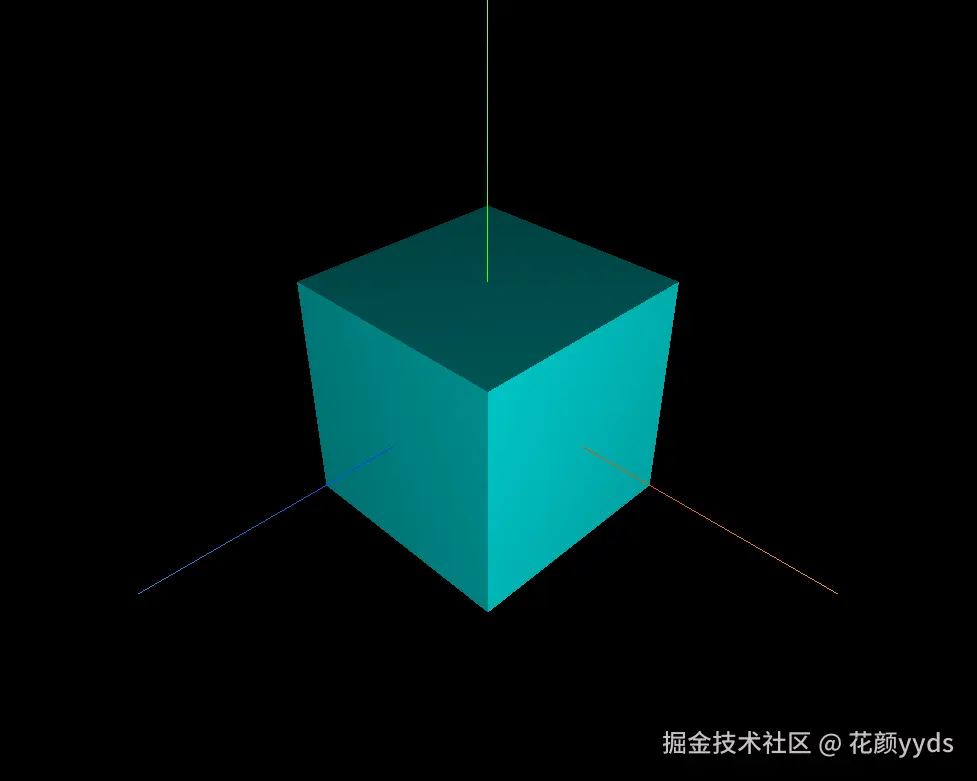
点光源
点光源沿着某个点向四周发射
js
// 创建一个点光源
// 第一个参数表示光源颜色,第二个参数表示光源强度
const light = new THREE.PointLight(0xffffff, 1)
// 设置光源衰减率 衰减率为0表示光源不衰减
light.decay = 0
// 设置光源位置
light.position.set(400, 200, 300)
// 将光源添加到场景中
scene.add(light)
效果图
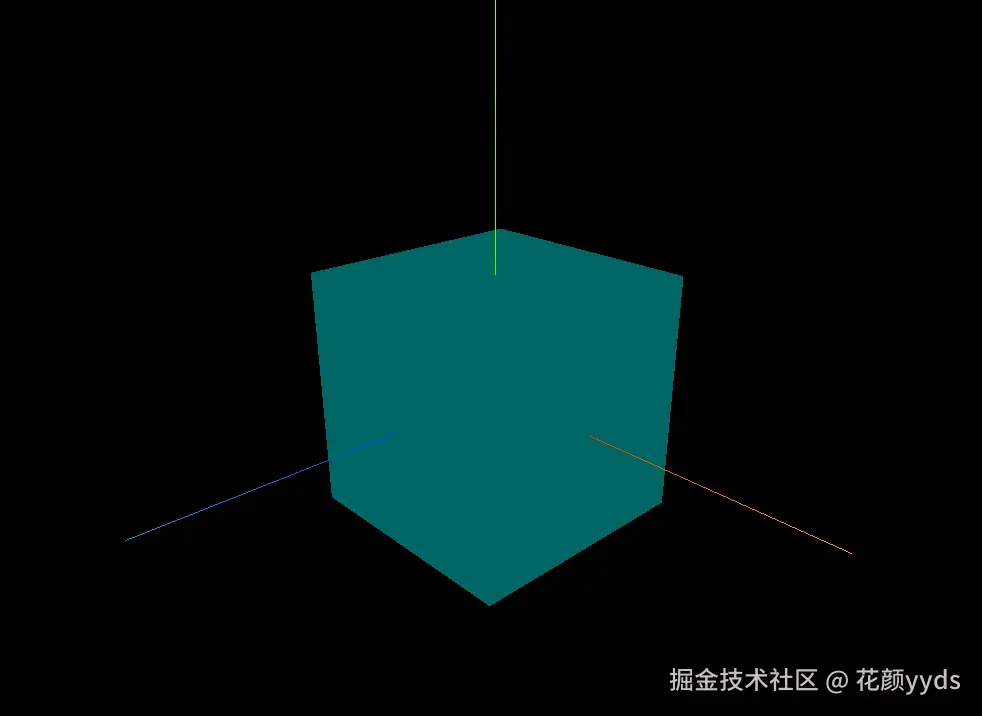
环境光
环境光AmbientLight没有特定方向,只是整体改变场景的光照明暗
js
// 环境光
const ambientLight = new THREE.AmbientLight(0xffffff, 0.4)
scene.add(ambientLight)
效果图
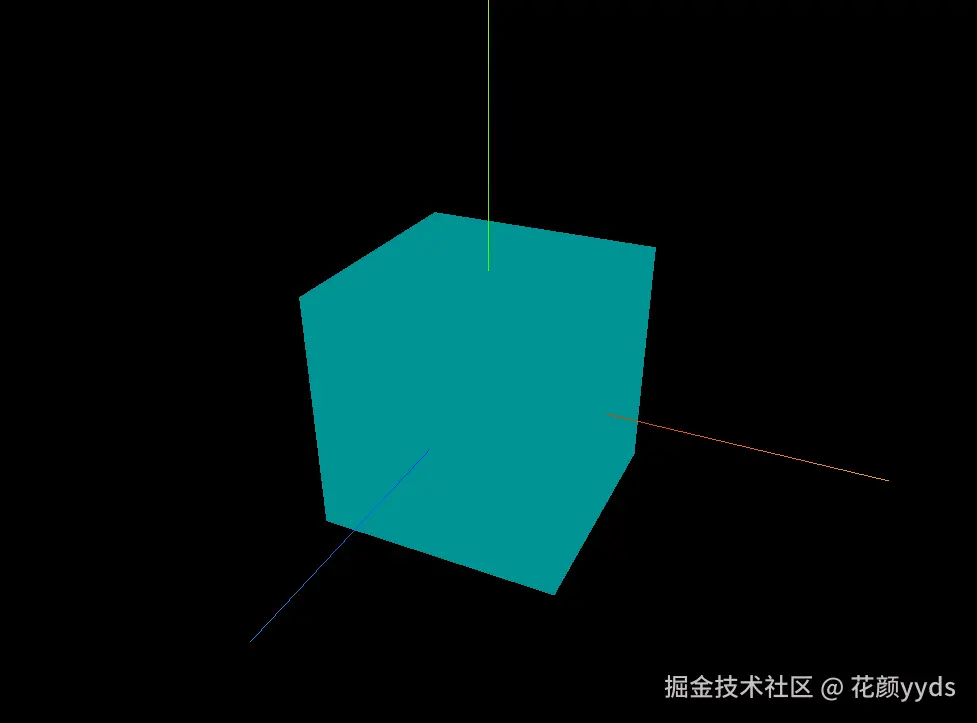
平行光
js
// 平行光
const directionalLight = new THREE.DirectionalLight(0xffffff, 1)
// 设置光源位置
directionalLight.position.set(200, 200,200)
// 将光源添加到场景中
scene.add(directionalLight)
效果图
点光源辅助观察
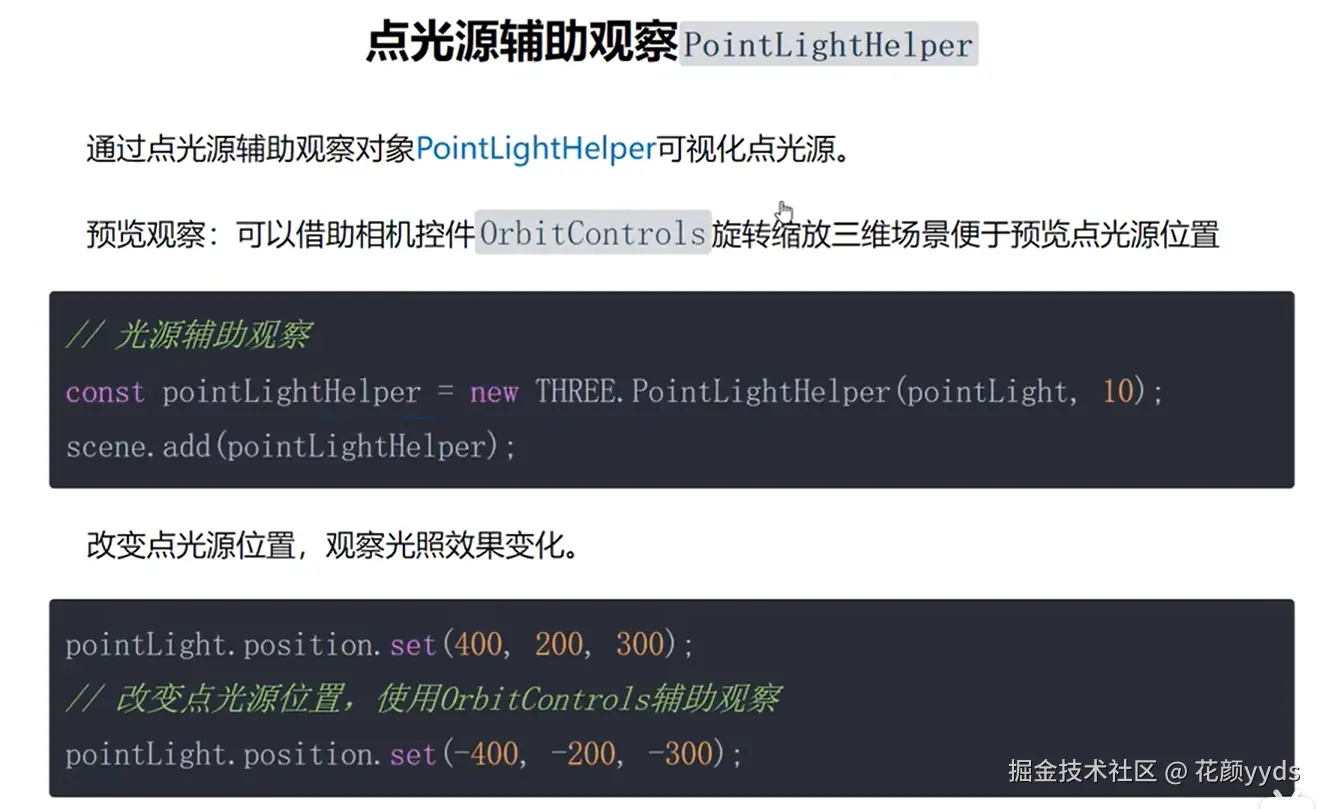
js
// 点光源辅助对象
const pointLightHelper = new THREE.PointLightHelper(light, 10)
scene.add(pointLightHelper)
效果图
4、相机控件轨道控制器OrbitControls
npm安装控件库
js
npm install three @types/three引入vue中
js
import { OrbitControls } from "three/addons/controls/OrbitControls.js";代码中使用
js
// 创建相机控件对象
const controls = new OrbitControls(camera, renderer.domElement);
// 启用控件阻尼(惯性效果)
controls.enableDamping = true;
// 设置阻尼系数
controls.dampingFactor = 0.05;

 // 动画循环
const animate = () => {
// 调用渲染器的render方法,执行渲染操作
requestAnimationFrame(animate);
// 每次调用requestAnimationFrame方法时,都会更新相机的位置
// 必须调用,否则阻尼无效
controls.update();
renderer.render(scene, camera);
};
animate();
5、动画渲染循环
threejs可以借助HTML5的API请求动画帧window.requestAnimationFrame 实现动画渲染。
js
// 周期性执行 默认每秒执行60次 可实现动画效果
const render = ()=>{
    mesh.rotateY(0.01)
    // 结合OrbitControls使用
    controls.update();
    // 周期性执行渲染操作 更新canvas到画布上的内容
    renderer.render(scene, camera);
    requestAnimationFrame(render)
}
render()
6、canvas画布宽高动态变化
js
  const width = window.innerWidth
  const height = window.innerHeight

 // 窗口大小调整
  window.addEventListener("resize", onWindowResize);

 // 窗口大小调整时更新相机和渲染器
function onWindowResize() {
  // 更新相机的宽高比
  camera.aspect = window.innerWidth / window.innerHeight;
  // 更新相机的投影矩阵
  camera.updateProjectionMatrix();
  // 更新渲染器的尺寸
  renderer.setSize(window.innerWidth, window.innerHeight);
}
7、WebGL渲染器基础设置(锯齿模糊、背景颜色)
渲染器锯齿属性
js
renderer = new THREE.WebGLRenderer({
    // 边界更平滑
    antialias: true,
})
设备像素比

js
// 通用设置
  // 告诉three.js你的屏幕设备像素比window.devicePixelRatio
  renderer.setPixelRatio(window.devicePixelRatio)
设置背景色
js
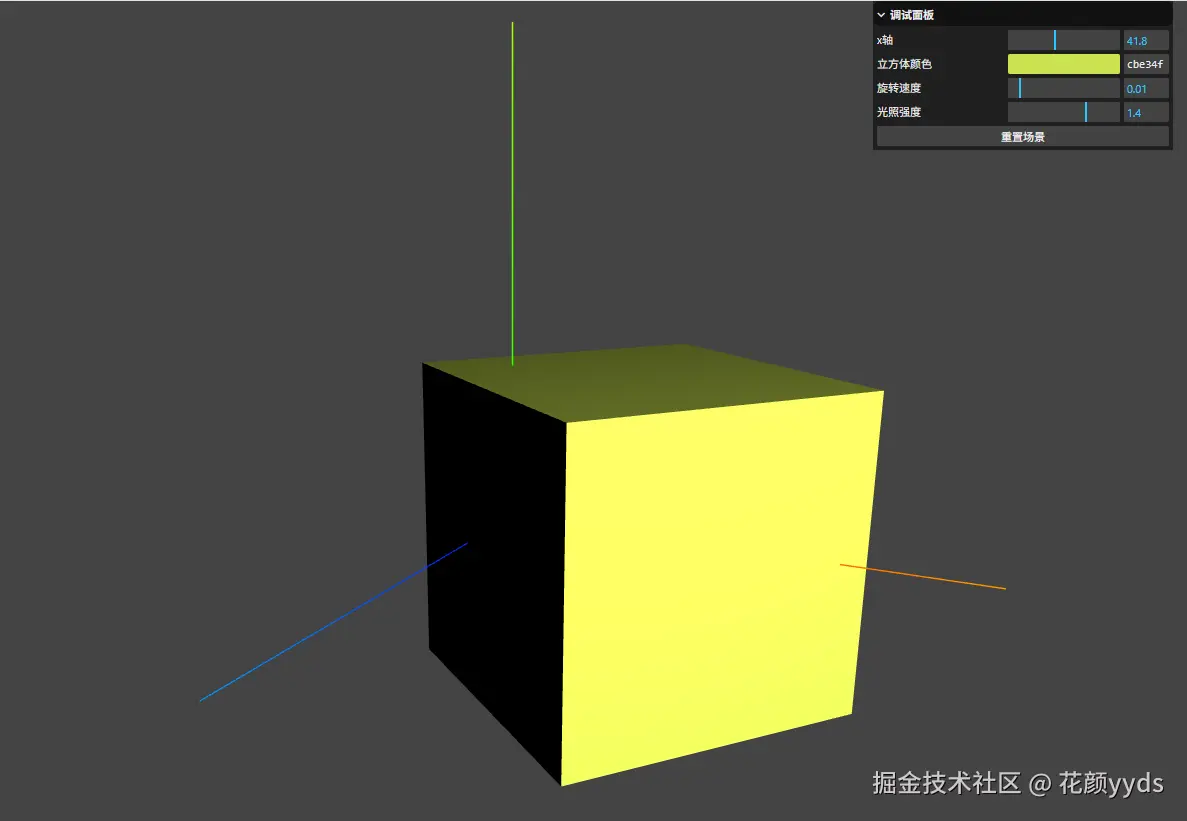
renderer.setClearColor(0x444444, 1)8、gui.js库(可视化改变三维场景)
vue3中安装gui库
js
npm install lil-gui导入并且使用
js
import GUI from "lil-gui"; // 导入 lil-gui

let gui = null

// 定义可调试的参数对象
const params = {
  x: 30,
  meshColor: '#00ffff',
  meshRotationSpeed: 0.01,
  lightIntensity: 1,
  resetScene: () => {
    mesh.rotation.set(0, 0, 0)
    mesh.material.color.set(params.meshColor)
  },
  materialType: 'MeshStandardMaterial',
}

// 10. 初始化 GUI
  initGUI();

const initGUI = () => {
  gui = new GUI({ title: "调试面板", width: 300 });

  // 添加x轴位置
  gui.add(mesh.position, "x", 0, 100)
    .name("x轴")
    .onChange((value) => {
      mesh.position.x = value;
    })

  // 添加颜色控制器
  gui.addColor(params, "meshColor")
    .name("立方体颜色")
    .onChange((value) => {
      mesh.material.color.set(value);
    });

  // 添加旋转速度滑块
  gui.add(params, "meshRotationSpeed", 0, 0.1, 0.001)
    .name("旋转速度");

  // 添加光照强度滑块
  gui.add(params, "lightIntensity", 0, 2, 0.1)
    .name("光照强度")
    .onChange((value) => {
      scene.children.forEach((child) => {
        if (child instanceof THREE.Light) {
          child.intensity = value;
        }
      });
    });

  // 添加重置按钮
  gui.add(params, "resetScene").name("重置场景");
};
效果图
gui.js库(下拉菜单、单选框)
下拉菜单
js
// 下拉菜单

const params = {
  materialType: "MeshStandardMaterial", // 默认选项
  // ...其他参数
};

gui
.add(params, 'materialType', [
  'MeshBasicMaterial',
  'MeshStandardMaterial',
  'MeshPhongMaterial',
])
.name('材质类型')
.onChange((value) => {
  // 根据选项切换材质
  switch (value) {
    case 'MeshBasicMaterial':
      mesh.material = new THREE.MeshBasicMaterial({ color: 0x00ff00 })
      break
    case 'MeshStandardMaterial':
      mesh.material = new THREE.MeshStandardMaterial({ color: 0x00ff00 })
      break
    case 'MeshPhongMaterial':
      mesh.material = new THREE.MeshPhongMaterial({ color: 0x00ff00 })
      break
  }
})
单选框
js
const params = {
  bool:true
  // ...其他参数
}

const render = () => {
    if(params.bool)mesh.rotateY(0.01)
    // ...其他内容
 }

gui.add(params,'bool').name('是否旋转')
效果图

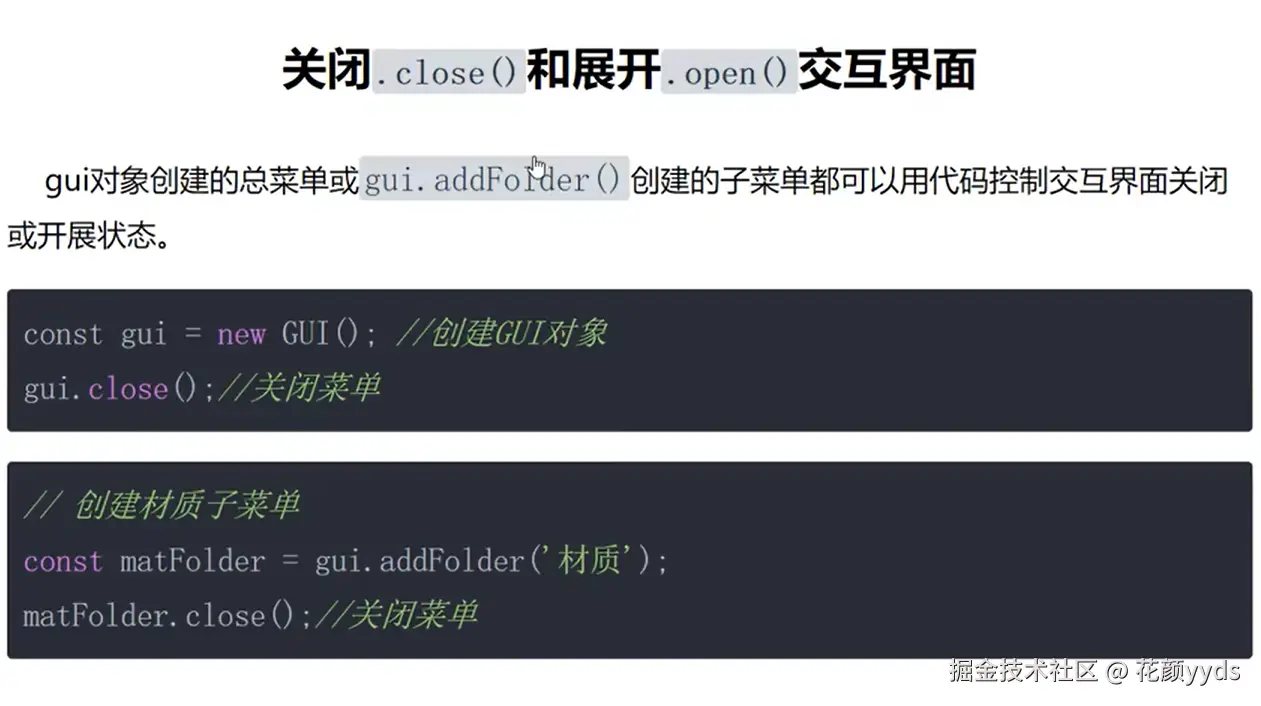
gui分组
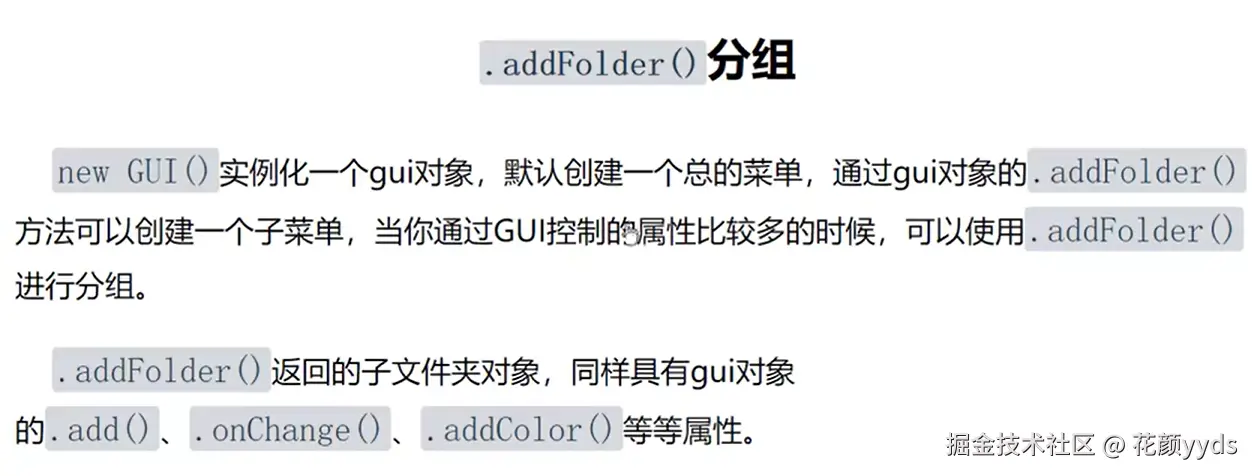
js
const gui = new GUI({ title: '调试面板', width: 300 })

const matForder = gui.addFolder('材质')

const lightForder = gui.addFolder('光照')

const otherForder = gui.addFolder('其他')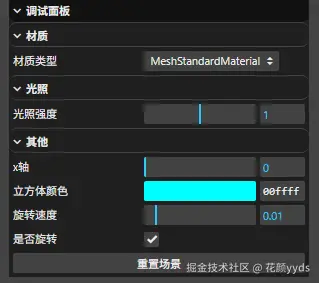
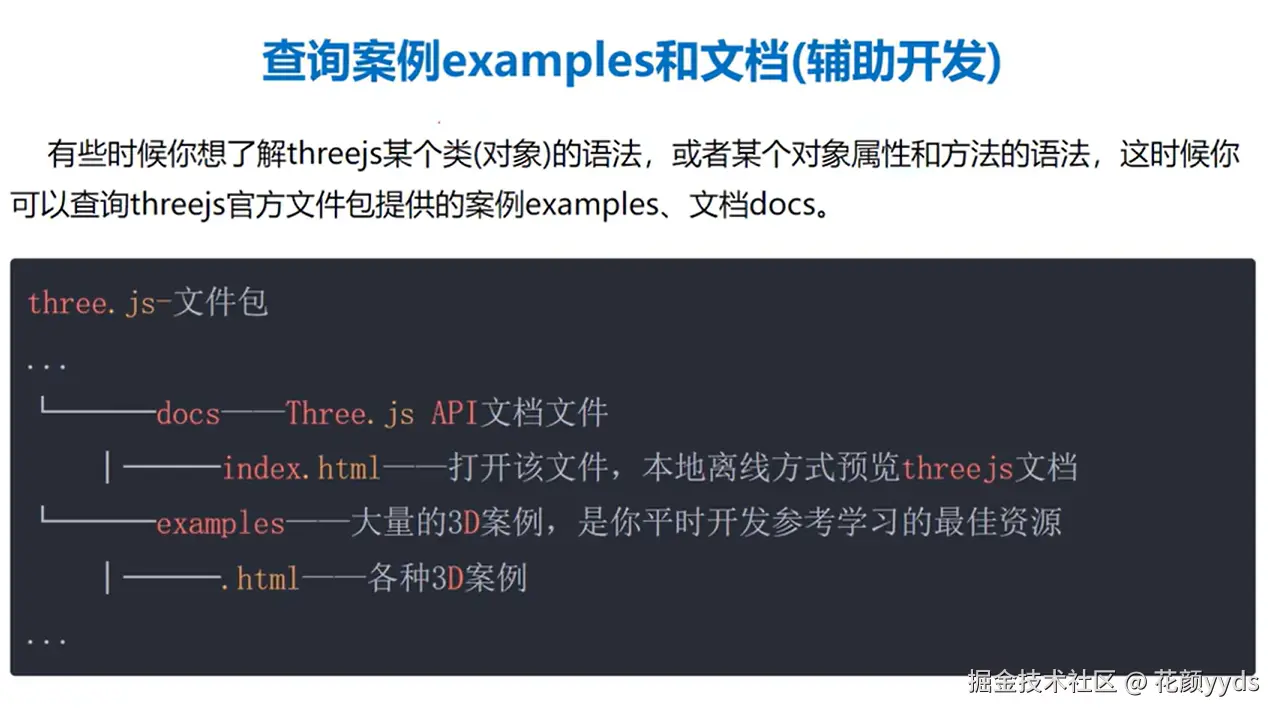
9、查询案例和文档(辅助开发)