Nest项目部署一般有两种做法,一种是在本地打包后上传到服务器,一种是docker容器化部署。这次采用的是第一种。但是,Nest在本地打包时,不会将依赖给打包进去,所以需要把package.json也带上,然后在服务器上安装依赖:
css
npm install --omit-dev接着,使用pm2后台运行node.js. 通过pm2 ecosystem生成配置文件:
js
module.exports = {
  apps: [
    {
      name: '', //应用名称
      script: './main.js',  //入口文件
      instances: 'max',  // 根据需求设置实例数量
      exec_mode: 'cluster',
      autorestart: true,
      watch: false,
      max_memory_restart: '1G',
      env: {
        NODE_ENV: 'production',
      },
    },
  ]
}启动:pm2 start ecosystem.config.js, 最后通过nginx转发到node监听的端口。
实际部署过程遇到的问题:
1) CentOS7内缺少支持node 18以上版本的C标准库:
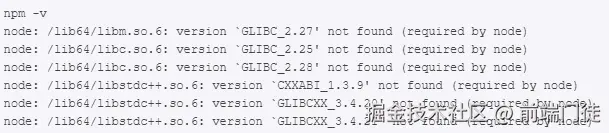
解决办法:需要升级到glibc-2.28
shell
wget http://ftp.gnu.org/gnu/glibc/glibc-2.28.tar.gz
tar xf glibc-2.28.tar.gz
cd glibc-2.28/ && mkdir build && cd build
../configure --prefix=/usr --disable-profile --enable-add-ons --with-headers=/usr/include --with-binutils=/usr/bin
在安装升级过程中,又遇到了
2) 第二个问题:

解决办法::升级gcc与make
shell
wget http://ftp.gnu.org/gnu/glibc/glibc-2.28.tar.gz
tar xf glibc-2.28.tar.gz
cd glibc-2.28/ && mkdir build && cd build
../configure --prefix=/usr --disable-profile --enable-add-ons --with-headers=/usr/include --with-binutils=/usr/bin

# 升级GCC(默认为4 升级为8)</span>
yum install -y centos-release-scl
yum install -y devtoolset-8-gcc*
mv /usr/bin/gcc /usr/bin/gcc-4.8.5
ln -s /opt/rh/devtoolset-8/root/bin/gcc /usr/bin/gcc
mv /usr/bin/g++ /usr/bin/g++-4.8.5
ln -s /opt/rh/devtoolset-8/root/bin/g++ /usr/bin/g++
# 升级 make(默认为3 升级为4)
wget http://ftp.gnu.org/gnu/make/make-4.3.tar.gz
tar -xzvf make-4.3.tar.gz && cd make-4.3/
./configure --prefix=/usr/local/make make && make install cd /usr/bin/ && mv make make.bak
ln -sv /usr/local/make/bin/make /usr/bin/make
在yum安装devtoolset-8-gcc时,遇到
第三个问题:
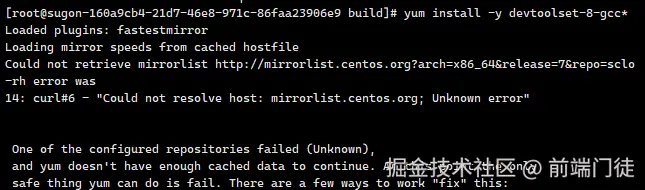
解决办法:更换为阿里的源
bash
cd /etc/yum.repos.d
wget -O /etc/yum.repos.d/CentOS-Base.repo http://mirrors.aliyun.com/repo/Centos-7.repo
执行上面步骤后,yum makecache还是报错:

还是使用了centos的源,原来还需要更新SCL的源。
vim
vim /etc/yum.repos.d/CentOS-SCLo-scl.repo修改如下:
shell
[centos-sclo-sclo]
name=CentOS-7 - SCLo sclo
baseurl=https://mirrors.aliyun.com/centos/7/sclo/x86_64/sclo/
# mirrorlist=http://mirrorlist.centos.org?arch=$basearch&release=7&repo=sclo-sclo
gpgcheck=0
enabled=1
gpgkey=file:///etc/pki/rpm-gpg/RPM-GPG-KEY-CentOS-SIG-SCLo
修改/etc/yum.repos.d/CentOS-SCLo-scl-rh.repo:
ini
[centos-sclo-rh]
name=CentOS-7 - SCLo rh
baseurl=https://mirrors.aliyun.com/centos/7/sclo/x86_64/rh/
# mirrorlist=http://mirrorlist.centos.org?arch=$basearch&release=7&repo=sclo-rh
gpgcheck=0
enabled=1
gpgkey=file:///etc/pki/rpm-gpg/RPM-GPG-KEY-CentOS-SIG-SCLo
刷新缓存:
css
yum repolist
yum clean all
yum makecache
解决完第三个问题,回到前面继续安装devtoolset-8-gcc,解决第二个问题。最后回到解决第一个问题,安装升级glibc-2.28.
bash
cd /root/glibc-2.28/build
../configure --prefix=/usr --disable-profile --enable-add-ons --with-headers=/usr/include --with-binutils=/usr/bin
接着遇到第四个问题:
4)bison版本太旧:

解决办法:
yum install -y bison最后安装更新所有软件:
go
make && make instal参考资料: