介绍
当业务的3D场景中有几万个Mesh时,传统的多Mesh+Raycast射线检测就慢得令人绝望,有没有什么两全其美的办法,既能提高大量几何体的渲染效率,又能支持快速单体拾取。本文将分享一种ms级响应的拾取方案,让上万级Mesh的场景也能流畅交互。
需求分析
业务需求
-
支持尽可能大数据量的建筑面数据,当前案例数据量是17K左右,静态帧率能够保持在60FPS。

-
支持用户光标拾取,可以通过hover或click方式触发,且有相应的拾取反馈
-
尽可能高性能和快速响应的交互,理想条件下拾取反馈毫秒级响应,且不因数据量上升而出现断崖式下降。
技术难点
-
高性能的Mesh渲染需要将几何体进行合并,且共享材质,在最大程度上减少Draw Call。但是几何体合并后的问题是会丢失单体特性,无法给每个建筑单独命名ID。
-
传统的单体拾取方案是使用three.js自带的Raycast射线检测,即从光标所在屏幕位置朝屏幕内部发送一条射线,检测射线依次"击中"哪些几何体,这需要大量的遍历工作,性能瓶颈随着数据量的增大而显著,同时也会带来交互体验的下降。
Mesh数量级 原生Raycast耗时 性能瓶颈与表现 100 1-5ms 基本无卡顿,交互流畅 1K 10-30ms 轻微卡顿(帧率可能降至30~40fps),频繁操作时感知明显 10K 100~500ms 严重卡顿(帧率<20fps),点击响应延迟明显,CPU占用率高 100K ≥1000ms 卡死风险,不可用
技术分析
技术选型
最终采用的技术方案是几何体合并 (Geometry Merging)加颜色编码拾取(Color-coded Picking),可以利用前者减少drawCall的消耗,同时也解决单体化和拾取性能问题。
| 方案 | 1k Mesh耗时 | 10k Mesh耗时 | 性能衰减 |
|---|---|---|---|
| Raycast射线检测 | 2.8-3.5ms | 22-28ms | 线性增长 (O(n)) |
| 颜色编码拾取 | 0.15ms | 0.18ms | 几乎不变 (O(1)) |
核心流程
-
ID颜色编码
- 为每个原始网格Mesh分配唯一整数ID,并建立ID与Mesh基础信息(建筑名称、高度等等)的映射关系。这些ID最终会转换为RGB颜色值,理论上支持256的3次方,约1677万个ID,实际开发中考虑到一些精度丢失问题取60%,约1000万个ID也是够用的。
- 将整数转换为RGB颜色,比如1转换为1,0,0、2转换为 2,0,0,以此类推。我们一般将第0位,
0x000000纯黑色留作画面背景色。当然编码取值也可以从100或者任意数值开始,避免一些边缘场景。 - 给同一网格Mesh的所有顶点使用相同颜色值,即上一步的编码值
-
创建两种材质
-
渲染可见材质MaterialA:最终渲染场景展现出来的材质效果
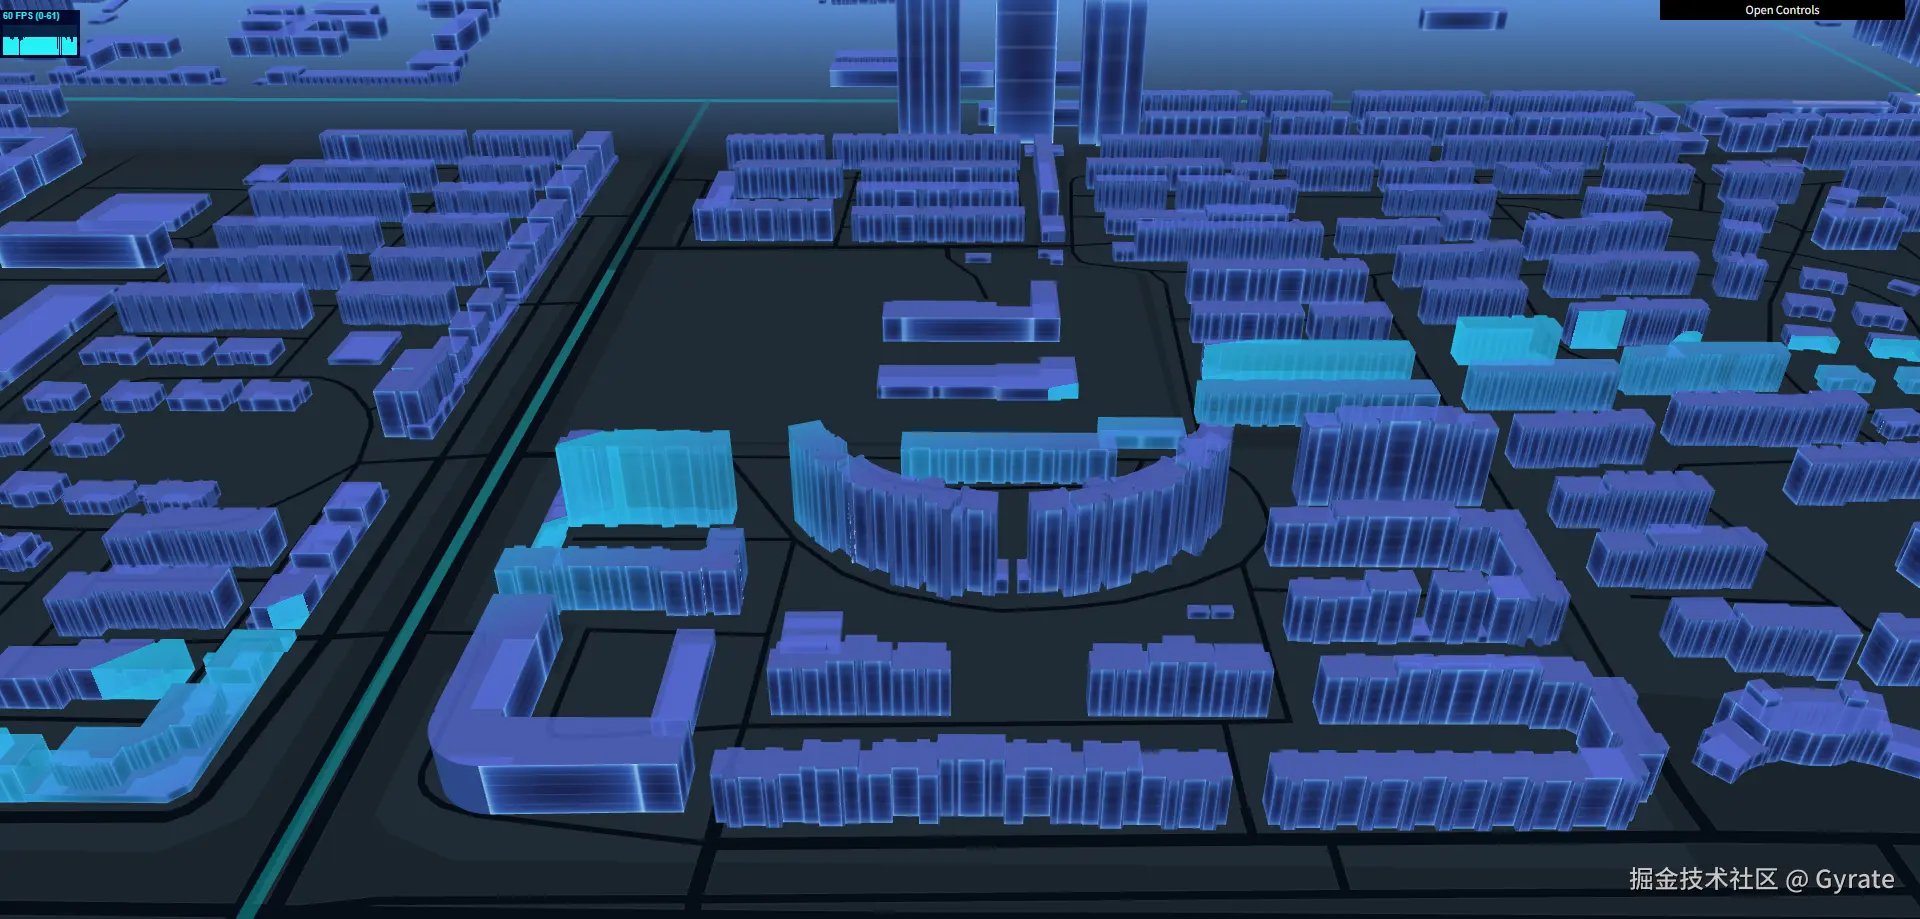
-
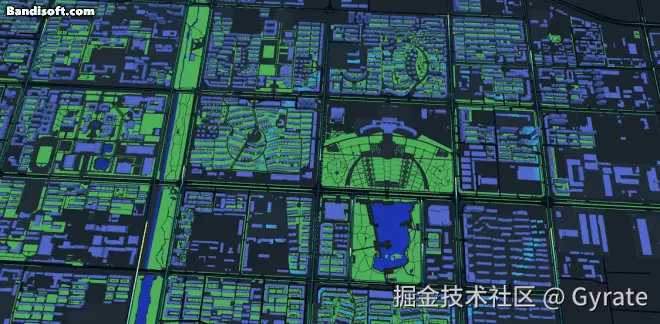
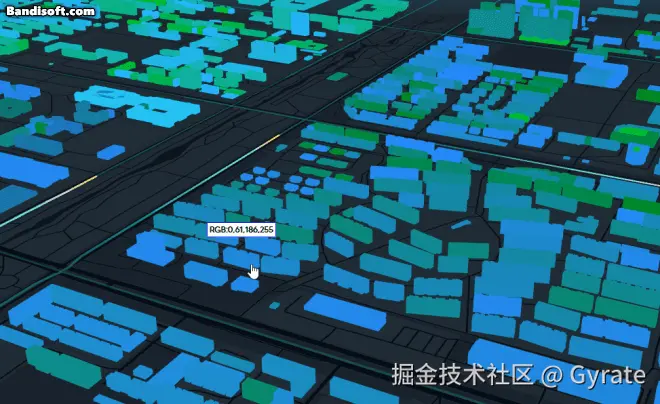
拾取材质MaterialP:仅输出颜色值的材质效果,颜色与Mesh编码一致,这会让Mesh看起来像一个彩色剪影,下图这个效果是渲染在一个看不见的缓冲区中吗,给程序读取像素值用的,一般情况下用户看不到
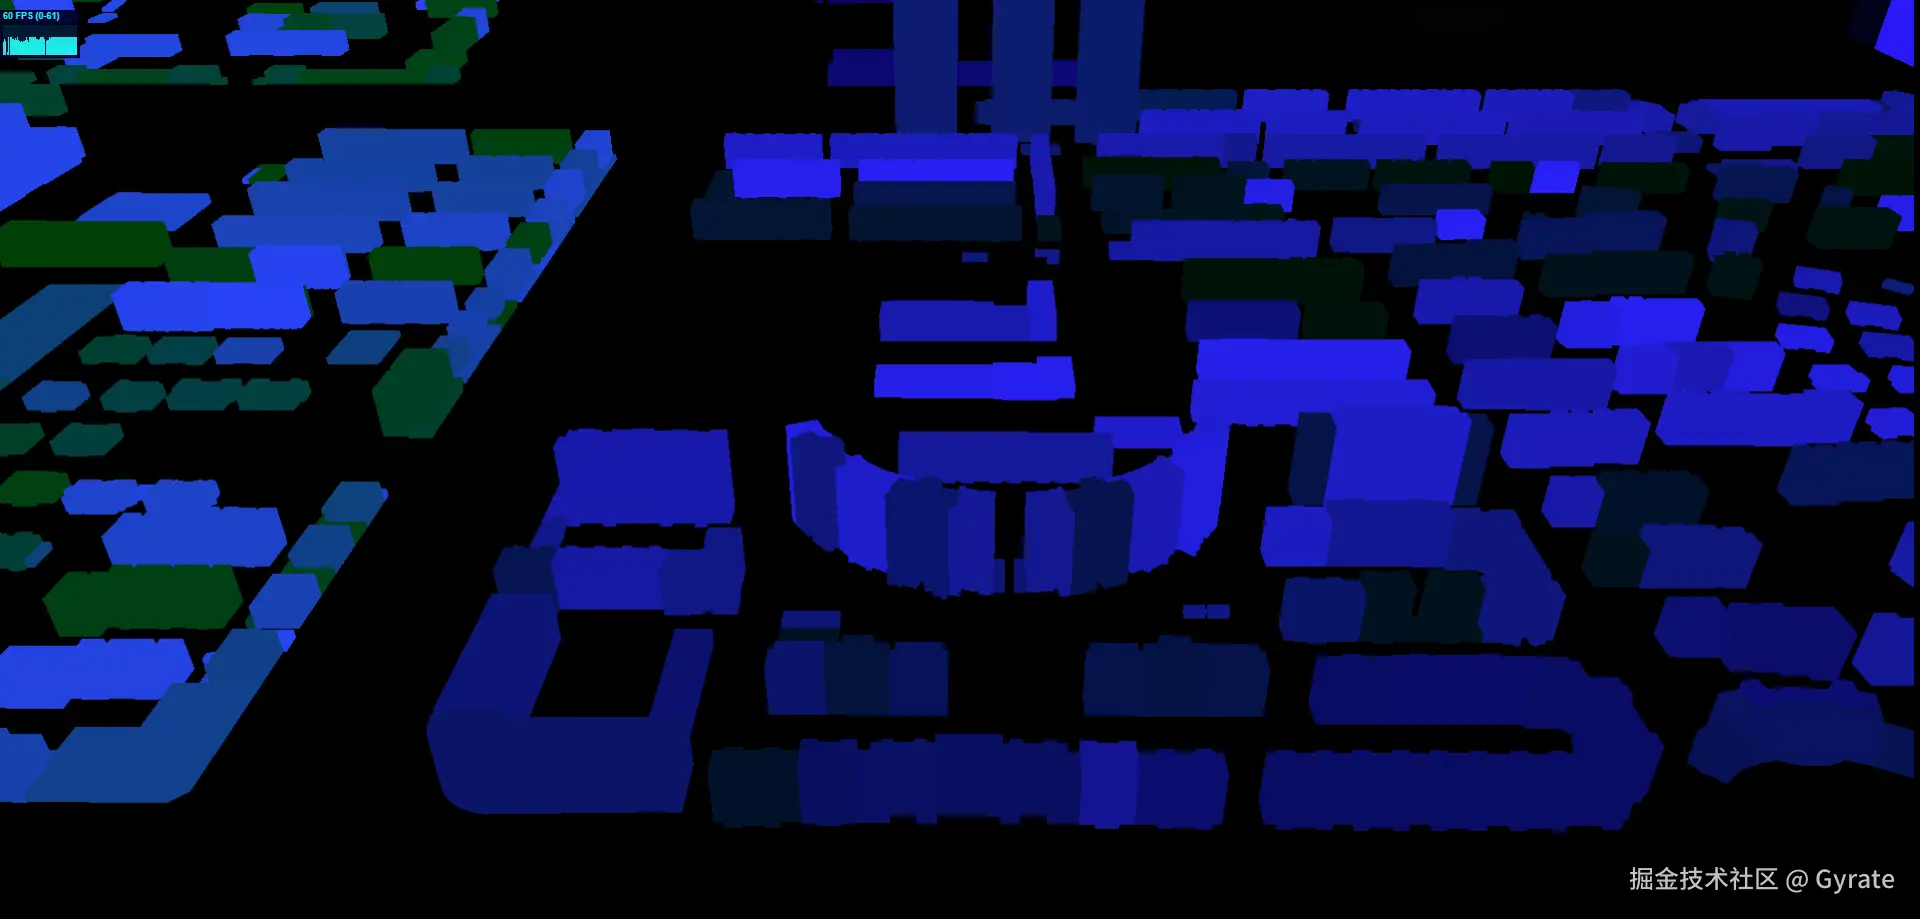
-
-
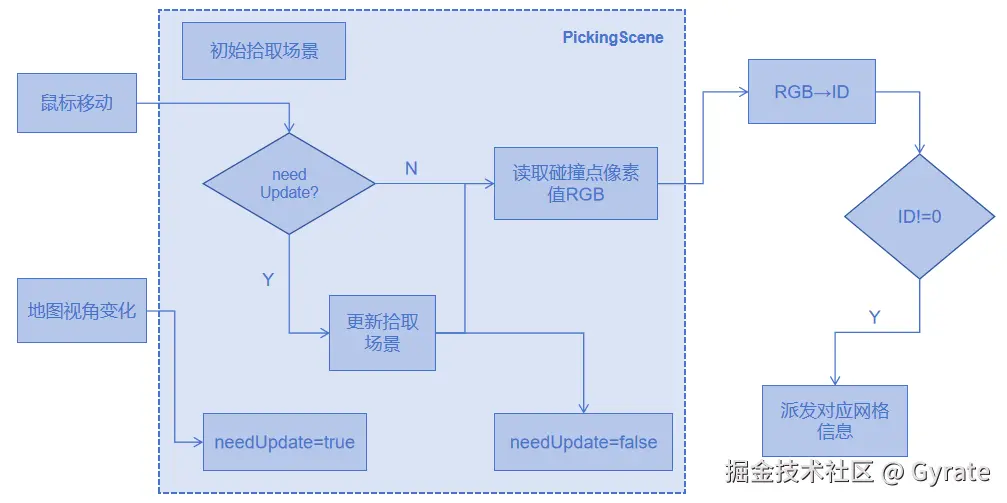
离屏渲染
- 我们用MaterialP材质提前渲染好当前拾取网格的场景PickingScene,并将此时的屏幕画面缓存起来
- 当鼠标移动时,获取鼠标时间的屏幕位置xy,并找到这个位置在PickingScene的像素点P
- 这个像素点P的颜色如果是
0x000000,说明鼠标并没有命中任何物体;如果是其他颜色,那么这个颜色就是Mesh的颜色编码RGB,将RGB转换回十进制就是ID。
-
信息展示
通过ID我们就可以获取对应Mesh的基础信息info了,将info通过事件派发出去,交给业务层进行展示,就完成最终的操作。
实现过程
技术栈
| 工具 | 说明 | 版本 |
|---|---|---|
| QGIS | 用于做原始数据展示和处理,比如数据清洗、转换坐标系 | 3.34.3 |
| Three.js | 提供数据可视化展现 | 0.157.0 |
数据准备
-
建筑图层的关键数据来自"建筑面"和"高度"2个属性,前者决定建筑的剖面外观,后者决定建筑高度
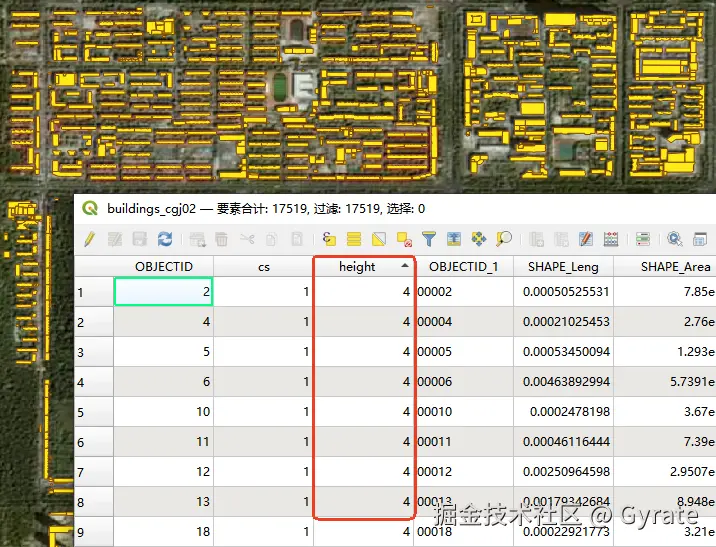
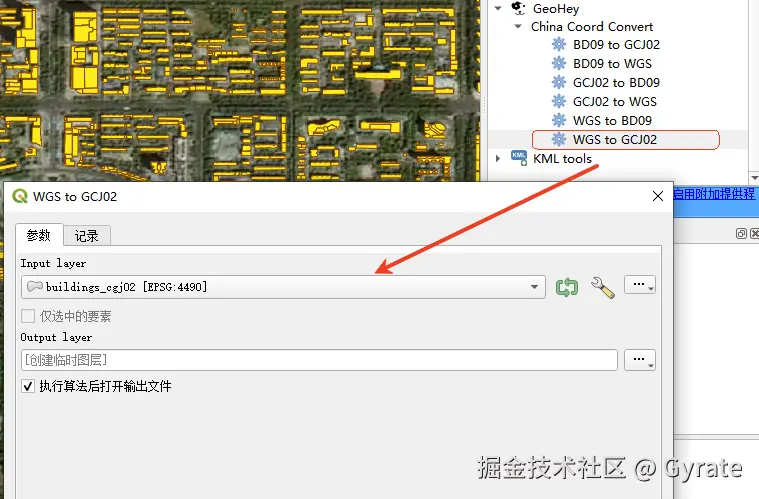
-
数据格式建议使用统一的geoJSON格式,由于本次示例我们是在高德地图+Three.js的基础上搭建,导出时转换为cgj02坐标系。这里可以安装QGIS插件GeoHey。
建筑图层
-
使用THREE.ExtrudeGeometry 挤压缓冲几何体,来将建筑数据逐个生成建筑几何体geometry
jsx/** * 根据路径绘制单个多边几何体(可能包含子几何体) * @param {Array} coordinates 坐标数组 * @param {Object} properties 属性 * @param {Number} id 建筑 ID * @returns {Object} 几何体对象 */ _createGeometry(coordinates, properties, id) { const geometries = [] // 将 ID 转换为 RGB 颜色 const [r, g, b] = this.intToRgb(id) coordinates.forEach((path) => { // 通过 path 生成 Shape const shape = new THREE.Shape() path.forEach(([x, y], index) => { if (index === 0) { shape.moveTo(x, y) } else { shape.lineTo(x, y) } }) // 通过 shape 生成 THREE.ExtrudeGeometry const extrudeSettings = { depth: properties.height || this._defaultHeight, bevelEnabled: false, steps: 1, curveSegments: 12, UVGenerator: '...' //生成UV(略) 用于材质渲染 } // 创建正常渲染用的几何体 const extrudeGeometry = new THREE.ExtrudeGeometry(shape, extrudeSettings) // 处理法线(略) 用于特定材质渲染 // ... geometries.push(extrudeGeometry) // 以下属性是为色彩拾取准备 if (this._conf.enablePicking) { // 为拾取几何体的每个顶点设置相同的颜色(色值对应建筑 ID) const colorAttribute = new THREE.Float32BufferAttribute(count * 3, 3) for (let i = 0; i < count; i++) { colorAttribute.setXYZ(i, r / 255, g / 255, b / 255) } extrudeGeometry.setAttribute('color', colorAttribute) } this._limitCount++ }) return { geometries } } -
将所有几何体合并,这是THREE.js自带的基础方法
jsximport { mergeBufferGeometries } from 'three/examples/jsm/utils/BufferGeometryUtils.js' createPolygon(){ let geometryArr = [] // 为每个建筑分配唯一 ID,从 1 开始(0 表示无选中) let buildingId = 1 // 声明颜色值间隔,这里可以根据需要设定 const colorInterval = 2 // 将所有_createGeometry创建的几何体放到geometryArr (略) // 合并所有几何体并添加到场景 if (geometryArr.length > 0) { const mesh = new THREE.Mesh(mergeBufferGeometries(geometryArr, false), this._mt) this.scene.add(mesh) } //... }
拾取图层
-
创建网格体
拾取场景的几何体,可以直接与实际可见的几何体共用一套;需要注意的是MeshBasicMaterial实例化参数**
vertexColors=true**,它是最终每个Mesh使用顶点颜色着色的关键。jsxcreatePolygon(){ // ... // 合并所有几何体并添加到场景 if (geometryArr.length > 0) { const mesh = new THREE.Mesh(mergeBufferGeometries(geometryArr, false), this._mt) this.scene.add(mesh) } // 创建拾取用的Mesh并添加到拾取场景 if (this._conf.enablePicking && geometryArr.length > 0) { const pickingMesh = new THREE.Mesh( mergeBufferGeometries(geometryArr, false), new THREE.MeshBasicMaterial({ vertexColors: true }) ) this._pickingScene.add(pickingMesh) // 更新当前状态下的拾取纹理 this._pickingTextureNeedsUpdate = true this.updatePickingTexture() } } -
创建/更新拾取场景
jsx/** * 更新拾取场景 * @private */ updatePickingTexture() { if ( !this._pickingTextureNeedsUpdate || !this._pickingTexture || !this._pickingScene || !this.camera ) { return } // 调整拾取场景大小 const pixelRatio = this.renderer.getPixelRatio() this._pickingTexture.setSize( this.container.clientWidth * pixelRatio, this.container.clientHeight * pixelRatio ) // 保存当前渲染器状态 const currentRenderTarget = this.renderer.getRenderTarget() // 设置渲染目标为拾取纹理 this.renderer.setRenderTarget(this._pickingTexture) // 清除颜色、深度或模板缓存,重新生成缓存截图 this.renderer.clear() this.renderer.render(this._pickingScene, this.camera) // 恢复渲染器状态 this.renderer.setRenderTarget(currentRenderTarget) // 重置标志位 this._pickingTextureNeedsUpdate = false } initPickingScene() { // 创建用于拾取的场景 this._pickingScene = new THREE.Scene() // 创建用于拾取的渲染目标纹理 this._pickingTexture = new THREE.WebGLRenderTarget(1, 1, { minFilter: THREE.LinearFilter, magFilter: THREE.NearestFilter, format: THREE.RGBAFormat }) // 监听地图视角变化事件 this.on('viewChange', this.onViewChange.bind(this)) } -
鼠标事件监听
jsx/** * 处理鼠标移动事件 * @param {MouseEvent} event 鼠标事件 */ handleMouseMove(event) { if (!this._visible || !this._conf.enablePicking) return const intersectedBuilding = this.pickBuilding(event) // 更新鼠标样式 if (intersectedBuilding) { this.container.style.cursor = 'pointer' } else { this.container.style.cursor = 'default' } // 派发 hover 事件 this.handleEvent('hover', { screenX: event.clientX, screenY: event.clientY, building: intersectedBuilding }) } -
根据鼠标屏幕位置,获取拾取场的像素值,转为ID后获取建筑数据(核心代码)
jsx/** * 拾取建筑 * @param {MouseEvent} event 鼠标事件 * @returns {Object|null} 拾取到的建筑数据 */ pickBuilding(event) { if (!this._pickingTexture || !this._pickingScene || !this.camera) { return null } // 如果需要更新拾取纹理,则更新 if (this._pickingTextureNeedsUpdate) { this.updatePickingTexture() } // 读取鼠标所在位置的像素值 const pixelRatio = this.renderer.getPixelRatio() const pixelBuffer = new Uint8Array(4) this.renderer.readRenderTargetPixels( this._pickingTexture, event.clientX * pixelRatio, this._pickingTexture.height - event.clientY * pixelRatio - 1, 1, 1, pixelBuffer ) // 直接从像素值中获取ID const id = this.rgbToInt(pixelBuffer[0], pixelBuffer[1], pixelBuffer[2]) // 如果 ID 为 0,表示没有拾取到对象 if (id === 0) { if (this._lastPickedBuilding) { this.highlightBuilding(null) this._lastPickedBuilding = null } return null } // 获取对应的建筑数据 const buildingData = this._buildingIdMap.get(id) // 如果拾取到的建筑与上次不同,更新高亮 if ( buildingData && (!this._lastPickedBuilding || this._lastPickedBuilding.id !== id) ) { this.highlightBuilding(buildingData) this._lastPickedBuilding = { id, data: buildingData } } return buildingData } -
ID值和RGB值的互转方法
jsx// 整数(int) → RGB数组 [r, g, b] intToRgb(number) { // 取低24位(RGB占24位) const validBits = number & 0xffffff // 位运算分解通道 const r = (validBits >> 16) & 0xff // 取16-23位(红色) const g = (validBits >> 8) & 0xff // 取8-15位(绿色) const b = validBits & 0xff // 取0-7位(蓝色) return [r, g, b] } // RGB数组 → 整数(int) rgbToInt(r, g, b) { // 校验范围(0-255) if ([r, g, b].some((c) => c < 0 || c > 255)) { throw new Error('RGB值必须在0-255范围内') } // 位运算合并通道 return (r << 16) | (g << 8) | b } -
把调试过程展示出来,我们能直观地看得到颜色是如何拾取的
拾取反馈
-
初始化高亮包围盒,包围盒默认为六面立方体
jsx_initHighlightBox() { // 创建高亮box材质(亮黄色半透明) const {highlightOpacity, highlightColor, enableHightlight} = this._conf if(!enableHightlight){ return } this._highlightBoxMaterial = new THREE.MeshBasicMaterial({ color: highlightColor, transparent: true, opacity: highlightOpacity, side: THREE.DoubleSide, depthTest: false, depthWrite: false }) // 创建一个默认的box几何体 const boxGeometry = new THREE.BoxGeometry(1, 1, 1) // 创建高亮box网格 this._highlightBox = new THREE.Mesh(boxGeometry, this._highlightBoxMaterial) // 默认隐藏高亮box this._highlightBox.visible = false // 将高亮box添加到场景 this.scene.add(this._highlightBox) } -
拾取到物体时,显示包围盒高亮选中状态。这里需要更新包围盒的底部,其实就是计算一个能够包裹住建筑面的矩形。
jsx/** * 高亮建筑 * @param {Object|null} buildingData 建筑数据 */ highlightBuilding(buildingData) { if (!buildingData || !this._highlightBox) { // 如果没有建筑数据或高亮box未初始化,则隐藏高亮box if (this._highlightBox) { this._highlightBox.visible = false } return } // 获取建筑的坐标和高度 const { coordinates, type } = buildingData const height = buildingData.height || this._defaultHeight // 计算建筑的包围盒 let minX = Infinity, minY = Infinity let maxX = -Infinity, maxY = -Infinity // 处理不同类型的几何体 let points = [] if (type === 'Polygon') { // 多边形类型,取第一个环(外环) points = coordinates[0] } else if (type === 'MultiPolygon') { // 多多边形类型,取第一个多边形的第一个环 points = coordinates[0][0] } // 计算包围盒 points.forEach(([x, y]) => { minX = Math.min(minX, x) minY = Math.min(minY, y) maxX = Math.max(maxX, x) maxY = Math.max(maxY, y) }) // 计算中心点和尺寸 const centerX = (minX + maxX) / 2 const centerY = (minY + maxY) / 2 const centerZ = height / 2 const sizeX = maxX - minX const sizeY = maxY - minY const sizeZ = height * 1.1 // 设置高亮box的位置和尺寸 this._highlightBox.position.set(centerX, centerY, centerZ) this._highlightBox.scale.set(sizeX, sizeY, sizeZ) // 显示高亮box this._highlightBox.visible = true } -
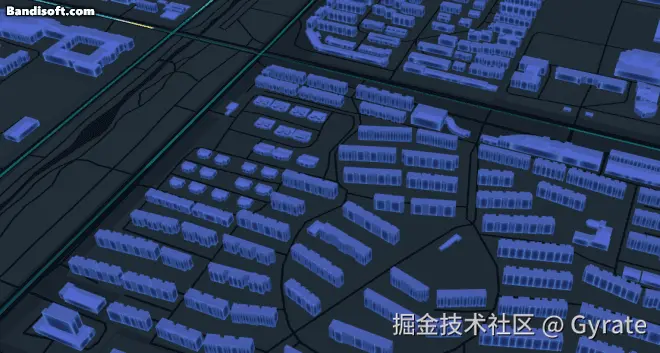
最终效果如下,这里只是简单示例。实际上包围盒底部矩形可以优化尽量与原建筑面贴合,材质也可以做一些动态效果。
总结
优化前后的帧率和地图拖拽体验上有明显的差别。
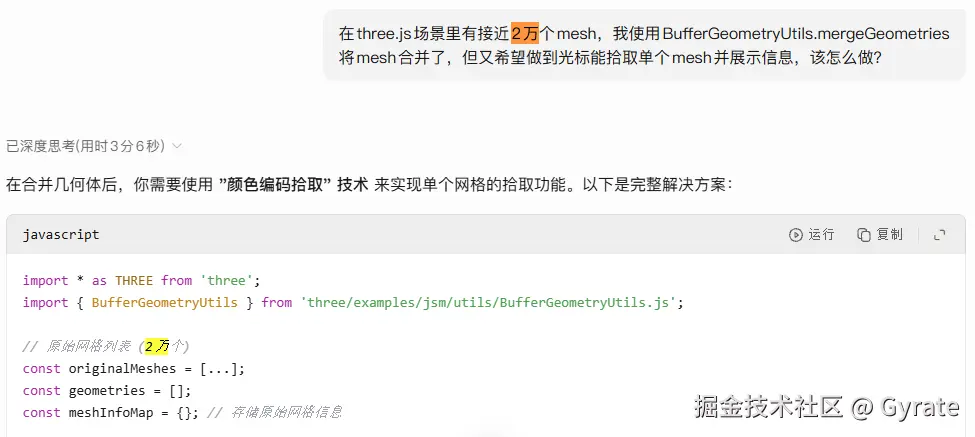
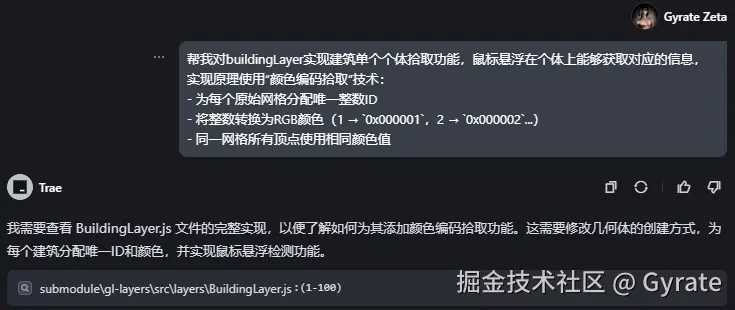
本次优化全靠Claude-4-Sonnet出主意,我自己是万万想不出来这么巧妙的方案,其中大部分代码也是AI代劳,开发者只负责审查、验证、纠错就够了。
在这期间也少不了对AI思考方向的引导和逐步具体详细的提问,如下图所示。我先抛出了问题,AI深度思考后给了我一个可实行的方案,但代码是不完整的,甚至还有些错误; 不过解题思路有了,于是我可以提出更具体的需求并依赖更专业的模型去一步步趋近理想结果。在AI辅助编程的时期,人作为决策者的能力变得越来越重要。