示例展示: 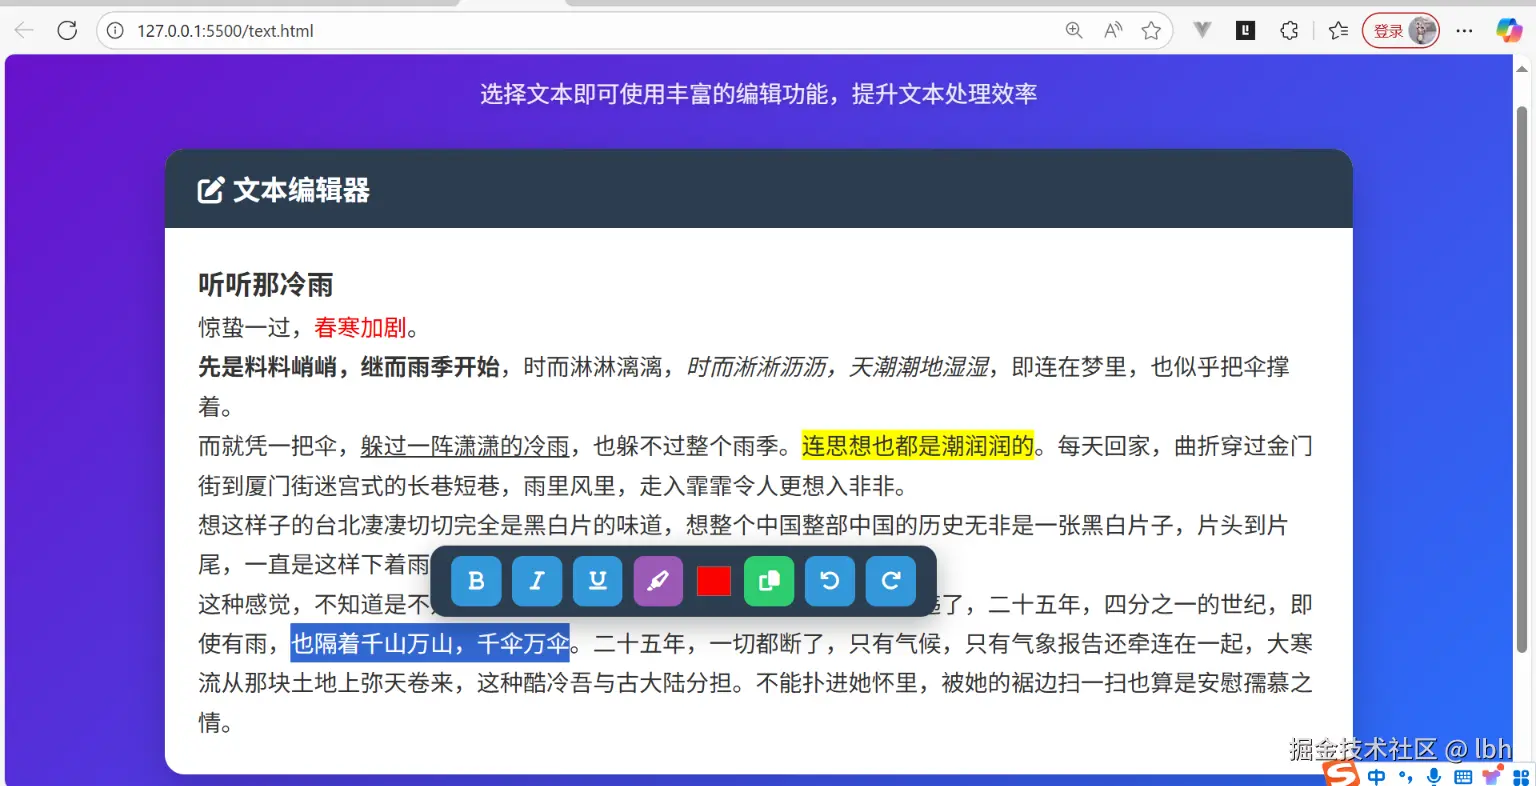
其实核心是在网页中获取用户鼠标选中的文本,通过 JavaScript 的 window.getSelection() 方法来实现。这个方法返回一个 Selection 对象,该对象包含了关于选中文本的信息,最后有贴上完整代码。
功能概述
-
富文本编辑功能:用户可以在编辑区域输入和格式化文本
-
智能工具栏:当用户选中文本时,会自动弹出浮动工具栏
-
格式操作:
- 文本加粗/斜体/下划线
- 高亮标记
- 文字颜色修改
- 复制文本
- 撤销/重做操作
-
历史记录:支持撤销(ctrl+z)和重做(ctrl+y)功能
-
响应式设计:适配不同屏幕尺寸
核心功能实现
1. DOM 加载与初始化
js
document.addEventListener("DOMContentLoaded", () => { ... });- 确保页面 DOM 完全加载后再执行脚本。
- 避免因元素未加载导致的
null错误。
2. 工具栏显示逻辑:showToolbar()
富文本编辑器中的"浮动格式栏"
触发条件
mouseup:鼠标释放(完成选择)keyup:键盘松开(可能改变了选区)
代码详解
js
const selection = window.getSelection();window.getSelection():此方法用于获取用户当前选中的文本。它返回一个Selection对象,其中包含有关选中的信息。- 它包含了用户鼠标拖拽选中的文本范围(可能跨多个元素)。
js
if (!selection.toString().trim()) {
  textToolbar.style.display = "none";
  return;
}selection.toString()获取选中的纯文本内容。.trim()去除空格、换行等空白字符。- 如果为空(比如只选中了空格或换行),则隐藏工具栏。
目的:防止用户"误触"或"空选"时显示无意义的工具栏。
获取选区的几何信息
js
const range = selection.getRangeAt(0);- 一个
Selection可能包含多个Range(比如跨 iframe 或复杂 DOM 结构),但通常只有第一个有效。 getRangeAt(0)获取第一个(也是最常见的)选区范围。
js
const rect = range.getBoundingClientRect();getBoundingClientRect()返回该Range在视口(viewport)中的矩形坐标。- 包含:
top,bottom,left,right,width,height(单位:px)。
rect.top是选区顶部距离浏览器可视区域顶部的像素值。
js
const editorRect = textEditor.getBoundingClientRect();- 获取整个编辑器容器的边界矩形,用于后续边界检测(防止工具栏超出编辑器)。
定位
js
let top = rect.top + window.scrollY - textToolbar.offsetHeight - 8;rect.top:选区顶部距视口顶部的距离window.scrollY:页面已滚动的垂直距离- 所以
rect.top + window.scrollY= 选区顶部距页面顶部的绝对坐标 - 减去
textToolbar.offsetHeight:工具栏自身高度 - 再减
8:留出 8px 间距(视觉上更美观)
减去工具栏高度 + 8px 间距,实现"悬浮在选区之上"的视觉效果。
边界处理(防溢出)
js
if (top < window.scrollY) {
  top = rect.bottom + window.scrollY + 8; // 放到下方
}
if (left < editorRect.left) { /* 左边界修正 */ }
if (left + width > editorRect.right) { /* 右边界修正 */ }
用户体验细节:避免工具栏被遮挡或超出编辑器范围。
3.高亮功能:toggleHighlight()
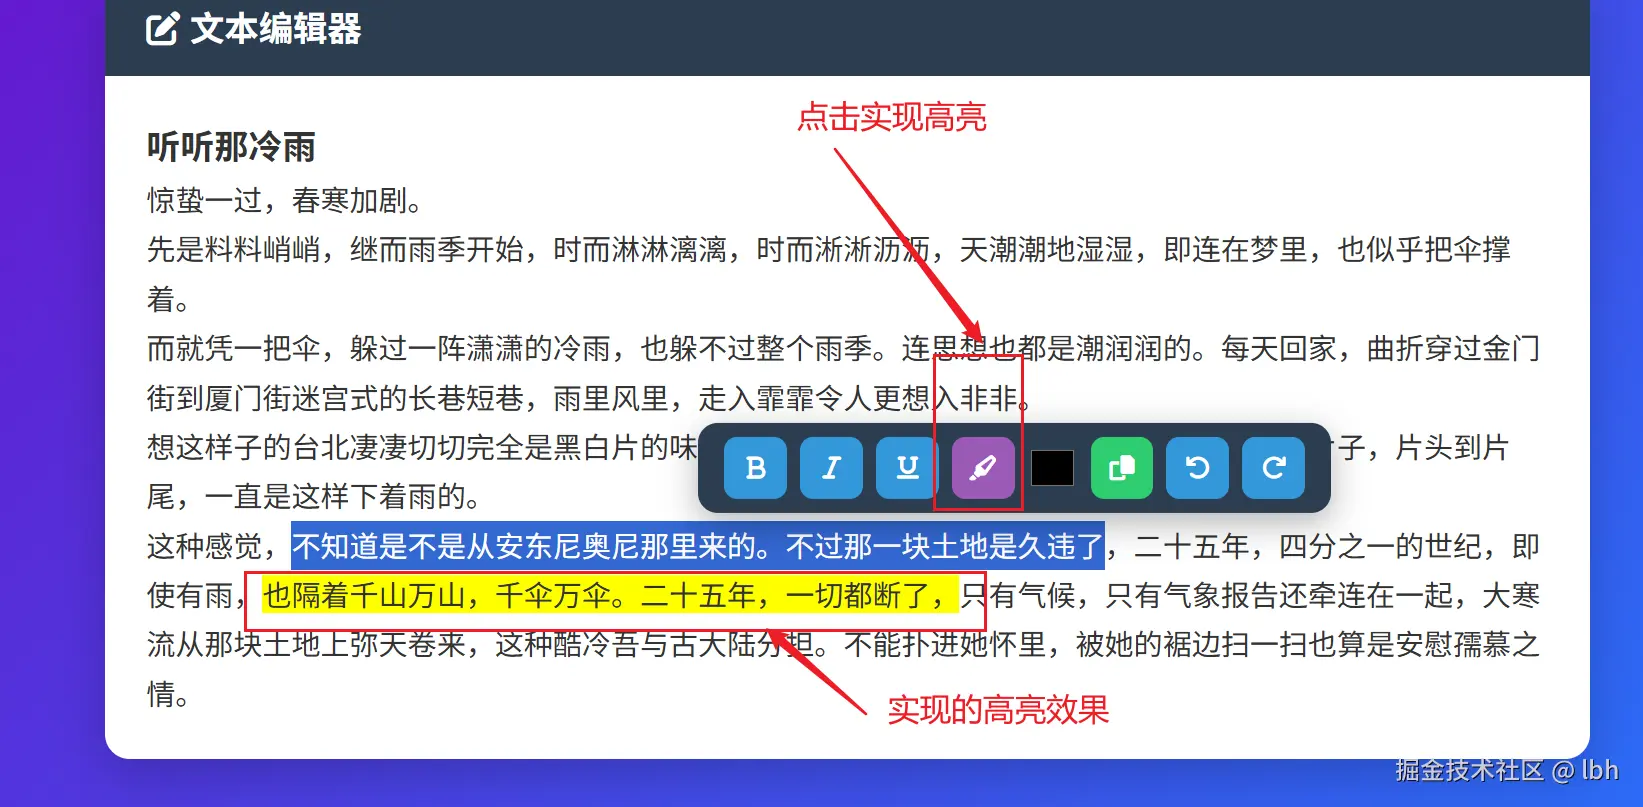
js
function toggleHighlight() {
  saveState();
  if (document.queryCommandState("hiliteColor")) {
    document.execCommand("hiliteColor", false, "transparent");
  } else {
    document.execCommand("hiliteColor", false, "#FFFF00");
  }
  textEditor.focus();
}- 使用
hiliteColor命令实现背景高亮。document.queryCommandState("hiliteColor")是一个旧式但广泛支持的 API。它的作用是:查询当前选中的文本是否已经应用了hiliteColor(背景高亮)命令,通过设置背景色操作高亮。 - 判断当前是否已高亮,实现"切换"效果。
不是简单设置颜色,而是实现了"有则清除,无则添加"的 toggle 逻辑。
4.复制功能:copyText()

js
navigator.clipboard.writeText(selection.toString())
  .then(() => {
    btnCopy.innerHTML = '<i class="fas fa-check"></i>';
    setTimeout(() => {
      btnCopy.innerHTML = '<i class="fas fa-copy"></i>';
    }, 1500);
  })
.catch(err => console.error("复制失败:", err));navigator.clipboard是现代浏览器提供的一个用于与系统剪贴板进行交互的 API,它属于 Clipboard API 的一部分。通过这个 API,JavaScript 可以安全地读取和写入剪贴板内容- 提供视觉反馈:按钮图标改变,1.5 秒后恢复提高用户体验
5.操作历史撤销与重做
js
const history = {
  states: [],
  currentIndex: -1,
};
这是一个 栈式历史管理器,类似浏览器的前进/后退。
states:保存每一步的innerHTML快照。currentIndex:当前指向的历史位置。
saveState() ------ 保存编辑状态
js
function saveState() {
  const html = textEditor.innerHTML;

  // 避免保存相同状态
  if (history.states[history.currentIndex] === html) return;

  // 移除"未来"状态(比如撤销后又输入,之前的"重做"记录应清除)
  history.states = history.states.slice(0, history.currentIndex + 1);
  history.states.push(html);
  history.currentIndex++;
}| 逻辑 | 说明 |
|---|---|
html = innerHTML |
序列化当前编辑器内容 |
if (same) return |
防止无意义操作(如连续点击 bold 两次)触发多余历史记录 |
slice(0, index+1) |
清除"未来"状态 ------ 这是实现 撤销后重新输入则丢弃后续历史 的关键 |
push + currentIndex++ |
添加新状态,指针前移 |
这是标准的"撤销-重做"实现模式,与 Photoshop、Word 一致。
undo() 和 redo() ------ 撤销与重做
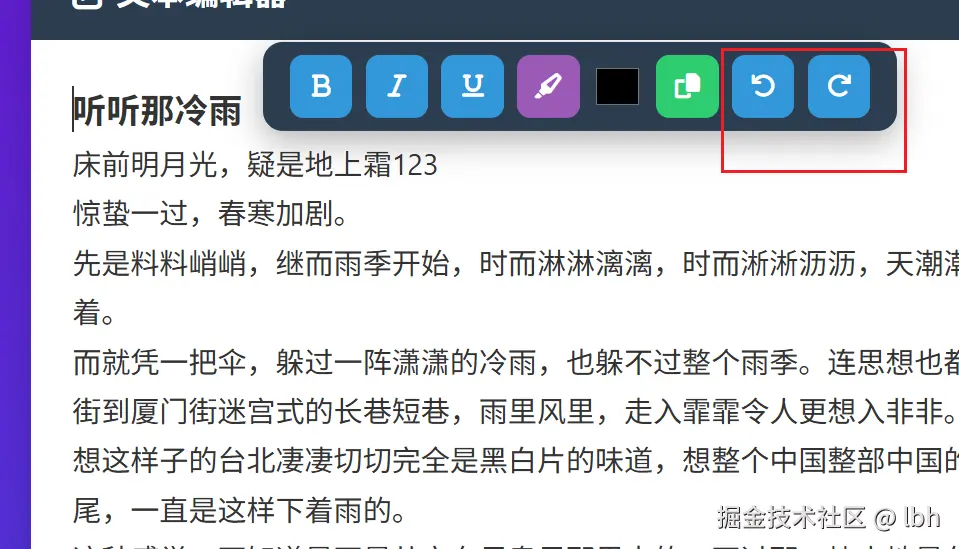
js
function undo() {
  if (history.currentIndex > 0) {
    history.currentIndex--;
    textEditor.innerHTML = history.states[history.currentIndex];
  }
  textEditor.focus();
}

function redo() {
  if (history.currentIndex < history.states.length - 1) {
    history.currentIndex++;
    textEditor.innerHTML = history.states[history.currentIndex];
  }
  textEditor.focus();
}undo:指针前移,还原前一个状态;redo:指针后移,恢复下一个状态;focus():恢复焦点,保证用户可以继续输入。
注意:直接设置
innerHTML会丢失光标位置。生产环境最好配合SelectionAPI 保存/恢复光标,可以试一下边这种写法,我这里就不用了。
js
// 增强版 history
const history = {
  states: [],
  currentIndex: -1,
  savedSelections: [], // 保存每次状态对应的光标
};

function saveState() {
  const html = textEditor.innerHTML;
  const selection = saveSelection(); // 保存当前光标

  if (history.states[history.currentIndex] === html) return;

  history.states = history.states.slice(0, history.currentIndex + 1);
  history.savedSelections = history.savedSelections.slice(0, history.currentIndex + 1);

  history.states.push(html);
  history.savedSelections.push(selection);
  history.currentIndex++;
}

function undo() {
  if (history.currentIndex <= 0) return;

  const currentSelection = saveSelection(); // 为 redo 保存
  history.redoSelections = history.redoSelections || [];
  history.redoSelections.push(currentSelection);

  history.currentIndex--;
  textEditor.innerHTML = history.states[history.currentIndex];

  // 尝试恢复光标
  restoreSelection(history.savedSelections[history.currentIndex]);
  textEditor.focus();
}

function redo() {
  if (history.currentIndex >= history.states.length - 1) return;

  history.currentIndex++;
  textEditor.innerHTML = history.states[history.currentIndex];

  // 恢复 redo 时的光标
  restoreSelection(history.redoSelections?.pop() || null);
  textEditor.focus();
}
6.字体加粗、倾斜和下划线
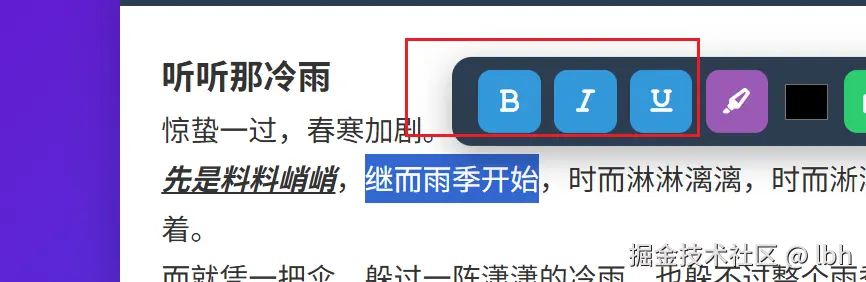
js
 // 加粗
 btnBold.addEventListener("click", () => formatCommand("bold"));
 // 倾斜
 btnItalic.addEventListener("click", () => formatCommand("italic"));
 // 下划线
 btnUnderline.addEventListener("click", () =>formatCommand("underline"));
可以看到都是调用的 formatCommand() 函数, 下边详细说说这个函数。
函数定义formatCommand()
js
        function formatCommand(command, value = null) {
          saveState();
          document.execCommand(command, false, value);
          textEditor.focus();
}-
参数:
command:要执行的格式化命令名称(字符串),比如'bold'、'italic'、'foreColor'。value = null:该命令的可选值。例如,设置颜色时,value就是颜色值(如'#ff0000')。默认为null。
scss
saveState();第一步:保存当前状态(为"撤销"做准备)
- 调用
saveState()函数,将当前编辑器的内容(innerHTML)保存到历史记录栈中。 - 这样用户在执行格式化后,如果想撤销,就可以回到这个状态。
- 这是实现"撤销/重做"功能的关键一步。
js
document.execCommand(command, false, value);第二步:执行格式化命令
这是核心!使用浏览器的 document.execCommand() API。
document.execCommand() 是一个已废弃(deprecated)但广泛支持 的 JavaScript API,用于在可编辑区域(如 contenteditable 或 designMode="on" 的页面)中执行格式化命令。
状态 :已废弃(Deprecated) ------ 不再是标准,未来可能被移除,不推荐用于新项目。
但它在许多旧项目、轻量级编辑器中仍被广泛使用,所以使用的话最好慎重一点。
第三步:恢复焦点
- 执行命令后,编辑器可能会失去焦点(尤其是在点击工具栏按钮后)。
- 调用
.focus()确保光标或选区仍在编辑器中,用户可以继续输入或操作。
完整代码:
html
<!DOCTYPE html>
<html lang="zh-CN">
<head>
<meta charset="UTF-8" />
<meta name="viewport" content="width=device-width, initial-scale=1.0" />
<title>优化版文本选择工具栏</title>
<!-- 在网页中方便地使用Font Awesome 图标库。 -->
<link
rel="stylesheet"
href="https://cdnjs.cloudflare.com/ajax/libs/font-awesome/6.4.0/css/all.min.css"
/>
<style>
* {
margin: 0;
padding: 0;
box-sizing: border-box;
font-family: "Segoe UI", Tahoma, Geneva, Verdana, sans-serif;
}
body {
background: linear-gradient(135deg, #6a11cb 0%, #2575fc 100%);
min-height: 100vh;
display: flex;
flex-direction: column;
align-items: center;
padding: 40px 20px;
color: #333;
}
.container {
width: 100%;
max-width: 900px;
}
header {
text-align: center;
margin-bottom: 30px;
color: white;
text-shadow: 0 2px 4px rgba(0, 0, 0, 0.2);
}
h1 {
font-size: 2.5rem;
margin-bottom: 15px;
font-weight: 700;
}
.subtitle {
font-size: 1.1rem;
opacity: 0.9;
max-width: 600px;
margin: 0 auto;
}
.editor-section {
background: white;
border-radius: 15px;
box-shadow: 0 10px 30px rgba(0, 0, 0, 0.2);
overflow: hidden;
margin-bottom: 30px;
}
.section-title {
background: #2c3e50;
color: white;
padding: 15px 25px;
font-size: 1.3rem;
font-weight: 600;
display: flex;
justify-content: space-between;
align-items: center;
flex-wrap: wrap;
gap: 15px;
}
.font-controls {
display: flex;
gap: 10px;
}
.font-select {
padding: 8px 12px;
border-radius: 8px;
border: 1px solid #ddd;
background: white;
font-size: 0.9rem;
min-width: 120px;
}
.editor-content {
padding: 25px;
min-height: 400px;
font-size: 1.1rem;
line-height: 1.7;
}
.text-editor {
min-height: 350px;
outline: none;
}
.text-toolbar {
display: none;
position: absolute;
background: #2c3e50;
border-radius: 12px;
box-shadow: 0 6px 20px rgba(0, 0, 0, 0.3);
padding: 8px 12px;
z-index: 1000;
transform: translateY(-100%);
animation: fadeIn 0.2s ease-out;
}
@keyframes fadeIn {
from {
opacity: 0;
transform: translateY(-80%);
}
to {
opacity: 1;
transform: translateY(-100%);
}
}
.toolbar-btn {
background: #3498db;
border: none;
color: white;
width: 38px;
height: 38px;
border-radius: 8px;
margin: 0 4px;
cursor: pointer;
font-size: 15px;
transition: all 0.2s ease;
display: inline-flex;
align-items: center;
justify-content: center;
}
.toolbar-btn:hover {
background: #2980b9;
transform: translateY(-2px);
}
.toolbar-btn:active {
transform: translateY(1px);
}
.btn-purple {
background: #9b59b6;
}
.btn-purple:hover {
background: #8e44ad;
}
.btn-green {
background: #2ecc71;
}
.btn-green:hover {
background: #27ae60;
}
.color-picker {
width: 38px;
height: 38px;
border: none;
background: none;
cursor: pointer;
padding: 4px;
border-radius: 8px;
vertical-align: middle;
}
.highlight {
background-color: rgba(255, 255, 0, 0.4);
}
footer {
margin-top: 20px;
color: rgba(255, 255, 255, 0.8);
text-align: center;
font-size: 0.9rem;
padding: 15px;
}
@media (max-width: 768px) {
h1 {
font-size: 2rem;
}
.section-title {
flex-direction: column;
align-items: flex-start;
}
.font-controls {
width: 100%;
}
.font-select {
flex: 1;
}
.editor-content {
padding: 20px 15px;
min-height: 300px;
}
.text-toolbar {
padding: 6px 8px;
border-radius: 10px;
flex-wrap: wrap;
max-width: 300px;
}
.toolbar-btn {
width: 34px;
height: 34px;
margin: 3px;
}
.color-picker {
width: 34px;
height: 34px;
}
}
@media (max-width: 480px) {
h1 {
font-size: 1.7rem;
}
.text-toolbar {
max-width: 260px;
}
}
</style>
</head>
<body>
<div class="container">
<header>
<p class="subtitle">选择文本即可使用丰富的编辑功能,提升文本处理效率</p>
</header>
<div class="editor-section">
<div class="section-title">
<div><i class="fas fa-edit"></i> 文本编辑器</div>
</div>
<div class="editor-content">
<div class="text-editor" id="textEditor" contenteditable="true">
<h3>听听那冷雨</h3>
<p>惊蛰一过,春寒加剧。</p>
<p>
先是料料峭峭,继而雨季开始,时而淋淋漓漓,时而淅淅沥沥,天潮潮地湿湿,即连在梦里,也似乎把伞撑着。
</p>
<p>
而就凭一把伞,躲过一阵潇潇的冷雨,也躲不过整个雨季。连思想也都是潮润润的。每天回家,曲折穿过金门街到厦门街迷宫式的长巷短巷,雨里风里,走入霏霏令人更想入非非。
</p>
<p>
想这样子的台北凄凄切切完全是黑白片的味道,想整个中国整部中国的历史无非是一张黑白片子,片头到片尾,一直是这样下着雨的。
</p>
<p>
这种感觉,不知道是不是从安东尼奥尼那里来的。不过那一块土地是久违了,二十五年,四分之一的世纪,即使有雨,也隔着千山万山,千伞万伞。二十五年,一切都断了,只有气候,只有气象报告还牵连在一起,大寒流从那块土地上弥天卷来,这种酷冷吾与古大陆分担。不能扑进她怀里,被她的裾边扫一扫也算是安慰孺慕之情。
</p>
</div>
</div>
</div>
<footer>
<p>优化版文本选择工具栏 © 2023 | 使用纯JavaScript实现</p>
</footer>
</div>
<div class="text-toolbar" id="textToolbar">
<button class="toolbar-btn" id="btnBold" title="加粗">
<i class="fas fa-bold"></i>
</button>
<button class="toolbar-btn" id="btnItalic" title="斜体">
<i class="fas fa-italic"></i>
</button>
<button class="toolbar-btn" id="btnUnderline" title="下划线">
<i class="fas fa-underline"></i>
</button>
<button class="toolbar-btn btn-purple" id="btnHighlight" title="高亮">
<i class="fas fa-highlighter"></i>
</button>
<input
type="color"
class="color-picker"
id="colorPicker"
title="文本颜色"
value="#000000"
/>
<button class="toolbar-btn btn-green" id="btnCopy" title="复制">
<i class="fas fa-copy"></i>
</button>
<button class="toolbar-btn" id="btnUndo" title="撤销">
<i class="fas fa-undo"></i>
</button>
<button class="toolbar-btn" id="btnRedo" title="重做">
<i class="fas fa-redo"></i>
</button>
</div>
<script>
document.addEventListener("DOMContentLoaded", () => {
const textEditor = document.getElementById("textEditor");
const textToolbar = document.getElementById("textToolbar");
const btnBold = document.getElementById("btnBold");
const btnItalic = document.getElementById("btnItalic");
const btnUnderline = document.getElementById("btnUnderline");
const btnHighlight = document.getElementById("btnHighlight");
const colorPicker = document.getElementById("colorPicker");
const btnCopy = document.getElementById("btnCopy");
const btnUndo = document.getElementById("btnUndo");
const btnRedo = document.getElementById("btnRedo");
// 操作历史记录
const history = {
states: [],
currentIndex: -1,
};
// 保存编辑器状态
function saveState() {
const html = textEditor.innerHTML;
// 避免保存相同状态
if (history.states[history.currentIndex] === html) return;
// 移除当前索引之后的状态
history.states = history.states.slice(0, history.currentIndex + 1);
history.states.push(html);
history.currentIndex++;
}
// 初始化状态
saveState();
// 显示工具栏
function showToolbar() {
const selection = window.getSelection();
if (!selection.toString().trim()) {
textToolbar.style.display = "none";
return;
}
const range = selection.getRangeAt(0);
const rect = range.getBoundingClientRect();
const editorRect = textEditor.getBoundingClientRect();
// 计算工具栏位置
let top = rect.top + window.scrollY - textToolbar.offsetHeight - 8;
let left =
rect.left +
window.scrollX +
rect.width / 2 -
textToolbar.offsetWidth / 2;
// 边界检查 - 确保工具栏在可视区域内
if (top < window.scrollY) {
top = rect.bottom + window.scrollY + 8;
}
if (left < editorRect.left) {
left = editorRect.left + 10;
} else if (left + textToolbar.offsetWidth > editorRect.right) {
left = editorRect.right - textToolbar.offsetWidth - 10;
}
textToolbar.style.display = "flex";
textToolbar.style.top = top + "px";
textToolbar.style.left = left + "px";
}
// 隐藏工具栏
function hideToolbar() {
textToolbar.style.display = "none";
}
// 执行格式命令
function formatCommand(command, value = null) {
saveState();
document.execCommand(command, false, value);
textEditor.focus();
}
// 高亮文本
function toggleHighlight() {
saveState();
if (document.queryCommandState("hiliteColor")) {
document.execCommand("hiliteColor", false, "transparent");
} else {
document.execCommand("hiliteColor", false, "#FFFF00");
}
textEditor.focus();
}
// 复制文本
function copyText() {
const selection = window.getSelection();
navigator.clipboard
.writeText(selection.toString())
.then(() => {
btnCopy.innerHTML = '<i class="fas fa-check"></i>';
setTimeout(() => {
btnCopy.innerHTML = '<i class="fas fa-copy"></i>';
}, 1500);
})
.catch((err) => {
console.error("复制失败:", err);
});
textEditor.focus();
}
// 撤销操作
function undo() {
if (history.currentIndex > 0) {
history.currentIndex--;
textEditor.innerHTML = history.states[history.currentIndex];
}
textEditor.focus();
}
// 重做操作
function redo() {
if (history.currentIndex < history.states.length - 1) {
history.currentIndex++;
textEditor.innerHTML = history.states[history.currentIndex];
}
textEditor.focus();
}
// 事件监听
textEditor.addEventListener("mouseup", showToolbar);
textEditor.addEventListener("keyup", showToolbar);
textEditor.addEventListener("input", saveState);
document.addEventListener("mousedown", (e) => {
if (!textToolbar.contains(e.target)) {
hideToolbar();
}
});
// 加粗
btnBold.addEventListener("click", () => formatCommand("bold"));
// 倾斜
btnItalic.addEventListener("click", () => formatCommand("italic"));
// 下划线
btnUnderline.addEventListener("click", () =>formatCommand("underline"));
btnHighlight.addEventListener("click", toggleHighlight);
colorPicker.addEventListener("input", (e) => {
formatCommand("foreColor", e.target.value);
});
btnCopy.addEventListener("click", copyText);
btnUndo.addEventListener("click", undo);
btnRedo.addEventListener("click", redo);
// 窗口大小变化时重新定位工具栏
window.addEventListener("resize", () => {
if (textToolbar.style.display === "flex") {
showToolbar();
}
});
});
</script>
</body>
</html>Font Awesome 官方推荐的引入方式(CDN)
在 Font Awesome 官网(fontawesome.com)的 "Get Started" 或 "Usage" 页面中,会提供如下官方 CDN 链接:
html
<link rel="stylesheet" href="https://kit.fontawesome.com/your-unique-kit-code.js">这是他们目前主推的 Font Awesome Kit 方式,你需要注册账号,创建一个"Kit",然后复制专属链接。这种方式更灵活,支持自定义图标集、自动更新、性能优化等。
那 cdnjs 链接是官网写的吗?
不是直接写在官网文档中的主流方式,但:
- Font Awesome 确实支持通过公共 CDN 使用 ,而
cdnjs.com是一个被广泛信任的开源 CDN 服务。 - 官方 GitHub 仓库和文档中会说明可以使用第三方 CDN(如 cdnjs、jsDelivr)来引入字体文件。
- 所以虽然
https://cdnjs.cloudflare.com/...这个链接不是官网首页直接推荐的 ,但它是合法、有效且广泛使用的替代方案。
其他
鼠标选中后跟随按钮效果实现
html
<!DOCTYPE html>
<html lang="zh">
<head>
  <meta charset="UTF-8" />
  <meta name="viewport" content="width=device-width, initial-scale=1.0"/>
  <title>文本选择按钮 - 右下角常显</title>
  <style>
    body {
      font-family: -apple-system, BlinkMacSystemFont, 'Segoe UI', sans-serif;
      padding: 40px;
      line-height: 1.8;
    }

    p {
      margin-bottom: 30px;
    }

    /* 浮动按钮:出现在选区右下角 */
    #action-btn {
      position: absolute;
      background-color: #007cba;
      color: white;
      border: none;
      border-radius: 4px;
      padding: 6px 12px;
      font-size: 14px;
      cursor: pointer;
      box-shadow: 0 2px 8px rgba(0, 0, 0, 0.2);
      z-index: 1000;
      /* 初始隐藏 */
      display: none;
      /* 添加一点小动画更自然 */
      transition: opacity 0.1s;
    }

    #action-btn:hover {
      background-color: #005a87;
    }
  </style>
</head>
<body>

  <h1>选中文本试试看</h1>

  <p>
    这是一段可以选中的文字。请用鼠标从某个位置开始拖动,选中一部分内容。
    比如这句话,选中后你会看到一个按钮出现在你选中区域的右下角。
  </p>

  <p>
    另一个段落。试试选中这里的几个字。
    这就是我们要实现的"持续显示在右下角"的交互效果。
  </p>

  <!-- 按钮:始终显示在选区右下角 -->
  <button id="action-btn"> 搜索 </button>

  <script>
    const button = document.getElementById('action-btn');
    let isUserClickingButton = false;

    // 点击按钮时标记(防止被 hide 干扰)
    button.addEventListener('mousedown', () => {
      isUserClickingButton = true;
    });

    button.addEventListener('mouseup', () => {
      isUserClickingButton = false;
    });

    function updateButton() {
      const selection = window.getSelection();

      // 如果没有选中文本,隐藏按钮
      if (selection.toString().length === 0) {
        button.style.display = 'none';
        return;
      }

      // 获取选区最后一个 range
      if (selection.rangeCount > 0) {
        const range = selection.getRangeAt(0);
        const rect = range.getBoundingClientRect();

        // 忽略极小选区(比如光标未移动)
        if (rect.width === 0 || rect.height === 0) {
          button.style.display = 'none';
          return;
        }

        // 定位到选区右下角
        const left = rect.right + window.scrollX;
        const top = rect.bottom + window.scrollY;

        button.style.left = left + 'px';
        button.style.top = top + 'px';
        button.style.display = 'block';
      }
    }

    // 监听选中变化(核心)
    document.addEventListener('selectionchange', updateButton);

    // 点击页面其他地方时:如果选择已清空,则隐藏按钮
    document.addEventListener('click', () => {
      const selection = window.getSelection();

      // 如果用户不是在点击按钮,并且没有选中任何文本
      if (!isUserClickingButton && selection.toString().length === 0) {
        button.style.display = 'none';
      }
    });

    // 可选:滚动时也更新位置(防止错位)
    window.addEventListener('scroll', () => {
      // 触发 selectionchange 会自动调用 updateButton
      if (window.getSelection().toString().length > 0) {
        updateButton();
      }
    }, { passive: true });
  </script>

</body>
</html>