概述
React 19 是 React 框架的一个重要里程碑版本,带来了众多突破性的改进和新特性。本文档将详细介绍 React 19 的主要变化,帮助开发者了解并迁移到新版本。
🚀 主要新特性
React Compiler (编译器)
React 19 引入了全新的 React Compiler,这是一个革命性的功能:
核心特点:
- 自动优化组件重新渲染
- 无需手动使用
useMemo、useCallback和memo - 编译时优化,运行时性能显著提升
- 向后兼容,渐进式采用
使用示例:
// React 18 - 需要手动优化
const ExpensiveComponent = memo(({ data }) => {
  const processedData = useMemo(() => {
    return data.map((item) => expensiveOperation(item));
  }, [data]);

  return <div>{processedData}</div>;
});

// React 19 - 编译器自动优化
const ExpensiveComponent = ({ data }) => {
  const processedData = data.map((item) => expensiveOperation(item));
  return <div>{processedData}</div>;
};
Actions (动作系统)
Actions 是 React 19 中处理异步操作的新方式:
核心概念:
- 简化异步状态管理
- 内置 pending、error 状态处理
- 自动处理竞态条件
- 更好的用户体验
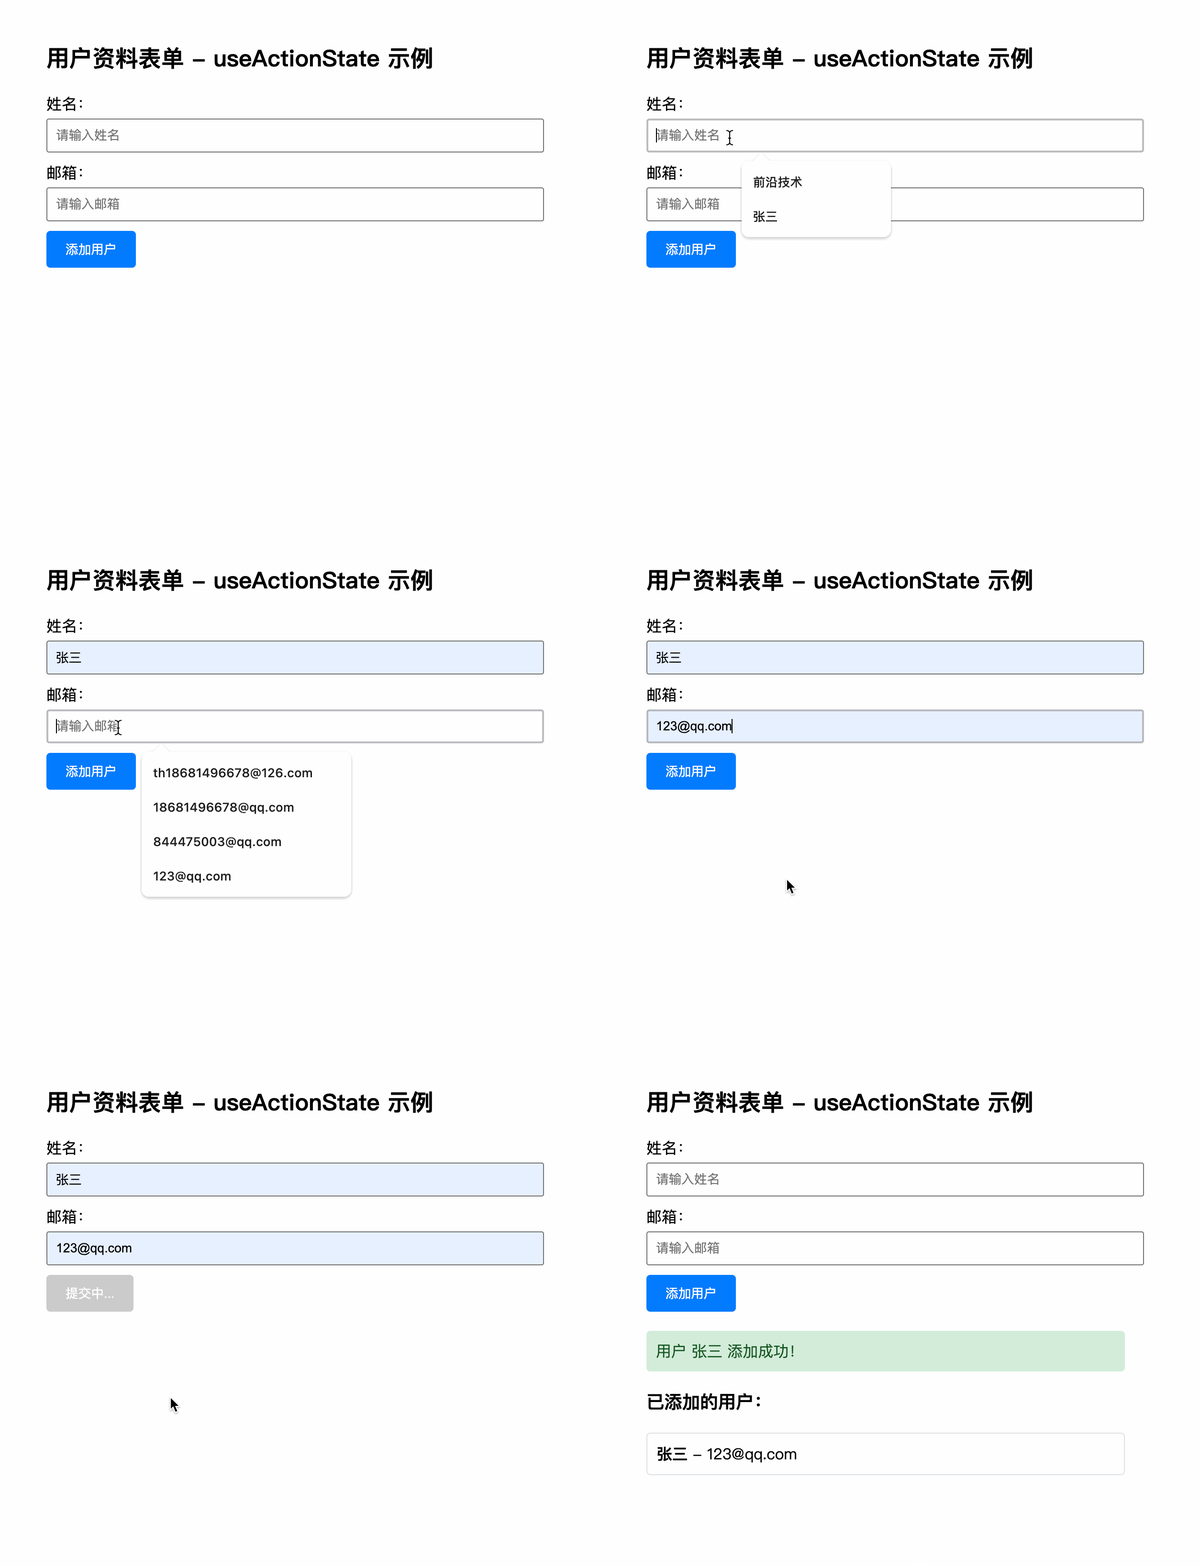
useActionState Hook:
import { useActionState, useState } from "react";

// 模拟一个异步的用户更新函数
async function updateUserProfile(formData) {
  // 模拟网络延迟
  await new Promise((resolve) => setTimeout(resolve, 1000));

  const name = formData.get("name");
  const email = formData.get("email");

  // 模拟验证逻辑
  if (!name || name.trim().length < 2) {
    throw new Error("姓名至少需要2个字符");
  }

  if (!email || !email.includes("@")) {
    throw new Error("请输入有效的邮箱地址");
  }

  // 模拟随机失败
  if (Math.random() < 0.3) {
    throw new Error("服务器错误,请稍后重试");
  }

  return { name, email };
}

function UserProfileForm() {
  const [users, setUsers] = useState([]);

  const [state, submitAction, isPending] = useActionState(
    async (previousState, formData) => {
      try {
        const userData = await updateUserProfile(formData);

        // 更新用户列表
        setUsers((prev) => [...prev, { ...userData, id: Date.now() }]);

        return {
          success: true,
          message: `用户 ${userData.name} 添加成功!`,
          error: null,
        };
      } catch (error) {
        return {
          success: false,
          message: null,
          error: error.message,
        };
      }
    },
    {
      success: false,
      message: null,
      error: null,
    }
  );

  return (
    <div style={{ padding: "20px", maxWidth: "500px", margin: "0 auto" }}>
      <h2>用户资料表单 - useActionState 示例</h2>

      <form action={submitAction} style={{ marginBottom: "20px" }}>
        <div style={{ marginBottom: "10px" }}>
          <label htmlFor="name">姓名:</label>
          <input
            type="text"
            id="name"
            name="name"
            required
            style={{ width: "100%", padding: "8px", marginTop: "4px" }}
            placeholder="请输入姓名"
          />
        </div>

        <div style={{ marginBottom: "10px" }}>
          <label htmlFor="email">邮箱:</label>
          <input
            type="email"
            id="email"
            name="email"
            required
            style={{ width: "100%", padding: "8px", marginTop: "4px" }}
            placeholder="请输入邮箱"
          />
        </div>

        <button
          type="submit"
          disabled={isPending}
          style={{
            padding: "10px 20px",
            backgroundColor: isPending ? "#ccc" : "#007bff",
            color: "white",
            border: "none",
            borderRadius: "4px",
            cursor: isPending ? "not-allowed" : "pointer",
          }}
        >
          {isPending ? "提交中..." : "添加用户"}
        </button>
      </form>

      {/* 显示状态信息 */}
      {state.error && (
        <div
          style={{
            padding: "10px",
            backgroundColor: "#f8d7da",
            color: "#721c24",
            borderRadius: "4px",
            marginBottom: "10px",
          }}
        >
          错误:{state.error}
        </div>
      )}

      {state.success && state.message && (
        <div
          style={{
            padding: "10px",
            backgroundColor: "#d4edda",
            color: "#155724",
            borderRadius: "4px",
            marginBottom: "10px",
          }}
        >
          {state.message}
        </div>
      )}

      {/* 用户列表 */}
      {users.length > 0 && (
        <div>
          <h3>已添加的用户:</h3>
          <ul style={{ listStyle: "none", padding: 0 }}>
            {users.map((user) => (
              <li
                key={user.id}
                style={{
                  padding: "10px",
                  backgroundColor: "#f8f9fa",
                  marginBottom: "5px",
                  borderRadius: "4px",
                  border: "1px solid #dee2e6",
                }}
              >
                <strong>{user.name}</strong> - {user.email}
              </li>
            ))}
          </ul>
        </div>
      )}
    </div>
  );
}

export default UserProfileForm;
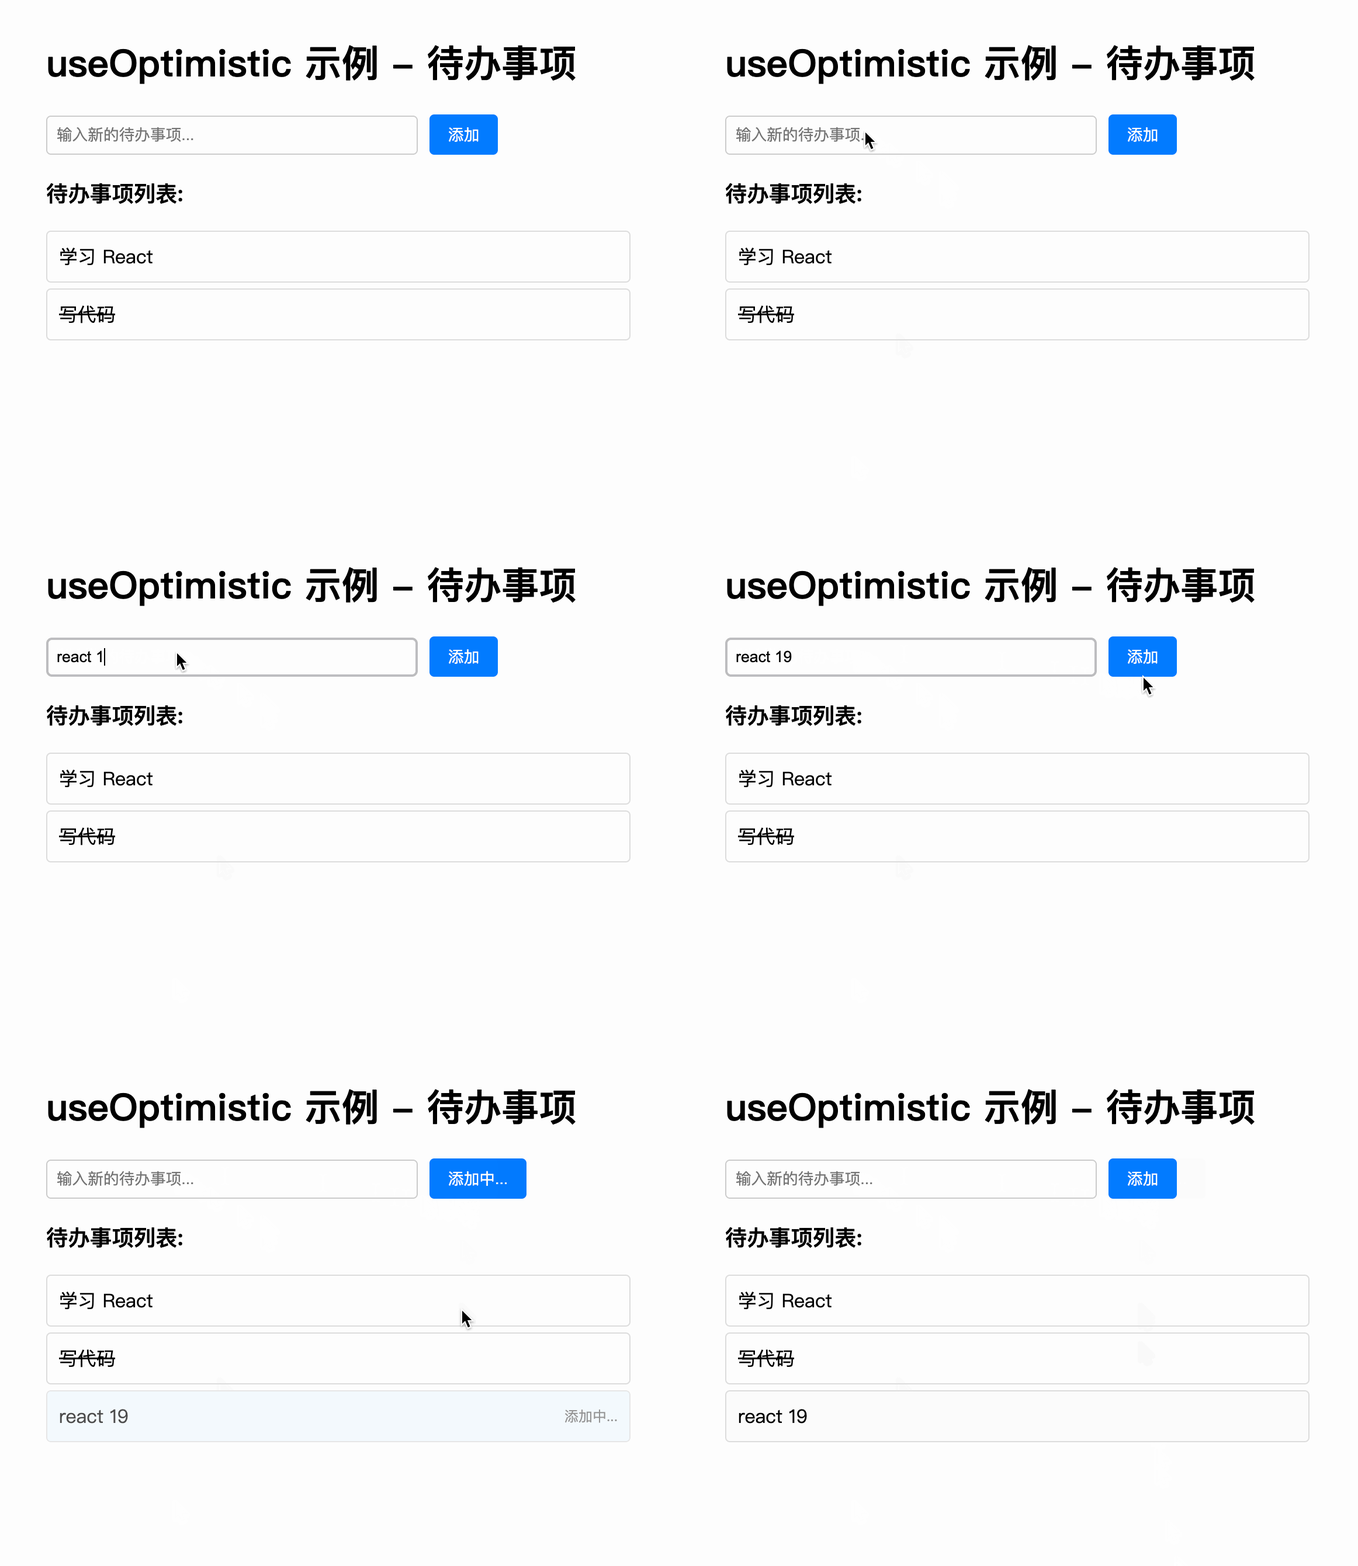
useOptimistic Hook:
import { useOptimistic, useState, useTransition } from "react";

// 模拟异步 API 调用
const addTodoAPI = async (text) => {
  // 模拟网络延迟
  await new Promise((resolve) => setTimeout(resolve, 2000));

  // 模拟可能的失败(10% 概率)
  if (Math.random() < 0.1) {
    throw new Error("添加失败");
  }

  return {
    id: Date.now(),
    text,
    completed: false,
  };
};

export default function TodoApp() {
  const [todos, setTodos] = useState([
    { id: 1, text: "学习 React", completed: false },
    { id: 2, text: "写代码", completed: true },
  ]);

  const [isPending, startTransition] = useTransition();

  // useOptimistic Hook - 用于乐观更新
  const [optimisticTodos, addOptimisticTodo] = useOptimistic(
    todos,
    (state, newTodo) => [...state, { ...newTodo, pending: true }]
  );

  const [inputValue, setInputValue] = useState("");

  const handleAddTodo = async (text) => {
    if (!text.trim()) return;

    // 立即显示乐观更新
    const optimisticTodo = {
      id: Date.now(),
      text,
      completed: false,
    };

    addOptimisticTodo(optimisticTodo);
    setInputValue("");

    startTransition(async () => {
      try {
        // 调用实际的 API
        const newTodo = await addTodoAPI(text);
        setTodos((prev) => [...prev, newTodo]);
      } catch (error) {
        // 如果失败,乐观更新会自动回滚
        alert("添加失败: " + error.message);
      }
    });
  };

  const handleSubmit = (e) => {
    e.preventDefault();
    handleAddTodo(inputValue);
  };

  return (
    <div style={{ padding: "20px", maxWidth: "500px", margin: "0 auto" }}>
      <h1>useOptimistic 示例 - 待办事项</h1>

      <form onSubmit={handleSubmit} style={{ marginBottom: "20px" }}>
        <input
          type="text"
          value={inputValue}
          onChange={(e) => setInputValue(e.target.value)}
          placeholder="输入新的待办事项..."
          style={{
            padding: "8px",
            marginRight: "10px",
            border: "1px solid #ccc",
            borderRadius: "4px",
            width: "300px",
          }}
        />
        <button
          type="submit"
          disabled={isPending || !inputValue.trim()}
          style={{
            padding: "8px 16px",
            backgroundColor: "#007bff",
            color: "white",
            border: "none",
            borderRadius: "4px",
            cursor: "pointer",
          }}
        >
          {isPending ? "添加中..." : "添加"}
        </button>
      </form>

      <div>
        <h3>待办事项列表:</h3>
        {optimisticTodos.length === 0 ? (
          <p>暂无待办事项</p>
        ) : (
          <ul style={{ listStyle: "none", padding: 0 }}>
            {optimisticTodos.map((todo) => (
              <li
                key={todo.id}
                style={{
                  padding: "10px",
                  margin: "5px 0",
                  backgroundColor: todo.pending ? "#f0f8ff" : "#f9f9f9",
                  border: "1px solid #ddd",
                  borderRadius: "4px",
                  opacity: todo.pending ? 0.7 : 1,
                  display: "flex",
                  alignItems: "center",
                }}
              >
                <span
                  style={{
                    textDecoration: todo.completed ? "line-through" : "none",
                    flex: 1,
                  }}
                >
                  {todo.text}
                </span>
                {todo.pending && (
                  <span
                    style={{
                      fontSize: "12px",
                      color: "#666",
                      marginLeft: "10px",
                    }}
                  >
                    添加中...
                  </span>
                )}
              </li>
            ))}
          </ul>
        )}
      </div>
    </div>
  );
}
改进的 Suspense
新的 Suspense 特性:
-
更好的错误边界集成
-
改进的加载状态管理
-
更细粒度的控制
function App() {
return (
<Suspense fallback={<Loading />}>
<ErrorBoundary fallback={<Error />}>
<DataComponent />
</ErrorBoundary>
</Suspense>
);
}
🔧 API 改进
forwardRef 简化
// React 18
const MyInput = forwardRef(function MyInput(props, ref) {
  return <input {...props} ref={ref} />;
});

// React 19 - 不再需要 forwardRef
function MyInput(props) {
  return <input {...props} />;
}
Context 作为 Provider
// React 18
const ThemeContext = createContext();
function App() {
  return (
    <ThemeContext.Provider value="dark">
      <Page />
    </ThemeContext.Provider>
  );
}

// React 19
const ThemeContext = createContext();
function App() {
  return (
    <ThemeContext value="dark">
      <Page />
    </ThemeContext>
  );
}
ref 作为 prop
// React 19 - ref 现在是普通 prop
function MyInput({ placeholder, ref }) {
  return <input placeholder={placeholder} ref={ref} />;
}

// 使用
<MyInput ref={ref} placeholder="输入文本" />;
📱 React Native 集成
React 19 与 React Native 的新架构更好地集成:
- 改进的性能
- 更好的类型安全
- 统一的开发体验
🛠️ 开发者体验改进
更好的错误信息
- 更清晰的错误提示
- 更好的调试信息
- 改进的开发工具支持
TypeScript 支持增强
- 更好的类型推断
- 改进的泛型支持
- 更严格的类型检查
开发工具改进
- React DevTools 增强
- 更好的性能分析
- 改进的组件检查
🔄 迁移指南
从 React 18 迁移
-
更新依赖:
npm install react@19 react-dom@19
-
启用 React Compiler:
// babel.config.js
module.exports = {
plugins: [
[
"babel-plugin-react-compiler",
{
// 配置选项
},
],
],
}; -
移除不必要的优化:
- 移除手动的
memo、useMemo、useCallback - 让编译器自动优化
- 更新 forwardRef 使用:
- 移除不必要的
forwardRef包装 - 直接使用 ref 作为 prop
🚨 破坏性变更
1. 移除的 API
- 某些过时的生命周期方法
- 废弃的 Context API
- 旧的 Suspense 行为
2. 行为变更
- 更严格的类型检查
- 改变的默认行为
- 新的错误处理机制
🎉 总结
React 19 带来了革命性的改进:
- React Compiler 自动优化性能
- Actions 简化异步操作
- 新的 Hooks 提供更强大的功能
- 改进的 API 简化开发体验
- 更好的性能 和开发者体验
这些改进使 React 应用更快、更易维护,同时保持了向后兼容性。建议开发者逐步迁移到 React 19,享受这些新特性带来的好处。
📚 参考资源
React 19 革命性升级:编译器自动优化,告别手动性能调优时代 - 高质量源码分享平台-免费下载各类网站源码与模板及前沿技术分享