1. 概述
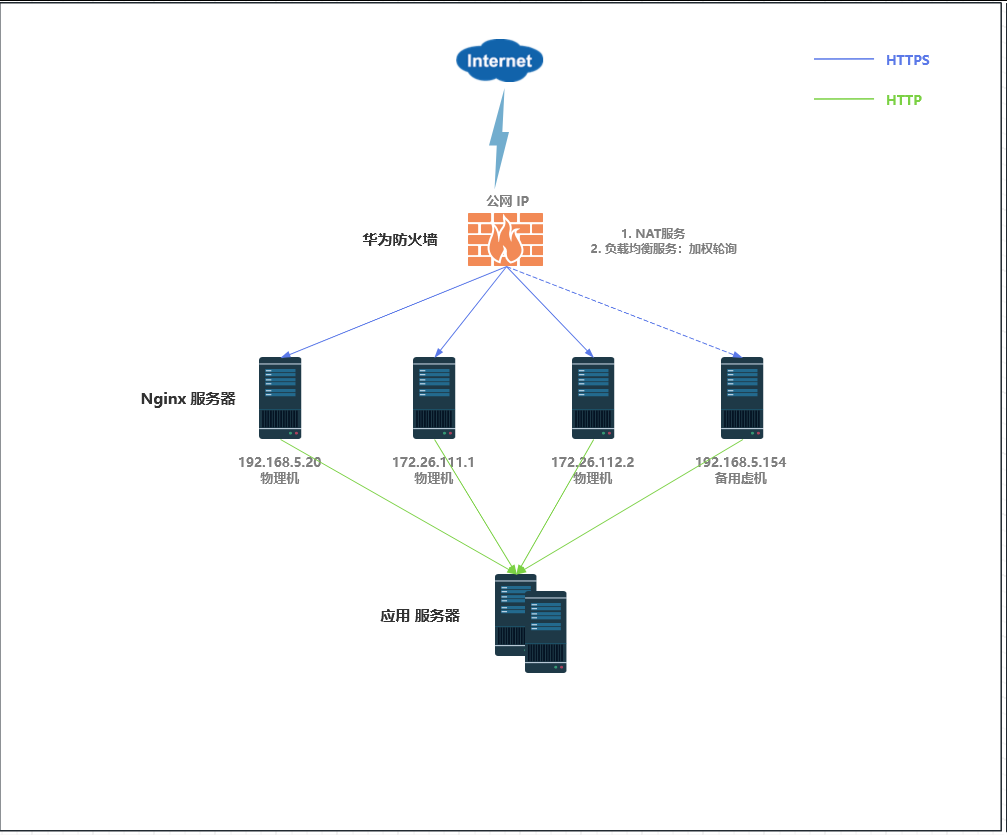
- 内部Nginx服务器做服务网关,代理后端应用服务,卸载ssl域名证书,将接收的https请求,转发至后端http服务。
- 华为防火墙负责NAT,启用服务器负载均衡功能,将公网虚拟IP+端口映射到内部多台Nginx服务器上,并对Nginx服务器进行健康检查。
- 因为外网带宽流量、负载都很低,所以直接使用华为防火墙做负载均衡。如果是外网带宽流量大或负载高,建议采用独立负载均衡方案(硬件或LVS)。
2. 架构图
3. 配置Nginx
3.1 安装Nginx
略
3.2 配置Nginx
1. 主配置文件
bash
vim /usr/local/nginx/conf/nginx.conf:
bash
user  username;

worker_processes  auto;
worker_cpu_affinity auto;

worker_rlimit_nofile 65535;

error_log  /var/log/nginx/error.log;
#error_log  logs/error.log  notice;
#error_log  logs/error.log  info;

pid        /var/run/nginx/nginx.pid;

events {
    use epoll;
    worker_connections  10240;
}

http {
    server_tokens off;
    include       mime.types;
    default_type  application/octet-stream;

    log_format main   '{"@timestamp":"$time_iso8601",'
                        '"@msec":"$msec",'
                        '"@source":"$server_addr",'
                        '"hostname":"$hostname",'
                        '"ip":"$http_x_forwarded_for",'
                        '"client":"$remote_addr",'
                        '"request_method":"$request_method",'
                        '"scheme":"$scheme",'
                        '"domain":"$server_name",'
                        '"referer":"$http_referer",'
                        '"request":"$request_uri",'
                        '"args":"$args",'
                        '"request_body":"$request_body",'
                        '"size":$body_bytes_sent,'
                        '"status": $status,'
                        '"responsetime":$request_time,'
                        '"upstreamtime":"$upstream_response_time",'
                        '"upstreamaddr":"$upstream_addr",'
                        '"http_user_agent":"$http_user_agent",'
                        '"https":"$https",'
                        #'"http_cookie: $http_cookie",'
                        #'"cookie_login_token: $cookie_login_token",'
                       '}';


    access_log  /var/log/nginx/access.log  main;

    map $http_upgrade $connection_upgrade {
        default upgrade;
        ''   close;
    }

    server_names_hash_bucket_size 256;
    client_header_buffer_size 32k;
    large_client_header_buffers 4 64k;
    client_max_body_size 1g;

    sendfile        on;
    tcp_nopush     on;

    #keepalive_timeout  0;
    keepalive_timeout  65;

    #gzip  on;
    fastcgi_connect_timeout 300;
    fastcgi_send_timeout 300;
    fastcgi_read_timeout 300;
    fastcgi_buffer_size 64k;
    fastcgi_buffers 8 64k;
    fastcgi_busy_buffers_size 128k;
    fastcgi_temp_file_write_size 128k;
    gzip on;
    gzip_min_length 1k;
    gzip_buffers 32 8k;
    gzip_http_version 1.0;
    gzip_comp_level 2;
    gzip_types text/plain application/x-javascript text/css application/xml;
    gzip_vary on;

    # 管理虚拟主机。维护单个服务时可以注释掉,然后重新加载配置文件禁用服务!
    include /usr/local/nginx/conf/conf.d/default_server.conf;                 # 8080 8443
    include /usr/local/nginx/conf/conf.d/proxy_yourdomain.conf;               # 8080 8443

}
2. 配置默认nginx服务站点
- 禁止没有域名的请求访问,return 444 不返回错误信息。
bash
vim /usr/local/nginx/conf/conf.d/default_server.conf
bash
# HTTP SERVER
server {
        listen       8080 default_server;
        listen       [::]:80 default_server;
        server_name  _;
        return 444;
}

# HTTPS SERVER
server {
        listen       8443 ssl default_server;
        listen       [::]:443 ssl default_server;
        server_name  _;

        ssl_certificate "/usr/local/nginx/conf/xunku-org/xunku.org.pem";
        ssl_certificate_key "/usr/local/nginx/conf/xunku-org/xunku.org.key";
        #ssl_session_cache shared:SSL:1m;
        ssl_session_timeout  10m;
        ssl_protocols TLSv1.2 TLSv1.3;

        return 444;
}
3. 配置自定义代理服务站点
bash
vim /usr/local/nginx/conf/conf.d/proxy_yourdomain.conf
bash
# 定义upstream
upstream  proxy_yourdomain.com {
            # server指令指定后端服务器的IP地址和端口
            server    192.168.5.76:18080;
          }


# HTTP Server
server {
           # 监听端口
           listen       8080;
           server_name  www.yourdomain.com;

           return 301 https://$host$request_uri;
        }


# HTTPS Server
server {
           # 监听端口
           listen       8443 ssl;
           server_name  www.yourdomain.com;

           ssl_certificate      /usr/local/nginx/conf/yourdomain/www.yourdomain.com.crt;
           ssl_certificate_key  /usr/local/nginx/conf/yourdomain/www.yourdomain.com.key;
           ssl_session_cache    shared:SSL:30m;
           ssl_session_timeout 5m;
           ssl_ciphers ECDHE-RSA-AES128-GCM-SHA256:ECDHE:ECDH:AES:HIGH:!NULL:!aNULL:!MD5:!ADH:!RC4:!3DES;
           ssl_protocols TLSv1.2 TLSv1.3;
           ssl_prefer_server_ciphers  on;

           add_header Cache-Control no-cache;

           location / {
                       # 代理转发,服务转发
                       proxy_pass http://proxy_yourdomain.com;

                       client_max_body_size 1000m;
                       proxy_set_header Host $host;
                       proxy_set_header X-Real-IP $remote_addr;
                       proxy_set_header X-Forwarded-For $proxy_add_x_forwarded_for;
                       proxy_set_header X-Forwarded-Proto $scheme;
                       proxy_set_header Upgrade $http_upgrade;
                       proxy_http_version 1.1;

                       proxy_connect_timeout 300;
                       proxy_read_timeout 300;
                       proxy_send_timeout 300;
                       #proxy_set_header Host $host:$server_port;
                    }
        }
3.3 同步配置
1. 登录192.168.5.154操作
bash
[root@centos7-192-168-005-154 conf]# cd /usr/local/nginx/conf/
[root@centos7-192-168-005-154 conf]# pwd
/usr/local/nginx/conf
2. 修改配置(略)
3. 同步修改配置
禁止在每台服务器上修改单独修改
bash
rsync -avz nginx.conf conf.d 192.168.5.120:/usr/local/nginx/conf/
rsync -avz nginx.conf conf.d 172.26.111.1:/usr/local/nginx/conf/
rsync -avz nginx.conf conf.d 172.26.112.2:/usr/local/nginx/conf/
4. 验证配置
bash
# username 是nginx运行的普通账户
sudo -u username /usr/local/nginx/sbin/nginx -t -c /usr/local/nginx/conf/nginx.conf
bash
nginx: the configuration file /usr/local/nginx/conf/nginx.conf syntax is ok
nginx: configuration file /usr/local/nginx/conf/nginx.conf test is successful
5. 加载配置
bash
systemctl reload nginx4. 配置负载均衡
4.1 配置负载均衡安全策略
参见 华为官方配置文档

4.2 配置实服务器组
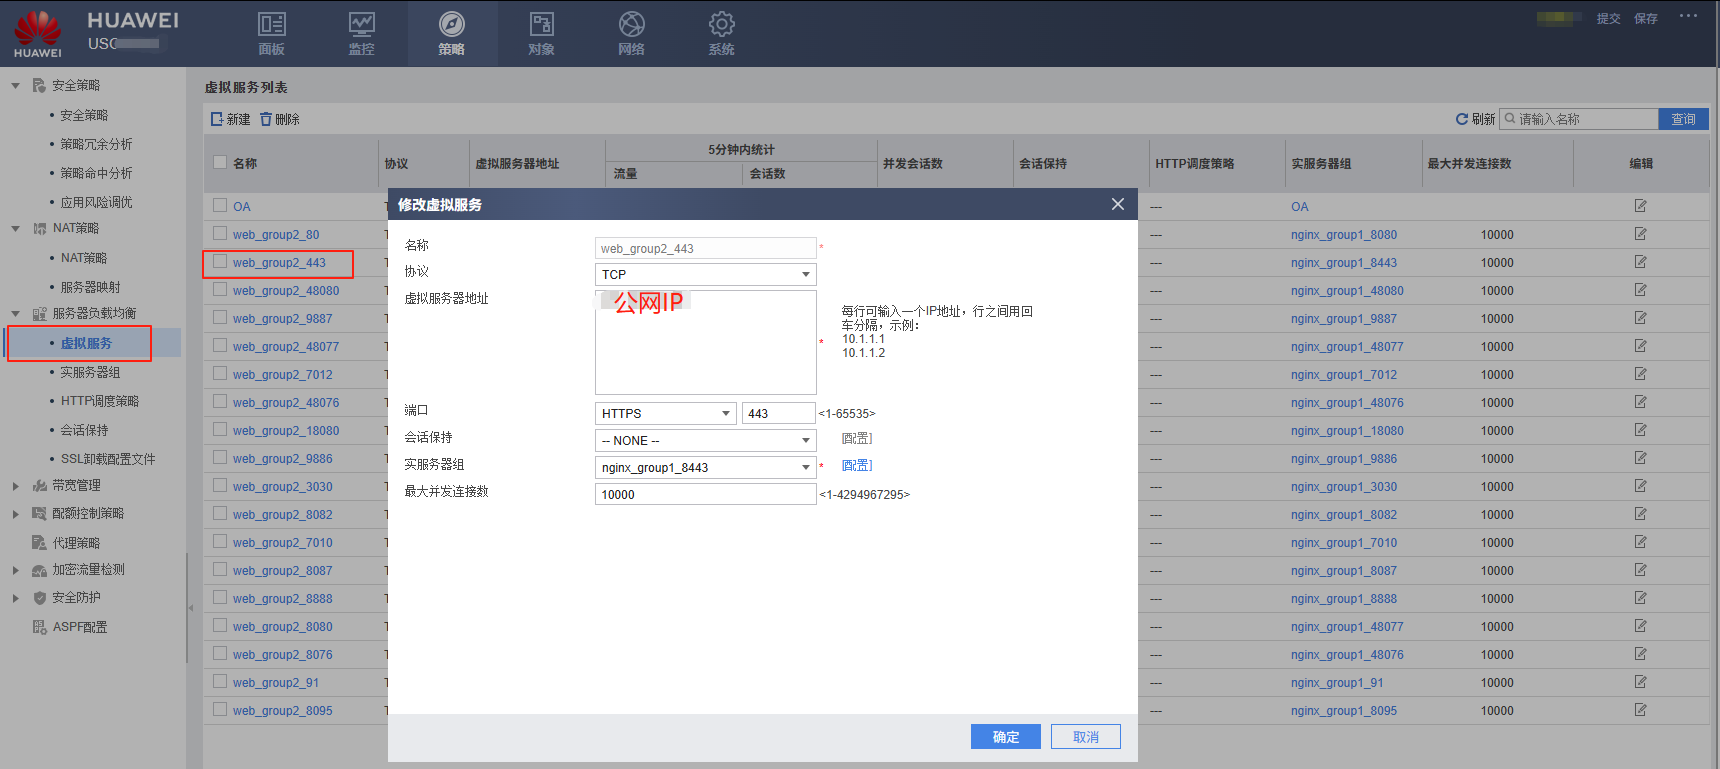
配置实服务器组,其中192.168.5.154配置了,但未启用。

4.3 配置虚拟服务