文章目录
-
- [一. JumpServer介绍](#一. JumpServer介绍)
-
- [1. JumpServer 的核心定位与价值](#1. JumpServer 的核心定位与价值)
- [2. JumpServer 的核心功能](#2. JumpServer 的核心功能)
- [3. JumpServer 的技术架构](#3. JumpServer 的技术架构)
- [二. JumpServer环境搭建](#二. JumpServer环境搭建)
-
- [1. 基础环境配置](#1. 基础环境配置)
- [2. 安装数据库](#2. 安装数据库)
- [3. 安装Python环境](#3. 安装Python环境)
- [4. 安装Redis](#4. 安装Redis)
- [5. 部署JumpServer](#5. 部署JumpServer)
- [6. 数据迁移](#6. 数据迁移)
- [7. 启动JumpServer](#7. 启动JumpServer)
- [8. 部署koko组件](#8. 部署koko组件)
- [9. 部署guacamole组件](#9. 部署guacamole组件)
- [10. lina/luna模块](#10. lina/luna模块)
- [11. 编译安装nginx、nginx-module-vts](#11. 编译安装nginx、nginx-module-vts)
- [12. 访问JumpServer](#12. 访问JumpServer)
- [三. JumpServer 问题](#三. JumpServer 问题)
-
- [1. 数据库导入失败](#1. 数据库导入失败)
- [2. 新版本JumpServer无requirements.txt文件](#2. 新版本JumpServer无requirements.txt文件)
JumpServer 是一款广受欢迎的开源堡垒机(Bastion Host) 软件,专为安全运维审计而设计,符合4A规范,也是中国首款开源堡垒机,由飞致云(Feitian Cloud)团队开发并维护。它允许企业集中管理和控制对服务器和网络设备的访问,实现事前授权、事中监控、事后审计。JumpServer 使用Python 开发,提供美观且用户友好的Web界面,并采用分布式架构,支持大规模并发和多机房部署
一. JumpServer介绍
1. JumpServer 的核心定位与价值
在企业 IT 架构中,服务器、网络设备、数据库等资产的运维通常面临以下痛点:
- 多账号分散管理,密码泄露风险高;
- 权限分配混乱,越权操作难以控制;
- 操作过程无记录,故障溯源困难;
- 合规审计(如等保 2.0)无法满足。
JumpServer 作为堡垒机,通过 "统一入口、集中管控、全程审计" 的模式解决上述问题,其核心价值包括:
- 安全合规:满足等保 2.0 对运维操作的审计要求,避免因操作不当导致的数据泄露或系统故障;
- 权限精细化:基于角色和资产的权限分配,确保 "最小权限原则" 落地;
- 运维效率提升:统一入口简化资产访问流程,支持批量操作和自动化运维;
- 成本可控:开源免费特性降低企业安全建设成本,同时支持二次开发满足定制化需求。
JumpServer 是广受欢迎的开源堡垒机,是符合 4A 规范的专业运维安全审计系统。
JumpServer 使用 Python 开发,配备了业界领先的 Web Terminal 方案,交互界面美观、用户体验好。
JumpServer 采纳分布式架构,支持多机房跨区域部署,支持横向扩展,无资产数量及并发限制。
改变世界,从一点点开始。
2. JumpServer 的核心功能
资产集中管理
- 全类型资产支持:涵盖服务器(Linux、Windows)、网络设备(交换机、路由器)、数据库(MySQL、Oracle)、应用系统(Web 应用、Kubernetes 容器)等;
- 资产信息标准化:记录资产的 IP、端口、操作系统、所属部门、负责人等信息,支持批量导入和标签化管理;
- 自动发现与同步:可通过网络扫描自动发现资产,支持与 CMDB 系统联动实现信息同步。
身份认证与权限控制
- 多因素认证(MFA):支持密码 + OTP 令牌(如 Google Authenticator)、密码 + USB Key 等组合认证方式,提升账号安全性;
- 统一身份管理:支持 LDAP、AD、OAuth2.0 等第三方身份系统集成,实现 "一次登录,多系统访问"(SSO);
- 基于角色的权限控制(RBAC):
- 角色定义:如 "系统管理员""运维专员""审计员" 等;
- 权限粒度:精确到 "某用户对某资产执行某操作"(如 "用户 A 可 SSH 登录服务器 B 并执行 reboot 命令");
- 临时权限:支持 "按需申请 - 审批 - 使用 - 自动回收" 的临时权限流程,避免权限长期闲置。
会话管理与审计
- 全协议支持:覆盖 SSH、RDP、VNC、Telnet、SFTP 等主流运维协议;
- 实时监控:管理员可实时查看所有活跃会话,支持 "隐身监控"(不打扰运维人员)和 "强制中断"(发现危险操作时);
- 操作录像与日志:
- 会话录像:完整记录 SSH 命令行操作和 RDP 桌面操作,支持录像回放和下载;
- 命令审计:精确记录每一条执行的命令(含时间、用户、资产、返回结果),支持关键词检索(如 "rm -rf""delete");
- 文件传输审计:记录通过 SFTP 上传 / 下载的文件名称、大小、时间等信息。
自动化与集成能力
- 批量操作:支持对多台资产批量执行命令、分发文件,提升运维效率;
- API 与 WebHook:提供丰富的 RESTful API,可与 Jenkins、Zabbix、Jira 等系统集成,实现自动化运维闭环;
- 工单系统联动:与企业工单系统对接,将权限申请、资产访问等操作纳入工单审批流程。
高可用与扩展性
- 分布式部署:核心组件(如 API 服务、终端服务)可分布式部署,支持负载均衡,避免单点故障;
- 容器化支持:提供 Docker 镜像和 Kubernetes 部署方案,便于在云环境中快速扩缩容;
- 国产化适配:兼容龙芯、飞腾等国产 CPU,以及银河麒麟、UOS 等国产操作系统。
3. JumpServer 的技术架构
JumpServer 采用 "前后端分离" 和 "微服务" 设计理念,核心架构包括:
| 组件 | 功能说明 |
|---|---|
| Core 核心服务 | 基于 Django 开发,处理 API 请求、权限校验、数据存储等核心业务逻辑。 |
| Koko 终端服务 | 基于 Golang 开发,提供 SSH Server 和 WebSocket 接口,处理 SSH 会话。 |
| Guacamole | 集成 Apache Guacamole,处理 RDP/VNC 协议,支持 Windows 桌面访问。 |
| Lina | 基于 Vue 开发的前端管理界面,负责用户、资产、权限等功能的可视化操作。 |
| Luna | 基于 Vue 开发的 Web 终端界面,提供 SSH/RDP 会话的网页端交互。 |
| Nginx | 反向代理服务器,统一入口,分发请求到各组件,处理静态资源。 |
| MySQL | 关系型数据库,存储用户、资产、权限、日志等结构化数据。 |
| Redis | 内存数据库,用于缓存、会话管理和 Celery 消息队列(处理异步任务)。 |
这种架构的优势在于:组件独立部署,可根据需求单独扩容(如高并发场景下增加 Koko 节点);前后端分离便于前端迭代,不影响后端服务。
二. JumpServer环境搭建
操作环境:
| 操作系统 | CentOS 7 |
|---|---|
| 内存 | 8G |
| 硬盘 | 100G |
| CPU | 2*2 |
1. 基础环境配置
(1)关闭防火墙与SElinux
shell
[root@jumpserver]# systemctl stop firewalld && setenforce 0(2)时间同步
shell
[root@jumpserver]# yum install ntpdate -y
[root@jumpserver]# timedatectl set-timezone Asia/Shanghai
[root@jumpserver]# ntpdate ntp1.aliyun.com
[root@jumpserver]# systemctl enable ntpdate
(3)安装所需的工具包
shell
[root@jumpserver ~]# yum -y install epel-release
[root@jumpserver]# yum install -y bash-completion vim lrzsz wget expect net-tools nc nmap tree dos2unix htop iftop iotop unzip telnet sl psmisc nethogs glances bc ntpdate openldap-devel gcc zlib zlib-devel
(4)修改字符集,否则可能报"input/output error"问题,因为日志里打印了中文。
- JumpServer 日志中会包含中文(如操作备注、错误信息),若字符集不支持中文,会出现 "input/output error" 等乱码问题,导致日志无法正常解析。设置
zh_CN.UTF-8确保中文正常显示。
shell
[root@jumpserver ~]# echo 'LANG="zh_CN.UTF-8"' > /etc/locale.conf 2. 安装数据库
shell
[root@jumpserver ~]# cd /opt/下载安装mariadb数据库
shell
# 查看并卸载所有残留的 MariaDB 组件
[root@jumpserver opt]# rpm -qa | grep -i mariadb
[root@jumpserver opt]# rpm -e --nodeps mariadb-libs-5.5.68-1.el7.x86_64  # 根据查询结果替换具体包名

[root@jumpserver opt]# wget http://dev.mysql.com/get/mysql-5.7.26-1.el7.x86_64.rpm-bundle.tar
[root@jumpserver opt]# ls
mysql-5.7.26-1.el7.x86_64.rpm-bundle.tar
[root@jumpserver opt]# tar -xvf mysql-5.7.26-1.el7.x86_64.rpm-bundle.tar
[root@jumpserver opt]# mkdir mysql
[root@jumpserver opt]# mv mysql-community*.rpm mysql
[root@jumpserver opt]# cd mysql/
[root@jumpserver mysql]# rpm -ivh mysql-community-common-5.7.26-1.el7.x86_64.rpm
[root@jumpserver mysql]# rpm -ivh mysql-community-libs-5.7.26-1.el7.x86_64.rpm
[root@jumpserver mysql]# rpm -ivh mysql-community-client-5.7.26-1.el7.x86_64.rpm
[root@jumpserver mysql]# rpm -ivh mysql-community-server-5.7.26-1.el7.x86_64.rpm
[root@jumpserver mysql]# systemctl start mysqld
[root@jumpserver mysql]# systemctl enable mysqld
查看初始密码:
shell
[root@jumpserver mysql]# grep 'temporary password' /var/log/mysqld.log
2025-08-05T06:00:36.683259Z 1 [Note] A temporary password is generated for root@localhost: #<3XrULHF?V?
登陆数据库:
shell
[root@jumpserver mysql]# mysql -uroot -p
Enter password:
Welcome to the MySQL monitor.  Commands end with ; or \g.
Your MySQL connection id is 2
Server version: 5.7.26

Copyright (c) 2000, 2019, Oracle and/or its affiliates. All rights reserved.

Oracle is a registered trademark of Oracle Corporation and/or its
affiliates. Other names may be trademarks of their respective
owners.

Type 'help;' or '\h' for help. Type '\c' to clear the current input statement.

mysql>
重新设置数据库密码:
shell
mysql> set global validate_password_length=6;
Query OK, 0 rows affected (0.00 sec)

mysql>  set global validate_password_mixed_case_count=0;
Query OK, 0 rows affected (0.00 sec)

mysql> set global validate_password_special_char_count=0;
Query OK, 0 rows affected (0.00 sec)

mysql> flush privileges;
ERROR 1820 (HY000): You must reset your password using ALTER USER statement before executing this statement.
mysql> ALTER USER 'root'@'localhost' IDENTIFIED BY 'hzy123456';
Query OK, 0 rows affected (0.00 sec)

mysql> FLUSH PRIVILEGES;
Query OK, 0 rows affected (0.00 sec)
创建jumpserver数据库与jumpserver用户:
shell
mysql> create database jumpserver default charset 'utf8' collate 'utf8_bin';
Query OK, 1 row affected (0.00 sec)

mysql> create user 'jumpserver'@'%' IDENTIFIED BY 'hzy123456';
Query OK, 0 rows affected (0.00 sec)

mysql> grant all privileges on root.* to 'jumpserver'@'%' identified by 'hzy123456';
Query OK, 0 rows affected, 1 warning (0.00 sec)

mysql> grant all privileges on jumpserver.* to 'jumpserver'@'%' identified by 'hzy123456';
Query OK, 0 rows affected, 1 warning (0.00 sec)
3. 安装Python环境
下载Python环境包:
shell
[root@jumpserver opt]# wget https://www.python.org/ftp/python/3.6.10/Python-3.6.10.tgz
[root@jumpserver opt]# tar -xvf Python-3.6.10.tgz
安装Python环境:
shell
[root@jumpserver opt]# cd Python-3.6.10/
[root@jumpserver Python-3.6.10]# yum install -y openssl openssl-devel
[root@jumpserver Python-3.6.10]# mkdir /usr/local/python3.6
[root@jumpserver Python-3.6.10]# ./configure --prefix=/usr/local/python3.6
[root@jumpserver Python-3.6.10]# make -j3 && make install
[root@jumpserver Python-3.6.10]# echo "PATH="/usr/local/python3.6/bin:$PATH"" >> /etc/profile
[root@jumpserver Python-3.6.10]# source /etc/profile
更换pip3的源:
shell
[root@jumpserver Python-3.6.10]# mkdir /root/.pip
[root@jumpserver Python-3.6.10]# touch /root/.pip/pip.conf
[root@jumpserver Python-3.6.10]# vi /root/.pip/pip.conf
[global]
index-url = https://mirrors.aliyun.com/pypi/simple/
安装python虚拟换环境:
shell
[root@jumpserver Python-3.6.10]# pip3 install virtualenv
[root@jumpserver opt]# cd /usr/local/
[root@jumpserver local]# virtualenv  --python=python3 py3
## 进入虚拟环境
[root@jumpserver local]# source /usr/local/py3/bin/activate
## 退出虚拟环境
(py3) [root@jumpserver local]# deactivate
4. 安装Redis
下载安装redis:
shell
(py3) [root@jumpserver opt]# yum -y install redis
(py3) [root@jumpserver opt]# systemctl start redis
(py3) [root@jumpserver opt]# systemctl enable redis
验证redis:
shell
(py3) [root@jumpserver opt]# redis-cli
127.0.0.1:6379> ping
PONG
127.0.0.1:6379> exit
#返回PONG证明可以正常启动
5. 部署JumpServer
JumpServer 核心服务是整个系统的 "大脑",负责处理 API 请求、权限校验、日志记录等核心逻辑。
- 下载源码:选择 v2.1.0 版本(稳定版),解压后需配置数据库、Redis 连接信息。
- SECRET_KEY 与 BOOTSTRAP_TOKEN:
SECRET_KEY:用于加密敏感数据(如密码、会话令牌),生成后需永久保存,丢失会导致数据解密失败。BOOTSTRAP_TOKEN:用于 JumpServer 与其他组件(如 koko、guacamole)通信认证,确保组件间安全连接。
- 配置文件(config.yml):指定数据库地址、端口、账号,Redis 连接信息,服务监听端口(8080 为 HTTP 端口,8070 为 WebSocket 端口)。
下载JumpServer,解压:
shell
(py3) [root@jumpserver opt]# wget https://github.com/jumpserver/jumpserver/releases/download/v2.1.0/jumpserver-v2.1.0.tar.gz
(py3) [root@jumpserver opt]# tar -zxvf jumpserver-v2.1.0.tar.gz
安装python虚拟环境下的py模块:
shell
(py3) [root@jumpserver jumpserver-v2.1.0]# cd requirements/
(py3) [root@jumpserver requirements]# ls
alpine_requirements.txt  issues.txt            requirements.txt
deb_requirements.txt     mac_requirements.txt  rpm_requirements.txt
## 安装jumperserver模块,必须保证在py3的虚拟环境,一定要先激活环境再安装

(py3) [root@jumpserver requirements]# pip3 install -r requirements.txt
## 如果报错 :ERROR: Could not find a version that satisfies the requirement tencentcloud-sdk-python==3.0.40
那就修改requirements.txt中关于tencentcloud-sdk-python的版本,修改为:
tencentcloud-sdk-python>=3.0.279,<=3.0.1437
##再次安装即可
获取SECRET_KEY、BOOTSTRAP_TOKEN秘钥:(需要写入配置文件)
shell
#获取SECRET_KEY
(py3) [root@jumpserver requirements]# if [ "$SECRET_KEY" = "" ]; then SECRET_KEY=`cat /dev/urandom | tr -dc A-Za-z0-9 | head -c 50` ; echo "SECRET_KEY=$SECRET_KEY" >> ~/.bashrc; echo $SECRET_KEY; else echo $SECRET_KEY; fi
EDgHartMCgR3JZ6moJeaSc6lUnNJrQ7QMW26zINd02UaK0rEZt

#获取BOOTSTRAP_TOKEN
(py3) [root@jumpserver requirements]# if [ "$BOOTSTRAP_TOKEN" = "" ]; then BOOTSTRAP_TOKEN=`cat /dev/urandom | tr -dc A-Za-z0-9 | head -c 16`; echo "BOOTSTRAP_TOKEN=$BOOTSTRAP_TOKEN" >> ~/.bashrc; echo $BOOTSTRAP_TOKEN; else echo $BOOTSTRAP_TOKEN; fi
CnbEyw1IOzt4DrRi
修改JumpServer配置文件:
shell
(py3) [root@jumpserver requirements]# cd /opt/jumpserver-v2.1.0/
(py3) [root@jumpserver jumpserver-v2.1.0]# cp config_example.yml config.yml
(py3) [root@jumpserver jumpserver-v2.1.0]# vi config.yml
(py3) [root@jumpserver jumpserver-v2.1.0]# egrep -v "^#|^$" config.yml
SECRET_KEY:EDgHartMCgR3JZ6moJeaSc6lUnNJrQ7QMW26zINd02UaK0rEZt
BOOTSTRAP_TOKEN:CnbEyw1IOzt4DrRi
DB_ENGINE: mysql
DB_HOST: 127.0.0.1
DB_PORT: 3306
DB_USER: jumpserver
DB_PASSWORD: hzy123456
DB_NAME: jumpserver
HTTP_BIND_HOST: 0.0.0.0
HTTP_LISTEN_PORT: 8080
WS_LISTEN_PORT: 8070
REDIS_HOST: 127.0.0.1
REDIS_PORT: 6379
(py3) [root@jumpserver jumpserver-v2.1.0]#
6. 数据迁移
jumpserver这个程序由python的web框架django开发而来。必须先进行数据迁移,生成库表的信息,才能运行程序。
登陆数据库:
shell
(py3) [root@jumpserver opt]# mysql -uroot -p
mysql> show databases ;
+--------------------+
| Database           |
+--------------------+
| information_schema |
| jumpserver         |
| mysql              |
| performance_schema |
| sys                |
+--------------------+
5 rows in set (0.01 sec)

mysql> use jumpserver
Database changed
mysql> show tables ;
Empty set (0.00 sec)
## 库内无表
进行数据迁移:
shell
(py3) [root@jumpserver jumpserver-v2.1.0]# cd apps/
(py3) [root@jumpserver apps]# python3 manage.py makemigrations
(py3) [root@jumpserver apps]# python3 manage.py migrate
JumpServer 基于 Django 框架开发,Django 通过 "迁移(migrations)" 管理数据库表结构。
makemigrations:根据模型定义生成迁移文件(记录表结构变更)。migrate:执行迁移文件,在数据库中创建实际的表(如用户表、资产表、权限表等)。
迁移完成后,jumpserver数据库会生成数十张表,用于存储系统所有业务数据。
验证是否导入成功:
shell
mysql> use jumpserver;
Reading table information for completion of table and column names
You can turn off this feature to get a quicker startup with -A

Database changed
mysql> show tables
    -> ;
+----------------------------------------------+
| Tables_in_jumpserver                         |
+----------------------------------------------+
| applications_databaseapp                     |
| applications_remoteapp                       |
| assets_adminuser                             |
| assets_asset                                 |
| assets_asset_labels                          |
| assets_asset_nodes                           |
| assets_assetgroup                            |
.......
7. 启动JumpServer
执行命令启动JumpServer:
shell
(py3) [root@jumpserver jumpserver-v2.1.0]# ./jms start
2025-08-05 15:37:22 Tue Aug  5 15:37:22 2025
2025-08-05 15:37:22 Jumpserver version v2.1.0, more see https://www.jumpserver.org

- Start Gunicorn WSGI HTTP Server
2025-08-05 15:37:22 Check database connection ...
users
 [X] 0001_initial
 [X] 0002_auto_20171225_1157_squashed_0019_auto_20190304_1459 (18 squashed migrations)
 [X] 0020_auto_20190612_1825
 [X] 0021_auto_20190625_1104
 [X] 0022_auto_20190625_1105
 [X] 0023_auto_20190724_1525
 [X] 0024_auto_20191118_1612
 [X] 0025_auto_20200206_1216
 [X] 0026_auto_20200508_2105
 [X] 0027_auto_20200616_1503
2025-08-05 15:37:24 Database connect success
2025-08-05 15:37:24 Check database structure change ...
2025-08-05 15:37:24 Migrate model change to database ...
Operations to perform:
  Apply all migrations: admin, applications, assets, audits, auth, authentication, captcha, common, contenttypes, django_cas_ng, django_celery_beat, jms_oidc_rp, ops, orgs, perms, sessions, settings, terminal, tickets, users
Running migrations:
  No migrations to apply.
2025-08-05 15:37:25 Collect static files
2025-08-05 15:37:27 Collect static files done

- Start Celery as Distributed Task Queue: Ansible

- Start Celery as Distributed Task Queue: Celery

- Start Beat as Periodic Task Scheduler

- Start Flower as Task Monitor

- Start Daphne ASGI WS Server
2025-08-05 15:37:39 Check service status: gunicorn -> running at 33765
2025-08-05 15:37:39 Check service status: celery_ansible -> running at 33776
2025-08-05 15:37:39 Check service status: celery_default -> running at 33784
2025-08-05 15:37:39 Check service status: beat -> running at 33798
2025-08-05 15:37:39 Check service status: flower -> running at 33803
2025-08-05 15:37:39 Check service status: daphne -> running at 33813gunicorn:WSGI HTTP 服务器,处理 API 请求(8080 端口)。celery:分布式任务队列,处理异步任务(如命令执行、日志上传)。beat:定时任务调度器(如定期清理过期日志)。daphne:ASGI 服务器,处理 WebSocket 连接(8070 端口,用于实时终端交互)。
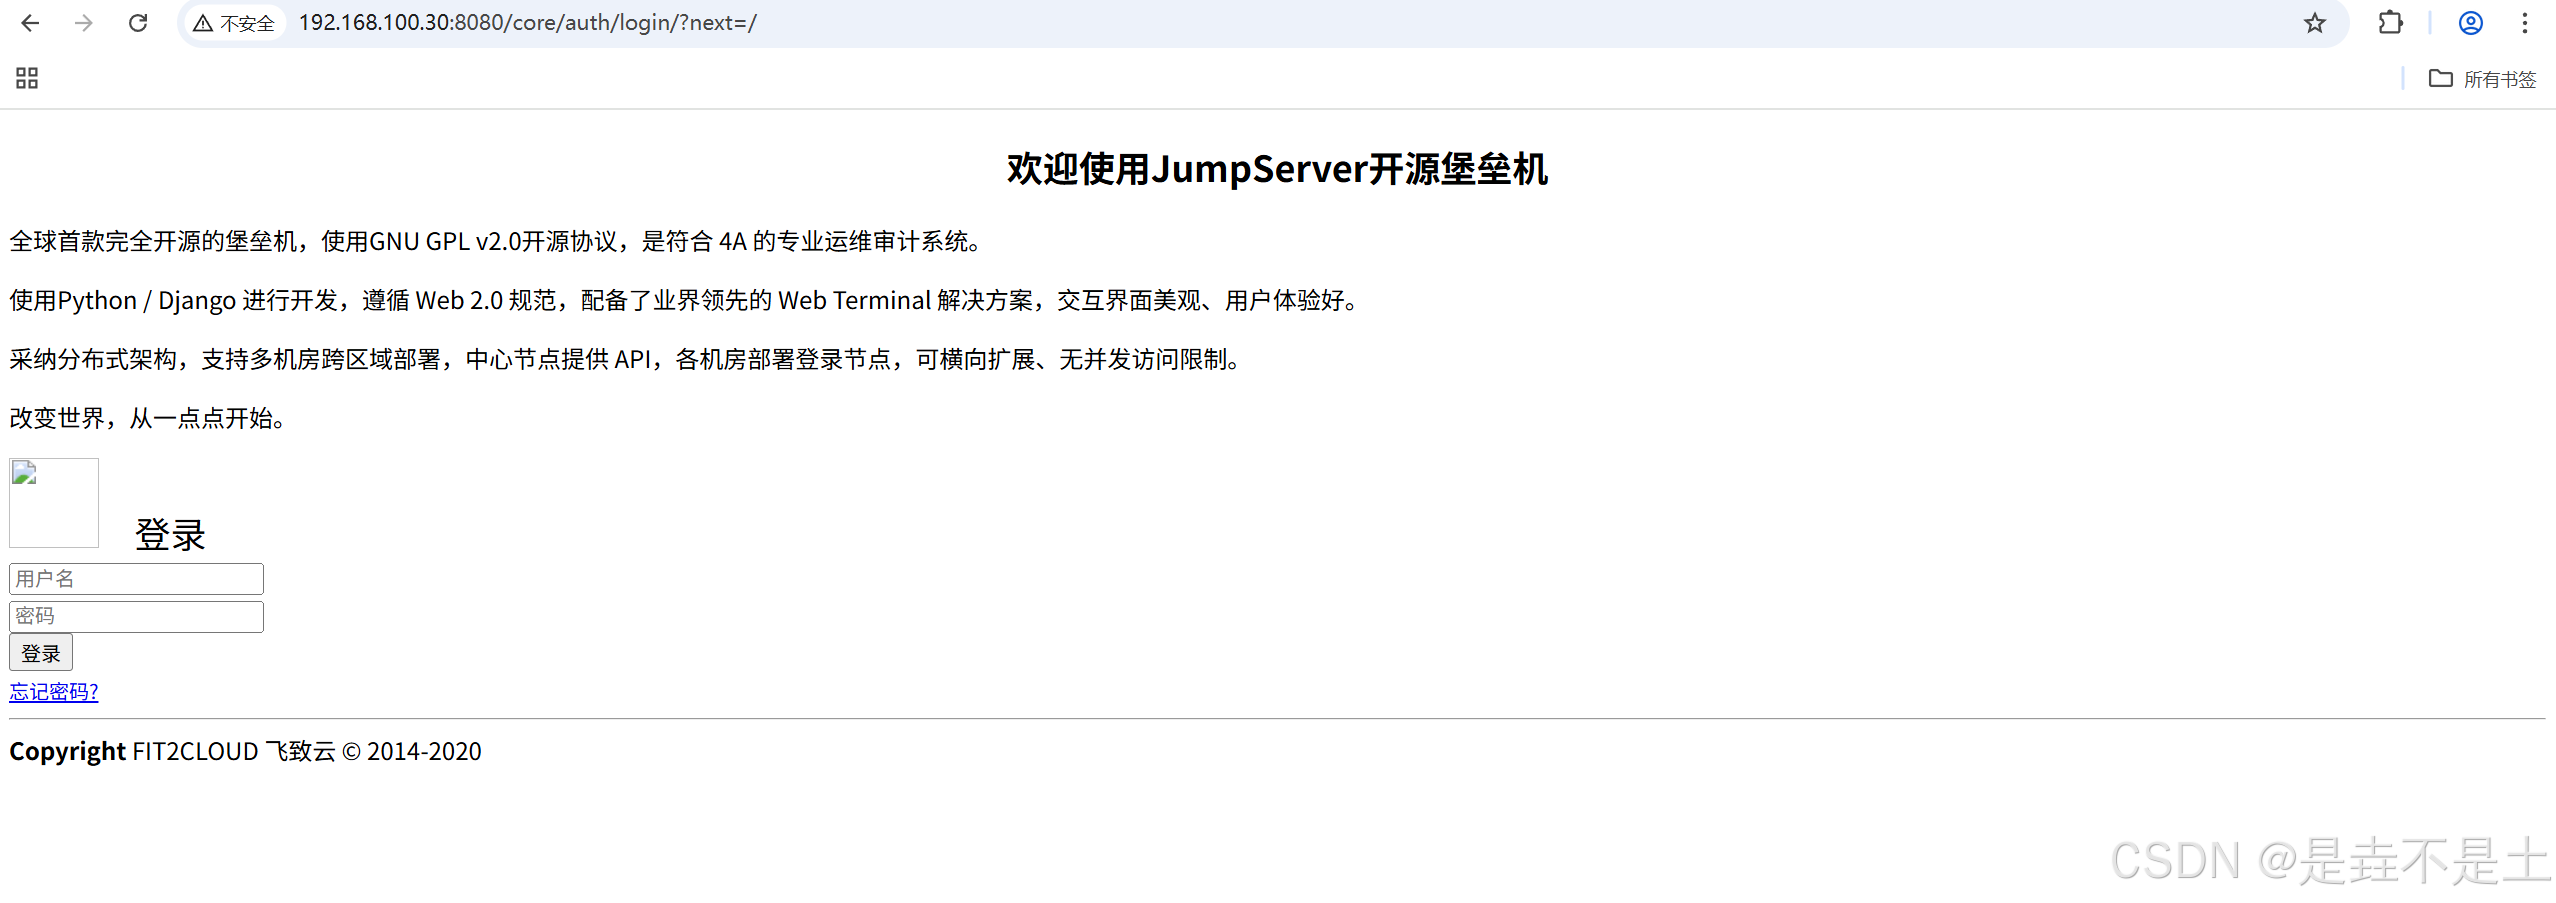
访问地址进行验证:192.168.100.30:8080
8. 部署koko组件
koko组件实现了SSH Server 和 Web Terminal Server的组件,提高SSH和WebSocket接口,使用Paramiko和Flask开发,可以让我们在线去像xshell一样在网页上去敲命令。他是golang编程语言开发的。和之前的coco组件(py写的)相比,性能更高。
组件作用 :
koko 是 JumpServer 的 SSH/Web 终端服务组件(基于 Golang 开发),替代早期的 coco 组件(Python 开发),性能更高。其核心功能:
- 提供 SSH Server 接口,支持通过 Xshell 等工具连接资产。
- 提供 WebSocket 接口,支持在网页端(luna)直接操作终端(类似 Xshell 的网页版)。
- 与 JumpServer 核心服务通信,校验用户权限,同步资产信息。
配置说明:
CORE_HOST:指向 JumpServer 核心服务地址(http://127.0.0.1:8080)。BOOTSTRAP_TOKEN:与核心服务保持一致,用于身份认证。REDIS_*:连接 Redis,用于缓存会话信息。
下载koko组件:
shell
(py3) [root@jumpserver opt]# wget https://github.com/jumpserver/koko/releases/download/v2.1.0/koko-v2.1.0-linux-amd64.tar.gz
(py3) [root@jumpserver opt]# tar -zxvf koko-v2.1.0-linux-amd64.tar.gz
(py3) [root@jumpserver opt]# cd koko-v2.1.0-linux-amd64/
(py3) [root@jumpserver opt]# cp config_example.yml config.yml
(py3) [root@jumpserver opt]# vi config.yml
##填入获取的BOOTSTRAP_TOKEN,将redis的注释删掉###
(py3) [root@jumpserver koko-v2.1.0-linux-amd64]# egrep -v "^#|^$" config.yml
CORE_HOST: http://127.0.0.1:8080
BOOTSTRAP_TOKEN: CnbEyw1IOzt4DrRi
REDIS_HOST: 127.0.0.1
REDIS_PORT: 6379
REDIS_PASSWORD:
REDIS_CLUSTERS:
REDIS_DB_ROOM:

#启动koko服务
(py3) [root@jumpserver koko-v2.1.0-linux-amd64]# ./koko -d
9. 部署guacamole组件
Apache 跳板机项目,Jumpserver使用其他组件实现RDP功能,Jumpserver并没有修改其他代码而是添加了额外的插件,支持Jumpserver调用。(这里的RDP就是远程桌面协议,通过浏览器就能操作后台服务器)
下载guacamole-server及ssh-forward:
shell
(py3) [root@jumpserver opt]# wget -O docker-guacamole-v2.1.1.tar.gz https://github.com/jumpserver/docker-guacamole/archive/master.tar.gz

(py3) [root@jumpserver opt]# tar -xf docker-guacamole-v2.1.1.tar.gz
#解压后目录名为docker-guacamole-master,目录下有三个文件#
(py3) [root@jumpserver opt]# cd docker-guacamole-master/
(py3) [root@jumpserver docker-guacamole-master]# ls
Dockerfile  etc  guacamole.properties
(py3) [root@jumpserver docker-guacamole-master]# wget http://download.jumpserver.org/public/guacamole-server-1.2.0.tar.gz #下载guacamole-server
(py3) [root@jumpserver docker-guacamole-master]# tar -zxvf guacamole-server-1.2.0.tar.gz
(py3) [root@jumpserver docker-guacamole-master]# wget http://download.jumpserver.org/public/ssh-forward.tar.gz--2020-08-09 14:33:54--  http://download.jumpserver.org/public/ssh-forward.tar.gz  #下载ssh-forward
(py3) [root@jumpserver docker-guacamole-master]# tar -zxvf ssh-forward.tar.gz
(py3) [root@jumpserver docker-guacamole-master]# cd guacamole-server-1.2.0  #进入源码包

(py3) [root@jumpserver guacamole-server-1.2.0]#  yum -y install cairo-devel libjpeg-turbo-devel libjpeg-devel libpng-devel libtool uuid-devel freerdp-devel pango-devel libssh2-devel libtelnet-devel libvncserver-devel libwebsockets-devel pulseaydio-libs-devel openssl-devel libvorbis-devel libwebp-devel  #安装依赖
安装ffmpeg工具:
ffmpeg工具是用来处理媒体文件。
shell
(py3) [root@jumpserver guacamole-server-1.2.0]# rpm -v --import http://li.nux.ro/download/nux/RPM-GPG-KEY-nux.ro
(py3) [root@jumpserver guacamole-server-1.2.0]# rpm -Uvh http://li.nux.ro/download/nux/dextop/el7/x86_64/nux-dextop-release-0-5.el7.nux.noarch.rpm
(py3) [root@jumpserver guacamole-server-1.2.0]# yum -y install ffmpeg ffmpeg-devell
编译安装guacamole:
shell
(py3) [root@jumpserver guacamole-server-1.2.0]# ./configure --with-init-dir=/etc/init.d
(py3) [root@jumpserver guacamole-server-1.2.0]# make && make install
(py3) [root@jumpserver guacamole-server-1.2.0]# echo $?
0
安装java环境:
shell
(py3) [root@jumpserver opt]# yum -y install java-1.8.0-openjdk
(py3) [root@jumpserver opt]# wget https://archive.apache.org/dist/tomcat/tomcat-9/v9.0.74/bin/apache-tomcat-9.0.74.tar.gz
(py3) [root@jumpserver opt]# tar -xf apache-tomcat-9.0.74.tar.gz
(py3) [root@jumpserver opt]# mv apache-tomcat-9.0.74 tomcat9
(py3) [root@jumpserver opt]# rm -rf /opt/tomcat9/webapps/*

(py3) [root@jumpserver opt]# cd /opt/docker-guacamole-master/
(py3) [root@jumpserver docker-guacamole-master]# wget http://download.jumpserver.org/release/v2.1.1/guacamole-client-v2.1.1.tar.gz
 #guacamole-clent里有一个war包和jar包

## 修改配置文件
 (py3) [root@jumpserver docker-guacamole-master]# sed -i 's/Connector port="8080"/Connector port="8081"/g' /opt/tomcat9/conf/server.xml
(py3) [root@jumpserver docker-guacamole-master]# echo "java.util.logging.ConsoleHandler.encoding = UTF-8" >> /opt/tomcat9/conf/logging.properties

## 创建三个软链接
(py3) [root@jumpserver docker-guacamole-master]# mkdir -p /config/guacamole/extensions/
(py3) [root@jumpserver docker-guacamole-master]# ln -sf /opt/docker-guacamole-master/guacamole-client-v2.1.1/guacamole-1.0.0.war /opt/tomcat9/webapps/ROOT.war
(py3) [root@jumpserver docker-guacamole-master]# ln -sf /opt/docker-guacamole-master/guacamole-client-v2.1.1/guacamole-auth-jumpserver-1.0.0.jar /config/guacamole/extensions/guacamole-auth-jumpserver-1.0.0.jar
(py3) [root@jumpserver docker-guacamole-master]# ln -sf /opt/docker-guacamole-master/guacamole.properties /config/guacamole/guacamole.properties
设置guacamole环境:
shell
(py3) [root@jumpserver docker-guacamole-master]# export JUMPSERVER_SERVER=http://127.0.0.1:8080
(py3) [root@jumpserver docker-guacamole-master]# echo "export JUMPSERVER_SERVER=http://127.0.0.1:8080" >> ~/.bashrc
(py3) [root@jumpserver docker-guacamole-master]# export BOOTSTRAP_TOKEN=CnbEyw1IOzt4DrRi
(py3) [root@jumpserver docker-guacamole-master]# echo "export B00TSTRAP_TOKEN=Ovn181zT7q7a8Die" >> ~/.bashrc
(py3) [root@jumpserver docker-guacamole-master]# export JUMPSERVER_KEY_DIR=/config/guacamole/keys
(py3) [root@jumpserver docker-guacamole-master]# echo "export JUMPSERVER_KEY_DIR=/config/guacamole/keys" >> ~/.bashrc
(py3) [root@jumpserver docker-guacamole-master]# export GUACAMOLE_HOME=/config/guacamole
(py3) [root@jumpserver docker-guacamole-master]# echo "export GUACAMOLE_HOME=/config/guacamole" >> ~/.bashrc
(py3) [root@jumpserver docker-guacamole-master]# export GUACAMOLE_LOG_LEVEL=ERROR
(py3) [root@jumpserver docker-guacamole-master]# echo "export GUACAMOLE_LOG_LEVEL=ERROR" >> ~/.bashrc
(py3) [root@jumpserver docker-guacamole-master]# export JUMPSERVER_ENABLE_DRIVE=true
(py3) [root@jumpserver docker-guacamole-master]# echo "export JUMPSERVER_ENABLE_DRIVE=true" >> ~/.bashrc
参数含义:
JUMPSERVER_SERVER 指core访问的地址
BOOTSTARAP_TOKEN一定要改为自己的,如果忘记就去jumpserver下的config.yml里去找
JUMPSERVER_KEY_DIR 认证成功后key存放目录
GUACAMOLE_HOME 为guacamole.properties配置文件所在目录
GUACAMOLE_LOG_LEVEL 为生成日志等级
JUMPSERVER_ENABLE_DRIVE 为rdp协议挂载共享盘
启动tomcat和guacamole:
shell
(py3) [root@jumpserver docker-guacamole-master]# /etc/init.d/guacd start
Starting guacd: guacd[45172]: INFO:	Guacamole proxy daemon (guacd) version 1.2.0 started
SUCCESS
(py3) [root@jumpserver docker-guacamole-master]# /opt/tomcat9/bin/startup.sh
Using CATALINA_BASE:   /opt/tomcat9
Using CATALINA_HOME:   /opt/tomcat9
Using CATALINA_TMPDIR: /opt/tomcat9/temp
Using JRE_HOME:        /usr
Using CLASSPATH:       /opt/tomcat9/bin/bootstrap.jar:/opt/tomcat9/bin/tomcat-juli.jar
Using CATALINA_OPTS:
Tomcat started.
10. lina/luna模块
lina是属于前端模块,负责页面的展现,luna现在是web terminal 前端、计划前端页面都有该项目提供。jumpserver只提供api,不再负责后台渲染html,他和lina结合可以实现网页上命令行界面的终端。
新建Linux用户nginx:
shell
(py3) [root@jumpserver opt]# useradd -M -s /sbin/nologin nginx安装lina/luna:
shell
(py3) [root@jumpserver opt]# wget https://github.com/jumpserver/lina/releases/download/v2.1.0/lina-v2.1.0.tar.gz
(py3) [root@jumpserver opt]# wget https://github.com/jumpserver/luna/releases/download/v2.1.1/luna-v2.1.1.tar.gz

(py3) [root@jumpserver opt]# tar -zxvf lina-v2.1.0.tar.gz
(py3) [root@jumpserver opt]# tar -zxvf luna-v2.1.1.tar.gz
(py3) [root@jumpserver opt]# mv lina-v2.1.0 lina
(py3) [root@jumpserver opt]# mv luna-v2.1.1 luna
(py3) [root@jumpserver opt]# chown -R nginx:nginx lina  #改变他的属主属组,让他归nginx管理
(py3) [root@jumpserver opt]# chown -R nginx:nginx luna  #改变他的属主属组,让他归nginx管理
11. 编译安装nginx、nginx-module-vts
nginx-module-vts 作用 :
用于监控 Nginx 的流量状态(如各虚拟主机的请求数、流量大小),便于排查访问异常。
下载安装nginx:
shell
(py3) [root@jumpserver opt]# wget http://nginx.org/download/nginx-1.22.0.tar.gz
(py3) [root@jumpserver opt]# tar -zxvf nginx-1.22.0.tar.gz
(py3) [root@jumpserver opt]# wget https://github.com/vozlt/nginx-module-vts/archive/refs/heads/master.zip
(py3) [root@jumpserver opt]# unzip master.zip

## 安装依赖
(py3) [root@jumpserver opt]# yum -y install gcc gcc-c++ pcre pcre-devel zlib zlib-devel openssl openssl-devel make

## 编译安装
(py3) [root@jumpserver nginx-1.22.0]# ./configure --prefix=/usr/local/nginx --user=nginx --group=nginx --add-module=/opt/nginx-module-vts-master/
(py3) [root@jumpserver nginx-1.22.0]# echo $?
0
(py3) [root@jumpserver nginx-1.22.0]# make && make install

## 验证安装
(py3) [root@jumpserver nginx-1.22.0]# /usr/local/nginx/sbin/nginx -V
nginx version: nginx/1.22.0
built by gcc 4.8.5 20150623 (Red Hat 4.8.5-44) (GCC)
configure arguments: --prefix=/usr/local/nginx --user=nginx --group=nginx --add-module=/opt/nginx-module-vts-master/
(py3) [root@jumpserver nginx-1.22.0]# /usr/local/nginx/sbin/nginx -t
nginx: the configuration file /usr/local/nginx/conf/nginx.conf syntax is ok
nginx: configuration file /usr/local/nginx/conf/nginx.conf test is successful
修改配置文件:
shell
(py3) [root@jumpserver opt]# vi /usr/local/nginx/conf/nginx.conf
#user  nobody;
worker_processes  1;

#error_log  logs/error.log;
#error_log  logs/error.log  notice;
#error_log  logs/error.log  info;

#pid        logs/nginx.pid;


events {
    worker_connections  1024;
}


http {
    include       mime.types;
    default_type  application/octet-stream;
    vhost_traffic_status_zone;                  #流量状态监控
    #log_format  main  '$remote_addr - $remote_user [$time_local] "$request" '
    #                  '$status $body_bytes_sent "$http_referer" '
    #                  '"$http_user_agent" "$http_x_forwarded_for"';

    #access_log  logs/access.log  main;
log_format main '{ "@timestamp": "$time_local", '
'"@fields": { '
'"uri":"$request_uri",'
'"url":"$uri",'
'"upstream_addr":"$upstream_addr",'
'"remote_addr": "$remote_addr", '
'"remote_user": "$remote_user", '
'"body_bytes_sent": "$body_bytes_sent", '
'"host":"$host",'
'"server_addr":"$server_addr",'
'"request_time": "$request_time", '
'"request_time":"$request_time",'
'"status":"$status",'
'"request": "$request", '
'"request_method": "$request_method", '
'"size":$body_bytes_sent,'
'"upstream_time":"$upstream_response_time"'
'"http_referrer": "$http_referer", '
'"body_bytes_sent":"$body_bytes_sent", '
'"http_x_forwarded_for": "$http_x_forwarded_for", '
'"http_user_agent": "$http_user_agent" } }';
    sendfile        on;
    #tcp_nopush     on;

    #keepalive_timeout  0;
    keepalive_timeout  65;

    #gzip  on;

    server {
        listen       80;
        server_name  localhost;

        #charset koi8-r;

        #access_log  logs/host.access.log  main;

        location / {
            root   html;
            index  index.html index.htm;
        }
        location /status {
            vhost_traffic_status_display;
            vhost_traffic_status_display_format html;
        }
        #error_page  404              /404.html;

        # redirect server error pages to the static page /50x.html
        #
        error_page   500 502 503 504  /50x.html;
        location = /50x.html {
            root   html;
        }

        # proxy the PHP scripts to Apache listening on 127.0.0.1:80
        #
        #location ~ \.php$ {
        #    proxy_pass   http://127.0.0.1;
        #}

        # pass the PHP scripts to FastCGI server listening on 127.0.0.1:9000
        #
        #location ~ \.php$ {
        #    root           html;
        #    fastcgi_pass   127.0.0.1:9000;
        #    fastcgi_index  index.php;
        #    fastcgi_param  SCRIPT_FILENAME  /scripts$fastcgi_script_name;
        #    include        fastcgi_params;
        #}

        # deny access to .htaccess files, if Apache's document root
        # concurs with nginx's one
        #
        #location ~ /\.ht {
        #    deny  all;
        #}
    }


    # another virtual host using mix of IP-, name-, and port-based configuration
    #
    #server {
    #    listen       8000;
    #    listen       somename:8080;
    #    server_name  somename  alias  another.alias;

    #    location / {
    #        root   html;
    #        index  index.html index.htm;
    #    }
    #}


    # HTTPS server
    #
    #server {
    #    listen       443 ssl;
    #    server_name  localhost;

    #    ssl_certificate      cert.pem;
    #    ssl_certificate_key  cert.key;

    #    ssl_session_cache    shared:SSL:1m;
    #    ssl_session_timeout  5m;

    #    ssl_ciphers  HIGH:!aNULL:!MD5;
    #    ssl_prefer_server_ciphers  on;

    #    location / {
    #        root   html;
    #        index  index.html index.htm;
    #    }
    #}

}

(py3) [root@jumpserver opt]# ln -s /usr/local/nginx/sbin/nginx /usr/local/sbin/
(py3) [root@jumpserver opt]# cd /usr/local/sbin/
(py3) [root@jumpserver sbin]# ./nginx 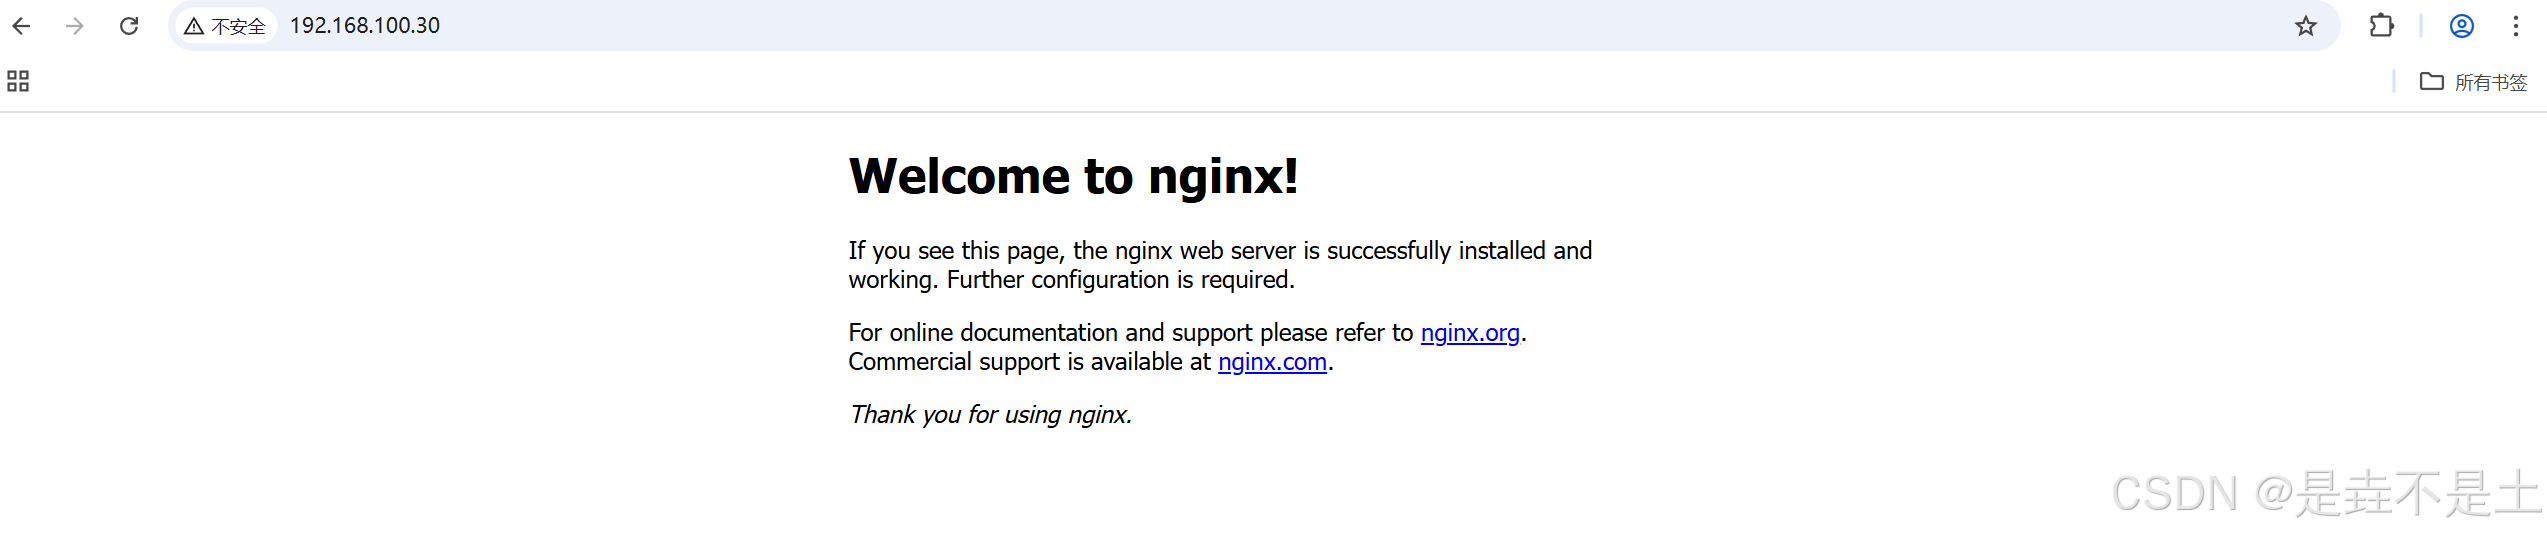
访问成功。
12. 访问JumpServer
再次修改配置文件:
shell
(py3) [root@jumpserver sbin]# vi /usr/local/nginx/conf/nginx.conf
worker_processes  1;

events {
    worker_connections  1024;
}


http {
    include       mime.types;
    default_type  application/octet-stream;
    vhost_traffic_status_zone;                  #流量状态监控
    #log_format  main  '$remote_addr - $remote_user [$time_local] "$request" '
    #                  '$status $body_bytes_sent "$http_referer" '
    #                  '"$http_user_agent" "$http_x_forwarded_for"';

    #access_log  logs/access.log  main;
log_format main '{ "@timestamp": "$time_local", '
'"@fields": { '
'"uri":"$request_uri",'
'"url":"$uri",'
'"upstream_addr":"$upstream_addr",'
'"remote_addr": "$remote_addr", '
'"remote_user": "$remote_user", '
'"body_bytes_sent": "$body_bytes_sent", '
'"host":"$host",'
'"server_addr":"$server_addr",'
'"request_time": "$request_time", '
'"request_time":"$request_time",'
'"status":"$status",'
'"request": "$request", '
'"request_method": "$request_method", '
'"size":$body_bytes_sent,'
'"upstream_time":"$upstream_response_time"'
'"http_referrer": "$http_referer", '
'"body_bytes_sent":"$body_bytes_sent", '
'"http_x_forwarded_for": "$http_x_forwarded_for", '
'"http_user_agent": "$http_user_agent" } }';
    sendfile        on;
    #tcp_nopush     on;

    #keepalive_timeout  0;
    keepalive_timeout  65;

    #gzip  on;
    server {
        listen       80;
        client_max_body_size 100m; #录像和文件上传大小限制
        #charset koi8-r;

        #access_log  logs/host.access.log  main;

        location /ui/ {
            try_files $uri / /index.html;
            alias /opt/lina/;
        }
        location /status {
            vhost_traffic_status_display;
            vhost_traffic_status_display_format html;
        }
        location /luna/ {
            try_files $uri / /index.html;
            alias /opt/luna/;   #luna路径,如果修改安装目录,此处需要修改
        }
        location /media/ {    #静态文件处理
        add_header Content-Encoding gzip;
        root /opt/jumpserver-v2.1.0/data/; #录像位置,如果修改安装目录,此处需要修改

        }
        location /static/ {
        root /opt/jumpserver-v2.1.0/data/;
        }
        location /koko/ {  #当我们请求koko,他会通过proxy_pass进行反向代理
        proxy_pass http://localhost:5000;
        proxy_buffering off;
        proxy_http_version 1.1;
        proxy_set_header Upgrade $http_upgrade;
        proxy_set_header Connection "upgrade";
        proxy_set_header X-Real-IP $remote_addr;
        proxy_set_header Host $host;
        proxy_set_header X-Forwarded-For $proxy_add_x_forwarded_for;
        access_log off;
        }
        location /guacamole/{
        proxy_pass http://localhost:8081/ ;
        proxy_buffering off;
        proxy_http_version 1.1;
        proxy_set_header upgrade $http_upgrade;
        proxy_set_header Connection $http_connection;
        proxy_set_header X-Real-IP $remote_addr;
        proxy_set_header Host $host;
        proxy_set_header X-Forwarded-For $proxy_add_x_forwarded_for;
        access_log off;
        }
        location /ws/{
        proxy_set_header X-Real-IP $remote_addr;
        proxy_set_header Host $host;
        proxy_set_header X-Forwarded-For $proxy_add_x_forwarded_for;
        proxy_pass http://localhost:8070;
        proxy_http_version 1.1;
        proxy_buffering off;
        proxy_set_header upgrade $http_upgrade;
        proxy_set_header Connection "upgrade";
        }
        location /api/{
        proxy_pass http://localhost:8080;
        proxy_set_header X-Real-IP $remote_addr;
        proxy_set_header Host $host;
        proxy_set_header X-Forwarded-For $proxy_add_x_forwarded_for;
        }
        location /core/ {
        proxy_pass http://localhost:8080;
        proxy_set_header X-Real-IP $remote_addr;
        proxy_set_header Host $host;
        proxy_set_header X-Forwarded-For $proxy_add_x_forwarded_for;
        }
        location / {
        rewrite ^/(.*)$ /ui/$1 last;
        }

}
}
重启nginx:
shell
(py3) [root@jumpserver sbin]# pkill -9 -f nginx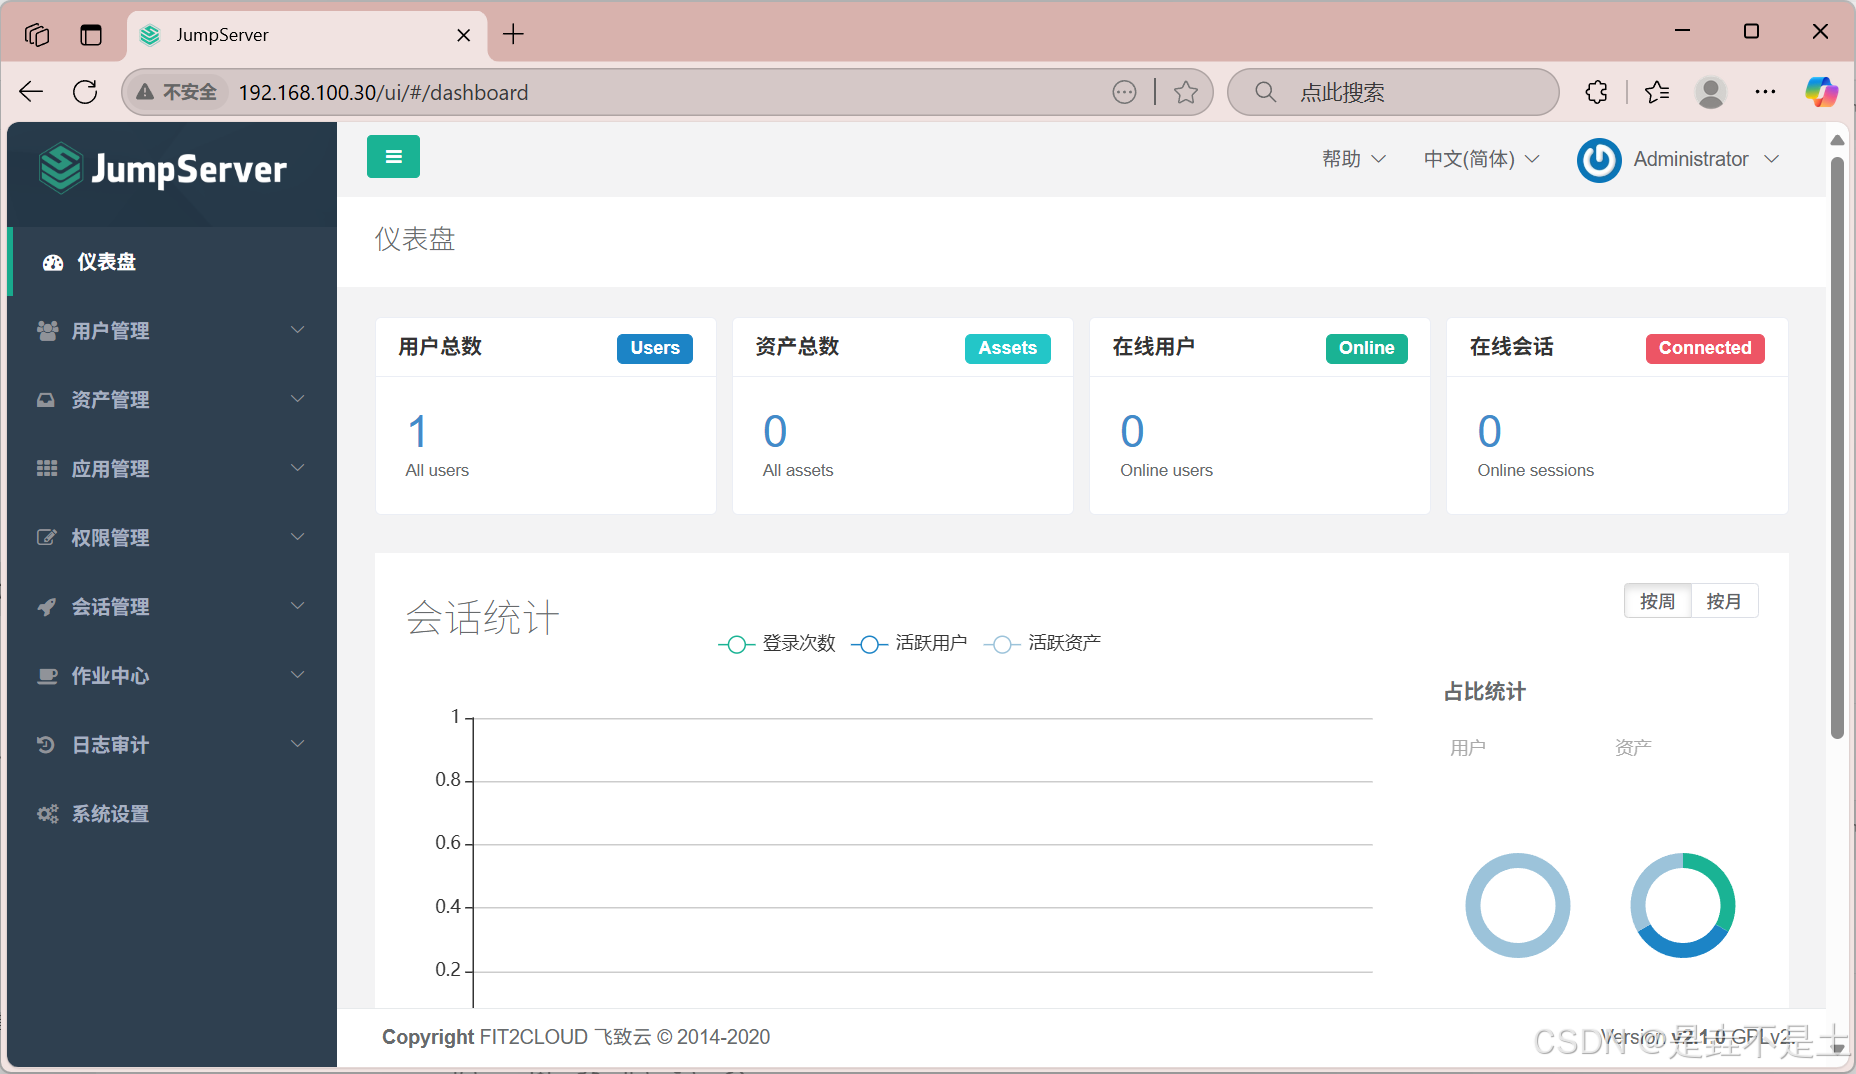
(py3) [root@jumpserver sbin]# ./nginx 再次访问JumpServer:此时不再是8080端口,而是80端口,因为被nginx代理,默认用户名密码均为admin。
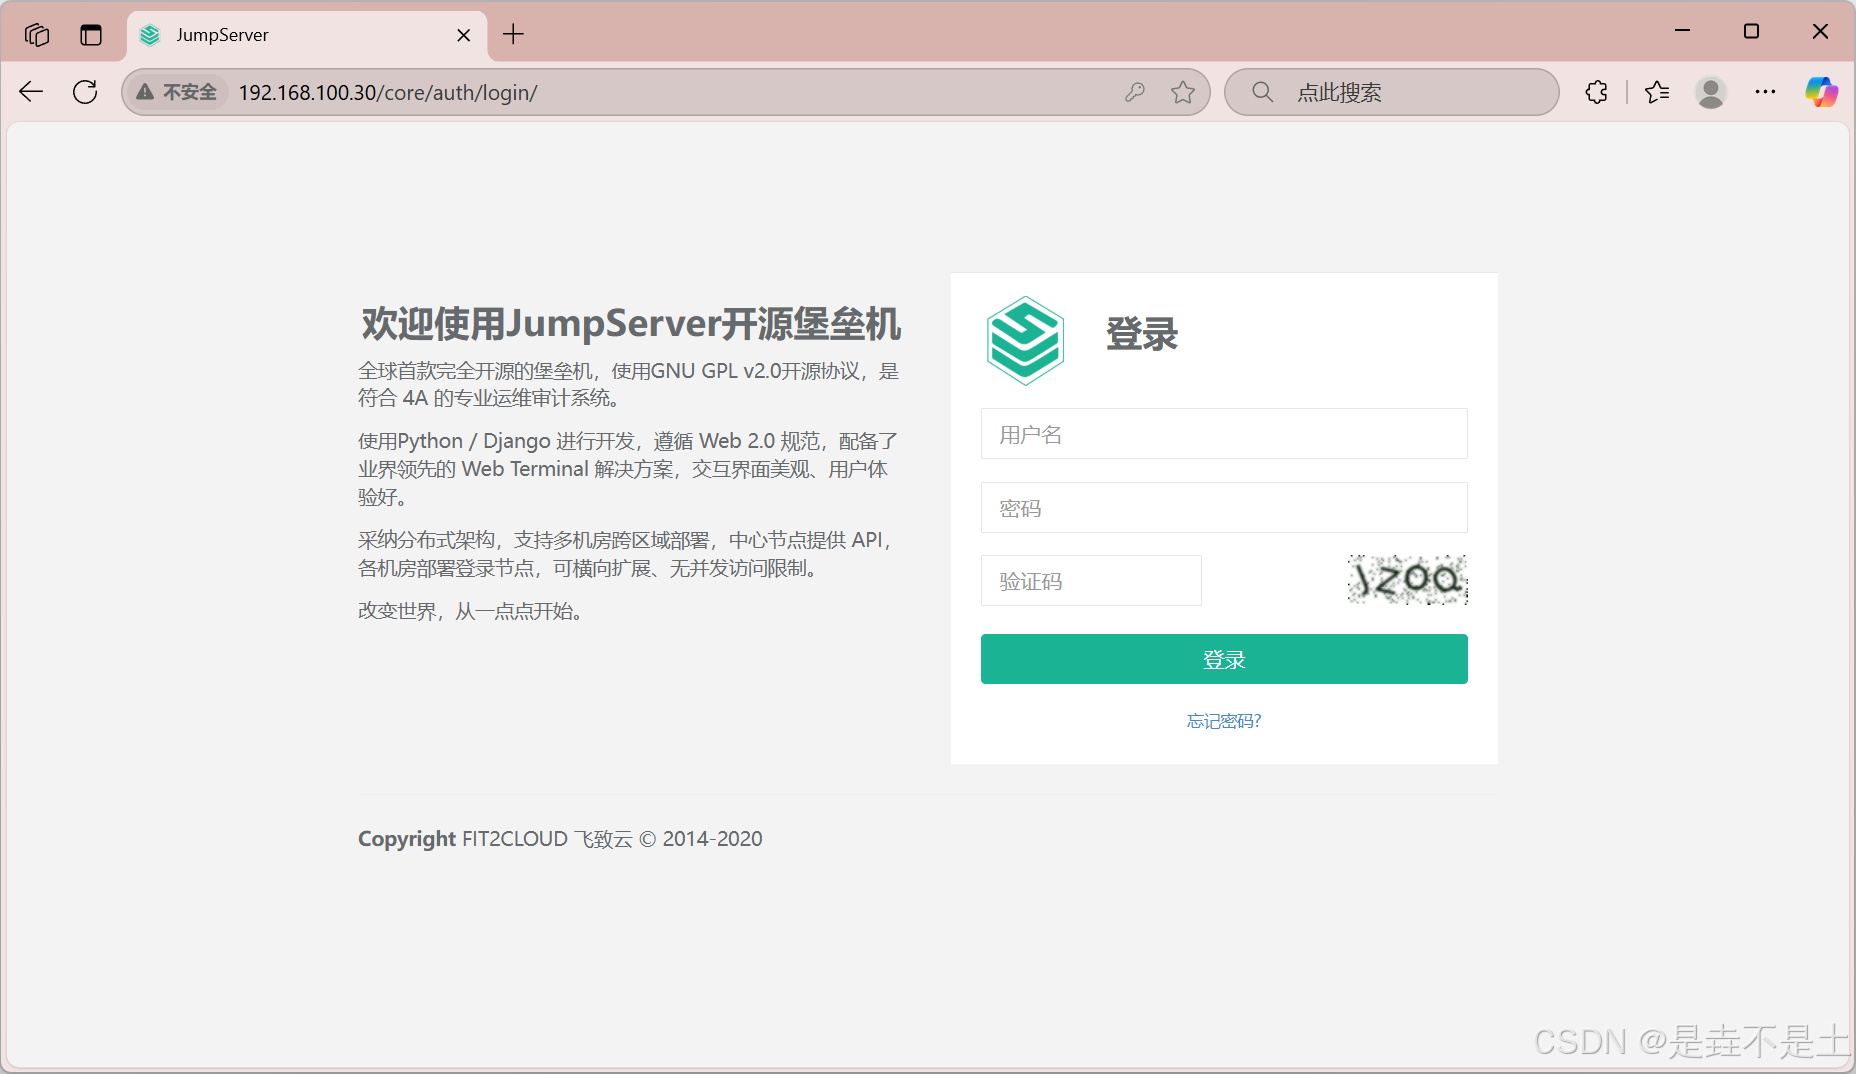
登陆成功。
JumpServer再次动方法:
shell
source /usr/local/jmp_venvl/bin/activate
/opt/jumpserver-v2.1.0/jms start -d
./usr/local/sbin/nginx
三. JumpServer 问题
1. 数据库导入失败
shell
(py3) [root@jumpserver apps]# python3 /opt/jumpserver/apps/manage.py makemigrations  报错
(py3) [root@jumpserver apps]# python3 /opt/jumpserver/apps/manage.py migrate
这是因为mysql数据库密码纯数字错误:修改密码重新填写配置文件即可。
shell
(py3) [root@jumpserver apps]# mysqladmin -ujumpserver -p password
Enter password:
New password:
Confirm new password:
2. 新版本JumpServer无requirements.txt文件
新版本存在的问题:(已解决)(仅针对新版本jumpserver4.0,python3.11)
很多安装教学上写的都是使用requirements.txt文件安装Python的依赖库,但问题在于新版本目录下根本不存在requirements.txt文件,这也是官方出现问题:
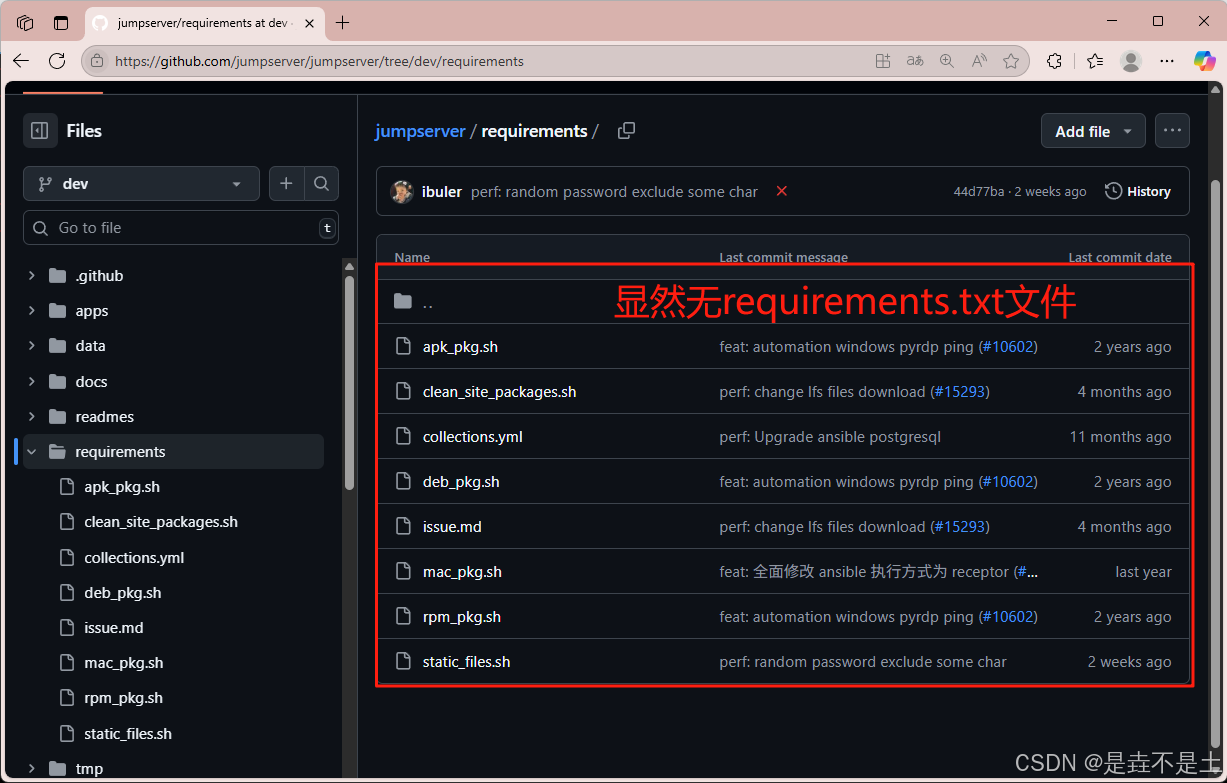
那么我们怎么办呢?
我们可以注意到:
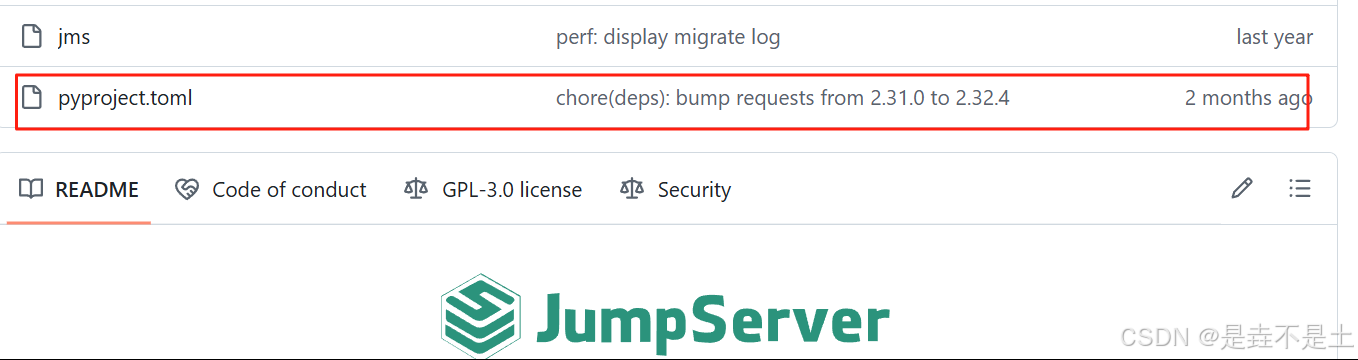
在该文件中存在pyproject.toml文件,通过这个文件我们也能安装相关Python模块依赖。
那么我们就解决依赖问题吧。
安装UV:
shell
(pv3) [root@hzy jumpserver]# pip install -U uv -i https://pypi.tuna.tsinghua.edu.cn/simple修改依赖配置文件:
shell
(pv3) [root@hzy jumpserver]# vi pyproject.toml

[tool.uv.sources]
ansible-core = { url = "https://github.com/jumpserver-dev/ansible/archive/refs/tags/v2.14.1.7.zip" }
ansible-runner = { url = "https://github.com/jumpserver-dev/ansible-runner/archive/refs/tags/2.4.0.1.zip" }
django-cas-ng = { url = "https://github.com/ibuler/django-cas-ng/releases/download/v4.3.2/django-cas-ng-4.3.2.zip" }
django-radius = { url = "https://github.com/ibuler/django-radius/archive/refs/tags/1.5.0.zip" }
redis = { url = "https://github.com/jumpserver-dev/redis-py/archive/refs/tags/v5.0.3.zip" }

## 在末尾添加以下字段
[tool.setuptools.packages.find]
include = ["apps*", "jms*"]
exclude = ["ui*", "tmp*", "data*", "readmes*"]
安装依赖:
shell
(pv3) [root@hzy jumpserver]# uv pip install . 如果觉得慢,可以搭梯子:
搭梯子的 办法也给各位提供出来了:
proxy () {
export http_proxy="http://192.168.0.106:7890"
export https_proxy=$http_proxy
export socks5_proxy="socks5://192.168.0.106:7890"
echo "HTTP Proxy on"
}
noproxy () {
unset http_proxy
unset https_proxy
echo "HTTP Proxy off"
}