利用Linux内核驱动开发,目前仅完成串口测试和摄像头测试
1、串口:以内核自带的串口驱动为基础,编写测试程序
uart.h
#ifndef __UART_H__
#define __UART_H__

#include <termios.h>
#include <fcntl.h>
#include <unistd.h>
#include <stdio.h>
#include <stdlib.h>
#include <string.h>
#include <errno.h>
#include <sys/types.h>

// 打开串口设备并配置为115200波特率、8位数据位、无校验、1位停止位
int open_serial_port(const char *port);

// 写入数据到串口
int write_to_serial(int fd, const char *data, size_t length);

// 从串口读取数据
int read_from_serial(int fd, char *buffer, size_t buffer_size);

// 关闭串口设备
void close_serial_port(int fd);

#endif // TERMIOS_H
uart.c
#include "uart.h"
int open_serial_port(const char *port) {
    // 打开串口设备(阻塞模式)
    int fd = open(port, O_RDWR | O_NOCTTY);
    if (fd == -1) {
        perror("Error opening serial port");
        return -1;
    }

    // 获取当前串口配置
    struct termios options;
    if (tcgetattr(fd, &options) != 0) {
        perror("tcgetattr failed");
        close(fd);
        return -1;
    }

    // 设置波特率为115200
    cfsetispeed(&options, B115200);
    cfsetospeed(&options, B115200);

    // 配置数据位、停止位和校验位
    options.c_cflag &= ~CSIZE;  // 清除数据位掩码
    options.c_cflag |= CS8;     // 8位数据位
    options.c_cflag &= ~PARENB; // 无校验位
    options.c_cflag &= ~CSTOPB; // 1位停止位

    // 启用接收和本地模式
    options.c_cflag |= (CLOCAL | CREAD);

    // 设置原始输入模式(非规范模式)
    options.c_lflag &= ~(ICANON | ECHO | ECHOE | ISIG);

    // 禁用特殊输出处理
    options.c_oflag &= ~OPOST;

    // 设置超时:立即返回(VMIN=0, VTIME=0)
    //options.c_cc[VMIN] = 0;
    //options.c_cc[VTIME] = 0;

    // 修改 c_cc 配置,启用阻塞读
    options.c_cc[VMIN] = 1;   // 至少读取1个字符才返回
    options.c_cc[VTIME] = 10; // 等待超时:1秒(10 * 0.1秒)

    // 应用配置
    if (tcsetattr(fd, TCSANOW, &options) != 0) {
        perror("tcsetattr failed");
        close(fd);
        return -1;
    }

    // 清空缓冲区
    tcflush(fd, TCIOFLUSH);
    return fd;
}

int write_to_serial(int fd, const char *data, size_t length) {
    ssize_t bytes_written = write(fd, data, length);
    if (bytes_written < 0) {
        perror("Error writing to serial port");
    }
    return bytes_written;
}

int read_from_serial(int fd, char *buffer, size_t buffer_size) {
    ssize_t bytes_read = read(fd, buffer, buffer_size - 1);
    if (bytes_read < 0) {
        perror("Error reading from serial port");
        return -1;
    }
    buffer[bytes_read] = '\0'; // 添加字符串结束符
    return bytes_read;
}

void close_serial_port(int fd) {
    if (fd >= 0) {
        close(fd);
    }
}
main.c
#include "uart.h"

int main(void)
{
    int uartfd = 0;
    int nret = 0;
    char tmpbuff[4096] = {0};

    uartfd = open_serial_port("/dev/ttymxc2");
    if (-1 == uartfd)
    {
        printf("open_serial_port failed\n");
        return -1;
    }

    while (1)
    {
        write_to_serial(uartfd, "hello world", 11);
        memset(tmpbuff, 0, sizeof(tmpbuff));
        nret = read_from_serial(uartfd, tmpbuff, sizeof(tmpbuff));
        printf("nret = %d, tmpbuff = %s\n", nret, tmpbuff);
        sleep(1);
    }


    close_serial_port(uartfd);

    return 0;
}
2、摄像头ov5640测试
一、修改设备树
1、 在i2c2下添加ov5640信息
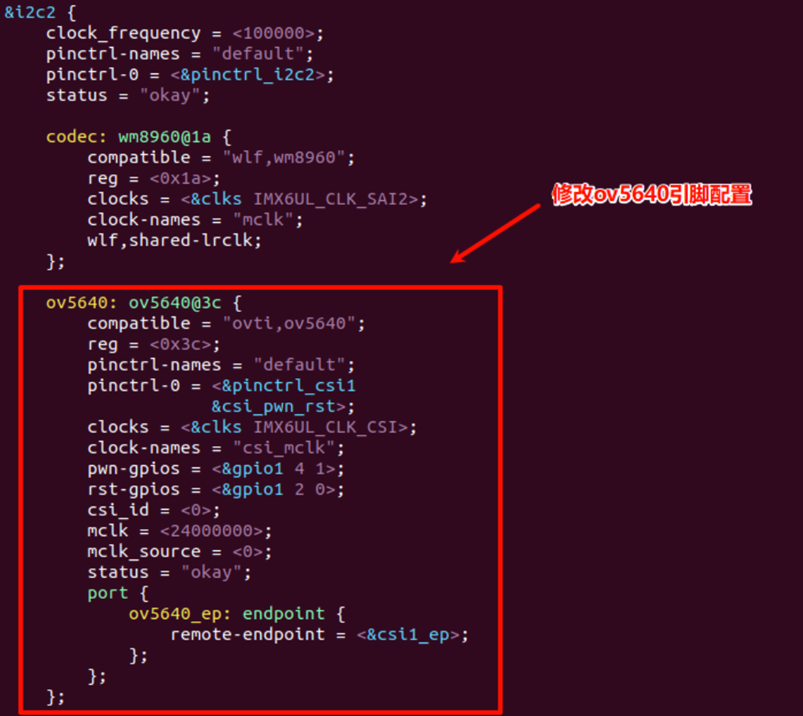
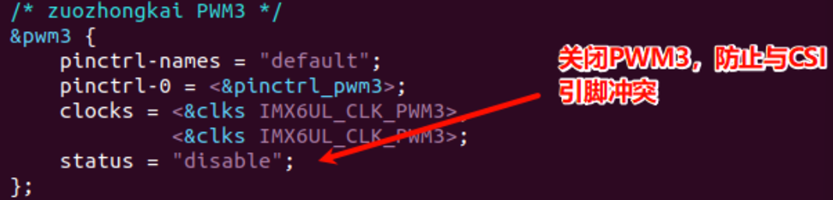
2、 设置pinctrl子系统中的摄像头复位引脚

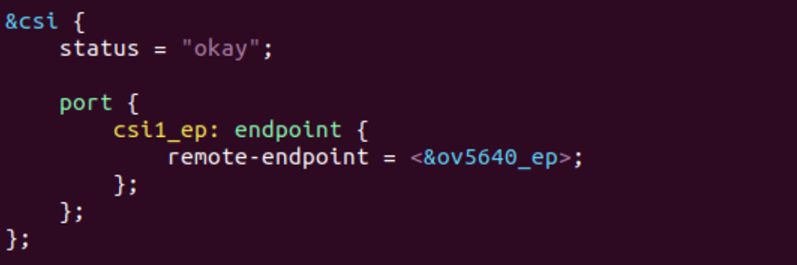
3、 开启CSI接口配置
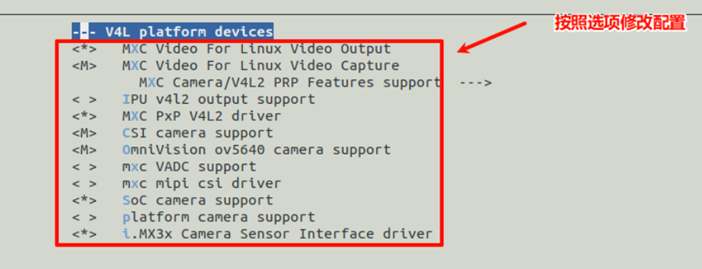
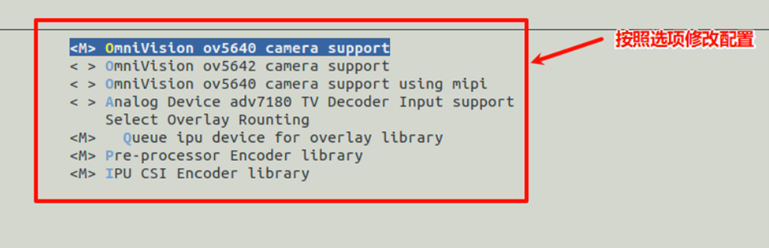
二、修改内核加入ov5640相关驱动模块:
1、通过图形界面修改
-
重新编译内核、设备树、驱动模块
make ARCH=arm CROSS_COMPILE=arm-linux-gnueabihf- zImage
make dtbs
make modules -
将设备树和内核镜像拷贝到tftp管理目录下
cp arch/arm/boot/dts/imx6ull-alientek-emmc.dtb ~/tftpboot
cp arch/arm/boot/zImage ~/tftpboot -
将所有的内核驱动模块安装到文件系统下
make INSTALL_MOD_PATH=/home/linux/nfs/rootfs modules_install
-
重新启动开发板,并插上ov5640摄像头
-
在开发板端加载摄像头内核驱动模块
cd /lib/modules/4.1.15 depmod -a
modprobe mx6s_capture.ko modprobe ov5640_camera.ko -
查看是否生成摄像头设备节点
ls /dev/video1。
三、编写测试文件测试摄像头功能