CAD插件
先了解环境与版本
目前本人写的时候最新AutoCAD2026,下面就以这个版本为例子讲解
.Net环境
我使用的是Net8,也就是区别与.net faamework的版本(这很重要)这也与cad版本有关系
当然在我写这篇文章的时候Net9我已经用上了,Net10也有苗头了,
但是!2026里面我测试过可以加载Net9程序,
但很多的包和库不能引用Net9(9.0)比如 IConfiguration,Microsoft.Extensions这些一旦加上,那么就不能加载也不会报错,我没有深究。也许我哪里错了,会的请指正我
AutoCad版本
想在cad添加插件,那么版本肯定是对应的.
csharp
AutoCAD 2025 .NET版本: Microsoft .NET 8.0

AutoCAD 2025 .NET版本: Microsoft .NET 8.0

AutoCAD 2024 .NET版本: Microsoft .NET 4.8

AutoCAD 2023 .NET版本: Microsoft .NET 4.8

AutoCAD 2022 .NET版本: Microsoft .NET 4.8

AutoCAD 2021 .NET版本: Microsoft .NET 4.8

AutoCAD 2019-2020  .NET版本: Microsoft .NET 4.7

AutoCAD 2017-2018  .NET版本: Microsoft .NET 4.6

AutoCAD 2015-2016  .NET版本: Microsoft .NET 4.5

AutoCAD 2012-2014  .NET版本: Microsoft .NET 4.0

AutoCAD 2010-2011  .NET版本: Microsoft .NET 3.5

AutoCAD 2007-2009 .NET版本: Microsoft .NET 2.0 以上
我的教学版本
AutoCad2026 + .Net8 + nuget-8.0的包
这里说一下,如果要嵌入winform或者wpf
那么你的版本就需要改成.Net8-windows、.Net7-windows。。。。
开始
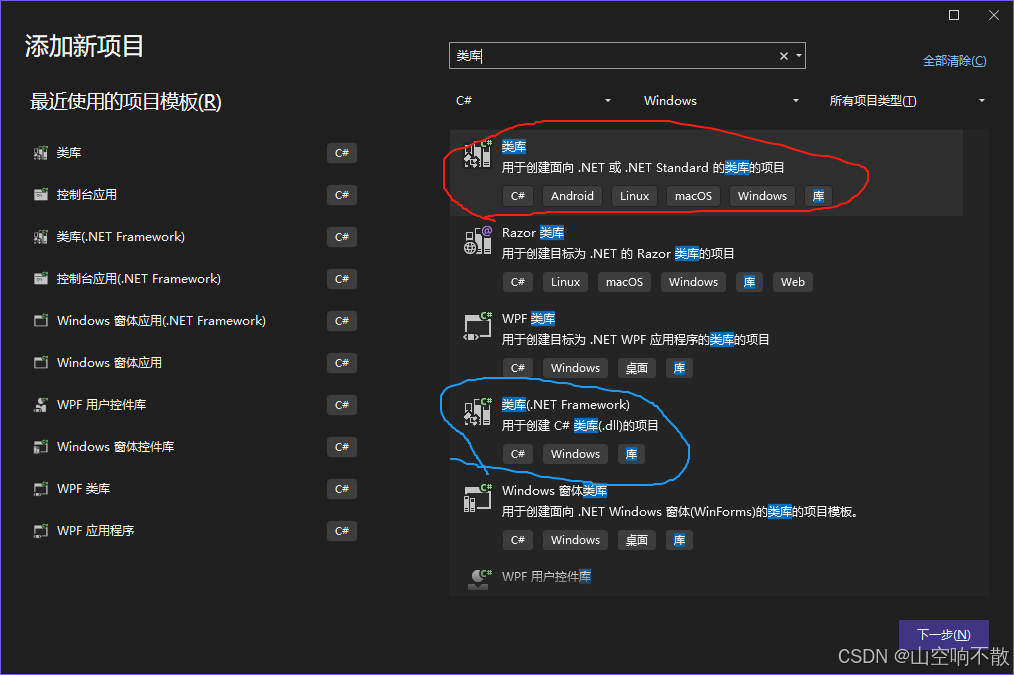
首先新建项目选择我们是以类库,也就是dll注入的方式作为插件加载到AutoCad当中。
图中可以看到红色框就是我们将要选择的,而蓝色框是老版本的,对照上面的版本支持来选择
引用AutoCad命令库
acmgd.dll
accoremgd.dll
AcCui.dll
acdbmgd.dll
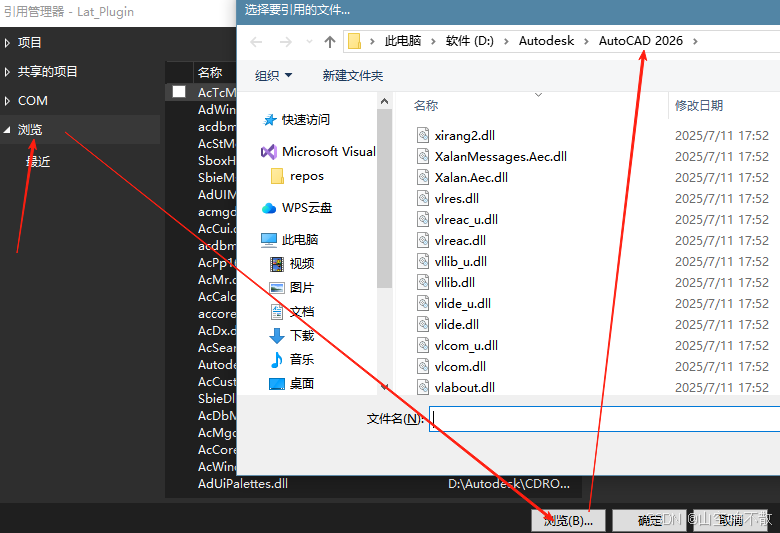
别说你不会引用程序集?
行吧,右键项目-》添加-》添加-》项目引用-| 引用管理器-》浏览-》打开自己AutoCad的安装目录搜索上面的文件添加引用
引用后添加下面的集,前三个是必须要的,后面的是对应的其他命令包
csharp
using Autodesk.AutoCAD.ApplicationServices;
using Autodesk.AutoCAD.DatabaseServices;
using Autodesk.AutoCAD.EditorInput;

using Autodesk.AutoCAD.Geometry;
using Autodesk.AutoCAD.Interop;
using Autodesk.AutoCAD.Ribbon;
using Autodesk.AutoCAD.Runtime;
using Autodesk.AutoCAD.Windows;
引用三个包,这个对接AutoCad的支持库,和上面的库不一样,上面的是命令包,类似win+R cmd的控制台调用,不包含对代码的支持,支持的是命令,通过包运行代码生成命令到上面的调用命令
开始编写
我知道有的人耐不住性子看,那我先贴出代码再讲解。 这不是全部的,这只是我摘取的,我封装完整的方法日志、输出、输入、调用、回调,这里我只贴出必要的。不能白给你们全部把
csharp
using System.Reflection;

[assembly: ComVisible(false)]
[assembly: ExtensionApplication(typeof(AutoBase))]
[assembly: CommandClass(typeof(AutoBase))]

namespace Lat_Plugin;

/// <summary>
/// 自动
/// </summary>
public class AutoBase : IExtensionApplication
{
    /// <summary>
    /// 公共
    /// </summary>
    public static Document SharedDoc { get; private set; } = null!;

    /// <summary>
    /// 写出
    /// </summary>
    public static void WriteMessage(string message)
    {
        SharedDoc.Editor.WriteMessage(message);
    }

    /// <summary>
    /// 初始
    /// </summary>
    public void Initialize()
    {
        SharedDoc = Application.DocumentManager.MdiActiveDocument;
        WriteMessage("\n★ 插件成功加载 - 开发者: 李澳特 ★");

        Application.DocumentManager.MdiActiveDocument.SendStringToExecute("main ", true, false, false);

    }

    /// <summary>
    /// 清理
    /// </summary>
    public void Terminate()
    {
        //SharedDoc = null;
    }
}
代码分解
那么我们开始,开始这三个是必须要的,这是作为dll注入式程序集的头参数来标记的
csharp
[assembly: ComVisible(false)]
[assembly: ExtensionApplication(typeof(AutoBase))]
[assembly: CommandClass(typeof(AutoBase))]
ComVisible ------cad中下方命令行中是否可见(提示,报错等等显示)
ExtensionApplication ------表面扩展程序加载名称 (必须是类名)
CommandClass ------是否作为主程序的入口 (这是唯一的)
我们剥开Cad的运行时程序集可以看到,其实只需要实现他两个接口就可以的,上面是我封装的
csharp
namespace Autodesk.AutoCAD.Runtime;

public interface IExtensionApplication
{
    void Initialize();

    void Terminate();
}
加载内容
csharp
using Lat_Plugin.Ribbons;

[assembly: CommandClass(typeof(LATMain))]
namespace Lat_Plugin;

/// <summary>
/// Main
/// </summary>
public class LATMain
{
    public LATMain()
    {
    }

    /// <summary>
    /// 你好
    /// </summary>
    [CommandMethod("hello")]
    public  void TestCommand()
    {
        try
        {
            Database db = AutoBase.SharedDoc.Database;
            Editor ed = AutoBase.SharedDoc.Editor;

            using (Transaction tr = db.TransactionManager.StartTransaction())
            {
                try
                {
                    ed.WriteMessage("\nHello, AutoCAD插件开发!我是李澳特");
                    tr.Commit();
                }
                catch (System.Exception ex)
                {
                    ed.WriteMessage("\n事务错误: " + ex.Message);
                    tr.Abort();
                }
            }
        }
        catch (System.Exception ex)
        {
            AutoBase.WriteMessage("\n命令执行错误: " + ex.Message);
            AutoBase.LogError((Autodesk.AutoCAD.Runtime.Exception)ex);
        }
    }
    [CommandMethod("main")]
    public  void main()
    {
        AutoBase.SendExecute("hello");
    }
}
敲黑板,这里是必须的,表明我们的方法是程序集命令加载的一部分
assembly: CommandClass(typeof(LATMain))
程序集是用命令才能启动方法,那么就需要加上特性标头
CommandMethod("main") ------表明注册这个方法到Cad当中
这样完成后就可以了,加载到Cad就会通过下面命令自动加载CommandMethod("main") 的main方法
Application.DocumentManager.MdiActiveDocument.SendStringToExecute("main ", true, false, false);
进而触发方法hello方法.这里我也给出了,命令名字可以和方法名字不同,也可以相同
CommandMethod("hello")
public void TestCommand()
编译插件
说的很高大上,其实就是重新生成一下,让我们的bin目录下有我们的dll
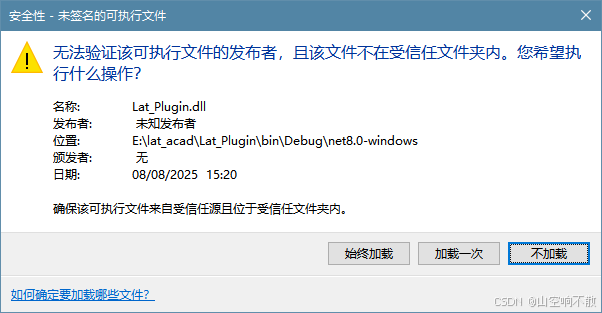
AutoCad添加插件
输入命令,然后选择我们的插件dll就可以启动了
netload
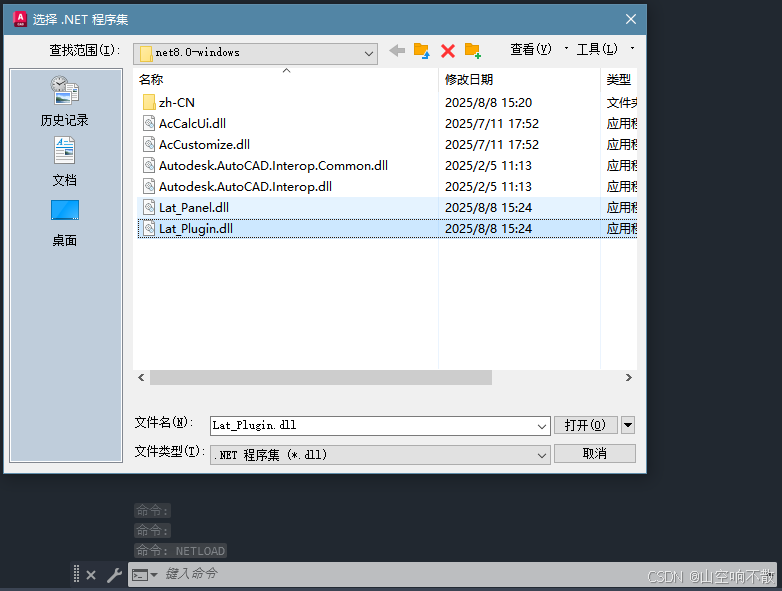
这个时候会提示一下,不用管直接通过就行
测试命令插件
加载后添加的提示会显示

输入命令 CommandMethod("hello")
输入hello就会显示出来

未完待续
后续还有,添加菜单栏,添加功能区,添加面板,添加命令行,太麻烦有时间再写把
因为太懒了,所以只是基础教程
有错误请不给我留言QAQ 哈哈哈开玩笑