Docker Compose 部署高可用 MongoDB 副本集集群(含 Keepalived + HAProxy 负载均衡)
-
- 背景与目标
- [📋 环境规划](#📋 环境规划)
- 部署步骤
-
- [1. 创建目录结构](#1. 创建目录结构)
- [2、生成 keyFile(三台机器内容必须一致)](#2、生成 keyFile(三台机器内容必须一致))
- [3. 准备 Keepalived + HAProxy 配置](#3. 准备 Keepalived + HAProxy 配置)
- [4、部署 MongoDB 副本集](#4、部署 MongoDB 副本集)
- [5. 初始化副本集](#5. 初始化副本集)
- [6. 创建管理员账户](#6. 创建管理员账户)
- [7. 配置 Prometheus 监控](#7. 配置 Prometheus 监控)
- 8、验证集群状态
背景与目标
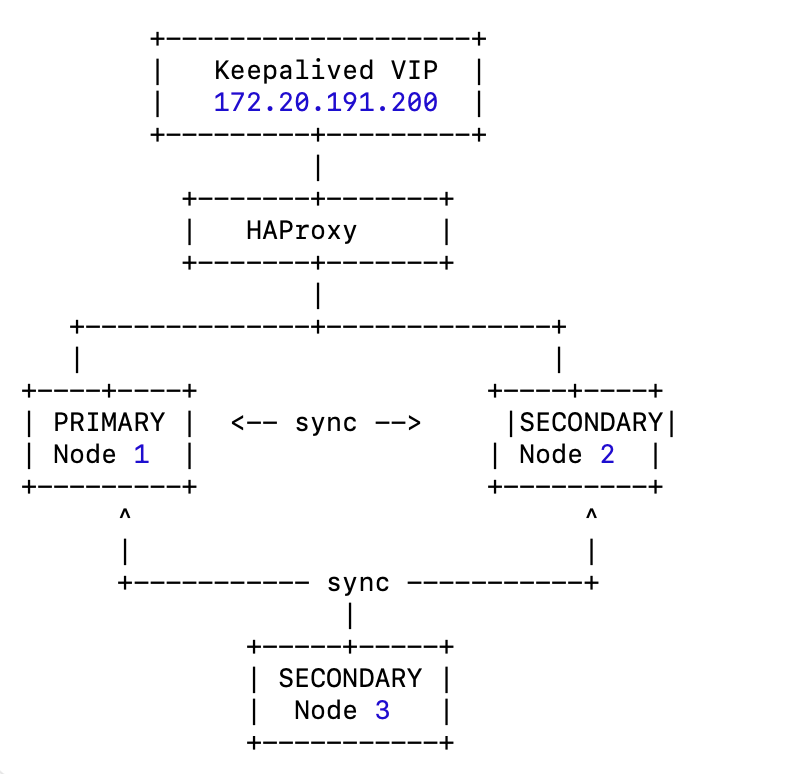
在生产环境中,单节点的 MongoDB 一旦宕机会导致服务中断。为了保证 高可用 和 数据一致性 ,我们使用 MongoDB 副本集(Replica Set) 配合 Keepalived + HAProxy 构建一个高可用架构,支持自动故障转移,并在应用端通过虚拟 IP(VIP)实现透明访问。
本文将介绍如何在三台服务器上使用 Docker Compose 部署 MongoDB 7.0 副本集,并通过 Keepalived + HAProxy 提供高可用访问入口,同时配置 Prometheus 监控指标采集。
📋 环境规划
服务器信息
| 节点 | 主机名 | IP地址 | 角色 |
|---|---|---|---|
| 1 | domp-server-001 | 172.20.191.185 | PRIMARY 节点 |
| 2 | domp-server-002 | 172.20.191.186 | SECONDARY 节点 |
| 3 | domp-server-003 | 172.20.191.187 | SECONDARY 节点 |
软件版本
- MongoDB:
7.0 - Docker:
>= 20.10 - Docker Compose:
>= 1.29 - Keepalived & HAProxy: 自定义镜像(基于生产优化)
部署步骤
1. 创建目录结构
bash
mkdir -p /data/mongodb/{data,logs,key}2、生成 keyFile(三台机器内容必须一致)
MongoDB 副本集认证需要一个共享的 keyFile,用于节点间安全通信。
bash
openssl rand -base64 756 > /data/mongodb/key/mongodb-keyfile
chmod 400 /data/mongodb/key/mongodb-keyfile
chown 999:999 /data/mongodb/key/mongodb-keyfile• 999:999 是 MongoDB 容器内的默认用户 UID/GID。
• 将 /data/mongodb/key/mongodb-keyfile 拷贝到所有三台机器相同路径下。3. 准备 Keepalived + HAProxy 配置
docker-compose-keepalived-haproxy.yml 内容
yml
version: "3.9"

services:
  keepalived:
    image: reg.deeplearning.cn/mmwei3/keepalived:latest-20250725
    container_name: keepalived
    restart: always
    network_mode: host
    privileged: true
    tty: true
    environment:
      - KOLLA_CONFIG_STRATEGY=COPY_ALWAYS
      - KOLLA_SERVICE_NAME=keepalived
    volumes:
      - /etc/kolla/keepalived/:/var/lib/kolla/config_files/:ro
      - /etc/localtime:/etc/localtime:ro
      - /lib/modules:/lib/modules:ro
      - haproxy_socket:/var/lib/kolla/haproxy/

  haproxy:
    image: reg.deeplearning.cn/mmwei3/haproxy:latest-20250725
    container_name: haproxy
    restart: always
    network_mode: host
    privileged: true
    tty: true
    environment:
      - KOLLA_CONFIG_STRATEGY=COPY_ALWAYS
      - KOLLA_SERVICE_NAME=haproxy
    volumes:
      - /etc/kolla/haproxy/:/var/lib/kolla/config_files/:ro
      - /etc/localtime:/etc/localtime:ro
      - haproxy_socket:/var/lib/kolla/haproxy/

volumes:
  haproxy_socket:
说明
• Keepalived 用于提供 VIP(虚拟 IP)漂移,保证故障切换。
• HAProxy 负责将请求路由到 MongoDB 副本集的 PRIMARY 节点。
4、部署 MongoDB 副本集
yaml
docker-compose-mongo.yml(示例为 domp-server-001):

version: '3.8'

services:
  mongo:
    image: reg.deeplearning.cn/mmwei3/mongo:7.0
    container_name: mongo
    restart: always
    hostname: domp-server-001
    ports:
      - 27017:27017
    volumes:
      - /data/mongodb/data:/data/db
      - /data/mongodb/logs:/var/log/mongodb
      - /data/mongodb/key/mongodb-keyfile:/etc/mongo-keyfile:ro
    command: >
      mongod --replSet rs0
             --auth
             --keyFile /etc/mongo-keyfile
             --bind_ip_all
             --logpath /var/log/mongodb/mongod.log
             --logappend
    networks:
      - mongo_net

networks:
  mongo_net:
    driver: bridge
另外两台机器只需修改 hostname 与数据路径即可。
5. 初始化副本集
bash
docker exec -it mongo mongoshMongo shell 中执行:
js
rs.initiate({
  _id: "rs0",
  members: [
    { _id: 0, host: "172.20.191.185:27017" },
    { _id: 1, host: "172.20.191.186:27017" },
    { _id: 2, host: "172.20.191.187:27017" }
  ]
})
6. 创建管理员账户
js
use admin
db.createUser({
  user: "admin",
  pwd: "<your_password_here>",
  roles: [ { role: "root", db: "admin" } ]
})
mongosh -u admin -p <your_password_here> --authenticationDatabase admin
7. 配置 Prometheus 监控
启动 mongodb-exporter 容器:
python
docker run -d \
  --name mongodb_exporter \
  -p 9216:9216 \
  -e MONGODB_URI="mongodb://admin:<your_password_here>@172.20.191.185:27017/?replicaSet=rs0" \
  reg.deeplearning.cn/mmwei3/bitnami/mongodb-exporter:latest-20250718_x86 \
  --no-mongodb.direct-connect \
  --collector.dbstats \
  --collector.topmetrics \
  --collector.indexstats \
  --collector.collstats \
  --collector.replicasetstatus
8、验证集群状态
python
root@domp-server-001:/# mongosh -u admin -p <your_password_here> --authenticationDatabase admin
Current Mongosh Log ID: 688b0eb4c0d8fffe6989b03c
Connecting to:          mongodb://<credentials>@127.0.0.1:27017/?directConnection=true&serverSelectionTimeoutMS=2000&authSource=admin&appName=mongosh+2.5.6
Using MongoDB:          7.0.22
Using Mongosh:          2.5.6

For mongosh info see: https://www.mongodb.com/docs/mongodb-shell/

------
   The server generated these startup warnings when booting
   2025-07-31T06:29:54.168+00:00: You are running on a NUMA machine. We suggest launching mongod like this to avoid performance problems: numactl --interleave=all mongod [other options]
   2025-07-31T06:29:54.169+00:00: vm.max_map_count is too low
------

rs0 [direct: primary] test>

rs0 [direct: primary] test> rs.status()
{
  set: 'rs0',
  date: ISODate('2025-07-31T06:35:54.773Z'),
  myState: 1,
  term: Long('1'),
  syncSourceHost: '',
  syncSourceId: -1,
  heartbeatIntervalMillis: Long('2000'),
  majorityVoteCount: 2,
  writeMajorityCount: 2,
  votingMembersCount: 3,
  writableVotingMembersCount: 3,
  optimes: {
    lastCommittedOpTime: { ts: Timestamp({ t: 1753943744, i: 1 }), t: Long('1') },
    lastCommittedWallTime: ISODate('2025-07-31T06:35:44.926Z'),
    readConcernMajorityOpTime: { ts: Timestamp({ t: 1753943744, i: 1 }), t: Long('1') },
    appliedOpTime: { ts: Timestamp({ t: 1753943744, i: 1 }), t: Long('1') },
    durableOpTime: { ts: Timestamp({ t: 1753943744, i: 1 }), t: Long('1') },
    lastAppliedWallTime: ISODate('2025-07-31T06:35:44.926Z'),
    lastDurableWallTime: ISODate('2025-07-31T06:35:44.926Z')
  },
  lastStableRecoveryTimestamp: Timestamp({ t: 1753943704, i: 1 }),
  electionCandidateMetrics: {
    lastElectionReason: 'electionTimeout',
    lastElectionDate: ISODate('2025-07-31T06:33:24.905Z'),
    electionTerm: Long('1'),
    lastCommittedOpTimeAtElection: { ts: Timestamp({ t: 1753943594, i: 1 }), t: Long('-1') },
    lastSeenOpTimeAtElection: { ts: Timestamp({ t: 1753943594, i: 1 }), t: Long('-1') },
    numVotesNeeded: 2,
    priorityAtElection: 1,
    electionTimeoutMillis: Long('10000'),
    numCatchUpOps: Long('0'),
    newTermStartDate: ISODate('2025-07-31T06:33:24.919Z'),
    wMajorityWriteAvailabilityDate: ISODate('2025-07-31T06:33:25.423Z')
  },
  members: [
    {
      _id: 0,
      name: '172.20.191.185:27017',
      health: 1,
      state: 1,
      stateStr: 'PRIMARY',
      uptime: 361,
      optime: { ts: Timestamp({ t: 1753943744, i: 1 }), t: Long('1') },
      optimeDate: ISODate('2025-07-31T06:35:44.000Z'),
      lastAppliedWallTime: ISODate('2025-07-31T06:35:44.926Z'),
      lastDurableWallTime: ISODate('2025-07-31T06:35:44.926Z'),
      syncSourceHost: '',
      syncSourceId: -1,
      infoMessage: '',
      electionTime: Timestamp({ t: 1753943604, i: 1 }),
      electionDate: ISODate('2025-07-31T06:33:24.000Z'),
      configVersion: 1,
      configTerm: 1,
      self: true,
      lastHeartbeatMessage: ''
    },
    {
      _id: 1,
      name: '172.20.191.186:27017',
      health: 1,
      state: 2,
      stateStr: 'SECONDARY',
      uptime: 160,
      optime: { ts: Timestamp({ t: 1753943744, i: 1 }), t: Long('1') },
      optimeDurable: { ts: Timestamp({ t: 1753943744, i: 1 }), t: Long('1') },
      optimeDate: ISODate('2025-07-31T06:35:44.000Z'),
      optimeDurableDate: ISODate('2025-07-31T06:35:44.000Z'),
      lastAppliedWallTime: ISODate('2025-07-31T06:35:44.926Z'),
      lastDurableWallTime: ISODate('2025-07-31T06:35:44.926Z'),
      lastHeartbeat: ISODate('2025-07-31T06:35:52.910Z'),
      lastHeartbeatRecv: ISODate('2025-07-31T06:35:53.911Z'),
      pingMs: Long('0'),
      lastHeartbeatMessage: '',
      syncSourceHost: '172.20.191.185:27017',
      syncSourceId: 0,
      infoMessage: '',
      configVersion: 1,
      configTerm: 1
    },
    {
      _id: 2,
      name: '172.20.191.187:27017',
      health: 1,
      state: 2,
      stateStr: 'SECONDARY',
      uptime: 160,
      optime: { ts: Timestamp({ t: 1753943744, i: 1 }), t: Long('1') },
      optimeDurable: { ts: Timestamp({ t: 1753943744, i: 1 }), t: Long('1') },
      optimeDate: ISODate('2025-07-31T06:35:44.000Z'),
      optimeDurableDate: ISODate('2025-07-31T06:35:44.000Z'),
      lastAppliedWallTime: ISODate('2025-07-31T06:35:44.926Z'),
      lastDurableWallTime: ISODate('2025-07-31T06:35:44.926Z'),
      lastHeartbeat: ISODate('2025-07-31T06:35:52.910Z'),
      lastHeartbeatRecv: ISODate('2025-07-31T06:35:53.910Z'),
      pingMs: Long('0'),
      lastHeartbeatMessage: '',
      syncSourceHost: '172.20.191.185:27017',
      syncSourceId: 0,
      infoMessage: '',
      configVersion: 1,
      configTerm: 1
    }
  ],
  ok: 1,
  '$clusterTime': {
    clusterTime: Timestamp({ t: 1753943744, i: 1 }),
    signature: {
      hash: Binary.createFromBase64('egpXegnGy7N0DNK8cxpAjSX2y7o=', 0),
      keyId: Long('7533130418208374789')
    }
  },
  operationTime: Timestamp({ t: 1753943744, i: 1 })
}
rs0 [direct: primary] test>


db.isMaster()
# 返回当前节点是 PRIMARY 还是 SECONDARY。

#手动切换 PRIMARY
rs.stepDown()
#当前 PRIMARY 会主动下台,触发选举新 PRIMARY。

# 添加新节点到副本集
rs.add("new_host:27017")
# 将新节点加入副本集。


# 从副本集中移除节点
rs.remove("host_to_remove:27017")


# 查看当前配置
rs.conf()


# 检查复制延迟
rs.printSlaveReplicationInfo()
# 显示 SECONDARY 节点复制延迟信息。


# 备份数据(使用 mongodump)

mongodump --host <primary_host> --port 27017 -u admin -p <password> --authenticationDatabase admin --out /backup/path/


# 恢复数据(使用 mongorestore)

mongorestore --host <host> --port 27017 -u admin -p <password> --authenticationDatabase admin /backup/path/