LAMP/LNMP 最佳实践
LAMP/LNMP 组件
LAMP :L inux+A pache+M ysql/M ariadb+P HP/P ython/Perl。
LNMP :L inux+N ginx+M ysql/M ariadb+P HP/P ython/Perl。
- Linux:操作系统,提供程序运行基础。
- A pache/Nginx:Web 服务器,提供网页访问。
- M ysql/Mariadb:数据库,提供数据管理。
- P HP/P ython/Perl:脚本语言,提供动态执行生成。
LAMP/LNMP 工作原理
-
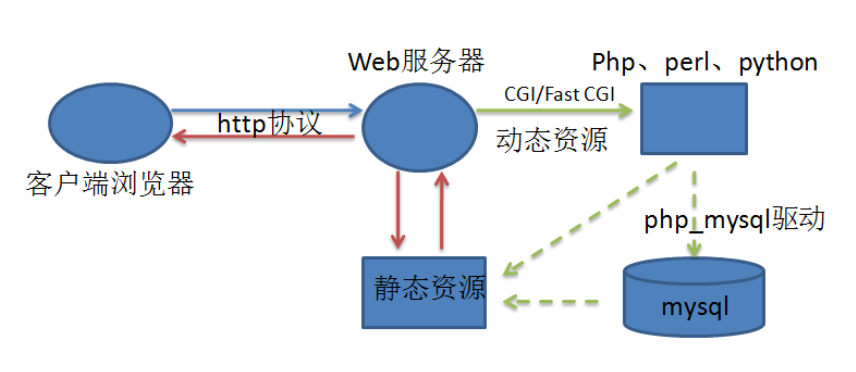
客户端通过HTTP协议请求web服务器资源
-
web 服务器根据资源类型进行处理:
-
静态资源:web直接把资源返回至客户端。
-
动态资源:通过指定的通讯方式将脚本网页交给后端程序执行。如果运算期间需要连接mysql数据库,则通过mysql连接器连接mysql。后端程序将运算结果返回给web服务。
-
-
web服务将结果返回给客户端。
PHP 与 WEB 协同工作模式
PHP 与 WEB 协同工作模式:
- CGI:Web 进程动态调用相应脚本解释器执行动态页面 ,执行完后再释放。特点:性能差。
- Modules:Web 进程动态加载相应模块执行动态页面 。特点:性能较好。
- FastCGI:后端进程独立运行管理,通过独立的网络套接字接口接收Web进程传过来的请求。特点:真正地实现前后端分离。适合于性能要求比较高的场景。Web 服务器需要开启反向代理功能,将请求转发到后端服务器。
ALL-IN-ONE
以部署 wordpress 应用为例。
实验环境
| 主机名 | IP 地址 | 角色 |
|---|---|---|
| blog.laoma.cloud | 10.1.8.10 | all |
以部署 wordpress 应用为例。
部署数据库
bash
# 安装服务端
[root@server ~ 21:55:21]# yum install -y mariadb-server

# 启用并启动服务
[root@server ~ 22:00:25]# systemctl enable --now mariadb

# 配置防火墙(一般防火墙是关闭的,不用做此步)
[root@blog ~]# firewall-cmd --permanent --add-service=mysql
[root@blog ~]# firewall-cmd --reload

# 加固 MariaDB
[root@server ~ 22:00:42]# mysql_secure_installation
# 交互式提示您进行更改,包括:
# - 为root帐户设置密码,例如123。
# - 禁止root帐户从本地主机外部访问数据库。
# - 删除匿名用户帐户。
# - 删除用于演示的test数据库。
准备数据库
bash
[root@server ~ 22:03:48]# mysql -uroot -p123
Welcome to the MariaDB monitor.  Commands end with ; or \g.
Your MariaDB connection id is 23
Server version: 5.5.68-MariaDB MariaDB Server

Copyright (c) 2000, 2018, Oracle, MariaDB Corporation Ab and others.

Type 'help;' or '\h' for help. Type '\c' to clear the current input statement.

MariaDB [(none)]> CREATE DATABASE wordpress;
ERROR 1007 (HY000): Can't create database 'wordpress'; database exists
MariaDB [(none)]> CREATE DATABASE word;
Query OK, 1 row affected (0.00 sec)

MariaDB [(none)]> CREATE USER wp@'%' identified by '123';
Query OK, 0 rows affected (0.01 sec)

MariaDB [(none)]> GRANT ALL PRIVILEGES ON wordpress.* TO 'wp'@'%';
Query OK, 0 rows affected (0.00 sec)

MariaDB [(none)]> FLUSH PRIVILEGES;
Query OK, 0 rows affected (0.00 sec)

MariaDB [(none)]> exit
Bye
部署 Nginx 服务
bash
[root@server ~ 22:05:37]# yum install -y nginx
[root@server ~ 22:14:51]# echo 'Hello World !' > /usr/share/nginx/html/index.html
[root@server ~ 22:15:04]# systemctl enable nginx --now
部署 PHP 服务
部署 php 服务
bash
[root@server ~ 22:15:09]# yum install -y php php-fpm php-mysqlnd
[root@server ~ 22:16:11]# systemctl enable php-fpm.service --now

# 修改配置文件
[root@server ~ 22:16:21]# vim /etc/nginx/default.d/php.conf
location ~ \.php$ {
    try_files $uri =404;
    fastcgi_pass 127.0.0.1:9000;
    fastcgi_index index.php;
    fastcgi_param SCRIPT_FILENAME $document_root$fastcgi_script_name;
    include fastcgi_params;
}

[root@server ~ 22:17:21]# systemctl restart nginx
准备 php 测试文件
bash
[root@server ~ 22:22:33]# cd /usr/share/nginx/html/
# 准备 index.php
[root@server html 22:25:46]# cat > index.php <<EOF
<?php
  echo "<h1>Hello World !</h1>\n";
?>
EOF

# 准备 test-mysql.php
[root@server html 22:26:15]# cat > test-mysql.php <<'EOF'
<?php
  $link=mysqli_connect('10.1.8.10','wp','123');
  if($link)
    echo "<h1>Connect Mysql Success !</h1>\n";
  else
    echo "<h1>Connect Mysql Failed !</h1>\n";
  $link->close();
?>
EOF

# 准备 info.php
[root@server html 22:27:07]# cat > info.php <<EOF

<?php
  phpinfo()
?>
EOF

[root@server html 22:27:20]# cp *.php /usr/share/nginx/html
cp: "index.php" 与"/usr/share/nginx/html/index.php" 为同一文件
cp: "info.php" 与"/usr/share/nginx/html/info.php" 为同一文件
cp: "php_test.php" 与"/usr/share/nginx/html/php_test.php" 为同一文件
cp: "test-mysql.php" 与"/usr/share/nginx/html/test-mysql.php" 为同一文件
php 程序测试
bash
[root@server html 22:27:33]# php -f index.php
<h1>Hello World !</h1>
[root@server html 22:27:46]# php -f test-mysql.php
<h1>Connect Mysql Success !</h1>
部署 wordpress 应用
下载 wordpress,上传到家目录。
bash
# 如果 Web 服务是 Nginx,则解压文件到/usr/share/nginx/html
[root@server ~ 22:35:00]# rz -E
rz waiting to receive.
[root@server ~ 22:35:13]# unzip -o wordpress-4.9.4-zh_CN.zip -d /usr/share/nginx/html
[root@server ~ 22:35:23]# chown -R nginx:nginx /usr/share/nginx/html/wordpress

# php-fpm 进程默认以 apache 用户身份运行,修改运行用户为 nginx,并重启服务
[root@server ~ 22:35:52]# vim /etc/php-fpm.d/www.conf
user=nginx
group=nginx
[root@server ~ 22:36:19]# systemctl restart php-fpm
客户端配置 blog.xiexin.cloud 名称解析。访问http://blog.xiexin.cloud/wordpress/。
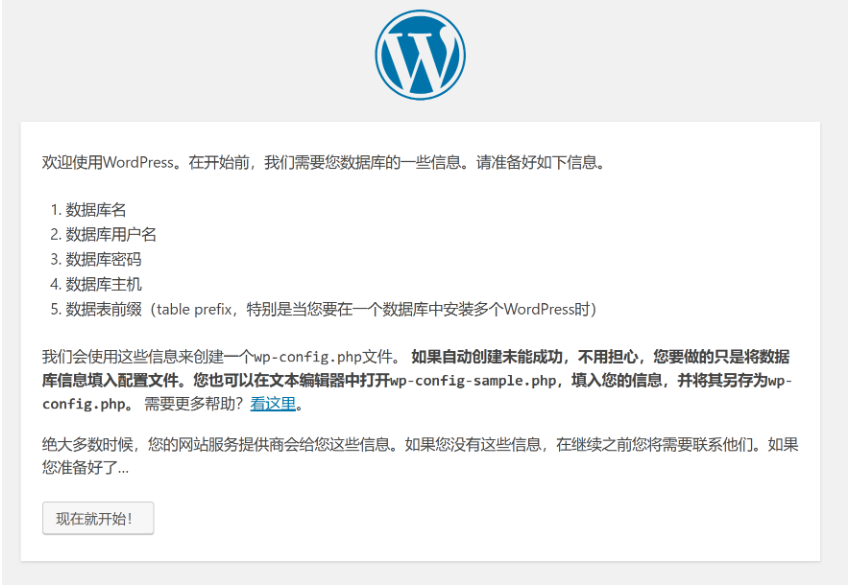
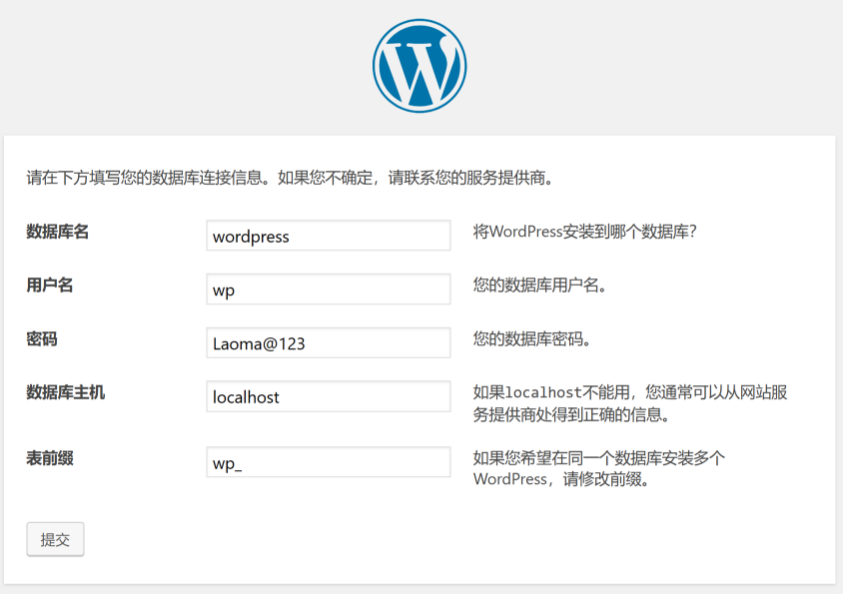
如果是nginx服务,则单击提交后,会出现如下提示:
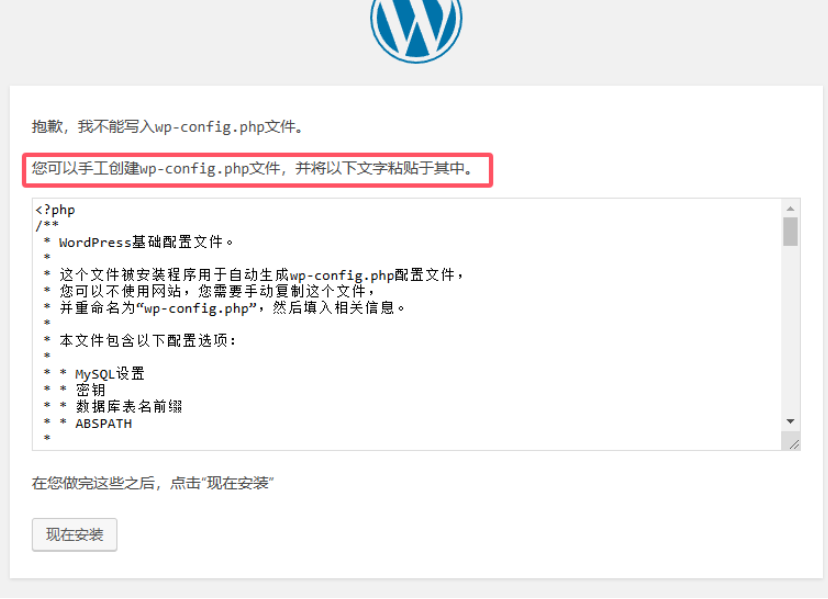
根据提示创建文件,然后单击现在安装。

Standalone
以部署 wordpress 应用为例。
实验环境
| 主机名 | IP 地址 | 角色 |
|---|---|---|
| www.xiexin.cloud | 10.1.8.21 | apache |
| php.xiexin.cloud | 10.1.8.22 | php |
| db.xiexin.cloud | 10.1.8.23 | mariadb |
| storage.xiexin.cloud | 10.1.8.24 | nfs |
所有节点关闭防火墙和SELinux。
预配置
所有节点配置名称解析:
bash
[root@all-node ~ ]# cat /etc/hosts
127.0.0.1   localhost localhost.localdomain localhost4 localhost4.localdomain4
::1         localhost localhost.localdomain localhost6 localhost6.localdomain6

10.1.8.21 www.xiexin.cloud www
10.1.8.22 php.xiexin.cloud php
10.1.8.23 db.xiexin.cloud db
10.1.8.24 storage.xiexin.cloud storage
部署存储服务器
由于静态文件和动态文件没有分开,所以 Web 服务器和 PHP 服务器都要存一份。实验环境通过NFS共享提供wordpress应用。
下载 wordpress,上传到家目录。
bash
[root@storage ~ 22:57:11]# yum install -y nfs-utils
[root@storage ~ 22:57:18]# mkdir -m 777 /www
[root@storage ~ 22:57:30]# echo '/www 10.1.8.0/24(rw)' > /etc/exports
[root@storage ~ 22:57:38]# systemctl enable nfs-server.service --now

# 准备 wordpress资源
[root@storage ~ 22:57:43]# rz -E
rz waiting to receive.
[root@storage ~ 22:58:20]# unzip -o wordpress-4.9.4-zh_CN.zip -d /www/

# 准备网页测试文件
[root@storage ~ 22:58:28]# echo 'Hello World !' > /www/index.html
[root@storage ~ 22:58:54]# cat > /www/index.php <<EOF
> <?php
>   echo "<h1>Hello World !</h1>\n";
> ?>
> EOF

[root@storage ~ 22:59:08]#  cat > /www/test-mysql.php <<'EOF'
> <?php
>   $link=mysqli_connect('db.xiexin.cloud','wp','123');
>   if($link)
>     echo "<h1>Connect Mysql Success !</h1>\n";
>   else
>     echo "<h1>Connect Mysql Failed !</h1>\n";
>   $link->close();
> ?>
> EOF

[root@storage ~ 22:59:35]#  cat > /www/info.php <<EOF
> <?php
>   phpinfo();
> ?>
> EOF
部署数据库服务器
bash
[root@db ~ 23:00:42]# yum install -y mariadb-server
[root@db ~ 23:00:47]# systemctl enable mariadb --now

# 加固 MariaDB
[root@db ~ 23:01:02]# mysql_secure_installation
# 交互式提示您进行更改,包括:
# - 为root帐户设置密码,例如123。
# - 禁止root帐户从本地主机外部访问数据库。
# - 删除匿名用户帐户。
# - 删除用于演示的test数据库。

# 准备wordpress数据库和用户
[root@db ~ 23:01:40]# mysql -uroot -p123
mysql> CREATE DATABASE wordpress;
mysql> CREATE USER wp@'%' identified by 'Laoma@123';
mysql> GRANT ALL PRIVILEGES ON wordpress.* TO 'wp'@'%';
mysql> FLUSH PRIVILEGES;
mysql> exit
部署 Nginx 服务器
bash
# 部署 Nginx 服务
[root@www ~ 23:09:11]# yum install -y nginx
[root@www ~ 23:09:17]# systemctl enable nginx --now

# 安装 nfs 工具
[root@www ~ 23:09:31]# yum install -y nfs-utils

# 挂载存储
[root@www ~ 23:09:36]# echo 'storage.xiexin.cloud:/www /usr/share/nginx/html nfs defaults 0 0' >> /etc/fstab
[root@www ~ 23:09:39]# mount /usr/share/nginx/html/
[root@www ~ 23:09:49]# df -h/usr/share/nginx/html/
Filesystem            Size  Used Avail Use% Mounted on
storage.xiexin.cloud:/www   64G  3.2G   61G   5% /usr/share/nginx/html
[root@www ~ 23:09:55]# ls /usr/share/nginx/html/
index.html  index.php  info.php  test-mysql.php  wordpress
部署 PHP 服务器
部署 php 服务
bash
[root@php ~ 23:12:09]# yum install -y php php-fpm php-mysqlnd
[root@php ~ 23:12:13]# vim /etc/php-fpm.d/www.conf
bash
#使用;号注释掉原有listen行
;listen = 127.0.0.1:9000
# 新增listen 监听所有ip的9000端口
listen = 9000
# 支持监听特定ip的9000端口,例如listen = 10.1.8.22:9000

# 使用;号注释掉原有 listen.allowed_clients 行
# 允许所有客户端访问
;listen.allowed_clients = 127.0.0.1

[root@php ~ 23:13:00]# systemctl enable php-fpm.service --now

[root@php ~ 23:13:06]# useradd -u 997 -s /sbin/nologin nginx
挂载存储
bash
# 安装 nfs 工具
root@php ~ 23:13:14]# yum install -y nfs-utils

# 挂载存储
[root@php ~ 23:15:27]# echo 'storage.xiexin.cloud:/www /www nfs defaults 0 0' >> /etc/fstab
[root@php ~ 23:15:38]# mkdir /www
[root@php ~ 23:15:44]# mount /www
[root@php ~ 23:15:48]# df -h /www
文件系统                   容量  已用  可用 已用% 挂载点
storage.xiexin.cloud:/www   50G  1.7G   49G    4% /www
[root@php ~ 23:15:52]# ls /www
index.html  index.php  info.php  test-mysql.php  wordpress
php 程序测试
bash
root@php ~ 23:16:21]# php /www/index.php
<h1>Hello World !</h1>
[root@php ~ 23:16:45]# php /www/test-mysql.php
<h1>Connect Mysql Success !</h1>
配置 Nginx 对接 PHP
bash
[root@www ~ 23:09:41]# cat > /etc/nginx/conf.d/vhost-www.conf <<'EOF'
> server {
>     listen 80;
>     server_name www.xiexin.cloud;
>
>     # 静态资源处理
>     location / {
>         root /usr/share/nginx/html;
>         index index.html index.htm index.php;
>     }
>
>     # PHP 请求处理
>     location ~ \.php$ {
>         # 配置 PHP-FPM 监听的地址和端口
>         fastcgi_pass php.xiexin.cloud:9000;
>         fastcgi_index index.php;
>         # 配置 php 服务器上 wordpress 应用所在位置
>         fastcgi_param SCRIPT_FILENAME /www/$fastcgi_script_name;
>         include fastcgi_params;
>     }
> }
> EOF

# 重启服务
[root@www ~ 23:18:39]# systemctl restart nginx
配置存储权限
bash
# 更改拥有者为nginx对应的uid
[root@storage ~ 22:59:47]# chown -R 997 /www

# php-fpm 进程默认以 apache 用户身份运行,修改运行用户为 nginx,并重启服务
[root@php ~ 23:16:49]# useradd -u 997 -s /sbin/nologin nginx
[root@php ~ 23:19:49]# vim /etc/php-fpm.d/www.conf
user=nginx
group=nginx
[root@php ~ 23:20:07]# systemctl restart php-fpm
测试应用
客户端配置 www.xiexin.cloud 名称解析。访问http://www.xiexin.cloud/wordpress/。