Centos7 用http ftp搭建本地yum源
文章标签: centos linux 服务器
一、环境准备
1.准备2-3台虚拟机,一台为服务端(安装yum源),其余的为客户端(测试yum源安装结果),最好是同网段的。
IP地址 角色 备注
192.168.116.5 服务端 将完整镜像上传到这台机器
192.168.116.15 客户端
2.准备镜像文件,这里以CentOS-7-x86_64-2009,当然最好是使用CentOS-7-x86_64-Everything-2207-02.iso(这是完整版,包含了所有软件组件,当然体积也庞大,高达9.58G。对完整版安装盘的软件进行补充,集成所有软件;不要使用mini版)
3.准备远程软件,secucrt或者FinalShell、xshell都可
4.关闭防火墙,每一台都要关闭,包括selinux。
root@test1 yum.repos.d# systemctl stop firewalld
root@test1 yum.repos.d# systemctl disabled firewalld //设置防火墙开机不自启
root@test1 yum.repos.d]# setenforce 0 //将selinux临时状态调整为开启
root@test1 yum.repos.d# getenforce //查看selinux状态
5.备份yum源
root@test1 \~# cd /etc/yum.repos.d //yum的配置文件所在
root@test1 yum.repos.d# mkdir bak
root@test1 yum.repos.d# mv *.repo bak/
root@test1 yum.repos.d# ls
bak
//注每台机器都要进行这一步操作
6.创建yum_http.repo文件 (本地yum源)
root@test1 yum.repos.d# vi yum_http.repo
将一下内容写入
centos
name=centos
baseurl=file:///opt/centos
gpgcheck=0
enabled=1
7.创建目录将镜像上传至/opt/centos
root@test1 yum.repos.d# mkdir /opt/centos
root@test1 yum.repos.d# cd /opt/centos
root@test1 centos# ls
CentOS-7-x86_64-DVD-2009.iso
root@test1 centos# mount /opt/centos/CentOS-7-x86_64-DVD-2009.iso /opt/centos //挂载镜像文件,简单挂载mount: /dev/loop0 写保护,将以只读方式挂载
8.安装createrepo
root@test1 html# yum install -y createrepo //利用createrepo 创建yum源仓
二、用http服务,配置yum源
1.安装httpd服务
root@test1 yum.repos.d# yum -y install httpd
2.配置httpd服务
root@test1 \~# cd /var/www/html/ //进入到httpd的默认目录
将/opt/centos下挂载的文件软连接到http默认访问目录下,当然也可以使用cp命令,不过镜像文件较大,使用软连接更快
root@test1 html# ln -s /opt/centos/ /var/www/html/
root@test1 html# ll
总用量 0
lrwxrwxrwx 1 root root 12 7月 8 16:06 centos -> /opt/centos/
或者cp 复制
root@test1 html# mkdir centos
root@test1 html# cp -r /opt/centos/* /var/www/html/centos
root@test1 html# createrepo /var/www/html/centos
Spawning worker 0 with 993 pkgs
Spawning worker 1 with 993 pkgs
Spawning worker 2 with 993 pkgs
Spawning worker 3 with 992 pkgs
3.启动httpd服务
root@test1 yum.repos.d# systemctl start httpd
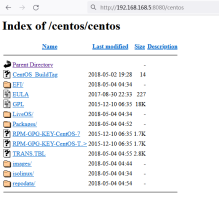
可以在网页上测试一下http://192.168.168.5:8080/centos
4.另外找一台服务器,修改http.repo(这里以自己创建的名字为准)文件中的baseurl为服务端ip
root@test3 yum.repos.d# vim http.repo
centos
name=centos
baseurl=http://192.168.168.5:8080/centos
gpgcheck=0
enabled=1
最后做测试
root@test3 yum.repos.d# yum -y install vim //可以安装则代表成功
- 用vsftpd配置yum源
1.安装vsftpd服务
root@test1 yum.repos.d# yum -y install vsftpd
2.配置vsftpd服务
root@test1 \~# cd /var/ftp/pub/ //进入到vsftpd的默认目录
将/opt/centos下挂载的文件软连接到ftp默认访问目录下,当然也可以使用cp命令,不过镜像文件较大,使用软连接更快
root@test1 pub# ln -s /opt/centos/ /var/ftp/pub/
root@test1 pub# ll
总用量 0
lrwxrwxrwx 1 root root 12 7月 8 16:06 centos -> /opt/centos/
或者cp 复制
root@test1 pub# mkdir centos
root@test1 pub# cp -r /opt/centos/* /var/ftp/pub/centos
用 createrepo 创建仓库
root@test1 pub# createrepo /var/ftp/pub/
Spawning worker 0 with 993 pkgs
Spawning worker 1 with 993 pkgs
Spawning worker 2 with 993 pkgs
Spawning worker 3 with 992 pkgs
3.启动vsftpd服务
root@test1 yum.repos.d# systemctl start httpd
可以在网页上测试一下ftp://192.168.168.5/pub 有内容则代表成功
4.另外找一台服务器,修改http.repo(这里以自己创建的名字为准)文件中的baseurl为服务端ip
root@test3 yum.repos.d# vi ftp.repo
ftpyum
name=ftpyum
baseurl=ftp://192.168.168.5/pub
enabled=1
gpgcheck=0
最后做测试
root@test3 yum.repos.d# yum -y install vim //可以安装则代表成功