解决 Spring Boot 应用程序中的"无法配置数据源"错误(Resolving Failed to Configure a DataSource Error in Spring Boot Application)
在本文中,我们将指导您完成使用 MySQL 数据库设置 Spring Boot 应用程序的过程。我们将介绍如何处理数据源配置失败以及如何通过重试机制实现自动重新配置。这种方法可确保应用程序保持稳健,并能够从瞬态数据库连接问题中恢复。
Spring Boot 应用程序中的"无法配置数据源 (Failed to configure the DataSource )"错误通常发生在应用程序无法与数据库建立连接时。发生这种情况的原因有很多,例如数据库 URL 不正确、凭据错误、数据库服务器宕机或网络问题。我们将解释如何通过实现重试机制来处理错误,从而提高应用程序的弹性。
理解错误
应用程序启动时,会尝试根据 application.properties 中定义的属性配置 DataSource。如果任何配置不正确,或者数据库无法访问,Spring Boot 将抛出异常,导致应用程序启动失败。
数据库失败的常见原因:
- 数据库 URL 不正确
- 数据库凭据无效
- 数据库服务器宕机
- 缺少或不正确的驱动程序
实现重试机制
为了处理瞬时数据库连接问题,我们可以实现重试机制。该机制将尝试重新连接数据库指定次数,直至放弃。
分步过程:
- 创建自定义数据源配置类:我们将创建配置类来定义 Spring 应用程序的数据源 bean。在这个类中,我们将添加在连接失败时重试连接的逻辑。
- 定义数据库属性:在 application.properties 文件中,我们将定义连接到 Spring 应用程序的 MySQL 数据库连接的属性。
- 实现重试逻辑:在配置类中,如果连接数据库失败,我们将实现重试一定次数的逻辑。
先决条件:
- Spring Boot 的基础知识。
- JDK 和 IntelliJ idea 安装在您的本地系统。
- MySQL 数据库用于 DataSource 配置。
- Maven 用于构建依赖管理。
解决数据源配置失败错误的实现
步骤1:创建Spring项目
使用 spring Initializr 创建一个新的 Spring 项目,并将以下依赖项添加到项目中。
依赖项:
- Spring Web
- Spring DevTools
- Spring Data JPA
- MySQL Drivers
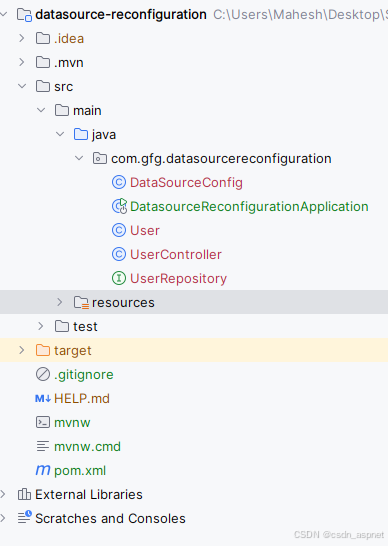
创建项目后,文件夹结构将如下图所示。
步骤 2:配置应用程序属性
打开application.properties文件,添加Spring Boot项目的MySQL数据库连接的配置。
spring.application.name=datasource-reconfiguration
spring.datasource.url=jdbc:mysql://localhost:3306/example
spring.datasource.username=root
spring.datasource.password=
spring.datasource.driver-class-name=com.mysql.cj.jdbc.Driver
spring.jpa.hibernate.ddl-auto=update
spring.jpa.show-sql=true
步骤3:创建数据源配置类
我们将创建 DataSourceConfig 类来定义 DataSource bean 并实现重试逻辑以连接数据库。
转到 src > main > java > com.gfg.datasourcereconfiguration > DataSourceConfig 并输入以下代码。
package com.gfg.datasourcereconfiguration;
import org.springframework.beans.factory.annotation.Value;
import org.springframework.context.annotation.Bean;
import org.springframework.context.annotation.Configuration;
import org.springframework.jdbc.datasource.DriverManagerDataSource;
import javax.sql.DataSource;
@Configuration // Indicates that this class contains Spring configuration
public class DataSourceConfig {
@Value("${spring.datasource.url}") // Injects the datasource URL from application.properties
private String url;
@Value("${spring.datasource.username}") // Injects the datasource username from application.properties
private String username;
@Value("${spring.datasource.password}") // Injects the datasource password from application.properties
private String password;
@Value("${spring.datasource.driver-class-name}") // Injects the datasource driver class name from application.properties
private String driverClassName;
@Bean // Defines this method as a Spring bean for DataSource
public DataSource dataSource() {
DriverManagerDataSource dataSource = new DriverManagerDataSource();
dataSource.setDriverClassName(driverClassName); // Sets the driver class name for the DataSource
dataSource.setUrl(url); // Sets the URL for the DataSource
dataSource.setUsername(username); // Sets the username for the DataSource
dataSource.setPassword(password); // Sets the password for the DataSource
int maxRetries = 3; // Maximum number of retry attempts
int retryCount = 0; // Counter for retry attempts
while (retryCount < maxRetries) { // Loop to retry connection attempts
try {
dataSource.getConnection().isValid(1); // Check if connection is valid with a 1-second timeout
return dataSource; // Return the configured DataSource if the connection is successful
} catch (Exception e) { // Catch any exceptions during the connection attempt
retryCount++; // Increment the retry counter
System.err.println("Failed to configure DataSource. Attempt " + retryCount + " of " + maxRetries); // Log the retry attempt
try {
Thread.sleep(2000); // Wait for 2 seconds before retrying
} catch (InterruptedException ie) {
Thread.currentThread().interrupt(); // Restore the interrupted status
}
}
}
throw new RuntimeException("Failed to configure DataSource after " + maxRetries + " attempts."); // Throw an exception if all retries fail
}
}
重试逻辑说明:
- maxRetries:连接数据库的最大重试次数。
- retryCount:用于跟踪重试次数的计数器。
- dataSource.getConnection.isValid(1):检查数据库连接是否有效。isValid() 方法检查连接是否仍然有效,超时时间为 1 秒。
- Thread.sleep(2000):等待 2 秒后再尝试下一次重试。
- 抛出新的 RuntimeException:如果在最大重试次数后仍未建立连接,则抛出运行时异常。
步骤4:创建用户类
转到 src > main > java > com.gfg.datasourcereconfiguration > User 并输入以下代码。
package com.gfg.datasourcereconfiguration;
import jakarta.persistence.Entity;
import jakarta.persistence.GeneratedValue;
import jakarta.persistence.GenerationType;
import jakarta.persistence.Id;
import lombok.AllArgsConstructor;
import lombok.Data;
import lombok.NoArgsConstructor;
@Entity
@Data
@AllArgsConstructor
@NoArgsConstructor
public class User {
@Id
@GeneratedValue(strategy = GenerationType.IDENTITY)
private Long id;
private String name;
private String email;
// Getters and setters
}
步骤 5:创建 UserRepository 类
转到 src > main > java > com.gfg.datasourcereconfiguration > UserRepository 并输入以下代码。
package com.gfg.datasourcereconfiguration;
import org.springframework.data.jpa.repository.JpaRepository;
public interface UserRepository extends JpaRepository<User, Long> {
}
步骤6:创建UserController类
转到 src > main > java > com.gfg.datasourcereconfiguration > UserController 并输入以下代码。
package com.gfg.datasourcereconfiguration;
import org.springframework.beans.factory.annotation.Autowired;
import org.springframework.web.bind.annotation.*;
import java.util.List;
@RestController // Indicates that this class is a REST controller
@RequestMapping("/users") // Maps HTTP requests to /users to methods in this controller
public class UserController {
@Autowired // Automatically injects the UserRepository bean
private UserRepository userRepository;
@GetMapping // Handles GET requests to /users
public List<User> getAllUsers() {
return userRepository.findAll(); // Retrieves all users from the database
}
@PostMapping // Handles POST requests to /users
public User createUser(@RequestBody User user) {
return userRepository.save(user); // Saves the user to the database and returns the saved entity
}
}
该类是一个 Spring Boot REST 控制器,用于处理与用户操作相关的 HTTP 请求。该类UserController主要有两个功能:
- getAllUsers() :处理 GET 请求
/users并返回数据库中所有用户的列表。 - createUser(User user) :处理 POST 请求以
/users创建新用户并将其保存到数据库。
步骤 7:主类
主类中不需要进行任何更改。
package com.gfg.datasourcereconfiguration;
import org.springframework.boot.SpringApplication;
import org.springframework.boot.autoconfigure.SpringBootApplication;
@SpringBootApplication
public class DatasourceReconfigurationApplication {
public static void main(String\[\] args) {
SpringApplication.run(DatasourceReconfigurationApplication.class, args);
}
}
pom.xml文件:
<?xml version="1.0" encoding="UTF-8"?>
<project xmlns="http://maven.apache.org/POM/4.0.0" xmlns:xsi="http://www.w3.org/2001/XMLSchema-instance"
xsi:schemaLocation="http://maven.apache.org/POM/4.0.0 https://maven.apache.org/xsd/maven-4.0.0.xsd">
<modelVersion>4.0.0</modelVersion>
<parent>
<groupId>org.springframework.boot</groupId>
<artifactId>spring-boot-starter-parent</artifactId>
<version>3.3.1</version>
<relativePath/> <!-- lookup parent from repository -->
</parent>
<groupId>com.gfg</groupId>
<artifactId>datasource-reconfiguration</artifactId>
<version>0.0.1-SNAPSHOT</version>
<name>datasource-reconfiguration</name>
<description>datasource-reconfiguration</description>
<url/>
<licenses>
<license/>
</licenses>
<developers>
<developer/>
</developers>
<scm>
<connection/>
<developerConnection/>
<tag/>
<url/>
</scm>
<properties>
<java.version>17</java.version>
</properties>
<dependencies>
<dependency>
<groupId>org.springframework.boot</groupId>
<artifactId>spring-boot-starter-data-jpa</artifactId>
</dependency>
<dependency>
<groupId>org.springframework.boot</groupId>
<artifactId>spring-boot-starter-web</artifactId>
</dependency>
<dependency>
<groupId>org.springframework.boot</groupId>
<artifactId>spring-boot-devtools</artifactId>
<scope>runtime</scope>
<optional>true</optional>
</dependency>
<dependency>
<groupId>com.mysql</groupId>
<artifactId>mysql-connector-j</artifactId>
<scope>runtime</scope>
</dependency>
<dependency>
<groupId>org.projectlombok</groupId>
<artifactId>lombok</artifactId>
<optional>true</optional>
</dependency>
<dependency>
<groupId>org.springframework.boot</groupId>
<artifactId>spring-boot-starter-test</artifactId>
<scope>test</scope>
</dependency>
</dependencies>
<build>
<plugins>
<plugin>
<groupId>org.springframework.boot</groupId>
<artifactId>spring-boot-maven-plugin</artifactId>
<configuration>
<excludes>
<exclude>
<groupId>org.projectlombok</groupId>
<artifactId>lombok</artifactId>
</exclude>
</excludes>
</configuration>
</plugin>
</plugins>
</build>
</project>
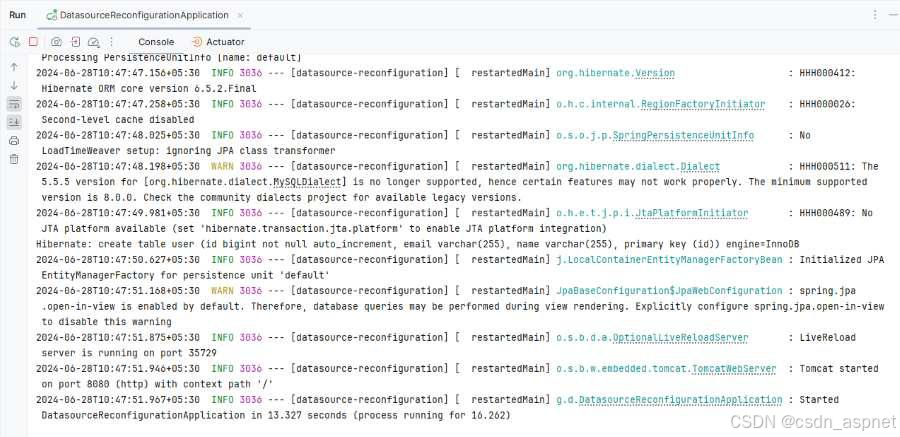
步骤 8:运行应用程序
现在,运行该应用程序,它将在 Tomcat 服务器的 8080 端口启动。
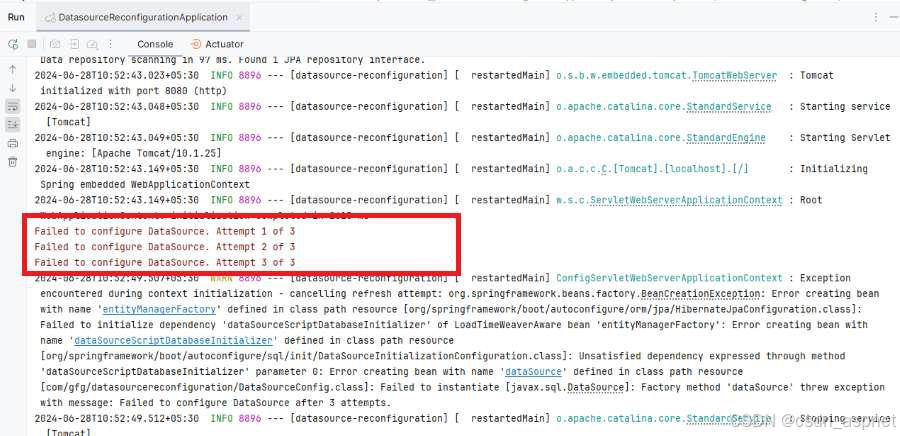
DataSource失败案例:
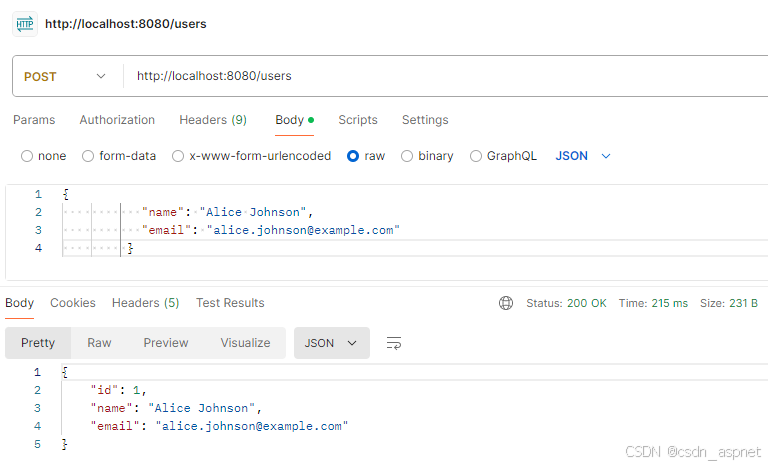
测试端点
创建用户:
POST http://localhost:8080/users
输出:
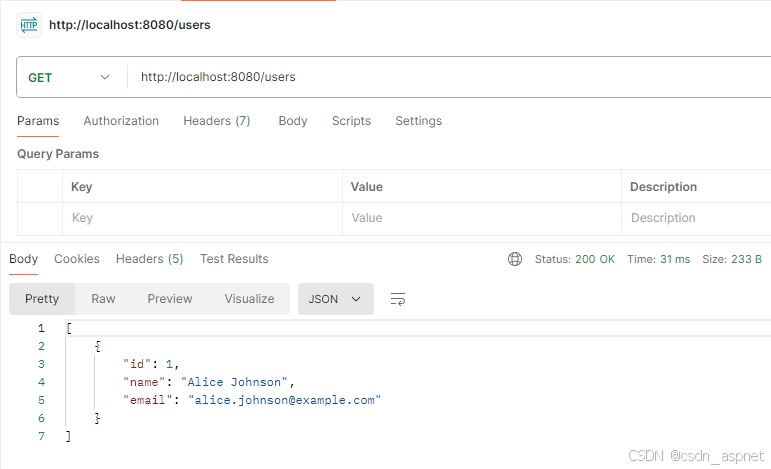
获取所有用户:
GET http://localhost:8080/users
输出:
结论
在本文中,我们讨论了如何解决 Spring Boot 应用程序中的"无法配置数据源"错误。通过实施重试机制,我们可以提高应用程序的弹性,并能够处理 Spring 应用程序的瞬态数据库连接问题。这种方法确保应用程序能够从临时故障中恢复并继续顺利运行。
如果您喜欢此文章,请收藏、点赞、评论,谢谢,祝您快乐每一天。