目录
[9.bug 分支](#9.bug 分支)
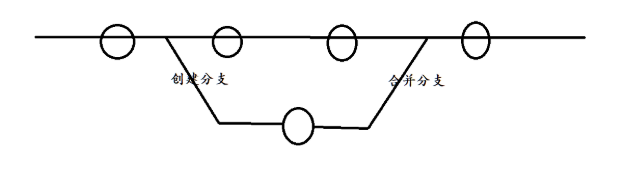
1.理解分支
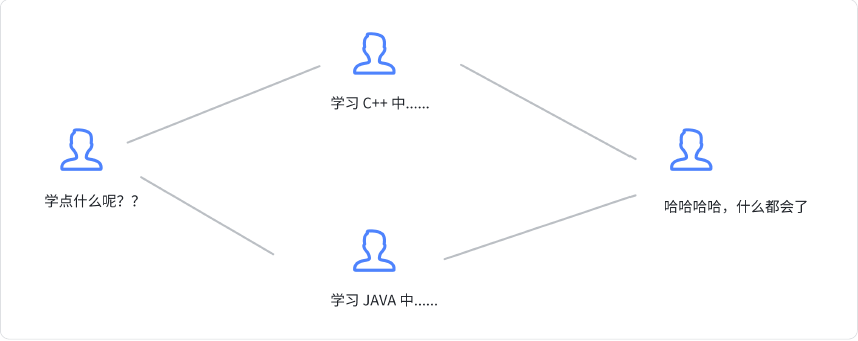
本章开始介绍 Git 的杀手级功能之一(注意是之一,也就是后面还有之二,之三......):分支。
分支就像分身,当你正在电脑前努力学习 C++ 的时候,分身正在努力学习 JAVA。如果两个人互不干扰,那分身对现在的你也没啥影响。不过,在某个时间点,分身与你合并了,结果,你既学会了 C++ 又学会了 JAVA!。
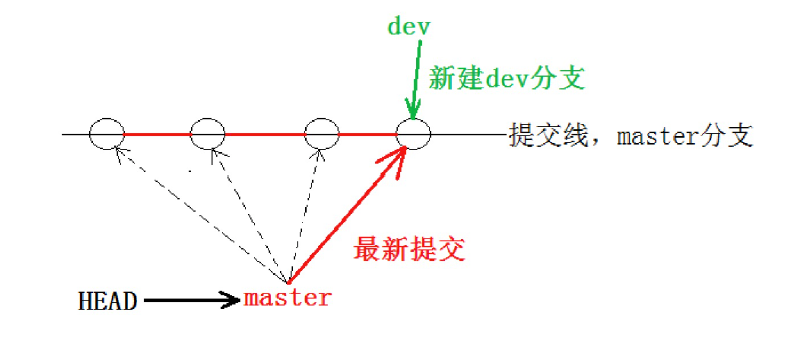
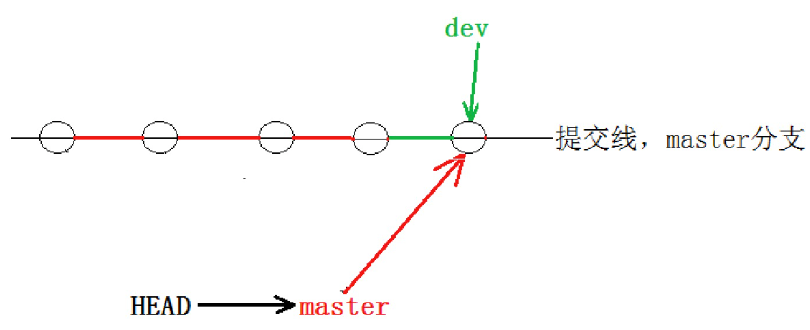
在版本回退里,我们知道HEAD指向了master,而master里面存储的是最新提交的commit id, 如果这时我们再观察master内的object对象,object内有个parent存储上一次操作的commit id ,同理上一次操作产生的object对象内也有parent,存储上上次的commit id.....所以我们发现Git把一系列操作通过parent按时间先后串成一条线,这条时间线就可以理解为是一个分支 。截止到目前,只有一条时间线,在Git里,这个分支叫主分支,即 master 分支。

再来理解一下HEAD,HEAD 严格来说不是指向提交,而是指向master,master才是指向提交的,所以,HEAD 指向的就是当前分支。
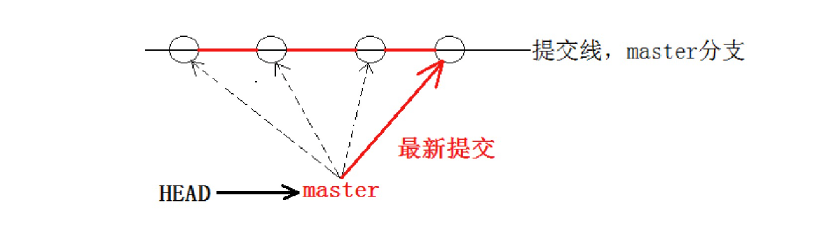
每次提交,master分支都会向前移动一步,这样,随着你不断提交,master分支的线也越来越长,而HEAD只要一直指向master分支即可指向当前分支。
通过查看当前的版本库,我们也能清晰的理出思路:
cpp
hyb@139-159-150-152:~/gitcode$ cat .git/HEAD
ref: refs/heads/master
hyb@139-159-150-152:~/gitcode$ cat .git/refs/heads/master
5476bdeb12510f7cd72ac4766db7988925ebd302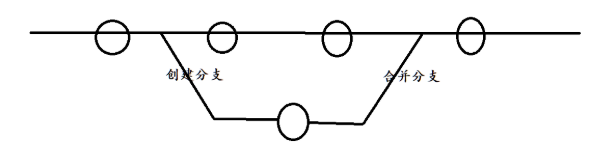
而在主分支master之外,git也提供方式创建分支,分支会继承master的代码,我们就可以对分支修改而不影响主分支master,修改完的分支也可以合并到master中。
2.创建分支
Git 支持我们查看或创建其他分支,在这里我们来创建第一个自己的分支 dev ,对应的命令为:
git branch name
cpp
hyb@139-159-150-152:~/gitcode$ git branch #查看当前本地所有分支
* master
hyb@139-159-150-152:~/gitcode$ git branch dev #新建分支dev
hyb@139-159-150-152:~/gitcode$ git branch
dev
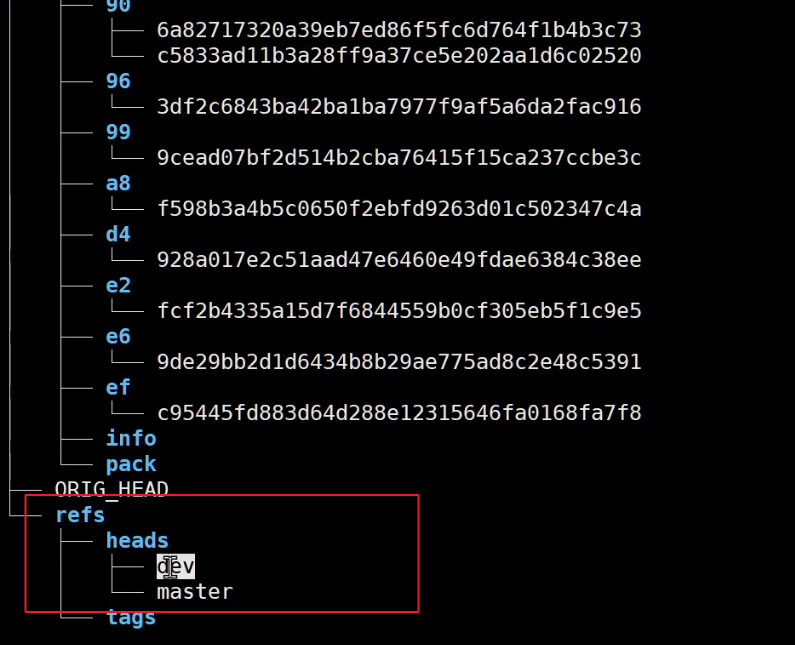
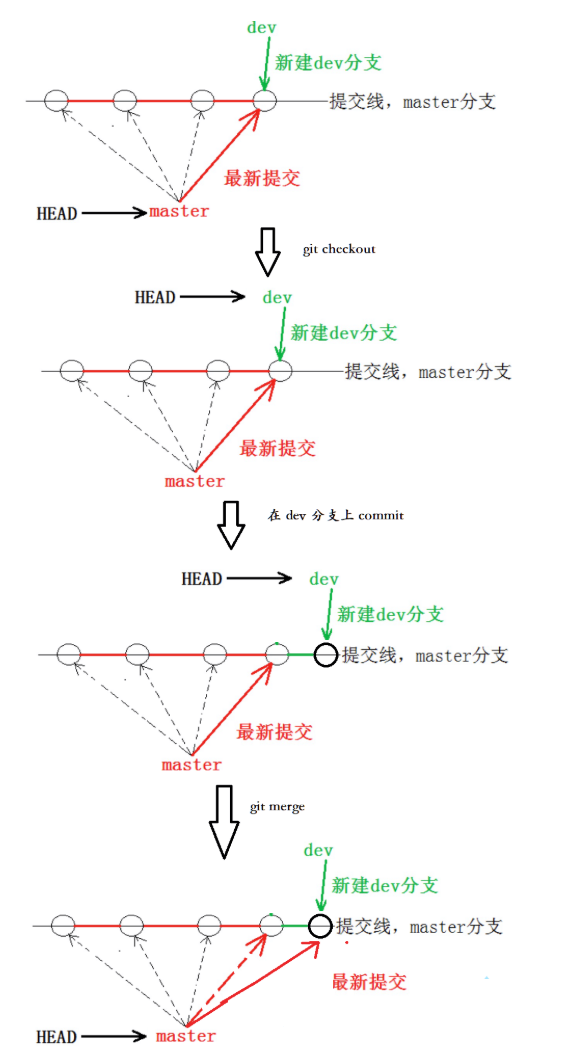
* master当我们创建新的分支后,Git 新建了一个指针叫 dev,HEAD也可以指向其他分支,被指向的分治就是当前正在工作的分支,当前HEAD 指向的分支前会有*做标识。另外,可以通过目录结构发现,新的dev 分支创建后,.git的refs目录下也会有对应dev:
cpp
hyb@139-159-150-152:~/gitcode$ ls .git/refs/heads/
dev master
hyb@139-159-150-152:~/gitcode$ cat .git/refs/heads/*
5476bdeb12510f7cd72ac4766db7988925ebd302
5476bdeb12510f7cd72ac4766db7988925ebd302
此外dev是基于当前最新的提交创建的,我们可以发现目前 dev 和 master 指向同一个修改。并且也可以验证下 HEAD 目前是指向master 的。
cpp
hyb@139-159-150-152:~/gitcode$ cat .git/HEAD
ref: refs/heads/master
一张图总结:
3.切换分支
那如何切换到 dev 分支下进行开发呢?使用 git checkout 命令即可完成切换,示例如下:
git checkout name
cpp
hyb@139-159-150-152:~/gitcode$ git checkout dev
Switched to branch 'dev'
hyb@139-159-150-152:~/gitcode$ git branch
* dev    #发现当前工作分支转化成了dev
master
hyb@139-159-150-152:~/gitcode$ cat .git/HEAD
ref: refs/heads/dev        #HEAD指向dev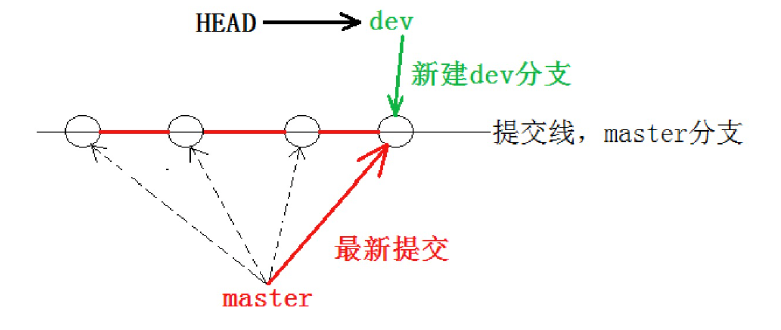
我们发现 HEAD 已经指向了 dev,就表示我们已经成功的切换到了 dev 上!
接下来,在dev 分支下修改 ReadMe 文件,新增一行内容,并进行一次提交操作:
cpp
hyb@139-159-150-152:~/gitcode$ vim ReadMe
hyb@139-159-150-152:~/gitcode$ cat ReadMe
hello bit
hello git
hello world
hello version1
hello version2
hello version3
write aaa for new branch
hyb@139-159-150-152:~/gitcode$ git add .
hyb@139-159-150-152:~/gitcode$ git commit -m"modify ReadMe"
[dev 3740dce] modify ReadMe
1 file changed, 1 insertion(+)
现在,dev 分支的工作完成,我们就可以切换回 master 分支:
cpp
hyb@139-159-150-152:~/gitcode$ git checkout master
Switched to branch 'master'
hyb@139-159-150-152:~/gitcode$ cat ReadMe
hello bit
hello git
hello world
hello version1
hello version2
hello version3
切换回 master 分支后,发现ReadMe文件中新增的内容不见了!!!赶紧再切回 dev 看看:
cpp
hyb@139-159-150-152:~/gitcode$ git checkout dev
Switched to branch 'dev'
hyb@139-159-150-152:~/gitcode$ cat ReadMe
hello bit
hello git
hello world
hello version1
hello version2
hello version3
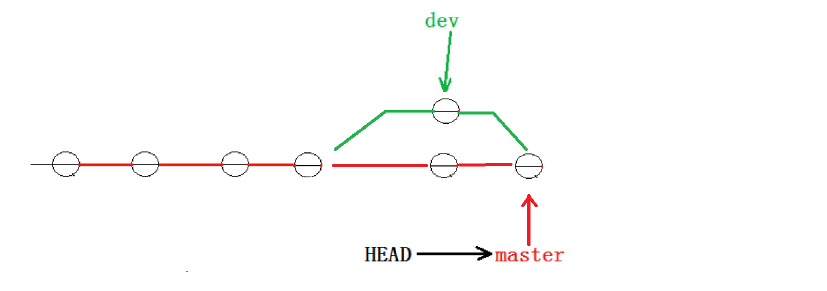
write aaa for new branch在 dev 分支上,内容还在。为什么会出现这个现象呢?我们来看看 dev 分支和 master 分支指向,发现两者指向的提交是不一样的:
cpp
hyb@139-159-150-152:~/gitcode$ cat .git/refs/heads/dev
bdaf528ffbb8e05aee34d37685408f0e315e31a4
hyb@139-159-150-152:~/gitcode$ cat .git/refs/heads/master
5476bdeb12510f7cd72ac4766db7988925ebd302
看到这里就能明白了,因为我们是在dev分支上提交的,而master分支此刻的提交点并没有变,两者指向了不同的object对象,就像上文我们讲的分身一样两者互不干扰。
此时的状态如图如下所示。
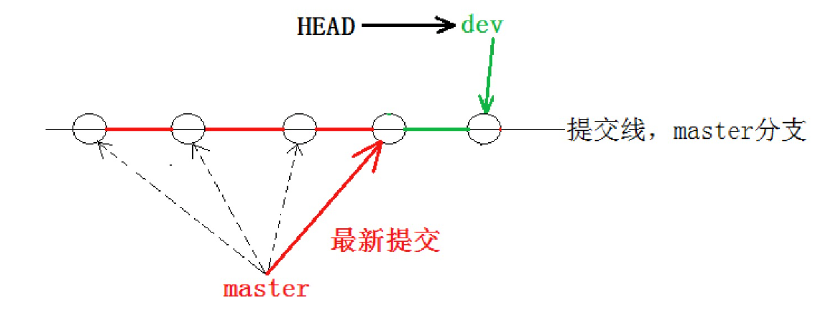
所以当切换到 master 分支之时,HEAD 就指向了 master,当然看不到提交了!
4.合并分支
为了在 master 主分支上能看到新的提交,就需要将dev 分支合并到master 分支,示例如下:
我们需要切换到主要合并的分支上,使用git merge 被合并分支的name 来进行合并分支操作
cpp
hyb@139-159-150-152:~/gitcode$ git branch
* dev
master
hyb@139-159-150-152:~/gitcode$ git checkout master # 切换到 master 上进行合并
Switched to branch 'master'
hyb@139-159-150-152:~/gitcode$ git merge dev # 合并 dev 分支
Updating 16623e1..3740dce
Fast-forward
ReadMe | 1 +
1 file changed, 1 insertion(+)
hyb@139-159-150-152:~/gitcode$ cat ReadMe
hello bit
hello git
hello world
hello version1
hello version2
hello version3
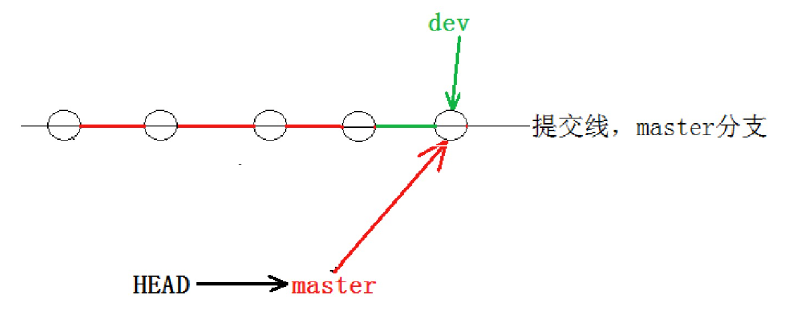
write aaa for new branchgit merge 命令用于合并指定分支到当前分支。合并后,master会指向dev指向的对象,master 就能看到 dev 分支提交的内容了。此时的状态如图如下所示。
提示信息中的Fast-forward 代表"快进模式",也就是直接把master指向dev的当前提交 ,因为我们这里只是增加了一行新字符串,所以是Fast-forward 合并,合并速度非常快。
当然,也不是每次合并都能 Fast-forward,我们后面会讲其他方式的合并。
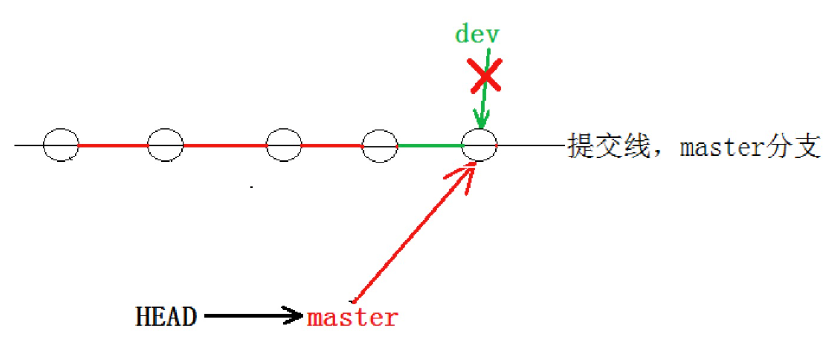
5.删除分支
合并完成后, dev 分支对于我们来说就没用了, 那么dev分支就可以被删除掉,注意如果当前正处于某分支下,就不能删除当前分支,如:
cpp
hyb@139-159-150-152:~/gitcode$ git branch
* dev
master
hyb@139-159-150-152:~/gitcode$ git branch -d dev
error: Cannot delete branch 'dev' checked out at '/home/hyb/gitcode'
而可以在其他分支下删除当前分支,如:
我们通过 git branch -d name 可以删除指定分支
cpp
hyb@139-159-150-152:~/gitcode$ git checkout master
Switched to branch 'master'
hyb@139-159-150-152:~/gitcode$ git branch -d dev
Deleted branch dev (was bdaf528).
hyb@139-159-150-152:~/gitcode$ git branch
* master
此时的状态如图如下所示。
因为创建、合并和删除分支非常快,所以Git鼓励你使用分支完成某个任务,合并后再删掉分支,这和直接在master分支上工作效果是一样的,并且如果实际开发过程中个代码出现问题我们可以先在分支解决,解决完后再合并到master主分支,过程更安全。
6.合并冲突
git checkout -b name 对于不存在的分支,会直接创建,并将当前工作分支转移到新分支
可是,在实际分支合并的时候,并不是想合并就能合并成功的,有时候可能会遇到代码冲突的问题。
为了演示这问题,创建一个新的分支 dev1 ,并切换至目标分支,我们可以使用 git checkout -
b dev1 一步完成创建并切换的动作,示例如下:
cpp
hyb@139-159-150-152:~/gitcode$ git checkout -b dev1
Switched to a new branch 'dev1'
hyb@139-159-150-152:~/gitcode$ git branch
* dev1
master
在dev1 分支下修改ReadMe 文件,更改文件内容如下,并进行一次提交,如:
cpp
hyb@139-159-150-152:~/gitcode$ cat ReadMe
hello bit
hello git
hello world
hello version1
hello version2
hello version3
write bbb for new branch # 将 aaa 该为 bbb
hyb@139-159-150-152:~/gitcode$ git add .
hyb@139-159-150-152:~/gitcode$ git commit -m"modify ReadMe"
[dev1 0854245] modify ReadMe
1 file changed, 1 insertion(+), 1 deletion(-)
切换至 master 分支,观察ReadMe 文件内容:
cpp
hyb@139-159-150-152:~/gitcode$ git checkout master
Switched to branch 'master'
hyb@139-159-150-152:~/gitcode$ cat ReadMe
hello bit
hello git
hello world
hello version1
hello version2
hello version3
write aaa for new branch
我们发现,切回来之后,master文件内容由变成了老的版本,这种现象很正常,我们现在也完全能理解。
此时在 master 分支上,我们对 ReadMe 文件再进行一次修改,并进行提交,如下:
cpp
hyb@139-159-150-152:~/gitcode$ git branch
dev1
* master
hyb@139-159-150-152:~/gitcode$ vim ReadMe
hyb@139-159-150-152:~/gitcode$ cat ReadMe
hello bit
hello git
hello world
hello version1
hello version2
hello version3
write ccc for new branch #修改aaa为ccc
hyb@139-159-150-152:~/gitcode$ git add .
hyb@139-159-150-152:~/gitcode$ git commit -m"modify ReadMe"
[master c10f6d0] modify ReadMe
1 file changed, 1 insertion(+), 1 deletion(-)
现在, master 分支和dev1 分支各自都分别有新的提交,变成了这样:
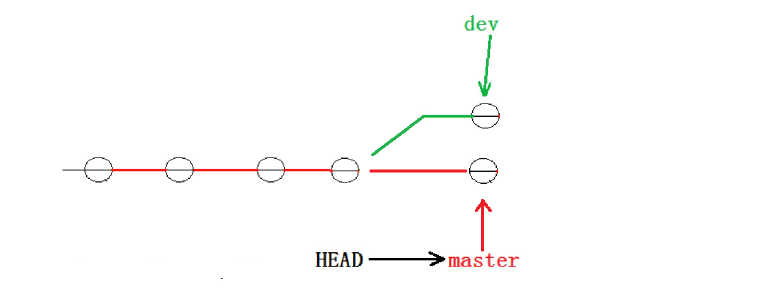
并且双方的这种修改是在同一位置处的,双方之间互相矛盾,这种情况下,Git 只能试图把各自的修改合并起来,但是问题在于master是主分支,为了避免bug影响,我们通常又会在其他分支上完成开发再合并到主分支上。所以这里两条分支很难绝对说选取哪个结果覆盖另一条,所以这里合并冲突必须程序员来主动处理。
这种就可能会有冲突的合并会返回信息提示程序员处理,如下所示:
cpp
hyb@139-159-150-152:~/gitcode$ git merge dev1
Auto-merging ReadMe
CONFLICT (content): Merge conflict in ReadMe
Automatic merge failed; fix conflicts and then commit the result.
hyb@139-159-150-152:~/gitcode$ git status
On branch master
You have unmerged paths.
(fix conflicts and run "git commit")
(use "git merge --abort" to abort the merge)
Unmerged paths:
(use "git add <file>..." to mark resolution)
both modified: ReadMe
no changes added to commit (use "git add" and/or "git commit -a")
发现 ReadMe 文件有冲突后,可以直接查看文件内容,要说的是 Git 会用 <<<<<<<,=======,
>>>>>>> 来标记出不同分支的冲突内容,=======是两个分支冲突区域的分界线。
如下所示:
cpp
hyb@139-159-150-152:~/gitcode$ cat ReadMe
hello bit
hello git
hello world
hello version1
hello version2
hello version3
<<<<<<< HEAD
write ccc for new branch
=======
write bbb for new branch
>>>>>>> dev1
此时我们必须要手动调整冲突代码,并需要再次提交修正后的结果!!,确认结果(再次提交很重要,切勿忘记)
cpp
hyb@139-159-150-152:~/gitcode$ cat ReadMe
hello bit
hello git
hello world
hello version1
hello version2
hello version3
write bbb for new branch
hyb@139-159-150-152:~/gitcode$ git add .
hyb@139-159-150-152:~/gitcode$ git commit -m"merge ReadMe"
[master 2976afc] merge ReadMe
到这里冲突就解决完成,此时的状态中master就会指向我们修改后才生的object了。
用带参数的 git log也可以看到分支的合并情况, --graph选项是会在打印结果左侧以图像化的形式表现提交的过程, --abbrev-commit选项是将commit id进行简化:
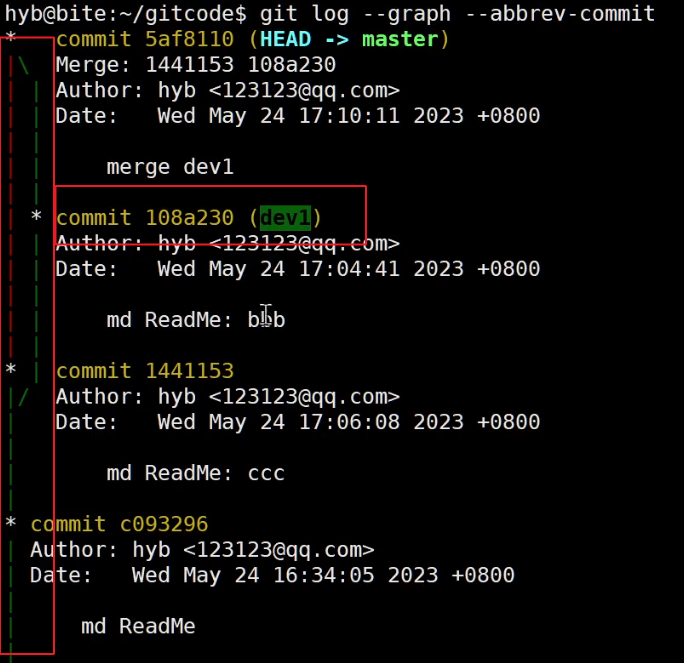
cpp
hyb@139-159-150-152:~/gitcode$ git log --graph --pretty=oneline --abbrev-commit
* 2976afc (HEAD -> master) merge ReadMe
|\
| * c594fd1 (dev1) modify ReadMe
* | c10f6d0 modify ReadMe
|/
最后,不要忘记 dev1 分支使用完毕后就可以删除了,避免继续占用资源:
cpp
hyb@139-159-150-152:~/gitcode$ git branch
* master
hyb@139-159-150-152:~/gitcode$ git branch -d dev1
Deleted branch dev1 (was c594fd1).
7.分支管理策略
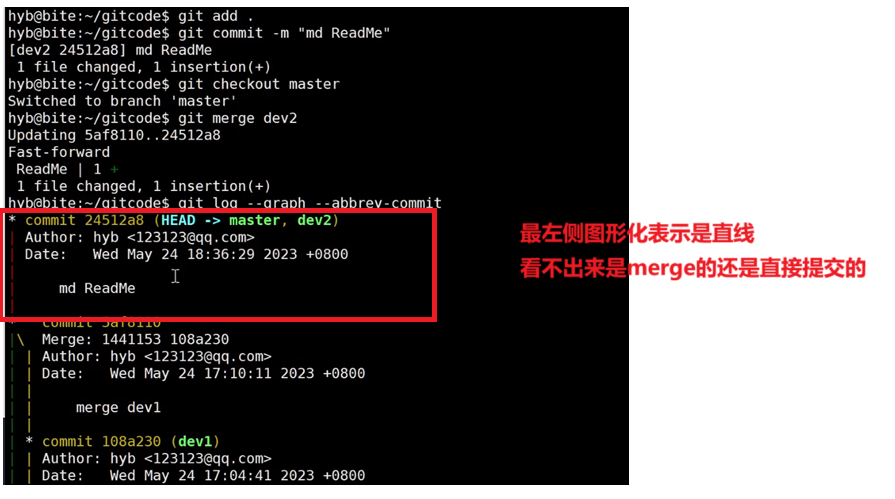
通常合并分支时,不会产生冲突的情况下,如果可能,Git 会采用 Fast forward 模式。
但是在这种Fast forward 模式下,删除分支后,查看分支历史时,会丢掉分支信息,看不出来最新提交到底是 merge 进来的还是正常提交的。
但在合并冲突部分,我们需要手动解决,会再进行一次新的提交,得到的最终状态为:

那么这就不是Fast forward 模式了,这样的好处是,从分支历史上就可以看出分支信息。
例如我们现在已经删除了在合并冲突部分创建的dev1 分支,但依旧能看到 master 其实是由其他分支合并得到:
cpp
hyb@139-159-150-152:~/gitcode$ git log --graph --pretty=oneline --abbrev-commit
* 2976afc (HEAD -> master) merge ReadMe
|\
| * c594fd1 modify ReadMe
* | c10f6d0 modify ReadMe
|/
Git 支持我们强制禁用 Fast forward 模式,通过 合并时**git merge --no-ff -m "备注信息" name**那么就会在 merge 时生成一个新的commit ,这样,从分支历史上就可以看出分支信息。
下面我们实战一下--no-ff 方式的 git merge 。首先,创建新的分支 dev2 ,并切换至新的分支:
cpp
hyb@139-159-150-152:~/gitcode$ git checkout -b dev2
Switched to a new branch 'dev2'
修改ReadMe 文件,并提交一个新的commit :
cpp
hyb@139-159-150-152:~/gitcode$ cat ReadMe
hello bit
hello git
hello world
hello version1
hello version2
hello version3
write bbb for new branch
a,b,c,d
hyb@139-159-150-152:~/gitcode$ git add .
hyb@139-159-150-152:~/gitcode$ git commit -m"modify ReadMe"
[dev2 41b082f] modify ReadMe
1 file changed, 1 insertion(+)
切回master 分支,开始合并:
cpp
hyb@139-159-150-152:~/gitcode$ git checkout master
Switched to branch 'master'
hyb@139-159-150-152:~/gitcode$ git merge --no-ff -m "merge with no-ff" dev2
Merge made by the 'recursive' strategy.
ReadMe | 1 +
1 file changed, 1 insertion(+)
hyb@139-159-150-152:~/gitcode$ cat ReadMe
hello bit
hello git
hello world
hello version1
hello version2
hello version3
write bbb for new branch
a,b,c,d
请注意--no-ff 参数,表示禁用 Fast forward 模式。禁用 Fast forward 模式后合并会创建
一个新的commit ,所以加上-m 参数,把描述写进去。
合并后,查看分支历史:
cpp
hyb@139-159-150-152:~/gitcode$ git log --graph --pretty=oneline --abbrev-commit
* 5bd16b4 (HEAD -> master) merge with no-ff
|\
| * 41b082f (dev2) modify ReadMe
|/
可以看到,不使用 Fast forward 模式,merge后就像这样:
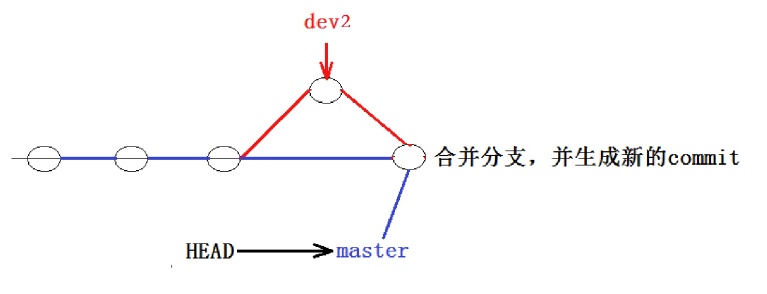
所以在合并分支时,加上**--no-ff** 参数就可以用普通模式 合并,合并后的历史有分支,能看出来曾
经做过合并,而 fast forward 合并就看不出来曾经做过合并。
8.分支策略
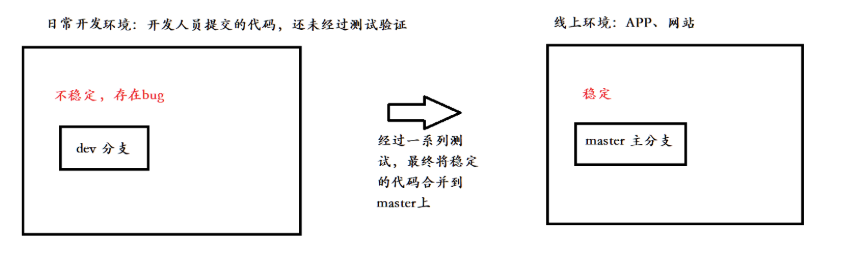
在实际开发中,我们应该按照几个基本原则进行分支管理:
首先,master分支应该是非常稳定的,也就是仅用来发布新版本,平时不能在上面进行开发(因为不能用户在使用软件时是不是出错);实际开发都在dev分支上,也就是说,dev分支是不稳定的,到某个时候,完成新功能开发,并测试完代码没有bug时,比如1.0版本发布时,再把dev分支合并到master上,在master分支发布1.0版本;
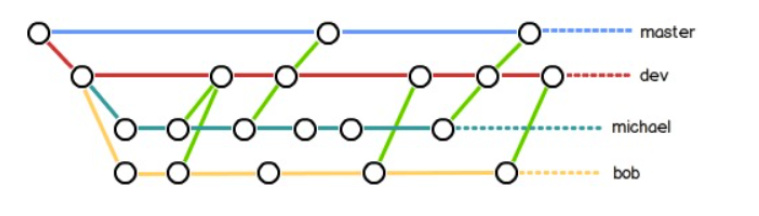
而团队开发中,每个人都在不同的dev分支上干活,每个人都有自己的分支,就可以同时负责不同功能的开发,最后测试完成再同一处理冲突,合并提交发布到主分支master上。
所以,团队合作的分支看起来就像这样:

9.bug 分支
假如我们现在正在 dev2 分支上进行开发,开发到一半,突然发现master 分支上面有 bug,需要
解决。在Git中,每个 bug 都可以通过一个新的临时分支来修复,修复后,合并分支,然后将临时分支删除 。
可现在 dev2 的代码在工作区中开发了一半,还无法提交,怎么办?例如:
cpp
hyb@139-159-150-152:~/gitcode$ git branch
* dev2
master
hyb@139-159-150-152:~/gitcode$ cat ReadMe
hello bit
hello git
hello world
hello version1
hello version2
hello version3
write bbb for new branch
a,b,c,d
i am coding ...
hyb@139-159-150-152:~/gitcode$ git status
On branch dev2
Changes not staged for commit:
(use "git add <file>..." to update what will be committed)
(use "git restore <file>..." to discard changes in working directory)
modified: ReadMe
no changes added to commit (use "git add" and/or "git commit -a")
Git 提供了git stash 命令,可以将当前的工作区信息进行储藏,被储藏的内容可以在将来某个时间恢复出来。
cpp
hyb@139-159-150-152:~/gitcode$ git stash
Saved working directory and index state WIP on dev2: 41b082f modify ReadMe
hyb@139-159-150-152:~/gitcode$ git status
On branch dev2
nothing to commit, working tree clean
用 git status 查看工作区,就是干净的(除非有没有被 Git 管理的文件),因此可以放心地创建分支来修复bug。
储藏dev2 工作区之后,由于我们要基于master分支修复 bug,所以需要切回master 分支,再新
建临时分支来修复 bug,示例如下:
cpp
hyb@139-159-150-152:~/gitcode$ git checkout master # 切回master
Switched to branch 'master'
hyb@139-159-150-152:~/gitcode$ git checkout -b fix_bug # 新建并切换到 fix_bug 分
支
Switched to a new branch 'fix_bug'
hyb@139-159-150-152:~/gitcode$ vim ReadMe
hyb@139-159-150-152:~/gitcode$ cat ReadMe
hello bit
hello git
hello world
hello version1
hello version2
hello version3
write bbb for new branch
a,b,c,d,e # 修复bug--忘记写e
hyb@139-159-150-152:~/gitcode$ git add ReadMe # 重新add,commit
hyb@139-159-150-152:~/gitcode$ git commit -m"fix bug"
[fix_bug 4bbc0c4] fix bug
1 file changed, 1 insertion(+), 1 deletion(-)
修复完成后,切换到master 分支,并完成合并,最后删除fix_bug 分支:
cpp
hyb@139-159-150-152:~/gitcode$ git checkout master
Switched to branch 'master'
hyb@139-159-150-152:~/gitcode$ git merge --no-ff -m"merge fix_bug branch"
fix_bug
Merge made by the 'recursive' strategy.
ReadMe | 2 +-
1 file changed, 1 insertion(+), 1 deletion(-)
hyb@139-159-150-152:~/gitcode$ cat ReadMe
hello bit
hello git
hello world
hello version1
hello version2
hello version3
write bbb for new branch
a,b,c,d,e
hyb@139-159-150-152:~/gitcode$ git branch -d fix_bug
Deleted branch fix_bug (was 4bbc0c4).
至此,bug 的修复工作已经做完了,我们还要继续回到 dev2 分支进行开发。切换回dev2 分支:
cpp
hyb@139-159-150-152:~/gitcode$ git checkout dev2
Switched to branch 'dev2'
hyb@139-159-150-152:~/gitcode$ git status
On branch dev2
nothing to commit, working tree clean
工作区是干净的,刚才的工作现场存到哪去了?用 git stash list 命令看看:
cpp
hyb@139-159-150-152:~/gitcode$ git stash list
stash@{0}: WIP on dev2: 41b082f modify ReadMe
工作现场还在,Git 把 stash 内容存在某个地方了,但是需要恢复一下,如何恢复现场呢?我们可以使用git stash pop 命令,恢复的同时会把 存储的stash 删了,示例如下:
cpp
hyb@139-159-150-152:~/gitcode$ git stash pop
On branch dev2
Changes not staged for commit:
(use "git add <file>..." to update what will be committed)
(use "git restore <file>..." to discard changes in working directory)
modified: ReadMe
no changes added to commit (use "git add" and/or "git commit -a")
Dropped refs/stash@{0} (4f873250b3503687b5efd26196776aee7e3724c2)
再次查看的时候,我们已经发现已经没有现场可以恢复了
cpp
hyb@139-159-150-152:~/gitcode$ git stash list
hyb@139-159-150-152:~/gitcode$
另外,恢复现场也可以采用 git stash apply 恢复,但是恢复后,stash内容并不删除,你需要
用 git stash drop 来删除;
你可以多次stash,恢复的时候,先用 git stash list 查看,然后恢复指定的stash,用命令
git stash apply stash@{0} ,这部分请同学们自行使用。
恢复完代码之后我们便可以继续完成开发,开发完成后便可以进行提交,例如:
cpp
hyb@139-159-150-152:~/gitcode$ cat ReadMe
hello bit
hello git
hello world
hello version1
hello version2
hello version3
write bbb for new branch
a,b,c,d
i am coding ... Done!
hyb@139-159-150-152:~/gitcode$ git add .
hyb@139-159-150-152:~/gitcode$ git commit -m"modify ReadMe"
[dev2 ed0916d] modify ReadMe
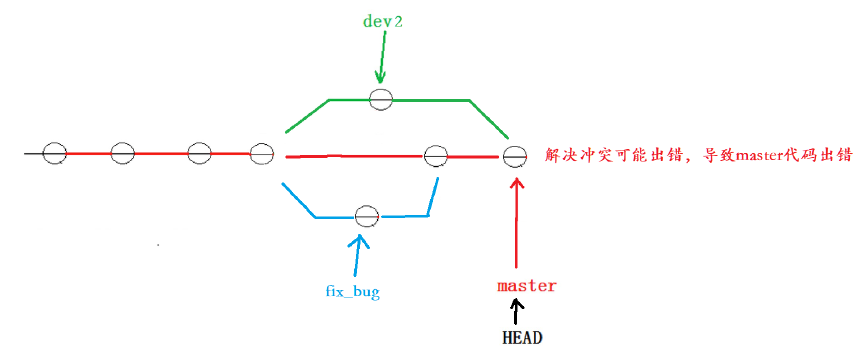
1 file changed, 1 insertion(+)但我们注意到了,修复 bug 的内容,并没有在 dev2 上显示。此时的状态图为:
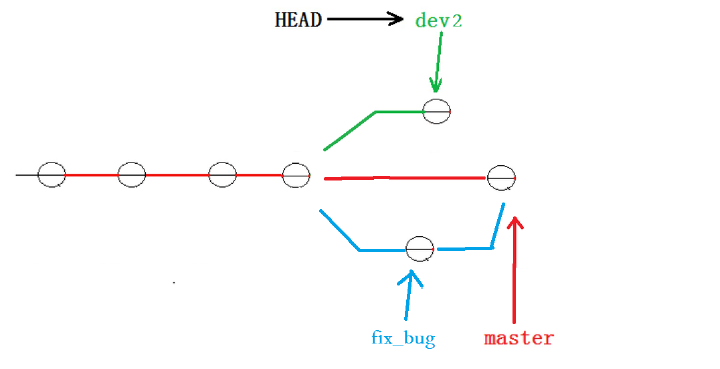
Master 分支目前最新的提交,是要领先于新建dev2 时基于的master 分支的提交的,所以我们
在dev2 中当然看不见修复 bug 的相关代码。
我们的最终目的是要让master 合并dev2 分支的,那么正常情况下我们切回master 分支直接合
并即可,但这样其实是有一定风险的。
因为在合并分支时可能会有冲突,而代码冲突需要我们手动解决(在master 上解决)。我们无法保证对于冲突问题可以正确地一次性解决掉,因为在实际的项目中,代码冲突不只一两行那么简单,有可能几十上百行,甚至更多,解决的过程中难免手误出错,导致错误的代码被合并到master 上。
此时的状态为:
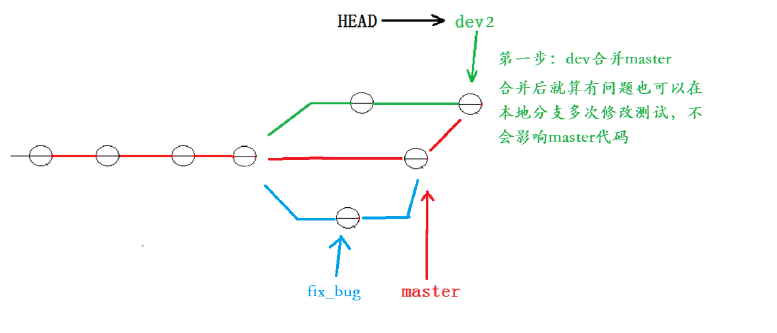
解决这个问题的一个好的建议就是:最好在自己的分支上先合并下master ,再让master 去合并dev ,这样做的目的是有冲突可以在本地分支解决并进行测试,而不影响master。
此时的状态为:

对应的实操演示如下,要说明的是,以下演示的merge操作,没有使用 --no-ff ,但上述的图示是
禁用 Fast forward 了模式后得出的,主要是为了方便解释问题。
cpp
# dev 合并 master
hyb@139-159-150-152:~/gitcode$ git branch
* dev2
master
hyb@139-159-150-152:~/gitcode$ git merge master
Auto-merging ReadMe
CONFLICT (content): Merge conflict in ReadMe
Automatic merge failed; fix conflicts and then commit the result.
# 发生冲突
hyb@139-159-150-152:~/gitcode$ cat ReadMe
hello bit
hello git
hello world
hello version1
hello version2
hello version3
write bbb for new branch
<<<<<<< HEAD
a,b,c,d
i am coding ... Done!
=======
a,b,c,d,e
>>>>>>> master
# 解决冲突并重新提交
hyb@139-159-150-152:~/gitcode$ vim ReadMe
hyb@139-159-150-152:~/gitcode$ cat ReadMe
hello bit
hello git
hello world
hello version1
hello version2
hello version3
write bbb for new branch
a,b,c,d,e
i am coding ... Done!
hyb@139-159-150-152:~/gitcode$ git add .
hyb@139-159-150-152:~/gitcode$ git commit -m"merge master"
[dev2 447d29f] merge master
hyb@139-159-150-152:~/gitcode$ git status
On branch dev2
nothing to commit, working tree clean
# 切回master
hyb@139-159-150-152:~/gitcode$ git checkout master
Switched to branch 'master'
# master 合并 dev2---无需解决冲突!!
hyb@139-159-150-152:~/gitcode$ git merge dev2
Updating 193421f..447d29f
Fast-forward
ReadMe | 1 +
1 file changed, 1 insertion(+)
hyb@139-159-150-152:~/gitcode$ git status
On branch master
nothing to commit, working tree clean
# 删除 dev2 分支
hyb@139-159-150-152:~/gitcode$ git branch -d dev2
Deleted branch dev2 (was 447d29f).
10.删除临时分支
软件开发中,总有无穷无尽的新的功能要不断添加进来。
添加一个新功能时,你肯定不希望因为一些实验性质的代码,把主分支搞乱了,所以,每添加一个新功能,最好新建一个分支,我们可以将其称之为 feature 分支,在上面开发,完成后,合并,最后,删除该 feature 分支。
可是,如果我们今天正在某个 feature 分支上开发了一半,被产品经理突然叫停,说是要停止新功能的开发。虽然白干了,但是这个 feature 分支还是必须就地销毁,留着无用了。这时使用传统的git branch -d 命令删除分支的方法是不行的。演示如下:
cpp
# 新增并切换到 dev3 分支
hyb@139-159-150-152:~/gitcode$ git checkout -b dev3
Switched to a new branch 'dev3'
# 开始开发新功能并提交
hyb@139-159-150-152:~/gitcode$ vim ReadMe
hyb@139-159-150-152:~/gitcode$ cat ReadMe
hello bit
hello git
hello world
hello version1
hello version2
hello version3
write bbb for new branch
a,b,c,d,e
i am coding ... Done!
i am writing new features ...
hyb@139-159-150-152:~/gitcode$ git add .
hyb@139-159-150-152:~/gitcode$ git commit -m"modify ReadMe for new features"
[dev3 cd2f149] modify ReadMe for new features
1 file changed, 1 insertion(+)
# 此时新功能叫停
# 切回master准备删除dev3
hyb@139-159-150-152:~/gitcode$ git checkout master
Switched to branch 'master'
# 常规删除dev3分支时失败
hyb@139-159-150-152:~/gitcode$ git branch -d dev3
error: The branch 'dev3' is not fully merged.
If you are sure you want to delete it, run 'git branch -D dev3'.
直接使用传统的删除分支的方法不行,按照提示,有了如下方式:
git branch -D name
cpp
hyb@139-159-150-152:~/gitcode$ git branch -D dev3
Deleted branch dev3 (was cd2f149).
hyb@139-159-150-152:~/gitcode$ git branch
* master
11.小结
分支在实际中有什么用呢?假设你准备开发一个新功能,但是需要两周才能完成,第一周你写了50%的代码,如果立刻提交,由于代码还没写完,不完整的代码库会导致别人不能干活了。如果等代码全部写完再一次提交,又存在丢失每天进度的巨大风险。
现在有了分支,就不用怕了。你创建了一个属于你自己的分支,别人看不到,还继续在原来的分支上正常工作,而你在自己的分支上干活,想提交就提交,直到开发完毕后,再一次性合并到原来的分支上,这样,既安全,又不影响别人工作。并且 Git 无论创建、切换和删除分支,Git在1秒钟之内就能完成!无论你的版本库是1个文件还是1万个文件。