经过前面对 GraphRAG 项目结构的深入了解,我们已经掌握了它的整体架构和技术栈。今天我们将顺着 graphrag index 命令的调用链,深入探索 GraphRAG 索引构建的核心流程,包括命令行入口、配置加载机制、工作流引擎,以及不同索引方法的实现细节。
命令行入口
当我们执行 graphrag index 命令时,整个调用过程如下:
- 入口点 :
__main__.py或bin/graphrag→graphrag.cli.main:app - CLI 解析 :
cli/main.py→@app.command("index")装饰器 - 配置加载 :
cli/index.py→index_cli()函数 - API 调用 :
api.build_index()函数
其中,前两步我们昨天已经学习过了:__main__.py 的作用是让 GraphRAG 能以包的方式运行,pyproject.toml 文件中的 [project.scripts] 配置让 GraphRAG 能以可执行文件的方式运行,运行的入口都是 graphrag.cli.main 包的 app 方法;该方法基于 Typer 这个现代化的 Python CLI 库实现,通过 @app.command 装饰器,定义了 GraphRAG 的 5 个子命令,index 就是其中之一。
跟随调用链,我们接着看一下 cli/index.py 文件中 index_cli() 函数的实现:
python
def index_cli(root_dir: Path, method: IndexingMethod, ...):
  # 配置加载
  config = load_config(root_dir, config_filepath, cli_overrides)
  # 索引构建
  _run_index(config=config, method=method, ...)
这里我们可以看到两个关键步骤:
- 配置加载 :调用
load_config()函数加载并合并配置,支持通过命令行参数覆盖配置文件中的设置 - 索引执行 :调用
_run_index()执行实际的索引构建
配置加载
配置加载是 GraphRAG 的核心功能之一,位于 config/load_config.py 文件中,其实现如下:
python
def load_config(
  root_dir: Path,
  config_filepath: Path | None = None,
  cli_overrides: dict[str, Any] | None = None,
) -> GraphRagConfig:
  # 路径规范化,确保使用绝对路径
  root = root_dir.resolve()
  # 在根目录中搜索配置文件
  config_path = _get_config_path(root, config_filepath)
  # 加载 .env 文件中的环境变量
  _load_dotenv(config_path)
  # 读取配置文件文本内容
  config_text = config_path.read_text(encoding="utf-8")
  # 解析环境变量引用
  config_text = _parse_env_variables(config_text)
  # 根据文件类型解析为字典(支持 YAML 和 JSON)
  config_extension = config_path.suffix
  config_data = _parse(config_extension, config_text)
  # 应用命令行参数覆盖
  if cli_overrides:
    _apply_overrides(config_data, cli_overrides)
  # 创建并验证最终配置对象
  return create_graphrag_config(config_data, root_dir=str(root))
这里的 load_config() 函数实现了一个完整的类型安全的配置管理流程,整体流程非常清晰:
- 路径规范化 :通过
root_dir.resolve()确保使用绝对路径,其中root_dir是用户通过--root或-r参数指定 - 配置发现 :如果用户指定了
--config或-c参数,则使用用户自定义配置;否则在根目录中搜索默认配置文件,比如settings.yaml、settings.yml或settings.json - 环境变量加载 :加载
.env文件中的环境变量 - 配置读取:读取配置文件文本内容
- 环境变量替换 :解析配置文件中环境变量引用,比如
${GRAPHRAG_API_KEY}等 - 格式解析:根据文件类型将配置解析为字典,支持 YAML 和 JSON 两种方式
- 覆盖应用 :应用命令行参数覆盖,比如
--output或-o参数会覆盖output.base_dir配置 - 对象创建 :创建并验证最终的
GraphRagConfig配置对象,使用 Pydantic 保证类型安全
这里有几个点比较有意思,可以展开介绍一下。
环境变量支持
GraphRAG 支持在配置文件中注入环境变量,这是使用 Python 的 Template 类实现的:
python
def _parse_env_variables(text: str) -> str:
  return Template(text).substitute(os.environ)
用户可以在配置文件中使用 ${VAR_NAME} 格式引用环境变量:
yaml
models:
  default_chat_model:
    type: openai_chat
    api_base: ${GRAPHRAG_API_BASE}
    auth_type: api_key
    api_key: ${GRAPHRAG_API_KEY}
    model: gpt-4o-mini
点号分隔覆盖机制
配置覆盖支持点号分隔的嵌套路径,比如当用户设置 --output 或 -o 参数时,会覆盖下面三个配置:
python
cli_overrides = {}
if output_dir:
  cli_overrides["output.base_dir"] = str(output_dir)
  cli_overrides["reporting.base_dir"] = str(output_dir)
  cli_overrides["update_index_output.base_dir"] = str(output_dir)
这种点号分隔的路径语法允许精确覆盖嵌套配置项,为用户提供了灵活的配置管理能力,这块的实现比较通用,有类似需求的话,可以参考下 _apply_overrides() 的函数实现。
使用 Pydantic 创建配置
在配置加载的最后,通过 create_graphrag_config() 函数创建最终的 GraphRagConfig 配置对象:
python
def create_graphrag_config(
  values: dict[str, Any] | None = None,
  root_dir: str | None = None,
) -> GraphRagConfig:

  values = values or {}
  if root_dir:
    root_path = Path(root_dir).resolve()
    values["root_dir"] = str(root_path)
  return GraphRagConfig(**values)
这里使用了 Pydantic 库,其中 GraphRagConfig 类被定义为一个 Pydantic 模型,我们直接将 values 字典展开(两个星号 ** 用于解包字典)变成一个类型安全的配置对象。Pydantic 不仅能保证类型安全,还支持自定义参数验证,我们下面重点介绍一下它。
简单介绍 Pydantic 库
GraphRAG 使用 Pydantic 进行配置管理,这是一个基于类型提示的数据验证库。
 它的核心优势包括:
- 类型安全:基于 Python 类型提示自动验证数据类型
- 数据转换:自动进行数据类型转换和标准化
- 验证规则:支持复杂的验证逻辑和自定义验证器
- 错误报告:提供详细的验证错误信息
- IDE 支持:完美的代码补全和类型检查支持
下面是一个简化的例子,展示如何使用 Pydantic 和 YAML 实现类似 GraphRAG 的配置管理。首先通过 Pydantic 定义配置类:
python
from enum import Enum
from pydantic import BaseModel, Field, field_validator

class StorageType(str, Enum):
  """存储类型枚举"""
  FILE = "file"
  AZURE_BLOB = "azure_blob"
  S3 = "s3"

class DatabaseConfig(BaseModel):
  """数据库配置模型"""
  host: str = Field(default="localhost", description="数据库主机")
  port: int = Field(default=5432, description="数据库端口")
  username: str = Field(description="用户名")
  password: str = Field(description="密码")

  @field_validator("port")
  @classmethod
  def validate_port(cls, v):
    if not 1 <= v <= 65535:
      raise ValueError("端口必须在 1-65535 范围内")
    return v

class AppConfig(BaseModel):
  """主配置模型"""
  app_name: str = Field(default="MyApp", description="应用名称")
  debug: bool = Field(default=False, description="调试模式")
  storage_type: StorageType = Field(default=StorageType.FILE, description="存储类型")
  database: DatabaseConfig = Field(description="数据库配置")

  # 自定义验证器
  @field_validator("app_name")
  @classmethod
  def validate_app_name(cls, v):
    if not v.strip():
      raise ValueError("应用名称不能为空")
    return v.strip()
然后创建一个配置文件 config.yaml 内容如下:
yaml
app_name: "Demo"
debug: true
storage_type: "file"
database:
  host: "localhost"
  port: 5432
  username: "admin"
  password: "secret"
接着我们就可以从 YAML 文件加载配置,并将其转换为强类型的配置对象:
python
import yaml
from pathlib import Path

def load_config_from_yaml(yaml_path: Path) -> AppConfig:
  """从 YAML 文件加载配置"""
  with open(yaml_path, 'r', encoding='utf-8') as f:
    config_data = yaml.safe_load(f)
  # Pydantic 自动验证和转换
  return AppConfig(**config_data)

# 使用示例
config_file = Path("config.yaml")
config = load_config_from_yaml(config_file)
print(f"应用名称: {config.app_name}")
print(f"数据库配置: {config.database.host}:{config.database.port}")
运行结果如下:
makefile
应用名称: Demo
数据库配置: localhost:5432
这个例子展示了 Pydantic 的核心特性,包括类型声明、默认值、验证器和自动数据转换等。
工作流引擎
配置加载之后,GraphRAG 调用 _run_index() 执行实际的索引构建,而它则是调用 API 层的 build_index() 函数:
python
async def build_index(
  config: GraphRagConfig,
  method: IndexingMethod | str = IndexingMethod.Standard,
  is_update_run: bool = False,
  ...
) -> list[PipelineRunResult]:

  outputs: list[PipelineRunResult] = []
  # 根据 method 创建对应的工作流管道
  method = _get_method(method, is_update_run)
  pipeline = PipelineFactory.create_pipeline(config, method)
  # 依次运行管道中的每个工作流
  async for output in run_pipeline(pipeline, config, is_update_run=is_update_run, additional_context=additional_context):
    outputs.append(output)
    logger.info("Workflow %s completed successfully", output.workflow)
  return outputs
GraphRAG 的索引构建采用了灵活的管道架构,其中 PipelineFactory 采用工厂设计模式,负责管理和创建处理工作流和管道:
python
class PipelineFactory:
  """工作流管道工厂类"""

  workflows: ClassVar[dict[str, WorkflowFunction]] = {}
  pipelines: ClassVar[dict[str, list[str]]] = {}

  @classmethod
  def register(cls, name: str, workflow: WorkflowFunction):
    """注册自定义工作流函数"""
    cls.workflows[name] = workflow

  @classmethod
  def register_all(cls, workflows: dict[str, WorkflowFunction]):
    """批量注册自定义工作流函数"""
    for name, workflow in workflows.items():
      cls.register(name, workflow)

  @classmethod
  def register_pipeline(cls, name: str, workflows: list[str]):
    """注册自定义管道,一个管道包含多个工作流函数"""
    cls.pipelines[name] = workflows

  @classmethod
  def create_pipeline(cls, config: GraphRagConfig, method: IndexingMethod) -> Pipeline:
    """根据 method 创建管道"""
    workflows = config.workflows or cls.pipelines.get(method, [])
    return Pipeline([(name, cls.workflows[name]) for name in workflows])
这里涉及 GraphRAG 中的两个核心概念:工作流(Workflow) 和 管道(Pipeline)。工作流是一个个独立的模块,比如加载文档、文本分片、提取图谱等等,程序启动时会自动注册所有内置的工作流函数:
python
PipelineFactory.register_all({
  "load_input_documents": run_load_input_documents,
  "create_base_text_units": run_create_base_text_units,
  "extract_graph": run_extract_graph,
  "create_communities": run_create_communities,
  # ...
})
而管道则是由多个工作流串起来的一个集合,系统预定义了四个管道:
python
PipelineFactory.register_pipeline(
  IndexingMethod.Standard, ["load_input_documents", *_standard_workflows]
)
PipelineFactory.register_pipeline(
  IndexingMethod.Fast, ["load_input_documents", *_fast_workflows]
)
PipelineFactory.register_pipeline(
  IndexingMethod.StandardUpdate, ["load_update_documents", *_standard_workflows, *_update_workflows],
)
PipelineFactory.register_pipeline(
  IndexingMethod.FastUpdate, ["load_update_documents", *_fast_workflows, *_update_workflows],
)
分别对应四种不同的构建索引的方法,当我们执行 graphrag index 命令时,可以通过 --method 或 -m 参数指定:
shell
# 标准方法
$ graphrag index --root ./ragtest --method standard

# 快速方法
$ graphrag index --root ./ragtest --method fast

# 标准方法(用于更新)
$ graphrag index --root ./ragtest --method standard-update

# 快速方法(用于更新)
$ graphrag index --root ./ragtest --method fast-update
GraphRAG 通过 create_pipeline() 方法,根据 method 找到对应的管道,然后依次运行管道中的每个工作流函数。
索引构建方法
上面提到 GraphRAG 内置了四种索引构建方法,每种都有其特定的适用场景:
| 索引方法 | 速度 | 质量 | 适用场景 | 主要特点 |
|---|---|---|---|---|
| Standard | 慢 | 高 | 首次索引,追求高质量 | 全 LLM 驱动的图构建 |
| Fast | 快 | 中 | 快速原型,大数据集 | NLP + LLM 混合方式 |
| StandardUpdate | 中 | 高 | 增量更新,保持高质量 | 标准方法 + 增量更新 |
| FastUpdate | 快 | 中 | 频繁更新,快速处理 | 快速方法 + 增量更新 |
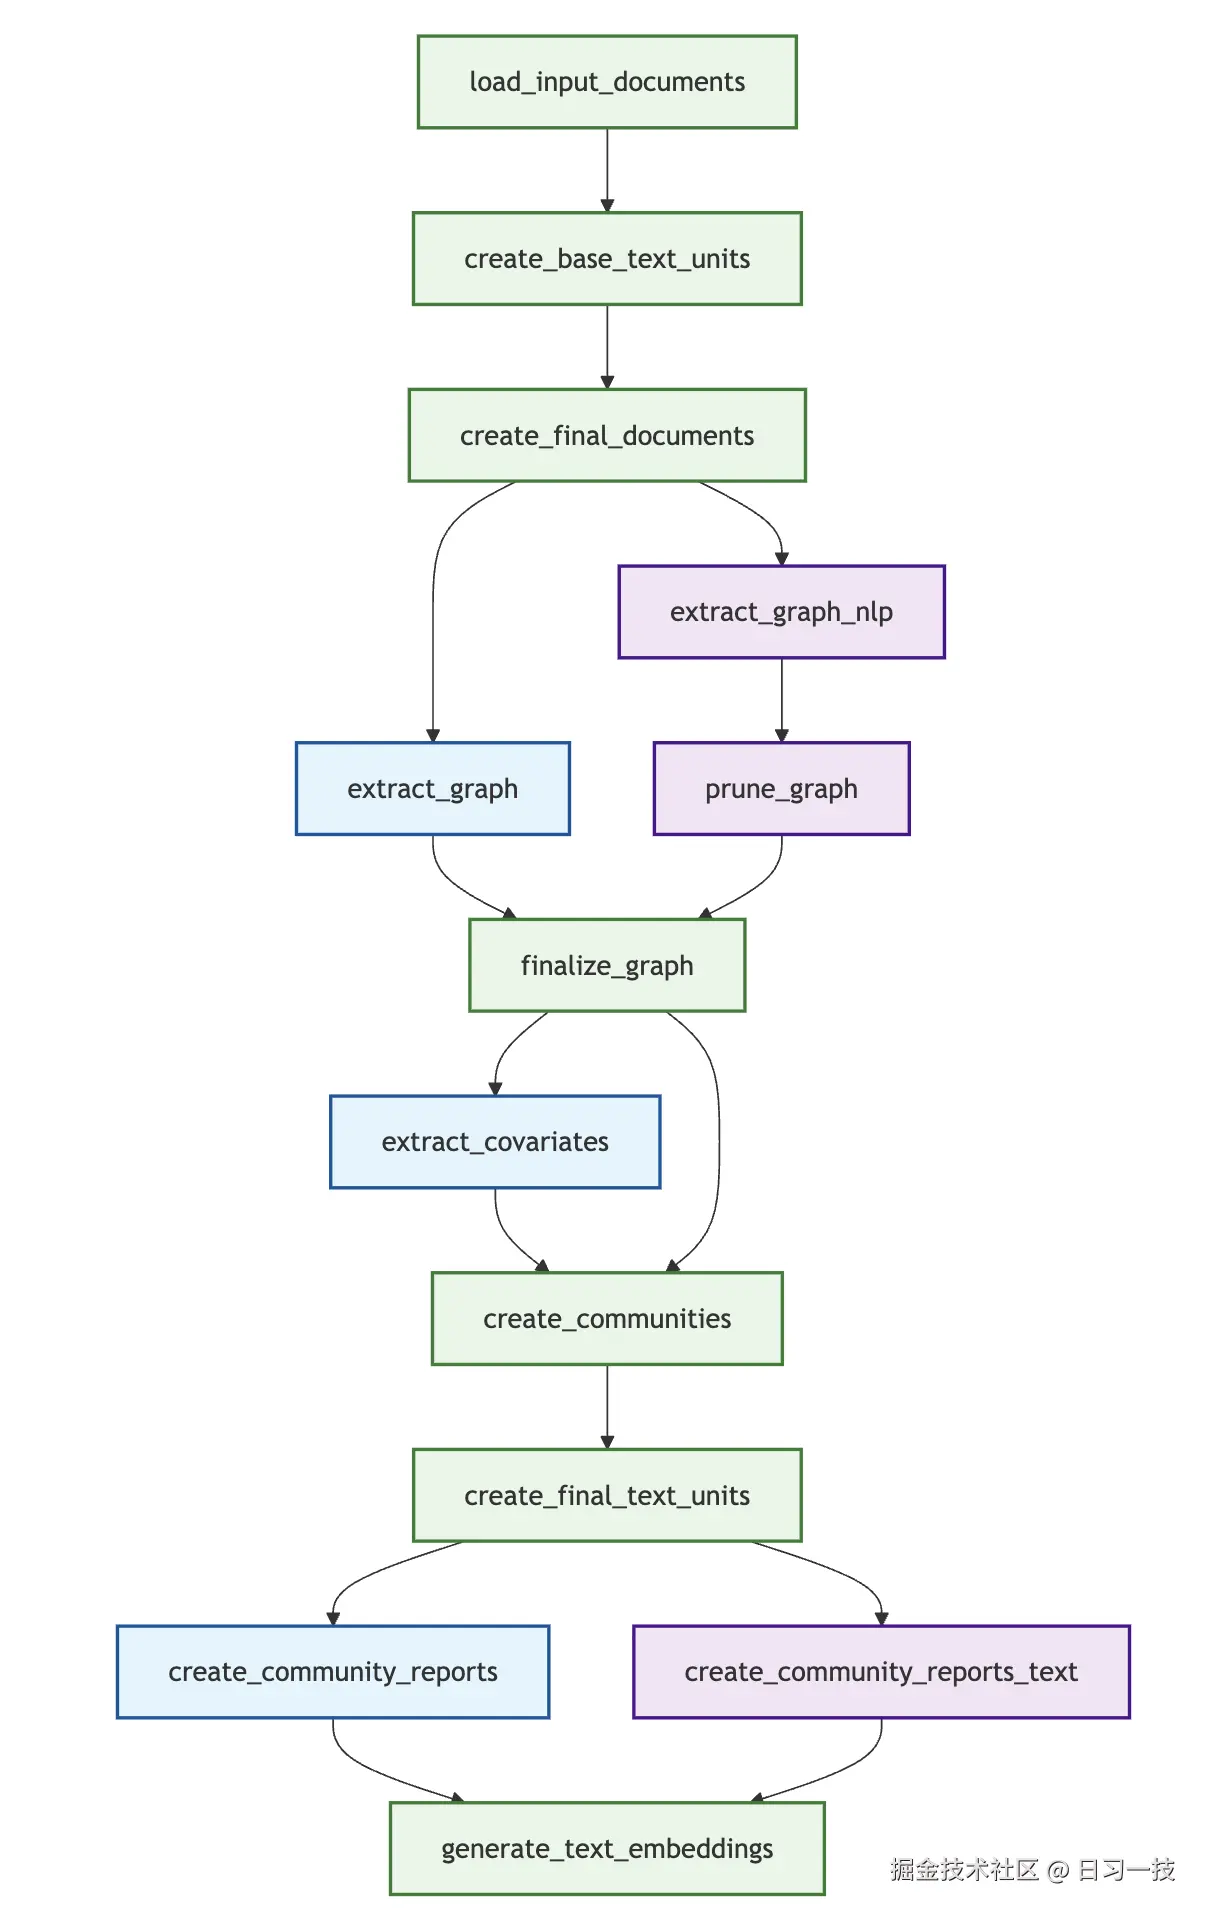
其中后两个 Update 方法是在前两个方法的基础上增加了增量更新的能力,能够在不重新构建整个索引的情况下,处理新增或修改的文档,大大提高了增量处理的效率。我们这里主要关注 Standard 和 Fast 这两个方法,它们的主要差异点在于:
- Standard 方法的 LLM 驱动流程
extract_graph:使用大语言模型从文本中提取实体和关系extract_covariates:使用 LLM 提取声明和协变量信息create_community_reports:基于图上下文生成高质量社区报告
- Fast 方法的混合流程
extract_graph_nlp:使用传统 NLP 技术(如 spaCy)进行实体识别prune_graph:对提取的实体进行过滤和清理create_community_reports_text:基于文本单元上下文生成报告(更快但质量稍低)
下图展示了两种方法的工作流执行顺序:
 蓝色为 Standard 方法使用的工作流,红色为 Fast 方法使用的工作流,绿色为二者共用的工作流。
小结
我们今天学习了当执行 graphrag index 命令时的整个调用过程,主要内容包括:
- 命令行入口 :详细分析了从
graphrag index命令到核心逻辑的完整调用链; - 配置加载 :深入解读了
load_config()函数的实现,包括环境变量支持和点号分隔覆盖机制; - Pydantic 介绍:通过一个简单的示例演示如何使用 Pydantic 和 YAML 实现类似 GraphRAG 的配置管理;
- 工作流引擎 :学习
PipelineFactory的设计模式和工作流注册机制; - 索引构建方法:对比了四种不同的索引构建方法及其适用场景,通过 Mermaid 图表展示了索引构建的完整处理流程;
在下一篇文章中,我们将深入索引构建的具体流程,先从文档处理阶段开始,详细分析 GraphRAG 如何从各种格式的原始文档中提取和预处理文本数据,为后续的知识提取做好准备。
欢迎关注
如果这篇文章对您有所帮助,欢迎关注我的同名公众号:日习一技,每天学一点新技术。
我会每天花一个小时,记录下我学习的点点滴滴。内容包括但不限于:
- 某个产品的使用小窍门
- 开源项目的实践和心得
- 技术点的简单解读
目标是让大家用5分钟读完就能有所收获,不需要太费劲,但却可以轻松获取一些干货。不管你是技术新手还是老鸟,欢迎给我提建议,如果有想学习的技术,也欢迎交流!