精度对齐,是模型部署中重要的一个环节。在把深度学习框架模型转换成中间表示模型后,部署工程师们要做的第一件事就是精度对齐,确保模型的计算结果与之前相当。精度对齐时最常用的方法,就是使用测试集评估一遍中间表示模型,看看模型的评估指标(如准确度、相似度)是否下降。
而在 PyTorch 到 ONNX 这条部署路线上,这种精度对齐方式有一些不便:一旦我们发现 PyTorch 模型和 ONNX 模型的评估指标有了出入,我们很难去追踪精度是在哪一个模块出了问题。这是因为 PyTorch 和 ONNX 模块总是难以对应。如下面的例子所示:
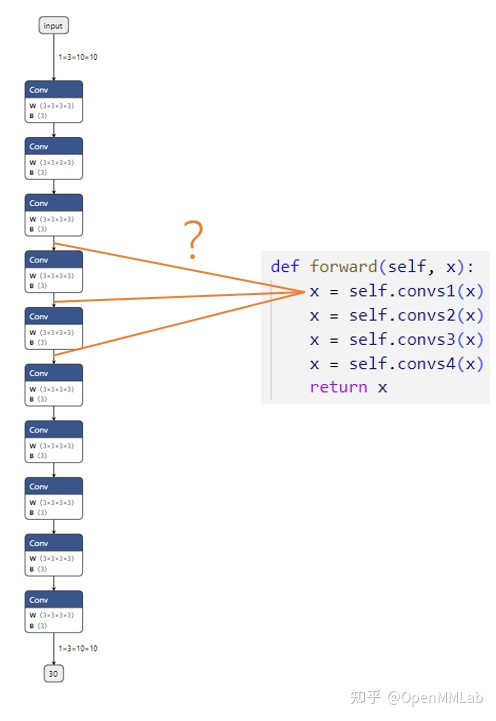 假设我们现在有一个由很多卷积块 convs1, convs2... 组成的网络,我们想对齐 PyTorch 模型和 ONNX 模型的精度。第一步,我们想比较第一个卷积块的输出 x = self.convs1(x)。模块在PyTorch 模型中的输出可以很轻松地得到,可是,这个输出究竟对应 ONNX 模型里的哪一个输出呢?在小模型里,我们或许能够通过阅读 PyTorch 模型的源码,推断出每个 ONNX 模块与 PyTorch 模块的对应关系;但是,在大模型中,我们是难以建立 PyTorch 与 ONNX 的对应关系的。
在这篇教程中,我们就来利用之前学过的自定义算子、子模型提取等工具,实现一个简单的 PyTorch-ONNX 精度对齐工具。
1. 设计思路
为了把 PyTorch 和 ONNX 模块对应起来,我们可以使用一种储存了调试信息的自定义算子,如下图所示:
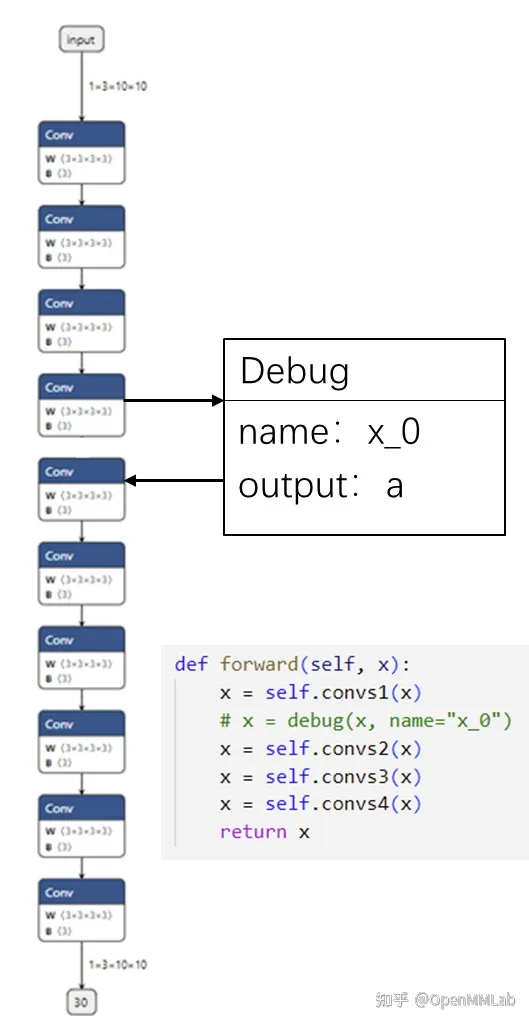
我们可以定义一个叫做 Debug 的 ONNX 算子,它有一个属性调试名 name。而由于每一个 ONNX 算子节点又自带了输出张量的名称,这样一来,ONNX 节点的输出名和调试名绑定在了一起。我们可以顺着 PyTorch 里的调试名,找到对应 ONNX 里的输出,完成 PyTorch 和 ONNX 的对应。
比如在上图的例子中,我们把第一个卷积块输出 x=self.convs1(x) 接入一个带有调试名 x_0 的调试算子。在最后生成的 ONNX 模型中,假设调试名 x_0 对应的输出张量叫做 a。知道了这一信息后,我们只需要先运行一遍 PyTorch 模型,记录第一个卷积块的输出;再运行一遍 ONNX 模型,用上篇教程中提到的截取 ONNX 中间结果的方法,记录中间张量 a 的值。这样,我们就可以对齐某 PyTorch 模块和它对应的 ONNX 模块的输出了。
2. 代码实现
2.1 Debug 算子
首先,我们需要实现之前提到的 Debug 算子:
py
import torch

class DebugOp(torch.autograd.Function):
    @staticmethod
    def forward(ctx, x, name):
        return x

    @staticmethod
    def symbolic(g, x, name):
        return g.op("my::Debug", x, name_s=name)

debug_apply = DebugOp.apply
Debug 算子的调用接口有两个参数:输入张量 x 和调试名 name。为了把这个算子"伪装"成一个普通的算子,使之能正常地参与推理、构建计算图的操作,我们还是需要正确定义对输入 x 进行操作的 forward 函数。而在表示 PyTorch 与 ONNX 映射规则的 symbolic 函数里,我们要定义一个带有调试名的 ONNX 算子,并把输入的 name 传给算子。
由于 Debug 算子本身不表示任何计算,因此在 forward 函数中,直接把输入 x 返回即可。
而 symbolic 函数定义了一个新算子 my::Debug:算子有一个输入 x,一个属性 name。我们直接把算子调用接口里的 x,name 传入即可。
这里需要补充介绍算子定义函数 g.op() 的一些规范。在g.op()中,算子的属性需要以 {attibute_name}_{type}=attibute_value 这样的格式传入。其中 {attibute_name} 为属性名,{type} 指定了算子属性的数据类型。比如说我们上面的算子属性写成 name_s,实际上是定义了一个字符串类型,名字叫做 name 的属性。除了表示字符串类型的 _s 外,还有表示 float 型的 _f,表示 tensor 型的 _t。
在完成算子的定义后,我们可以通过 debug_apply = DebugOp.apply 获取算子的调用接口。这样以后就可以通过 debug_apply(x, name) 来使用这个算子了。
2.2Debugger 类
接着,我们来实现精度对齐工具的核心------Debugger 类。这个类包含了实现精度对齐所需的所有操作。其定义如下:
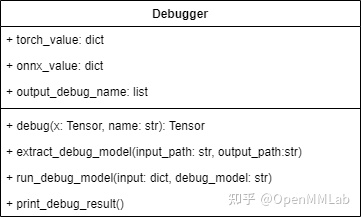
Debugger 类有三个成员变量:
- torch_value 记录了运行 PyTorch 模型后每个调试张量的值。
- onnx_value 记录了运行 ONNX 模型后每个调试张量的值。
- output_debug_name 记录了把调试张量加入 ONNX 的输出后,每个输出张量的调试名。
稍后我们会在类实现的代码里看到这些成员变量的具体用法。
Debugger 类有以下方法:
- debug 封装了之前编写好的 debug_apply。该方法需要在原 PyTorch 模型中调用,可以为导出的 ONNX 模型添加 Debug 算子节点,同时记录 PyTorch 调试张量值。
- extract_debug_model 和 ONNX 的子模型提取函数的用法类似,可以把带调试节点的 ONNX 模型转化成一个可以输出调试张量的 ONNX 模型。
- run_debug_model 会使用 ONNX Runtime 运行模型,得到 ONNX 调试张量值。
- print_debug_result 会比较 PyTorch 和 ONNX 的调试张量值,输出比较的结果。
这 4 个方法会依次被调用。下面我们来具体探究一下每个方法的实现。
2.2.1生成调试节点
py
def debug(self, x, name):
    self.torch_value[name] = x.detach().cpu().numpy()
    return debug_apply(x, name)
如前文所述,debug完成了两件事:记录 PyTorch 模型中调试张量的值、添加 Debug 节点。我们使用 self.torch_valuename = x.detach().cpu().numpy() 把调试张量转成 numpy 格式并保存进 torch_value 词典里。之后,我们调用之前编写的 debug_apply 算子。
2.2.2提取调试模型
python
def extract_debug_model(self, input_path, output_path):
    model = onnx.load(input_path)
    inputs = [input.name for input in model.graph.input]
    outputs = []

    for node in model.graph.node:
        if node.op_type == 'Debug':
            # 记录调试张量名
            debug_name = node.attribute[0].s.decode('ASCII')
            self.output_debug_name.append(debug_name)

            # 添加输入
            output_name = node.output[0]
            outputs.append(output_name)

            # 转换 Debug 节点为 Indentity 节点
            node.op_type = 'Identity'
            node.domain = ''
            del node.attribute[:]

    e = onnx.utils.Extractor(model)
    extracted = e.extract_model(inputs, outputs)
    onnx.save(extracted, output_path)
在 PyTorch 模型中插入 debug 方法后,我们可以得到一个包含了若干 Debug 节点的 ONNX 模型。但是,这个 ONNX 模型不是我们最终拿来执行的模型。为了得到 Debug 节点的输出(即调试张量的值),我们需要做三项处理以提取出一个可运行的调试模型:
记录每个调试张量的调试名,为之后对齐 PyTorch、ONNX 调试张量值做准备。
把所有 Debug 节点的输出加入到整个模型的输出中,这样在运行模型后就能得到这些中间节点的输出了。
自定义的 Debug 节点在推理引擎中是没有实现的,为了让处理后的 ONNX 模型运行起来,需要把 Debug 节点转化成可运行的 Identity (恒等)节点。
完成了这三项处理后,我们才能进行模型提取。下面,我们来看看模型提取和这几项处理是怎么实现的。
首先,看一下和模型提取有关的代码:
py
model = onnx.load(input_path)
inputs = [input.name for input in model.graph.input]
outputs = []

# 获取 outputs
...

# 调用提取模型 API
e = onnx.utils.Extractor(model)
extracted = e.extract_model(inputs, outputs)

# 保存模型
onnx.save(extracted, output_path)
``
   在提取模型时,我们要准备新模型的输入和输出。输入张量 inputs 还是保持原状,而输出张量 outputs 会在之后填入 Debug 节点的输出。获取完 outputs 后,我们调用提取模型的 API,得到处理过后的模型,并保存此模型。
  接着,看一下主处理逻辑:
```py
for node in model.graph.node:
   if node.op_type == 'Debug':
       ...
为了获取和 Debug 节点相关的信息,我们需要遍历 ONNX 模型的所有节点,找出那些类型为 Debug 的节点,并对这些节点执行操作。
下面的代码实现了记录调试张量名:
py
debug_name = node.attribute[0].s.decode('ASCII')
self.output_debug_name.append(debug_name)
这段代码的作用是:从节点的第一个属性(即 name )中取出调试名信息,并存入 output_debug_name 中。节点第一个属性的值可以通过 node.attribute0 获得。由于 name 是属性是字符串,这里要用 .s 获取属性的字符串值。又由于 ONNX 是以二进制的形式保存所有数据的,这里要用 .decode('ASCII') 把二进制字符串转成一个文本字符串。
接下来的代码用于填写新模型输出 outputs:
py
output_name = node.output[0]
outputs.append(output_name) node.output0 就是 Debug 节点的输出张量在 ONNX 里的名称。把这个名称加入新模型的输出后,只要运行新模型,就可以得到该输出张量的值了。
最后这段代码用于更改 Debug 节点的类型:
python
node.op_type = 'Identity'
node.domain = ''
del node.attribute[:]
为了消除 ONNX 不支持的 Debug 节点,一种比较简单的方式是直接把 Debug 节点修改成不执行任何操作的 Indentity 类型的节点。为了做这个转换,我们要先修改节点类型名 node.op_type 为Identity,再把节点的域(即命名空间)node.domain 修改成空,最后删除节点的所有属性,保证节点符合 ONNX 的规范。
回忆一下,如果一个节点的 domain 为空,这个节点就会被当成一个 ONNX 原生算子节点。
2.2.3 运行调试模型
在生成调试节点时,我们已经顺便记录了 PyTorch 模型调试张量的值。下一步,我们要运行调试模型,记录 ONNX 模型调试张量的值。其实现如下:
py
def run_debug_model(self, input, debug_model):
    sess = onnxruntime.InferenceSession(debug_model,
    providers=['CPUExecutionProvider'])
    onnx_outputs = sess.run(None, input)

    for name, value in zip(self.output_debug_name, onnx_outputs):
        self.onnx_value[name] = value
在运行调试模型前,我们要给出模型输入、模型名这两个参数。根据这些参数,run_debug_model 会调用 ONNX Runtime 的 API,对 ONNX 模型进行推理。在得到了 ONNX 模型的输出后,我们要使用上一步得到的 output_debug_name 信息,填写 onnx_value,把 ONNX 的中间运算结果绑定到调试名上。完成了这些步骤之后,我们就有足够的信息做精度对齐了。
2.2.4 输出调试信息
py
 def print_debug_result(self):
    for name in self.torch_value.keys():
        if name in self.onnx_value:
            mse = np.mean(self.torch_value[name] - self.onnx_value[name])**2)
            print(f"{name} MSE: {mse}")
最后,我们同时遍历 self.torch_value 和 self.onnx_value 这两个词典,比较同一个张量在 PyTorch 模型和 ONNX 模型里的输出。在循环体中,我们只需要使用 self.torch_valuename 和 self.onnx_valuename 就可以访问同一个张量在 PyTorch 里的值和在 ONNX 里的值。作为示例,这里我们可以计算二者的均方误差 mse,以此为精度对齐的依据。
整理一下,整个工具库的代码如下:
py
import torch
import onnx
import onnxruntime
import numpy as np

class DebugOp(torch.autograd.Function):
    @staticmethod
    def forward(ctx, x, name):
        return x

    @staticmethod
    def symbolic(g, x, name):
        return g.op("my::Debug", x, name_s=name)

debug_apply = DebugOp.apply

class Debugger():
    def __init__(self):
        super().__init__()
        self.torch_value = dict()
        self.onnx_value = dict()
        self.output_debug_name = []

    def debug(self, x, name):
        self.torch_value[name] = x.detach().cpu().numpy()
        return debug_apply(x, name)

    def extract_debug_model(self, input_path, output_path):
        model = onnx.load(input_path)
        inputs = [input.name for input in model.graph.input]
        outputs = []

        for node in model.graph.node:
            if node.op_type == 'Debug':
                debug_name = node.attribute[0].s.decode('ASCII')
                self.output_debug_name.append(debug_name)

                output_name = node.output[0]
                outputs.append(output_name)

                node.op_type = 'Identity'
                node.domain = ''
                del node.attribute[:]
        e = onnx.utils.Extractor(model)
        extracted = e.extract_model(inputs, outputs)
        onnx.save(extracted, output_path)

    def run_debug_model(self, input, debug_model):
        sess = onnxruntime.InferenceSession(debug_model,
        providers=['CPUExecutionProvider'])

        onnx_outputs = sess.run(None, input)
        for name, value in zip(self.output_debug_name, onnx_outputs):
            self.onnx_value[name] = value

    def print_debug_result(self):
        for name in self.torch_value.keys():
            if name in self.onnx_value:
                mse = np.mean(self.torch_value[name] - self.onnx_value[name])**2)
                print(f"{name} MSE: {mse}")
2.2.5 使用方法
实现了精度对齐工具后,我们来看看该怎么把这个工具用起来。
现在,假设我们得到了一个这样的模型:
py
class Model(torch.nn.Module):

    def __init__(self):
        super().__init__()
        self.convs1 = torch.nn.Sequential(torch.nn.Conv2d(3, 3, 3, 1, 1),
                                          torch.nn.Conv2d(3, 3, 3, 1, 1),
                                          torch.nn.Conv2d(3, 3, 3, 1, 1))
        self.convs2 = torch.nn.Sequential(torch.nn.Conv2d(3, 3, 3, 1, 1),
                                          torch.nn.Conv2d(3, 3, 3, 1, 1))
        self.convs3 = torch.nn.Sequential(torch.nn.Conv2d(3, 3, 3, 1, 1),
                                          torch.nn.Conv2d(3, 3, 3, 1, 1))
        self.convs4 = torch.nn.Sequential(torch.nn.Conv2d(3, 3, 3, 1, 1),
                                          torch.nn.Conv2d(3, 3, 3, 1, 1),
                                          torch.nn.Conv2d(3, 3, 3, 1, 1))

    def forward(self, x):
        x = self.convs1(x)
        x = self.convs2(x)
        x = self.convs3(x)
        x = self.convs4(x)
        return x

torch_model = Model()
没错!这就是本文开头展示的那个全卷积网络。现在我们想对齐 convs1 至 convs4 这每一个卷积块的输出精度,该怎么使用之前写好的精度对齐工具呢?
首先,我们生成管理类 Debugger 的一个实例:
py
debugger = Debugger() 之后,我们要设法把 Debug 节点插入原模型:
py
from types import MethodType

def new_forward(self, x):
    x = self.convs1(x)
    x = debugger.debug(x, 'x_0')
    x = self.convs2(x)
    x = debugger.debug(x, 'x_1')
    x = self.convs3(x)
    x = debugger.debug(x, 'x_2')
    x = self.convs4(x)
    x = debugger.debug(x, 'x_3')
    return x

torch_model.forward = MethodType(new_forward, torch_model)
我们可以为原模型新写一个 forward 函数。在这个新的函数函数中,我们可以通过 debugger.debug 把每一个输出张量标记起来,并各取一个不重复的调试名。
有了 new_forward 函数,我们需要使用 MethodType 这个 Python API 把这个函数变成模型实例 torch_model 的一个成员方法,确保 torch_model 的 forward 函数能够被正确替换。
实现了"狸猫换太子"般巧妙的操作后,我们就可以使用 PyTorch API 导出一个带有 Debug 节点的 ONNX 模型了:
py
dummy_input = torch.randn(1, 3, 10, 10)
torch.onnx.export(torch_model, dummy_input, 'before_debug.onnx', input_names=['input'])
由于 torch.onnx.export 模型使用的是跟踪法,模型的 forward 函数会被执行一次, debugger.debug 操作可以把 PyTorch 模型的调试张量输出记录在 debugger.torch_value 里。
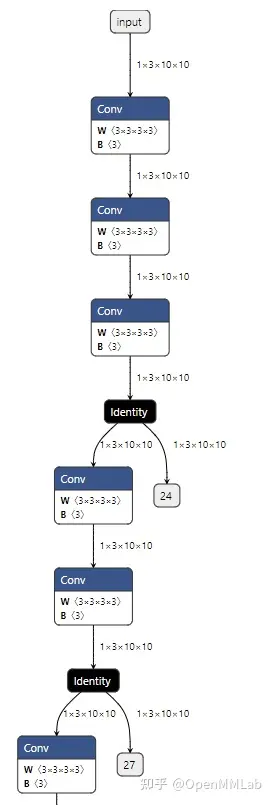
这个 before_debug.onnx 模型的部分可视化结果如下:

接下来,我们替换掉所有 Debug 节点,并记录每个 Debug 输出张量的 ONNX 名与调试名的对应关系:
py
debugger.extract_debug_model('before_debug.onnx', 'after_debug.onnx') 这步操作得到的 after_debug.onnx 模型的部分可视化结果如下:
我们可以使用下面的代码运行这个模型:
py
debugger.run_debug_model({'input':dummy_input.numpy()}, 'after_debug.onnx') 这样,ONNX 模型的调试张量输出会记录在 debugger.onnx_value 里。
总算,一切准备工作结束了。我们可以轻轻松松地用一行代码输出精度对齐的结果:
py
debugger.print_debug_result() 这个函数大致会输出以下内容:
py
x_0 MSE: 8.465450562766819e-16
x_1 MSE: 1.4122021817221354e-16
x_2 MSE: 6.501743508551734e-17
x_3 MSE: 1.7635199492054931e-16
这份输出表明,在这一轮精度对齐测试中,所有模块的精度误差都很小。我们几乎可以认为,ONNX 模型的运行结果等价于 PyTorch 模型的运行结果。
如果有某些模块的误差比较大,我们可以深入子模块,去加更多的 debug 节点,看看是哪一步、哪一个算子出现了问题。