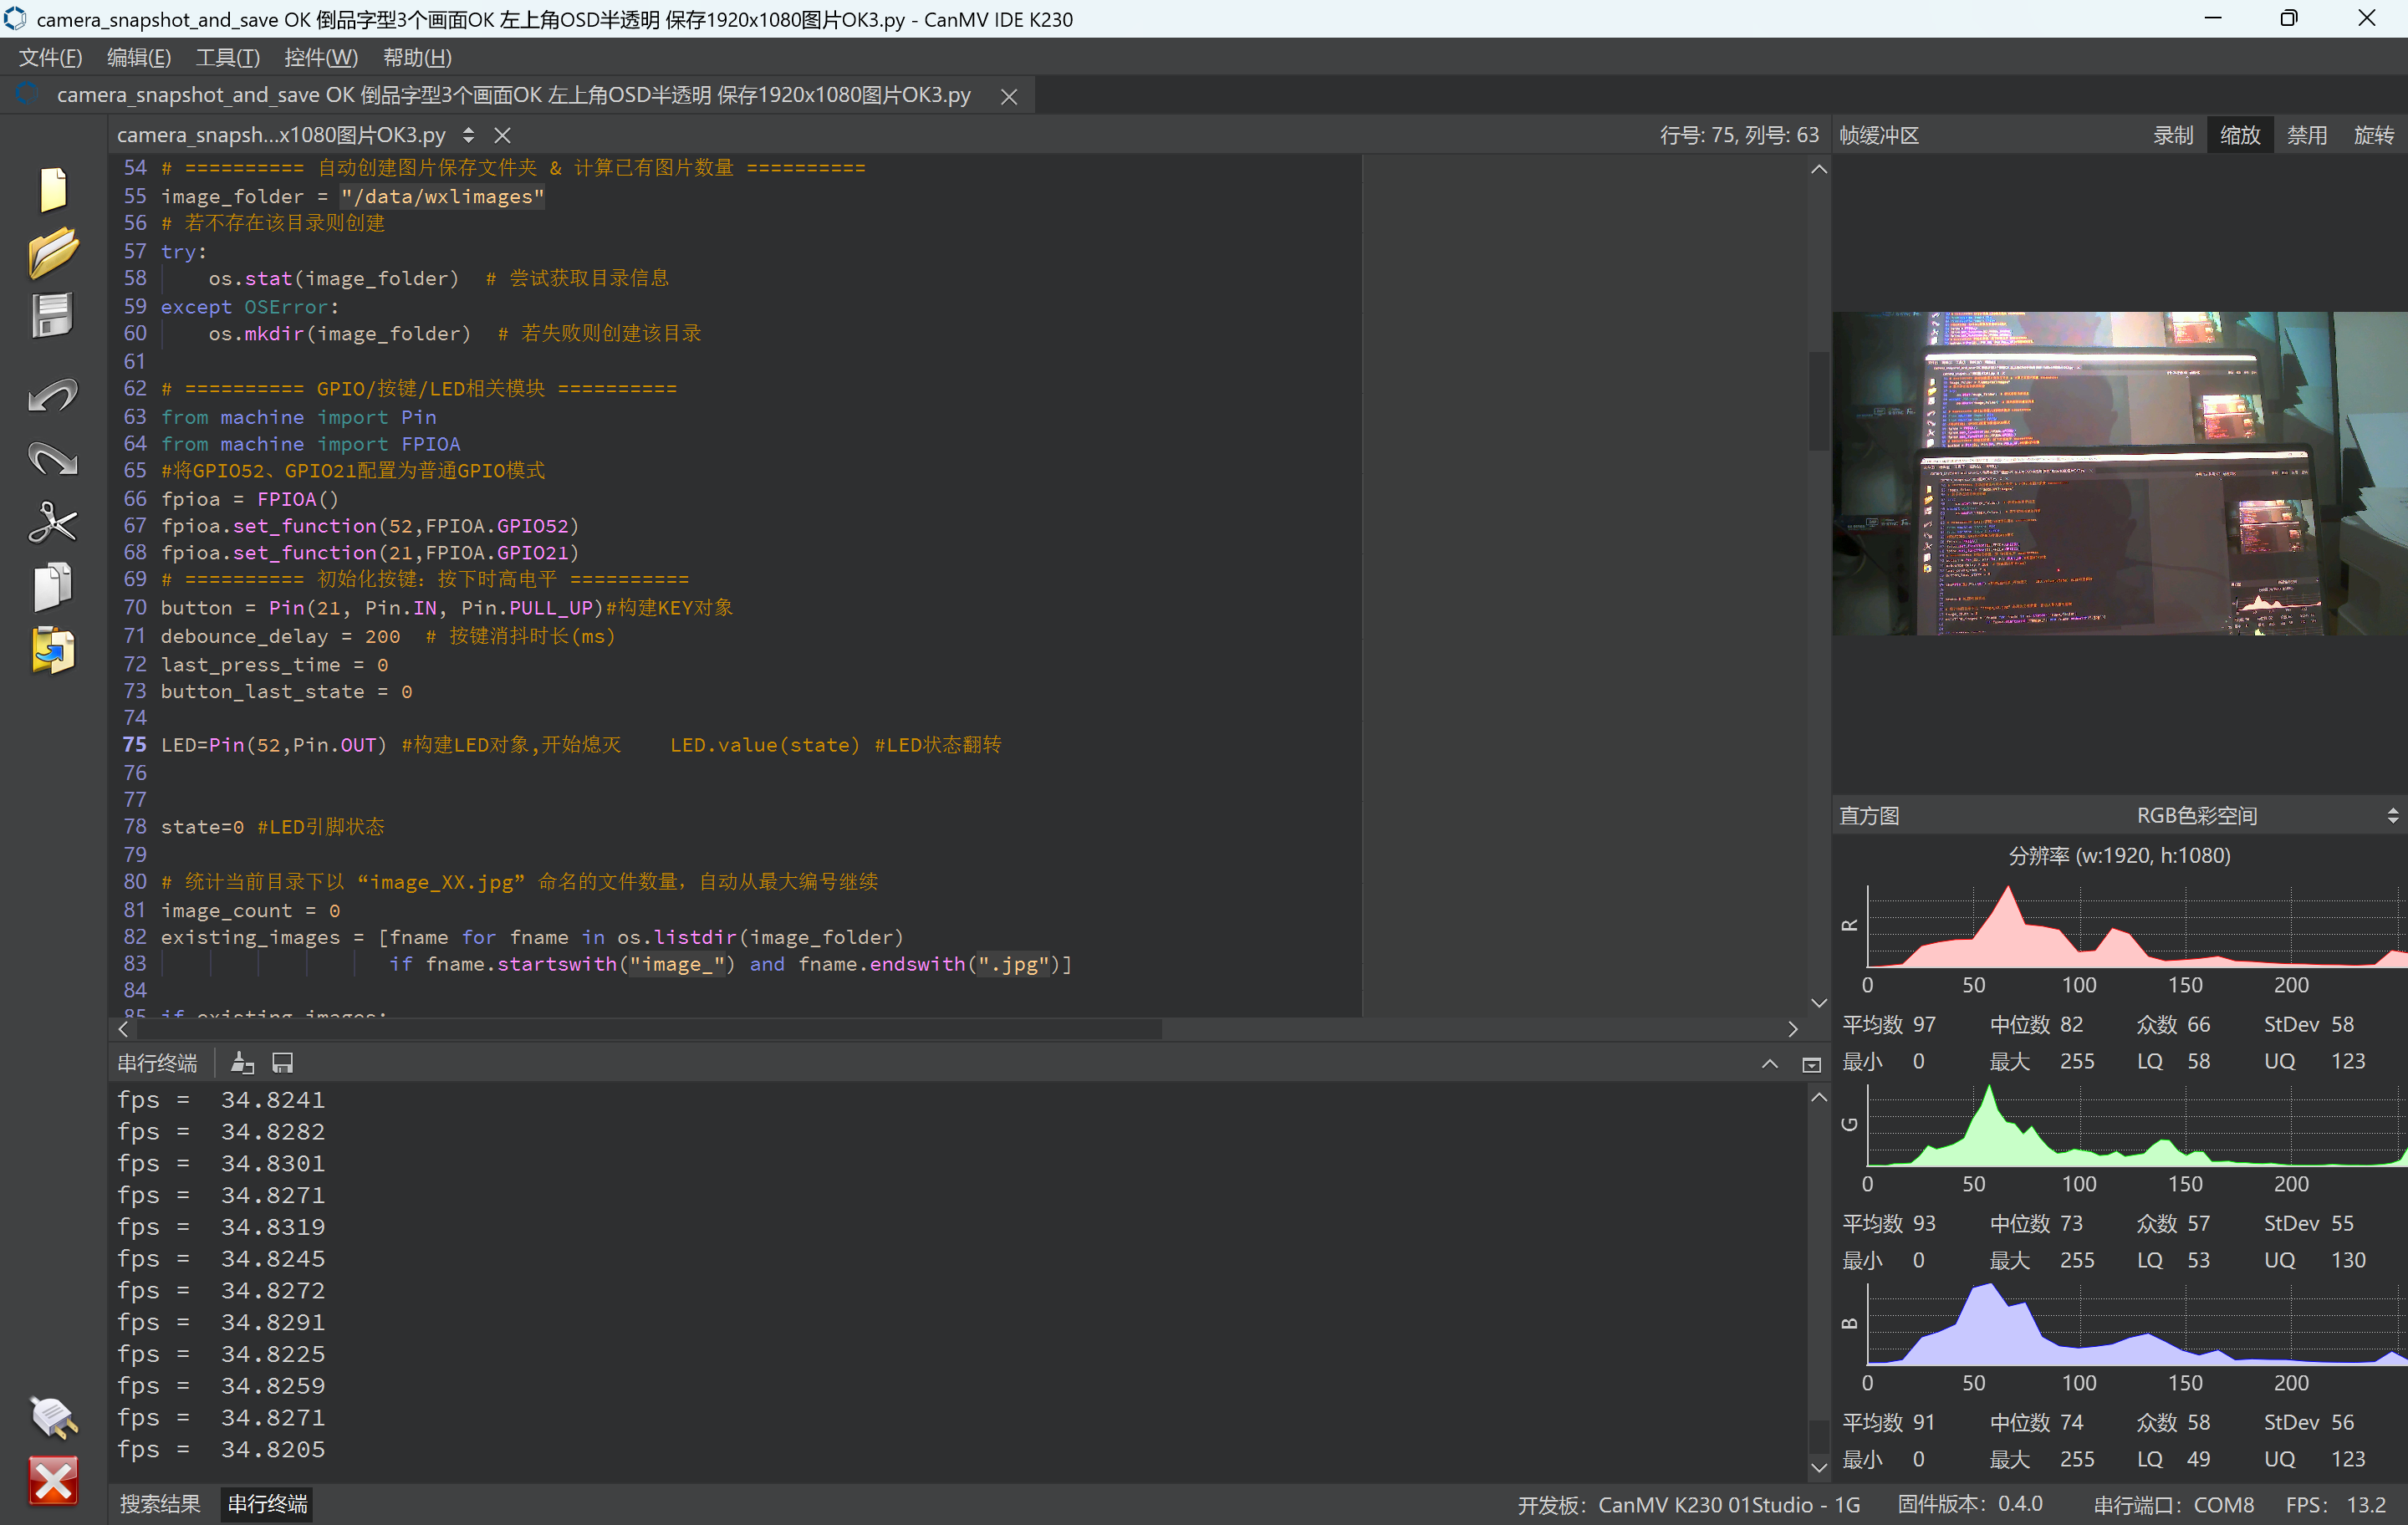
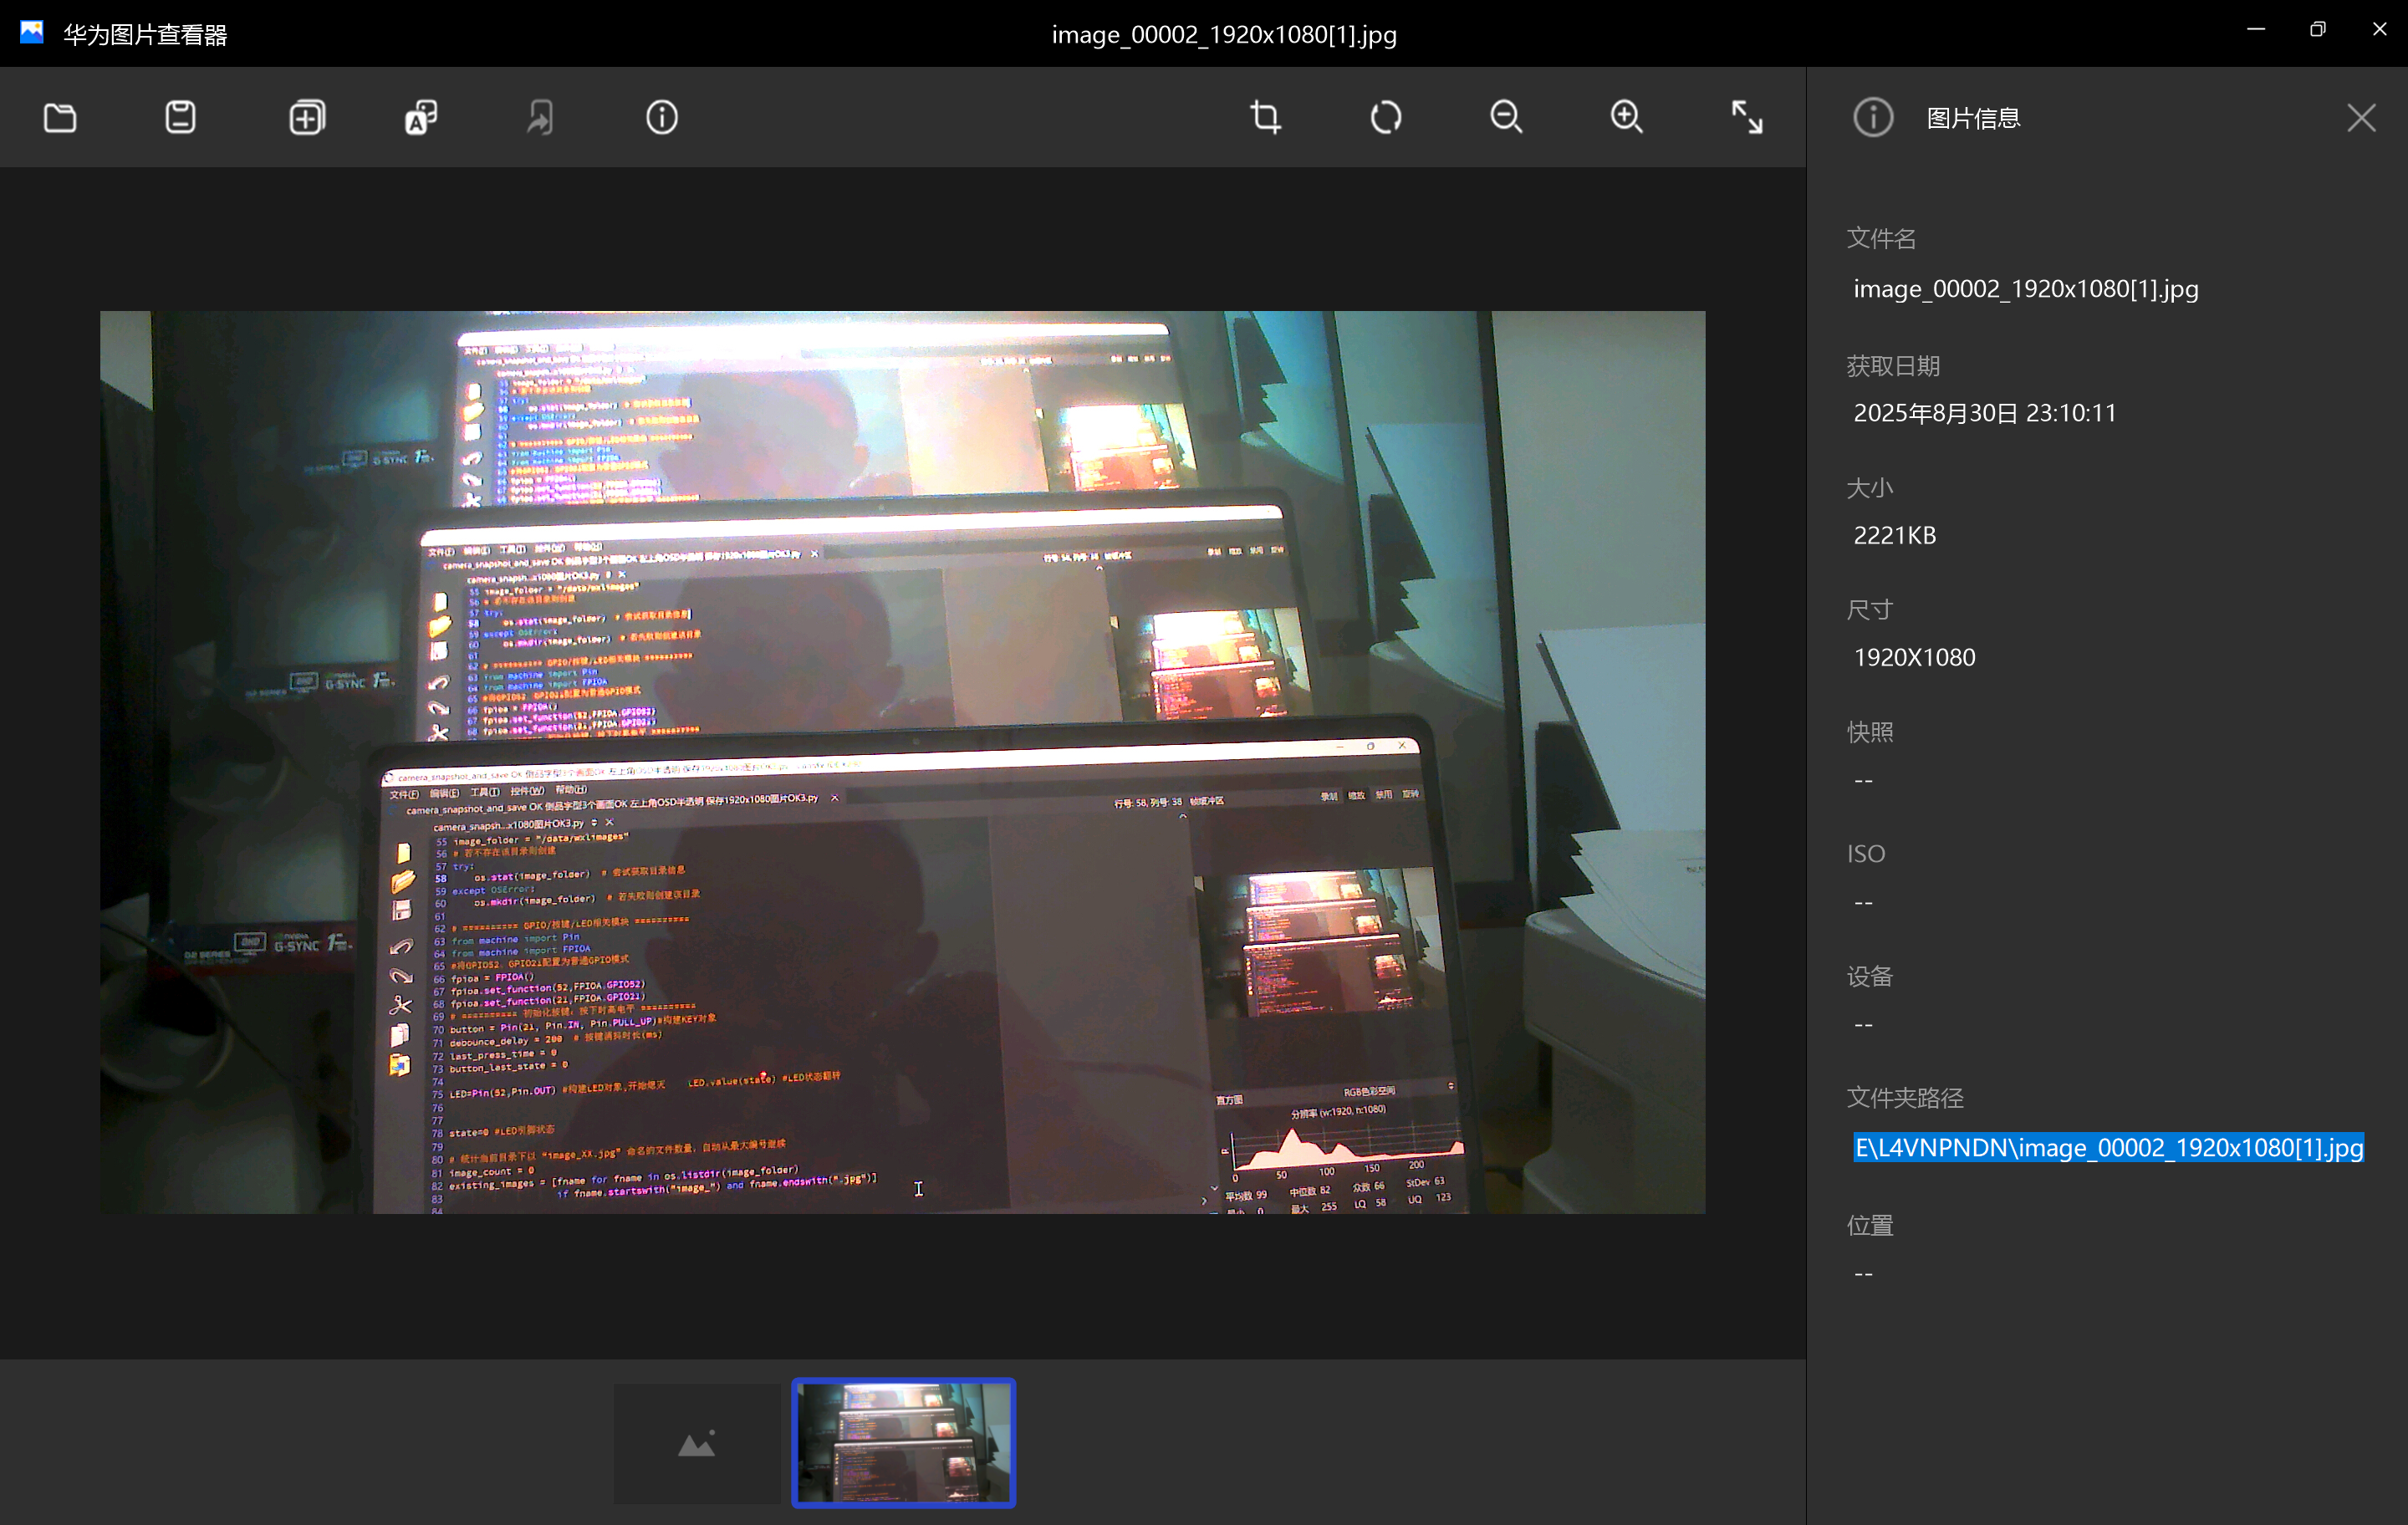
这是一个比较综合性的完整例程,演示了01 studio 的k230 canMV开发板,在通过板载的按键拍照后,将摄像头拍照的1920*1080分辨率的图片以jpg文件格式,保存到板载TF存储卡的指定文件夹目录中。
主要功能点:
一、配置摄像头高清显示的参数:
set chn2 output format
sensor.set_framesize(width = 1920, height = 1080, chn = CAM_CHN_ID_2)
sensor.set_pixformat(Sensor.RGB565, chn = CAM_CHN_ID_2)#RGB565格式才能调用save直接存储 。
二、检测拍照按键按下的状态,以触发保存照片功能:
#按键处理(检测上升沿)
current_time = time.ticks_ms()
button_state = button.value()
if button_state == 0 and button_last_state == 1: # 下降沿
if current_time - last_press_time > debounce_delay:
LED闪烁提示
print(f"拍照快门按键按下!")
LED.high() # 熄灭LED
time.sleep_ms(20)
LED.low() # 点亮LED
拍照并保存
image_count += 1
filename = f"{image_folder}/image_{image_count:05d}_{img.width()}x{img.height()}.jpg"
print(f"[INFO] 拍照保存 -> {filename}")
直接调用自定义的图片保存函数
wxl_save_jpg(img, filename, quality=99)
last_press_time = current_time
button_last_state = button_state
三、保存照片:
img.save(filename,quality=quality)#ok img.save(filename,quality=quality)
四、照片名称管理:
统计当前目录下以 "image_XX.jpg" 命名的文件数量,自动从最大编号继续
image_count = 0
existing_images = [fname for fname in os.listdir(image_folder)
if fname.startswith("image_") and fname.endswith(".jpg")]
if existing_images:
提取编号并找出最大值
numbers = []
for fname in existing_images:
假设文件名格式为 "image_XX.jpg"
取中间 XX 部分转为数字
try:
num_part = fname[6:11] # "image_" 长度为6,取到 ".jpg" 前还要注意下标
numbers.append(int(num_part))
except:
pass
if numbers:
image_count = max(numbers)
避坑点:
摄像头的RGB565格式才能调用save直接存储 ;
sensor.set_pixformat(Sensor.RGB565, chn = CAM_CHN_ID_2)
RGB888可显示,但无法保存 ,如果设置 RGB888格式进行图片保存的话,
sensor.set_pixformat(Sensor.RGB888, chn = CAM_CHN_ID_2)
会提示以下错误:
出现异常 'current format not support save function!'
程序实际运行效果:

程序保存照片效果:

程序源代码:
python
# Camera Example
#
# Note: You will need an SD card to run this example.
#
# You can start camera preview and capture yuv image.
import time, os, sys

from media.sensor import *
from media.display import *
from media.media import *

# save image raw data, use 7yuv to preview

sensor_id = 2
sensor = None

picture_width = 1920/2
picture_height = 1080/2


def save_img(img, chn):
    if img.format() == image.YUV420:
        suffix = "yuv420sp"
    elif img.format() == image.RGB888:
        suffix = "rgb888"
    elif img.format() == image.RGBP888:
        suffix = "rgb888p"
    else:
        suffix = "unkown"

    filename = f"/data/camera_chn_{chn:02d}_{img.width()}x{img.height()}.{suffix}"
    print("save capture image to file:", filename)
    img.save(filename)

def wxl_save_jpg(img, filename, quality=95):
    """
    将图像压缩成JPEG后写入文件 (不依赖第一段 save_jpg/MediaManager.convert_to_jpeg 的写法)
    :param img:    传入的图像对象 (Sensor.snapshot() 得到)
    :param filename: 保存的目标文件名 (含路径)
    :param quality:  压缩质量 (1-100)
    """
    #compressed_data = img.compress(quality=quality)
    #with open(filename, "wb") as f:
    #    f.write(compressed_data)
    img.save(filename,quality=quality)#ok   img.save(filename,quality=quality)

    print(f"[INFO] 使用 WXL_save_jpg() 保存完毕: {filename}")


# ========== 自动创建图片保存文件夹 & 计算已有图片数量 ==========
image_folder = "/data/wxlimages"
# 若不存在该目录则创建
try:
    os.stat(image_folder)  # 尝试获取目录信息
except OSError:
    os.mkdir(image_folder)  # 若失败则创建该目录

# ========== GPIO/按键/LED相关模块 ==========
from machine import Pin
from machine import FPIOA
#将GPIO52、GPIO21配置为普通GPIO模式
fpioa = FPIOA()
fpioa.set_function(52,FPIOA.GPIO52)
fpioa.set_function(21,FPIOA.GPIO21)
# ========== 初始化按键:按下时高电平 ==========
button = Pin(21, Pin.IN, Pin.PULL_UP)#构建KEY对象
debounce_delay = 200  # 按键消抖时长(ms)
last_press_time = 0
button_last_state = 0

LED=Pin(52,Pin.OUT) #构建LED对象,开始熄灭    LED.value(state) #LED状态翻转


state=0 #LED引脚状态

# 统计当前目录下以 "image_XX.jpg" 命名的文件数量,自动从最大编号继续
image_count = 0
existing_images = [fname for fname in os.listdir(image_folder)
                   if fname.startswith("image_") and fname.endswith(".jpg")]

if existing_images:
    # 提取编号并找出最大值
    numbers = []
    for fname in existing_images:
        # 假设文件名格式为 "image_XX.jpg"
        # 取中间 XX 部分转为数字
        try:
            num_part = fname[6:11]  # "image_" 长度为6,取到 ".jpg" 前还要注意下标
            numbers.append(int(num_part))
        except:
            pass
    if numbers:
        image_count = max(numbers)

try:
    print("camera_snapshot_and_save_test")#find sensor gc2093_csi2, type 30, output 1920x1080@60

    # 构造一个具有默认配置的摄像头对象
    sensor = Sensor(id=sensor_id,width=1920, height=1080)#sensor = Sensor()
    # sensor reset
    sensor.reset()
    # set hmirror
    # sensor.set_hmirror(False)
    # sensor vflip
    # sensor.set_vflip(False)

    # set chn0 output size, 1920x1080
    sensor.set_framesize(Sensor.FHD)
    # set chn0 output format
    sensor.set_pixformat(Sensor.YUV420SP)#sensor.set_pixformat(Sensor.YUV420SP) RGB565

    # bind sensor chn0 to display layer video 1
    bind_info = sensor.bind_info()
    Display.bind_layer(**bind_info, layer = Display.LAYER_VIDEO2)#Display.bind_layer(**bind_info, layer = Display.LAYER_VIDEO1) 也可以设置为LAYER_VIDEO2 , 不可设置为LAYER_OSD0,会提示:'osd layer not support pix_format (31)'

    # set chn1 output format
    sensor.set_framesize(width = 1920, height = 1080, chn = CAM_CHN_ID_1)# sensor.set_framesize(width = 640, height = 480, chn = CAM_CHN_ID_1)
    sensor.set_pixformat(Sensor.RGB888, chn = CAM_CHN_ID_1)

    # set chn2 output format
    sensor.set_framesize(width = 1920, height = 1080, chn = CAM_CHN_ID_2)#sensor.set_framesize(width = 640, height = 480, chn = CAM_CHN_ID_2)
    #sensor.set_pixformat(Sensor.RGBP888, chn = CAM_CHN_ID_2)
    sensor.set_pixformat(Sensor.RGB565, chn = CAM_CHN_ID_2)#RGB565格式才能调用save直接存储 ; RGB888可显示,但无法保存 ;RGBP888和YUV420SP直接无法显示


    # use hdmi as display output
    Display.init(Display.LT9611, to_ide = True, osd_num=1)
    # init media manager
    MediaManager.init()

    # sensor start run
    sensor.run()#必须在MediaManager.init()之前调用
    print("[INFO] 摄像头已启动,进入主循环 ...")

    clock = time.clock()
    while True:
        os.exitpoint()
        #更新当前时间(毫秒)
        clock.tick()
        #fps.tick()

        # 捕获通道0的图像
        #img = sensor.snapshot(chn=CAM_CHN_ID_1)#LAYER_OSD0  CAM_CHN_ID_0
        #img = sensor.snapshot()##拍摄一张图 id: CSI输入号: 默认值CSI2,开发板上的摄像头

        img = sensor.snapshot(chn = CAM_CHN_ID_1)#'current format not support save function!'
        Display.show_image(img, alpha = 128)


        img = sensor.snapshot(chn = CAM_CHN_ID_2)
        Display.show_image(img, x=0,  layer = Display.LAYER_OSD1)#LAYER_OSD1  LAYER_VIDEO1  OSD序号需要和初始化OSD序号对应:Display.init(Display.LT9611, to_ide = True, osd_num=2)
        #Display.show_image(img, x=int(1920-800),  alpha = 150,layer = Display.LAYER_OSD1)
        #Display.show_image(img,layer = Display.LAYER_OSD1)#LAYER_OSD1  LAYER_VIDEO1  OSD序号需要和初始化OSD序号对应:Display.init(Display.LT9611, to_ide = True, osd_num=2)


        # 图像处理放到这里
        #--------开始--------

        # 这里可以插入各种图像处理逻辑,例如二值化、直方图均衡化、滤波等
        # 当前示例仅仅直接显示原图,不做任何操作

        #按键处理(检测上升沿)
        current_time = time.ticks_ms()
        button_state = button.value()

        if button_state == 0 and button_last_state == 1:  # 下降沿
            if current_time - last_press_time > debounce_delay:
                # LED闪烁提示
                print(f"拍照快门按键按下!")
                LED.high()  # 熄灭LED
                time.sleep_ms(20)
                LED.low()   # 点亮LED

                # 拍照并保存
                image_count += 1
                filename = f"{image_folder}/image_{image_count:05d}_{img.width()}x{img.height()}.jpg"
                print(f"[INFO] 拍照保存 -> {filename}")

                # 直接调用自定义的 lckfb_save_jpg() 函数
                wxl_save_jpg(img, filename, quality=99)

                last_press_time = current_time

        button_last_state = button_state


        #--------结束--------
        # 打印帧率到控制台
        print("fps = ", clock.fps())
        time.sleep_ms(20)

except KeyboardInterrupt as e:
    print(f"用户停止")
except BaseException as e:
    print(f"出现异常 '{e}'")
finally:
    # sensor stop run
    #if isinstance(sensor, Sensor):
    if 'sensor' in locals() and isinstance(sensor, Sensor):
        sensor.stop()#必须在MediaManager.deinit()之前调用
    # deinit display
    Display.deinit()

    os.exitpoint(os.EXITPOINT_ENABLE_SLEEP)
    time.sleep_ms(100)

    # release media buffer
    MediaManager.deinit()


'''


# drop 100 frames
for i in range(500):
    sensor.snapshot()

# snapshot and save
img = sensor.snapshot(chn = CAM_CHN_ID_0)
save_img(img, 0)

img = sensor.snapshot(chn = CAM_CHN_ID_1)
save_img(img, 1)

img = sensor.snapshot(chn = CAM_CHN_ID_2)
save_img(img, 2)


camera_snapshot_and_save_test
find sensor gc2093_csi2, type 30, output 1920x1080@60
vb common pool count 6
sensor(0), mode 0, buffer_num 4, buffer_size 0
[INFO] 摄像头已启动,进入主循环 ...
fps =  22.2222
fps =  27.3973
fps =  30.303
fps =  33.0578
fps =  34.4828
fps =  35.2941
fps =  34.6535
fps =  35.5556
fps =  36.4372
fps =  35.8423
fps =  35.4839
fps =  36.2538
fps =  36.3128
fps =  35.8056
fps =  36.3196
fps =  36.6972
fps =  36.2473
fps =  36.6599
fps =  36.965
fps =  36.4963
fps =  36.0825
fps =  36.4238
fps =  36.566
fps =  36.3086
fps =  36.6032
fps =  36.7751
fps =  36.4372
fps =  37.1653
fps =  37.1304
拍照快门按键按下!
[INFO] 拍照保存 -> /data/wxlimages/image_00001_1920x1080.jpg
[INFO] 使用 WXL_save_jpg() 保存完毕: /data/wxlimages/image_00001_1920x1080.jpg
fps =  30.0074
fps =  30.0037
fps =  30.0164
fps =  30.0725
fps =  34.4886
拍照快门按键按下!
[INFO] 拍照保存 -> /data/wxlimages/image_00002_1920x1080.jpg
[INFO] 使用 WXL_save_jpg() 保存完毕: /data/wxlimages/image_00002_1920x1080.jpg
fps =  31.3501
fps =  31.369
fps =  31.383
fps =  31.4065
fps =  31.4203

'''