0 布局的定义
布局可以理解为一种容器 ,用于组织与排列界面上的控件。
-
布局是一个相框,控件就是你要展示的照片。•
-
你(布局规则)决定这些照片怎么排列:是从上到下整齐放(LinearLayout),还是自由定位(ConstraintLayout),还是全部叠在一起(FrameLayout)。
🔹 布局的本质是树状结构:一个布局可以包含多个子布局或控件,子布局又可以继续嵌套,从而形成复杂的 UI 结构。
🧠 常见问题:为什么别人写的布局能实现效果,我的却不行?
很多时候是因为对布局类型及其属性规则 不了解,尤其是某些属性是由父布局决定的 ,而不是通用的。
一、布局中的属性来源分类
我们在 XML 布局文件中写的各种属性,大致可以分为以下两类:
✅ 1. 来自 View 本身 的属性(通用属性,大多数控件都支持)
这些属性是 Android 控件共有的基本属性,比如:
android:id:为控件设置唯一标识符
android:layout_width:控件的宽度(如 match_parent, wrap_content)
android:layout_height:控件的高度
android:text:文本内容(TextView、Button 等)
android:textSize:字体大小
android:background:背景颜色或图片
android:padding/ android:margin:内边距和外边距
android:textColor:文字颜色
📌 这些属性在任何控件中基本都有效,因为它们定义在
android.view.View或其子类中。
✅ 2. 来自 父布局的 LayoutParams (布局参数,取决于当前控件所在的父布局类型)
这些属性 不是控件本身的属性,而是由父布局决定的布局行为 ,比如:
layout_gravity(在某些布局中控制控件在其父容器中的对齐方式)
layout_centerInParent(居中,但只有特定父布局支持)
layout_weight(权重,LinearLayout 特有)
layout_below, layout_toRightOf(RelativeLayout 特有)
app:layout_constraintXXX(ConstraintLayout 特有)
⚠️ 重要提醒:
如果你在一个布局中使用了 **只属于某种父布局的属性,但该控件的实际父布局并不支持它,那么这个属性虽然不会报错,但也不会生效!**
例如:在
ConstraintLayout中使用layout_centerInParent是无效的,因为它是RelativeLayout的属性
如下面两张图,layout_centerInParent在父布局RelativeLayout中是生效的,但是在ConstraintLayout中不会报错,但是不会生效。
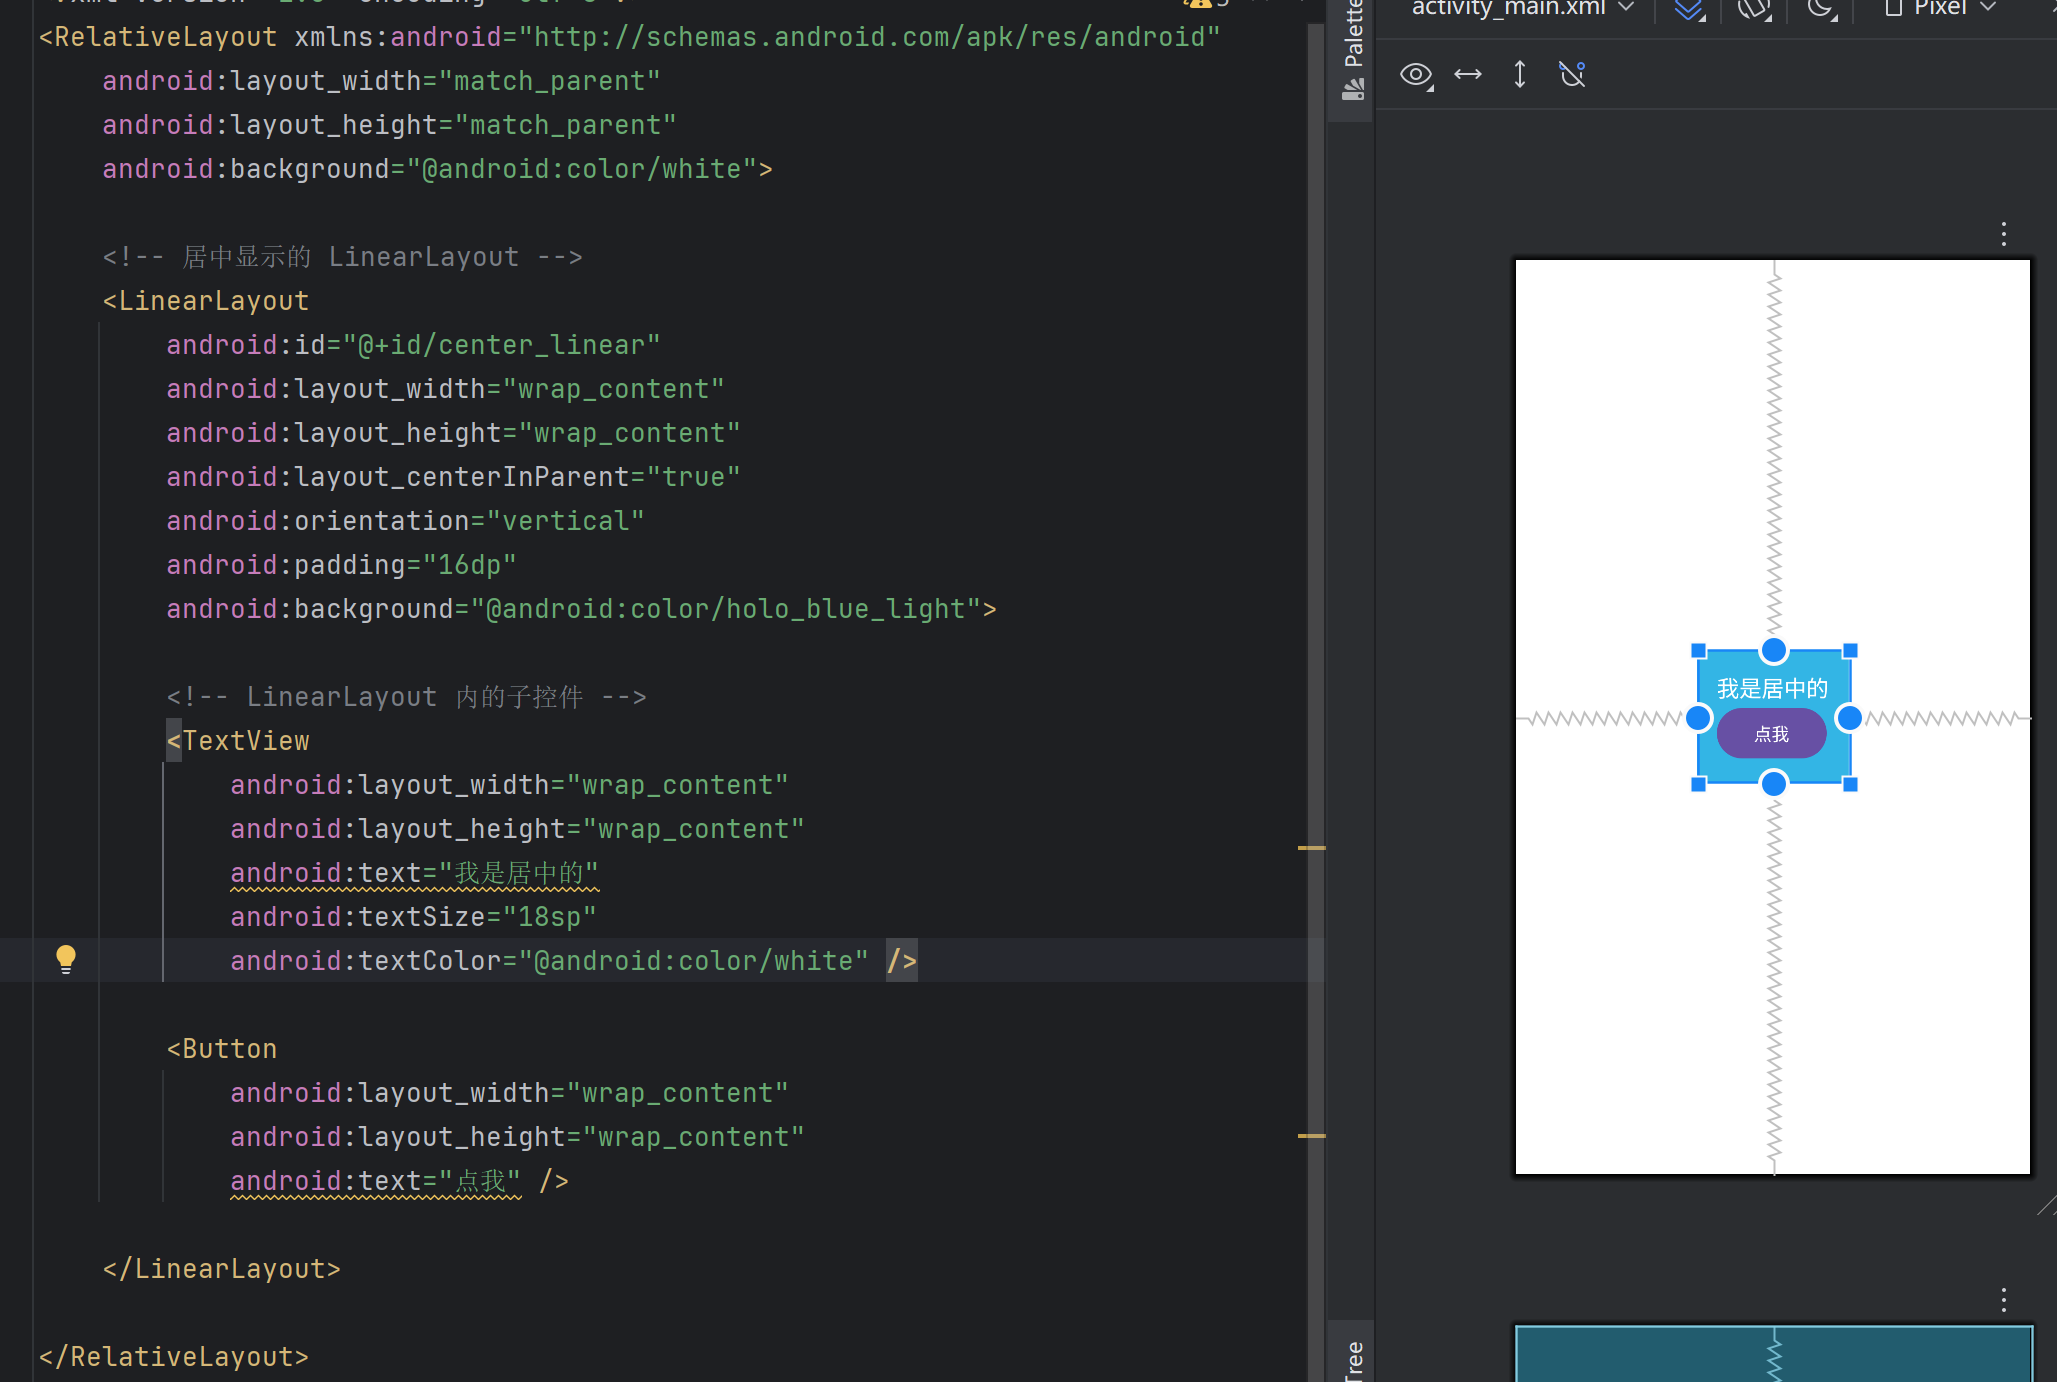
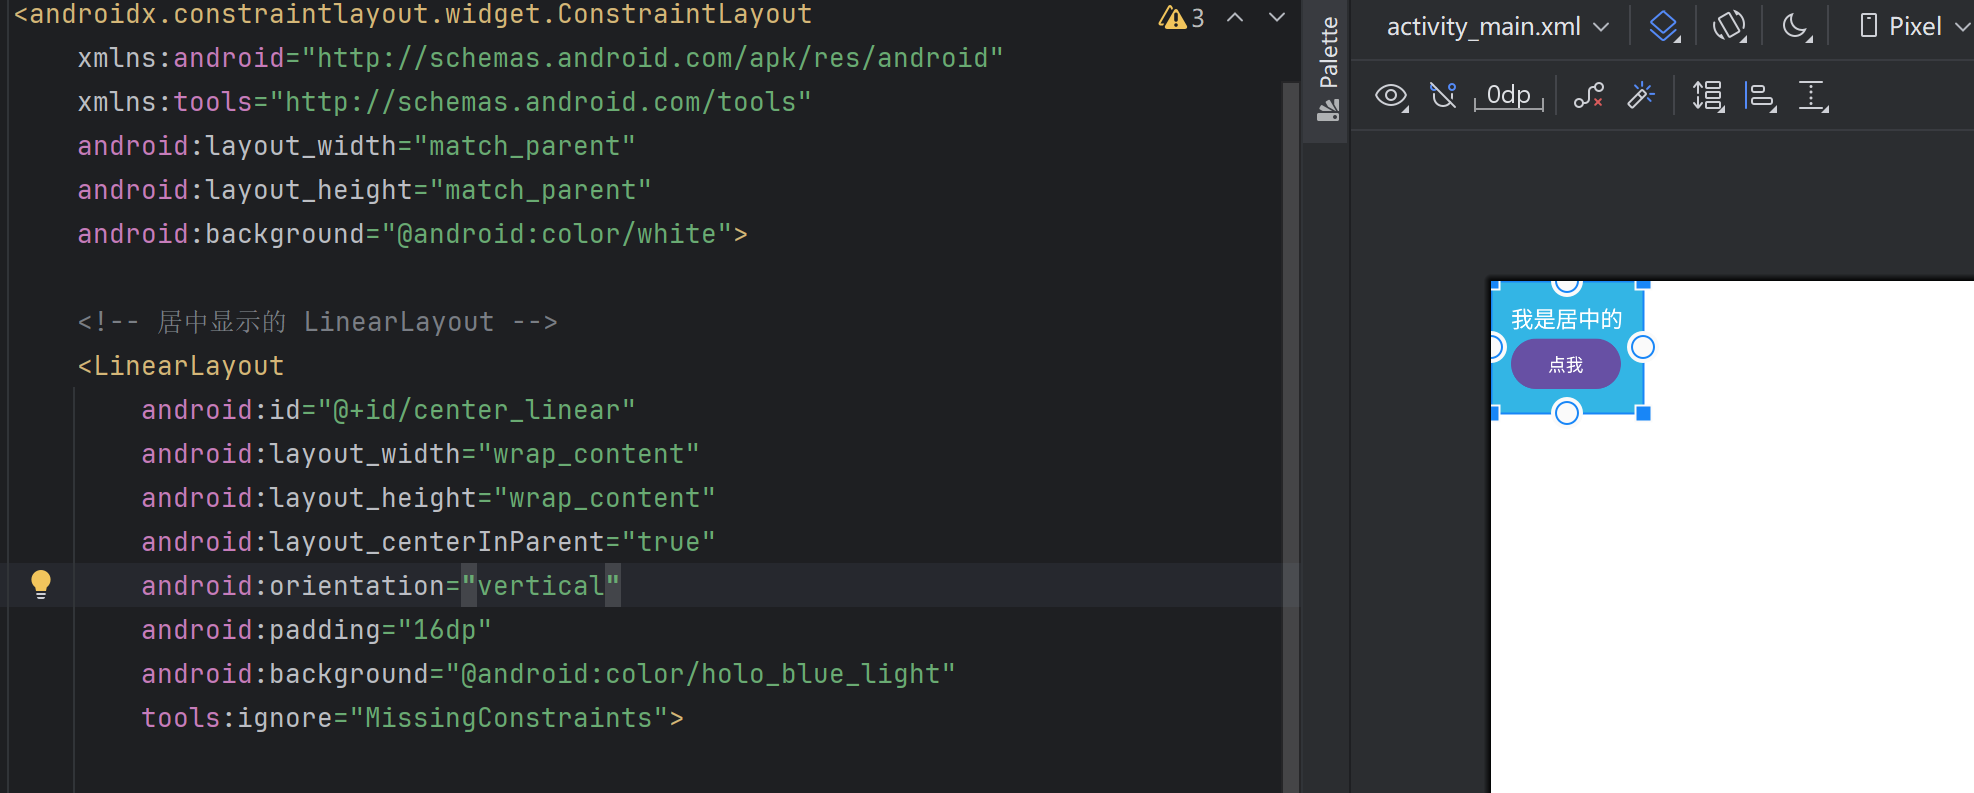
实际中我们在判断这个布局是否有这个属性可以通过这个方式,只要在android studio中能显示,说明就有这个属性。
二 常见布局体系总栏(详细参数去andorid官网学习)
2.1 LinearLayout (线性叠加布局):
-
垂直方向:下一个子控件从上一个控件的底部开始排列
-
水平方向:下一个子控件从上一个控件的右边开始排列
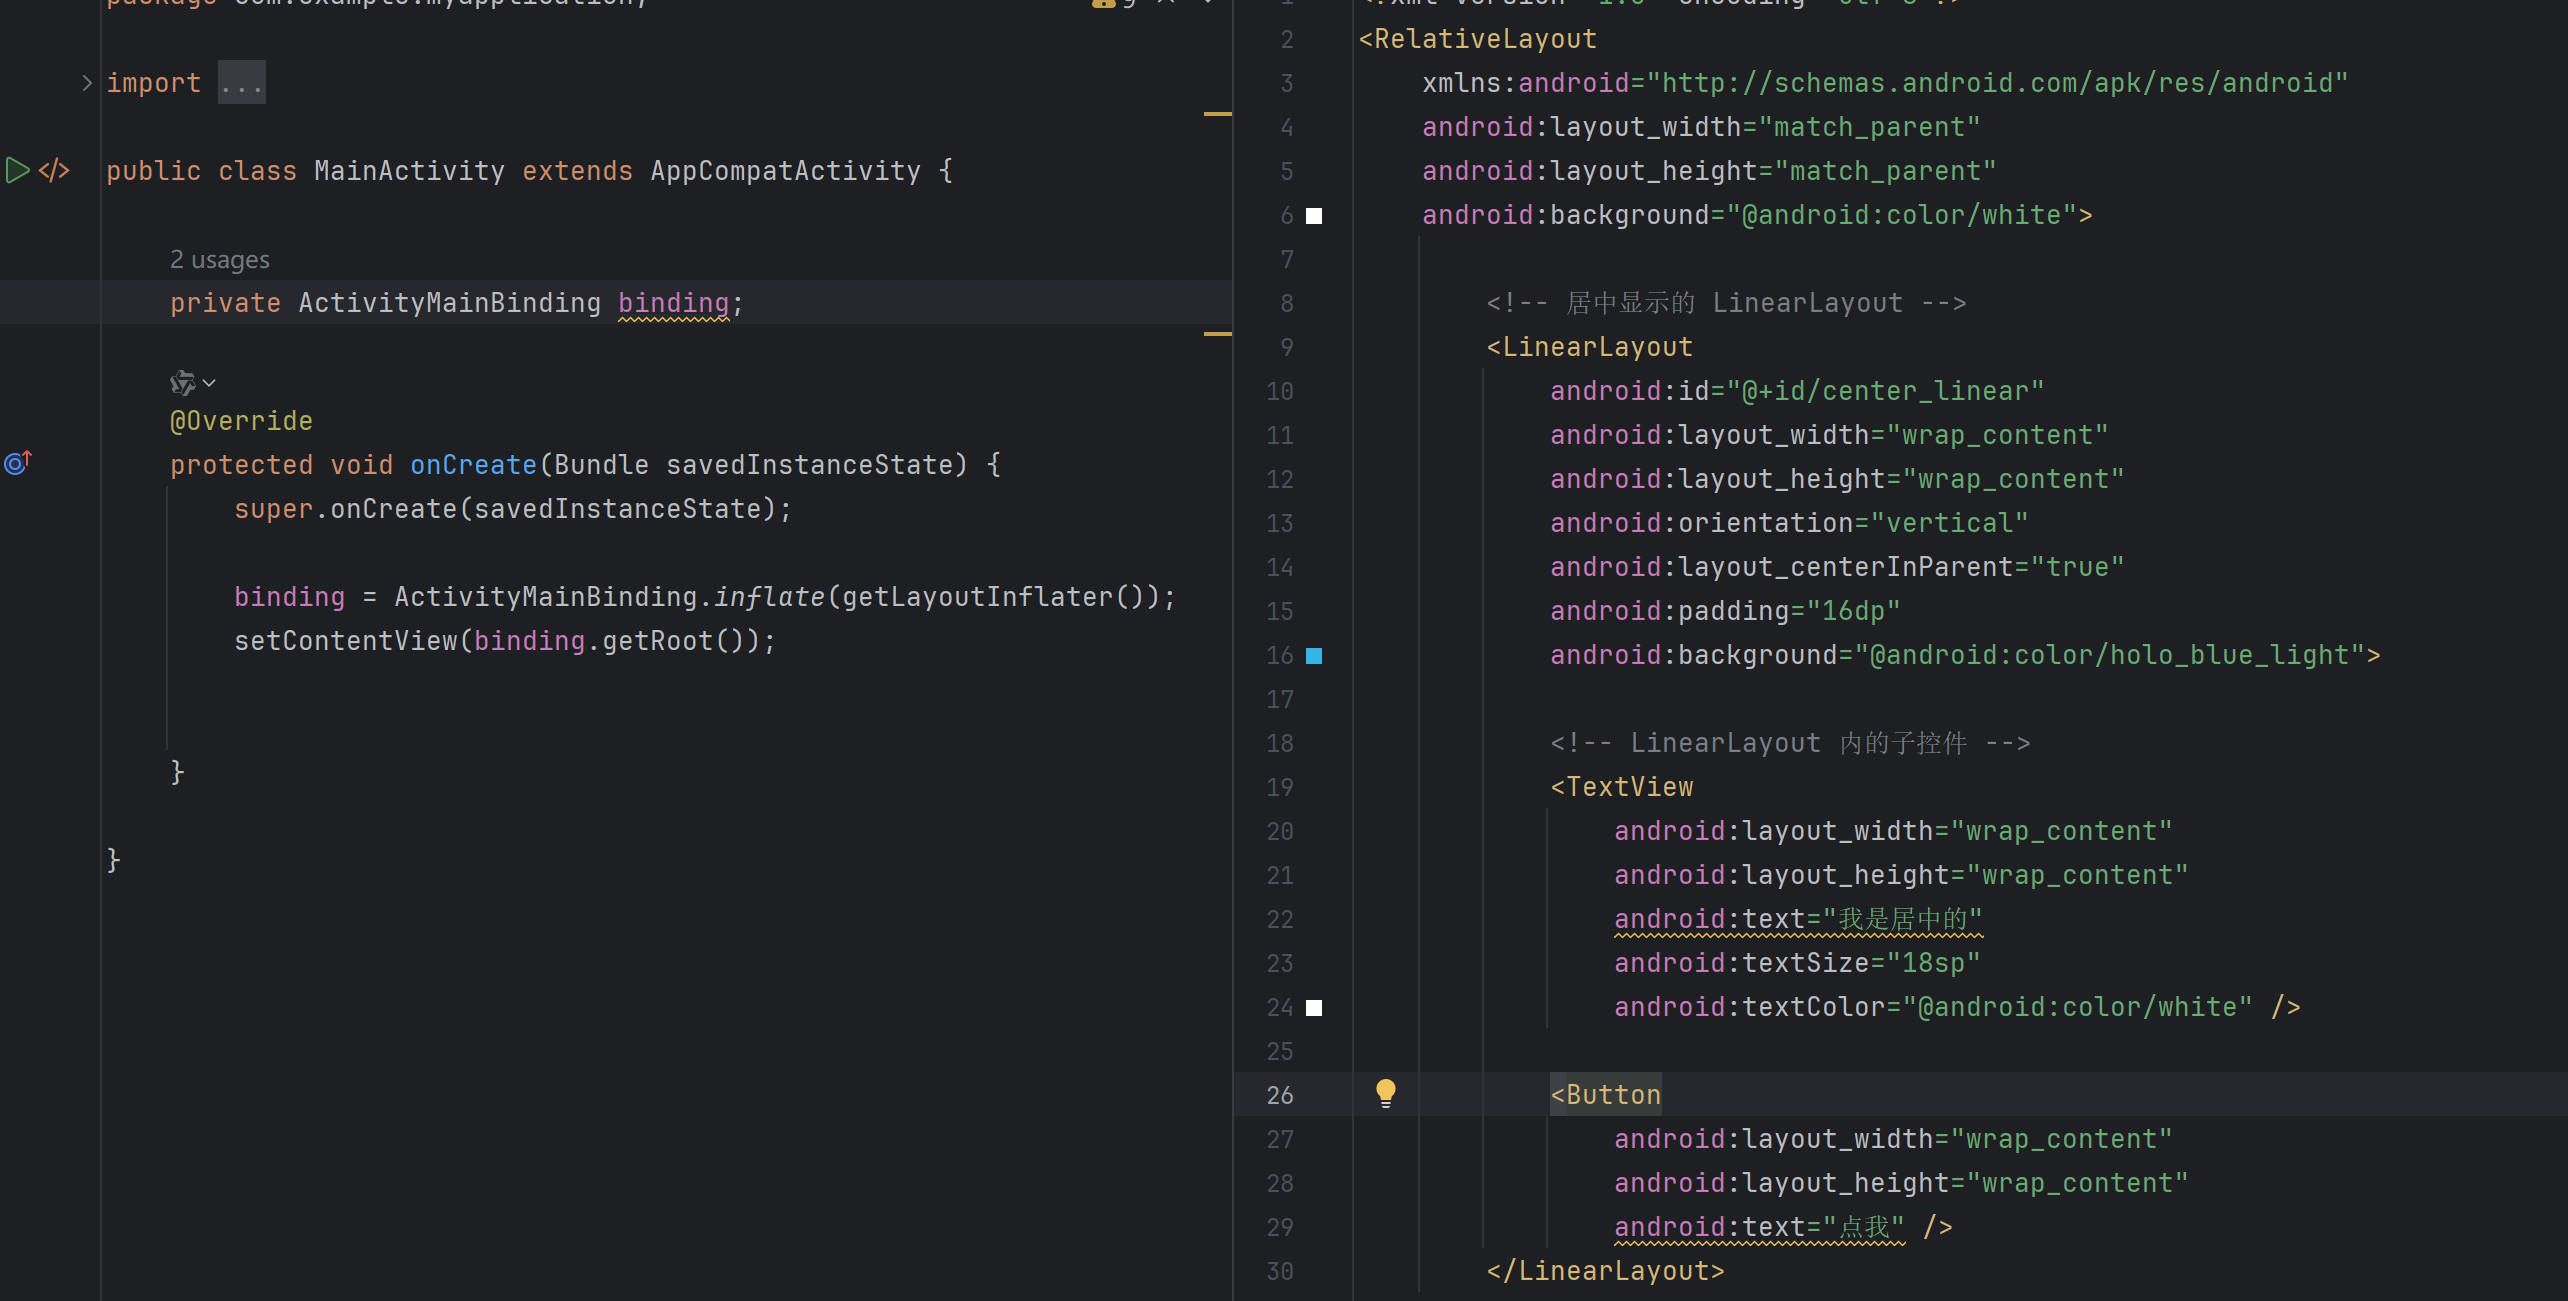
方法1:在xml中并且布局,然后直接在代码中加载
1.1.1 直接在Java中实现布局,不使用xml
java
public class MainActivity extends AppCompatActivity {

    @Override
    protected void onCreate(Bundle savedInstanceState) {
        super.onCreate(savedInstanceState);

        // 1. 创建 RelativeLayout 作为根布局
        RelativeLayout relativeLayout = new RelativeLayout(this);
        relativeLayout.setLayoutParams(new RelativeLayout.LayoutParams(
                RelativeLayout.LayoutParams.MATCH_PARENT,
                RelativeLayout.LayoutParams.MATCH_PARENT
        ));
        relativeLayout.setBackgroundColor(Color.WHITE);
        // 2. 创建 LinearLayout 并设置属性
        LinearLayout linearLayout = new LinearLayout(this);
        linearLayout.setOrientation(LinearLayout.VERTICAL);
        linearLayout.setPadding(16, 16, 16, 16);
        linearLayout.setBackgroundColor(0xFF03A9F4); // holo_blue_light

        // 3. 添加子控件
        TextView textView = new TextView(this);
        textView.setText("我是居中的");
        textView.setTextSize(18);
        textView.setTextColor(Color.WHITE);
        linearLayout.addView(textView);
        Button button = new Button(this);
        button.setText("点我");
        linearLayout.addView(button);

        // 4. 设置 LinearLayout 在 RelativeLayout 中居中
        RelativeLayout.LayoutParams llParams = new RelativeLayout.LayoutParams(
                RelativeLayout.LayoutParams.WRAP_CONTENT,
                RelativeLayout.LayoutParams.WRAP_CONTENT
        );
        llParams.addRule(RelativeLayout.CENTER_IN_PARENT, RelativeLayout.TRUE);
        linearLayout.setLayoutParams(llParams);
        // 5. 把 LinearLayout 添加到 RelativeLayout
        relativeLayout.addView(linearLayout);
        // 6. 设置 Activity 内容为 RelativeLayout
        setContentView(relativeLayout);
    }
}
方法3:可以在 XML 定义布局基础结构,然后在 Java 中动态修改或添加控件
1.2 RelativeLayout(相对布局)
✅ 核心特点:
子控件通过相对位置来排列(比如相对于父布局,或相对于其他控件)
支持诸如 layout_alignParentTop, layout_below, layout_toRightOf等属性
灵活性强,但复杂布局容易难以维护
1.3 FrameLayout(帧布局)
✅ 核心特点:
所有子控件默认都堆叠在左上角(0,0)位置
后添加的控件会覆盖在先添加的控件之上(常用于叠加显示),
-
可以通过
android:layout_gravity或FrameLayout.LayoutParams.gravity控制子控件在父容器中的位置 -
常见值:
center、top|left、bottom|right等
通常用来显示单个全屏控件
🎯 适用场景:
显示单一内容,比如全屏的图片、视频播放器
实现层叠效果(比如浮动按钮盖在内容上方)
用作 Fragment 的容器
举个例子,下面这个就是framelayout从zuos左上角开始叠加的布局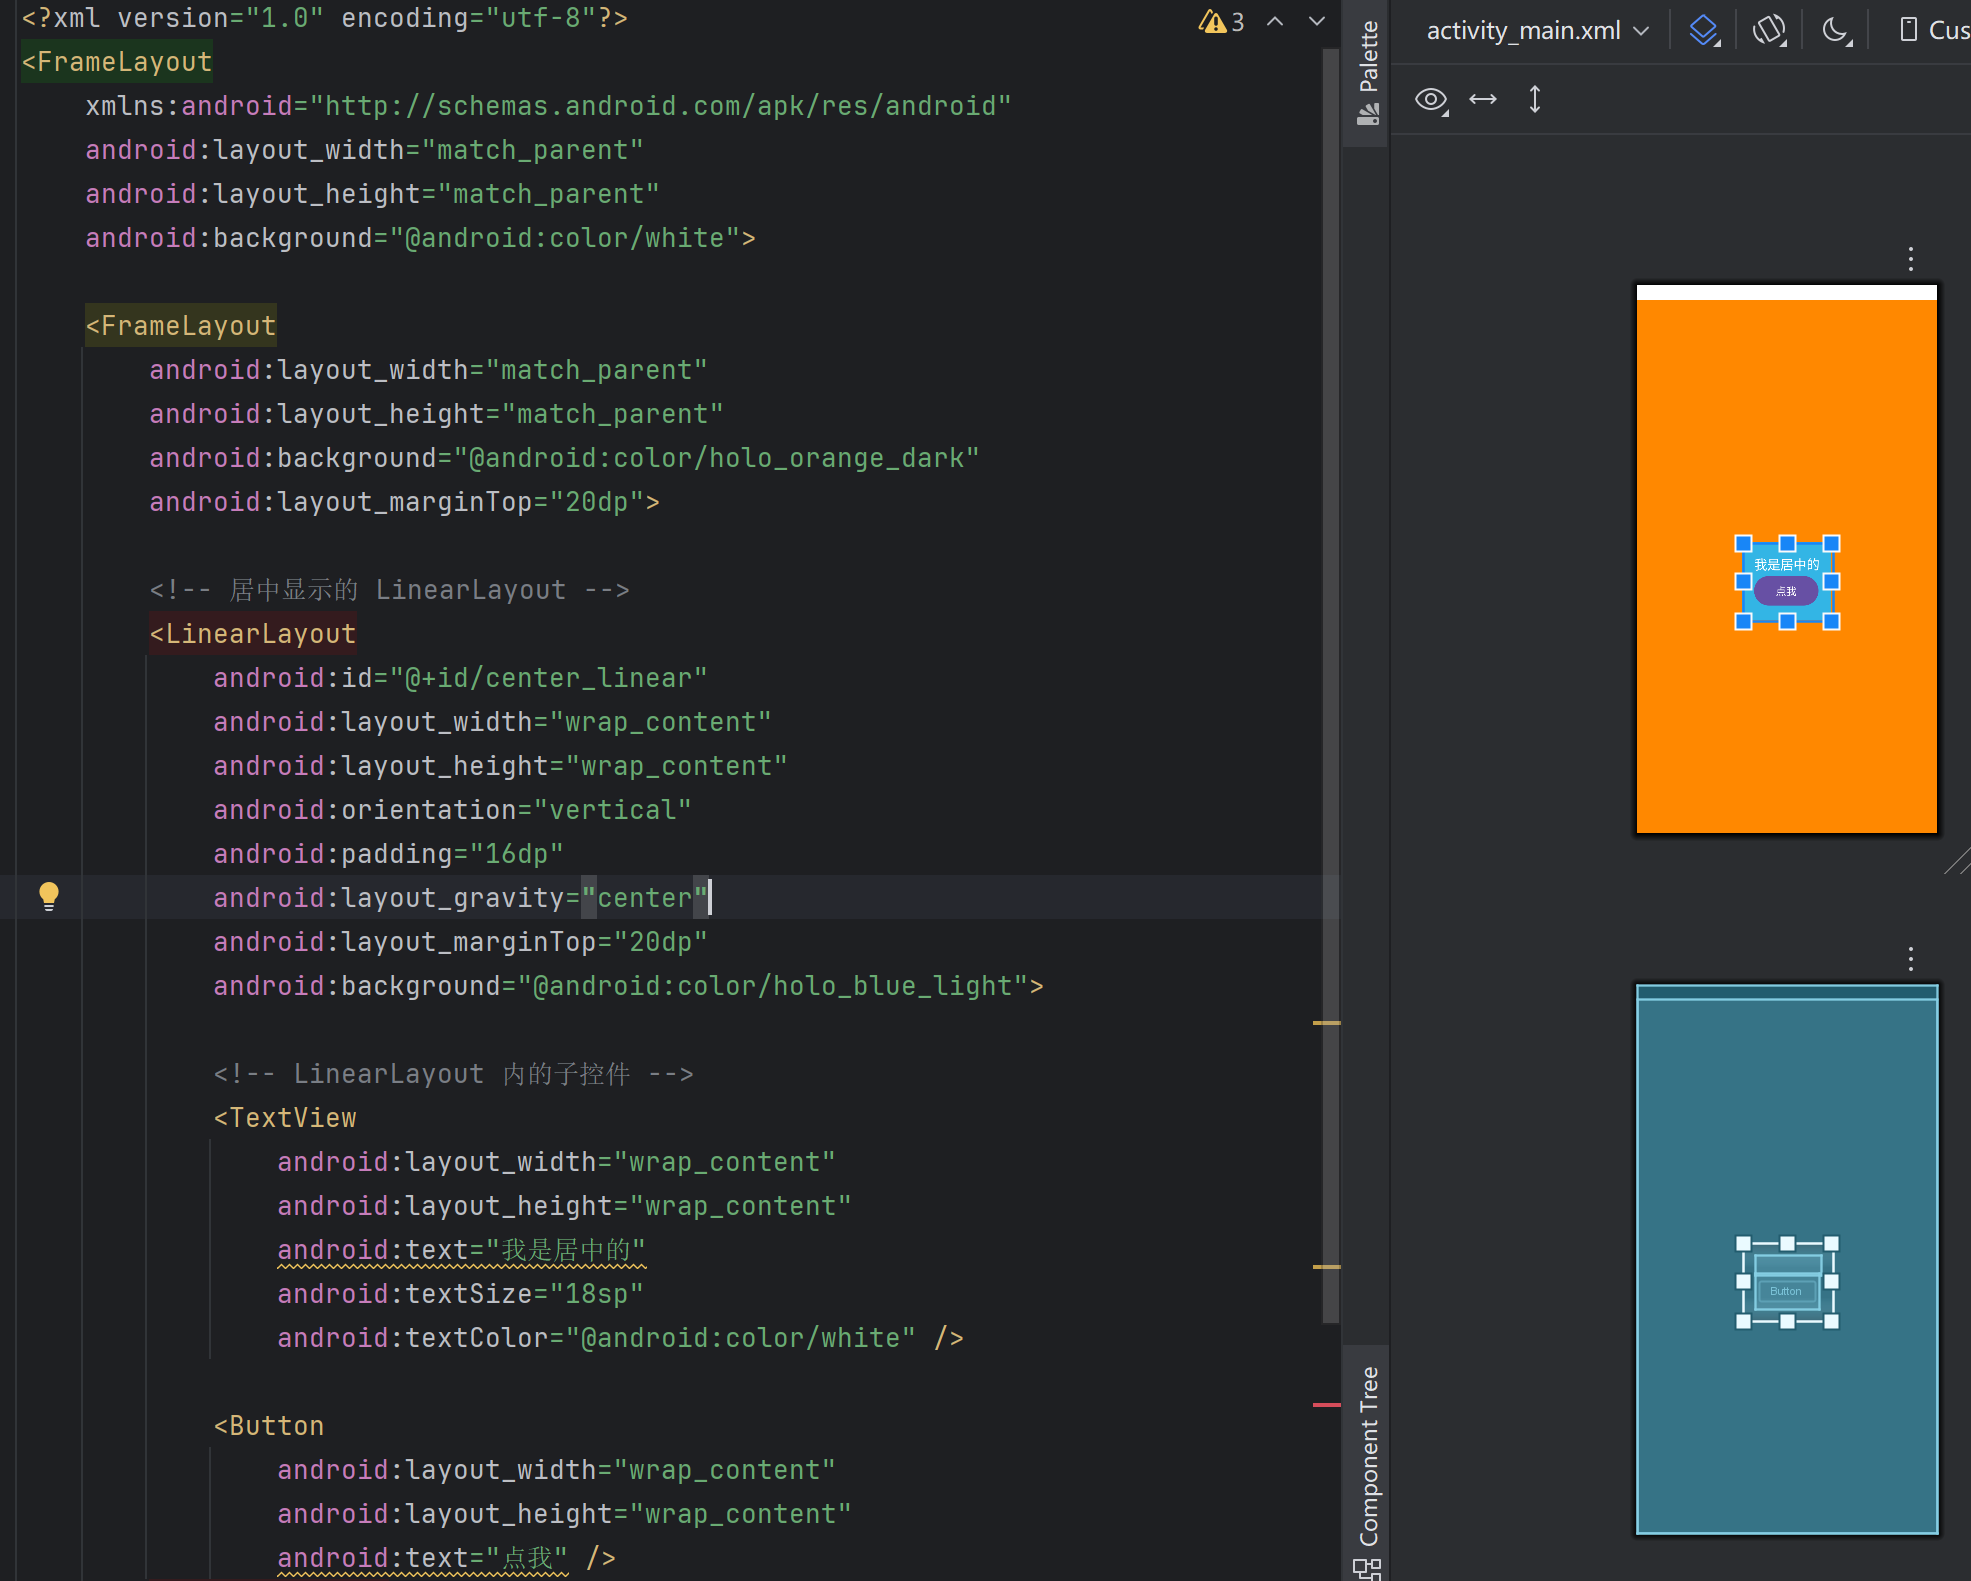
1.4 ConstraintLaout(约束布局)
ConstraintLayout 功能抢到,可以替代 LinearLayout、RelativeLayout、FrameLayout 等组合布局,主要特点如下:
✅ 核心特点:
通过控件之间的约束关系(Constraints)来定位,而不是嵌套
支持百分比定位、居中、偏移、链条(Chains)、屏障(Barrier)、Guideline 等高级功能
官方推荐用于替代多层嵌套的 LinearLayout / RelativeLayout
支持在 Android Studio 的 布局编辑器中可视化拖拽约束
🎯 适用场景:
构建复杂且响应式的 UI
需要精确控制控件位置与对齐
希望减少布局嵌套层级,提升渲染性能
XML
<?xml version="1.0" encoding="utf-8"?>
<androidx.constraintlayout.widget.ConstraintLayout xmlns:android="http://schemas.android.com/apk/res/android"
    xmlns:tools="http://schemas.android.com/tools"
    android:layout_width="match_parent"
    android:layout_height="match_parent"
    xmlns:app="http://schemas.android.com/apk/res-auto"
    android:background="@android:color/white">
        <!-- 居中显示的 LinearLayout -->
        <LinearLayout
            android:id="@+id/center_linear"
            android:layout_width="wrap_content"
            android:layout_height="wrap_content"
            android:orientation="vertical"
            android:padding="16dp"
            app:layout_constraintStart_toStartOf="parent"
            app:layout_constraintEnd_toEndOf="parent"
            app:layout_constraintTop_toTopOf="parent"
            app:layout_constraintBottom_toBottomOf="parent"
            android:background="@android:color/holo_blue_light"
            tools:ignore="MissingConstraints">
            <!-- LinearLayout 内的子控件 -->
            <TextView
                android:layout_width="wrap_content"
                android:layout_height="wrap_content"
                android:text="我是居中的"
                android:textSize="18sp"
                android:textColor="@android:color/white" />

            <Button
                android:layout_width="wrap_content"
                android:layout_height="wrap_content"
                android:text="点我" />
        </LinearLayout>

    <LinearLayout
        android:id="@+id/center_linear1"
        android:layout_width="wrap_content"
        android:layout_height="wrap_content"
        android:orientation="vertical"
        android:padding="16dp"
        app:layout_constraintStart_toStartOf="@id/center_linear"
        app:layout_constraintTop_toBottomOf="@id/center_linear"
        android:background="@android:color/holo_green_light"
        >
        <TextView
            android:layout_width="wrap_content"
            android:layout_height="wrap_content"
            android:text="居中的下面"
            android:textSize="18sp"
            android:textColor="@android:color/white" />
        <Button
            android:layout_width="wrap_content"
            android:layout_height="wrap_content"
            android:text="点我" />
    </LinearLayout>
</androidx.constraintlayout.widget.ConstraintLayout>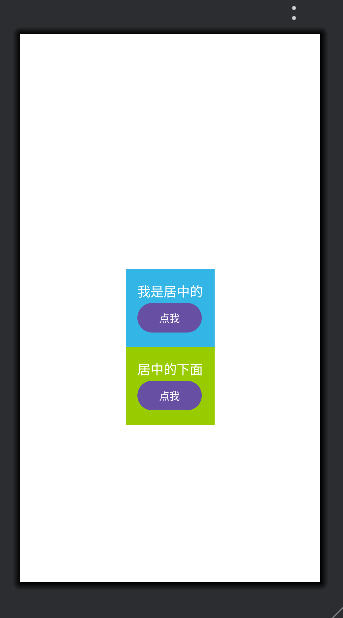
✅ 提示:
使用
app:layout_constraintXXX来定义控件间的约束关系
ConstraintLayout强大之处在于不用嵌套也能实现复杂布局
tip:
如果在 XML 和 Java 代码中都对同一个控件设置了相同属性,后设置的会覆盖前者
所有的布局与属性设置,都是在 setContentView()之后才会真正生效嵌套太深会影响性能与渲染速度,
尽量使用 ConstraintLayout减少布局层级