揭秘AI的"视线":可视化Qwen2.5-VL的视觉注意力机制
前言
随着多模态大语言模型(MLLM)的兴起,像通义千问 Qwen2.5-VL 这样的模型已经能够理解图像和文本的复杂组合。但它们在"看"一张图片时,到底在关注什么?模型是如何将我们的文本提示(Prompt)与图像的不同区域关联起来的?
为了回答这些问题,我们可以借助一种强大的技术------注意力可视化。通过将模型内部的注意力权重提取出来并呈现在原始图像上,我们可以直观地看到模型的"视线焦点"。这不仅有助于我们理解模型的工作原理,还能在模型调试和可解释性分析中发挥关键作用。
本文将通过一个完整的 Python 代码实例,手把手带你深入 Qwen2.5-VL 的视觉编码器(Vision Transformer, ViT),利用"猴子补丁"(Monkey Patching)技术,捕获并可视化其在处理图像时的注意力热图。
核心概念
视觉编码器 (ViT): ViT 的工作方式是将输入图像分割成一个个小的图像块(Patches),然后将这些图像块视为序列数据,输入到标准的 Transformer 编码器中进行处理。
自注意力机制 (Self-Attention): 这是 Transformer 的核心。它允许模型在处理序列中的一个元素(在这里是一个图像块)时,动态地评估序列中所有其他元素(其他所有图像块)的重要性。这种"重要性"就由注意力分数来量化。
注意力图 (Attention Map): 在 ViT 中,所有图像块对之间的注意力分数构成了一个矩阵,我们称之为注意力图。这张图揭示了模型认为哪些图像区域之间存在强关联。
猴子补丁 (Monkey Patching): 这是一种在运行时动态修改类或模块行为的技术。由于 transformers 库默认不会直接返回所有中间层的注意力图,我们需要用这种方法"侵入"模型内部,用我们自定义的函数替换掉原始的注意力计算函数,从而在计算过程中"窃取"我们需要的注意力图。
代码实践:分步详解
我们的目标是:针对给定的图像和文本提示,捕获 Qwen2.5-VL 视觉编码器中特定层的注意力图,并将其生成为热图叠加在原图上。
完整代码
python
import torch
import torch.nn as nn
from torch.nn import functional as F
from transformers import Qwen2_5_VLForConditionalGeneration, AutoProcessor
from PIL import Image
import numpy as np
import cv2
import matplotlib.pyplot as plt
import os
from functools import partial
# 导入 ViT 所需的旋转位置编码(RoPE)应用函数
from transformers.models.qwen2_5_vl.modeling_qwen2_5_vl import apply_rotary_pos_emb_vision
# --- 1. 配置区域 ---
# 模型路径、图片路径、提示词和输出设置
MODEL_PATH = "/path/to/your/Qwen2.5-VL-7B-Instruct"
IMAGE_PATH = "/path/to/your/image.jpg"
PROMPT = "List all components."
OUTPUT_FILENAME_BASE = "attention_visualization"
# 选择你希望可视化的视觉编码器层(索引从0开始)
LAYERS_TO_VISUALIZE = [7, 15, 23, 31]
# 用于在模型前向传播期间捕获注意力图的全局变量
captured_attention_map = None
# --- 2. 加载模型和处理器 ---
print("正在加载模型和处理器...")
model = Qwen2_5_VLForConditionalGeneration.from_pretrained(
MODEL_PATH,
torch_dtype=torch.bfloat16,
device_map="auto",
trust_remote_code=True
)
processor = AutoProcessor.from_pretrained(MODEL_PATH, trust_remote_code=True)
print("模型加载成功!")
# --- 3. 定义用于替换的自定义前向传播方法 ---
def patched_attention_forward(self, hidden_states, rotary_pos_emb_cos_sin=None, **kwargs):
"""
这是一个自定义的注意力前向传播函数,用于替换原始函数。
它在执行标准注意力计算的同时,将生成的注意力图保存到全局变量中。
"""
global captured_attention_map
# 处理2D和3D输入,以增加函数的鲁棒性
was_2d = False
if hidden_states.dim() == 2:
was_2d = True
hidden_states = hidden_states.unsqueeze(0)
bsz, q_len, _ = hidden_states.size()
# 计算 Q, K, V
qkv = self.qkv(hidden_states)
qkv = qkv.reshape(bsz, q_len, 3, self.num_heads, self.head_dim).permute(2, 0, 3, 1, 4)
query_states, key_states, value_states = qkv[0], qkv[1], qkv[2]
# 对 Query 和 Key 应用旋转位置编码 (RoPE)
if rotary_pos_emb_cos_sin is not None:
cos, sin = rotary_pos_emb_cos_sin
query_states, key_states = apply_rotary_pos_emb_vision(query_states, key_states, cos, sin)
# 计算注意力权重
attn_weights = torch.matmul(query_states, key_states.transpose(-1, -2))
# 使用 Softmax 归一化得到注意力图,并将其捕获到全局变量
captured_attention_map = F.softmax(attn_weights, dim=-1, dtype=torch.float32).to(query_states.dtype)
# 应用注意力权重到 V,并进行后续处理
attn_output = torch.matmul(captured_attention_map, value_states)
attn_output = attn_output.permute(0, 2, 1, 3).contiguous()
hidden_size = self.proj.in_features
attn_output = attn_output.reshape(bsz, q_len, hidden_size)
attn_output = self.proj(attn_output)
# 保持接口一致性,如果输入是2D,则返回2D
if was_2d:
attn_output = attn_output.squeeze(0)
return attn_output
# --- 4. 准备输入数据 ---
print("\n正在准备输入数据...")
try:
image = Image.open(IMAGE_PATH).convert("RGB")
except FileNotFoundError:
print(f"错误: 找不到图片文件,请检查路径: {IMAGE_PATH}")
exit()
messages = [{"role": "user", "content": [{"type": "image"}, {"type": "text", "text": PROMPT}]}]
text = processor.apply_chat_template(messages, tokenize=False, add_generation_prompt=True)
inputs = processor(text=[text], images=image, return_tensors="pt").to(model.device)
# --- 5. 循环执行替换、推理和恢复操作 ---
all_attention_maps = {}
for layer_idx in LAYERS_TO_VISUALIZE:
print("\n" + "="*40)
print(f" 开始处理第 {layer_idx+1} 层 (索引 {layer_idx}) ")
print("="*40)
captured_attention_map = None
try:
# 定位到要修改的目标层
target_layer = model.model.visual.blocks[layer_idx].attn
print(f"定位到目标层: visual.blocks[{layer_idx}].attn")
# 保存原始的 forward 方法
original_forward = target_layer.forward
# 使用我们的自定义方法替换它
target_layer.forward = partial(patched_attention_forward, target_layer)
print("成功执行 Monkey Patch。")
except Exception as e:
print(f"Monkey Patch 失败: {e}")
continue
print("正在执行模型前向传播...")
with torch.no_grad():
outputs = model(**inputs, output_attentions=True)
print("前向传播完成。")
# 恢复原始的 forward 方法
target_layer.forward = original_forward
print("已恢复原始 forward 方法。")
if captured_attention_map is not None:
all_attention_maps[layer_idx] = captured_attention_map
print(f"第 {layer_idx+1} 层的注意力图已成功捕获并存储。")
# --- 6. 循环处理并保存所有捕获到的注意力图 ---
print("\n" + "="*40)
print(f" 所有推理完成,开始生成可视化图片 ")
print("="*40)
if not all_attention_maps:
print("\n最终错误: 未能捕获到任何层的注意力图。")
else:
for layer_idx, attn_map_raw in all_attention_maps.items():
print(f"正在处理第 {layer_idx+1} 层的可视化...")
# [B, H, N, N] -> [H, N, N]
attn_map = attn_map_raw.squeeze(0).detach()
attn_map = attn_map.mean(dim=0) # 平均所有注意力头
attn_map_summary = attn_map.sum(dim=0)
num_patches = attn_map_summary.shape[0]
# 动态计算网格形状
factors = [i for i in range(1, int(num_patches**0.5) + 1) if num_patches % i == 0]
if not factors:
print(f"错误: 无法为第 {layer_idx+1} 层的 {num_patches} 个 patches 确定网格形状。")
continue
h_grid = factors[-1]
w_grid = num_patches // h_grid
attention_grid = attn_map_summary.reshape(h_grid, w_grid).cpu().to(torch.float32).numpy()
# 上采样到原图大小
original_image = np.array(image)
h, w, _ = original_image.shape
attention_heatmap = cv2.resize(attention_grid, (w, h), interpolation=cv2.INTER_CUBIC)
# 归一化 & 着色
attention_heatmap = (attention_heatmap - np.min(attention_heatmap)) / (np.max(attention_heatmap) - np.min(attention_heatmap))
attention_heatmap_colored = cv2.applyColorMap(np.uint8(255 * attention_heatmap), cv2.COLORMAP_JET)
# 叠加
superimposed_img = cv2.addWeighted(original_image, 0.6, attention_heatmap_colored, 0.4, 0)
superimposed_img_rgb = cv2.cvtColor(superimposed_img, cv2.COLOR_BGR2RGB)
# 绘制 & 保存
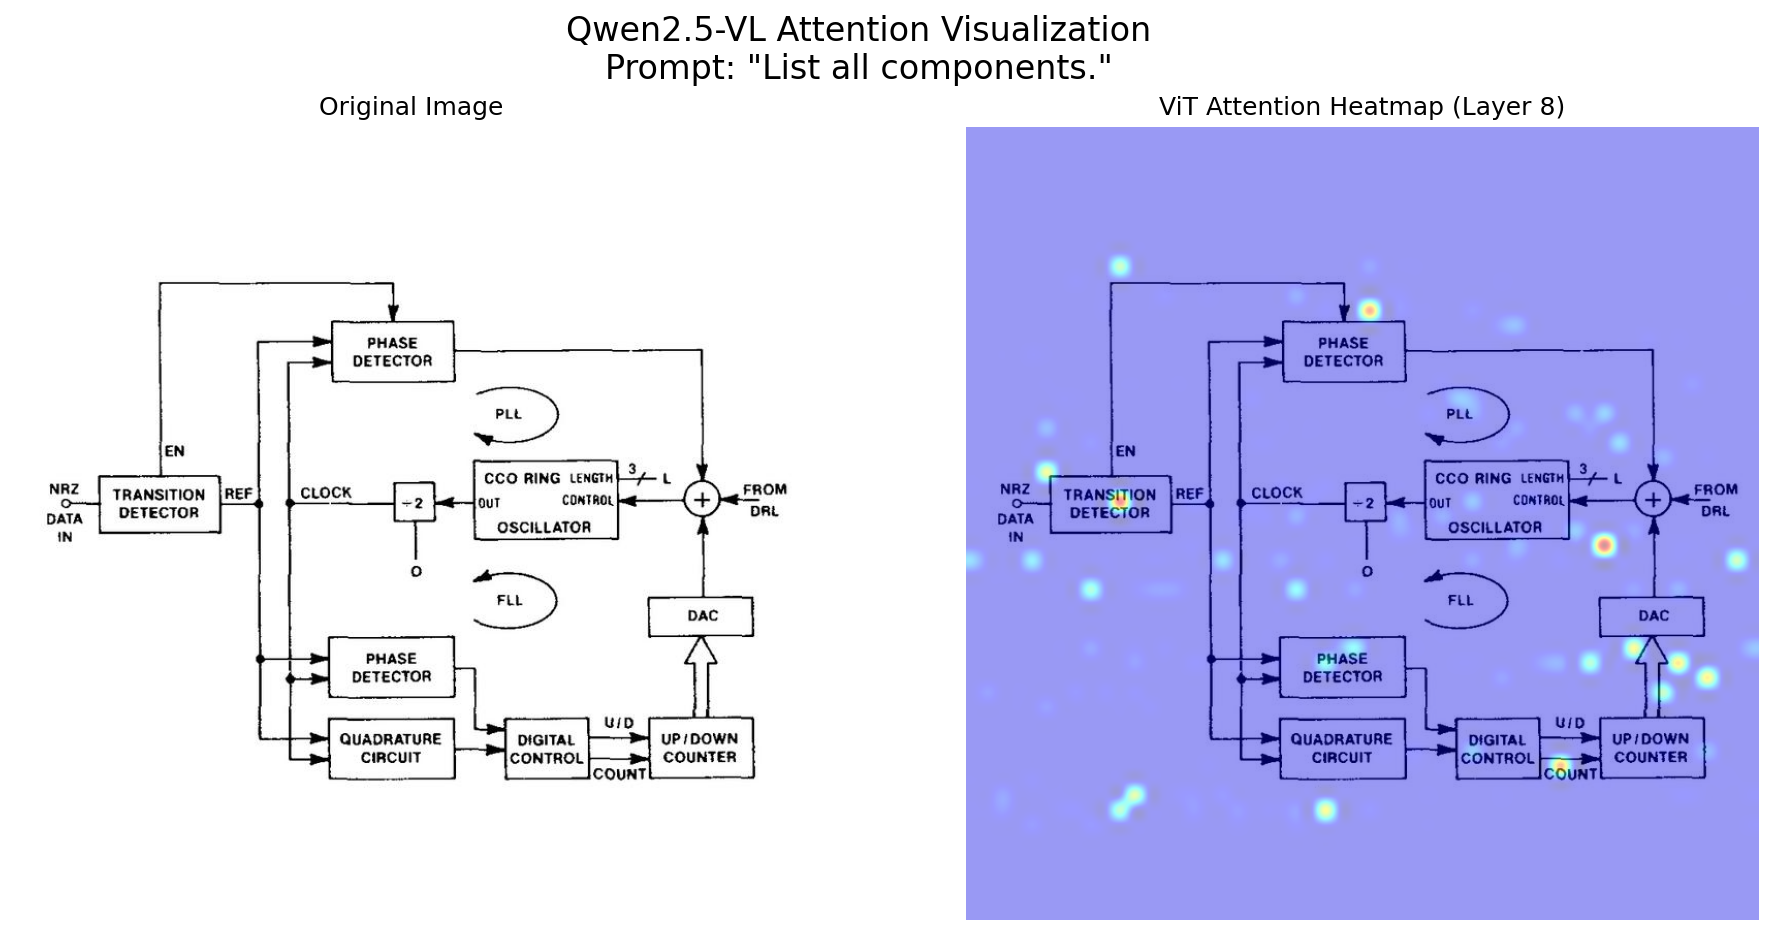
fig, (ax1, ax2) = plt.subplots(1, 2, figsize=(15, 7))
ax1.imshow(original_image); ax1.set_title("Original Image"); ax1.axis('off')
ax2.imshow(superimposed_img_rgb); ax2.set_title(f"ViT Attention Heatmap (Layer {layer_idx+1})"); ax2.axis('off')
plt.suptitle(f'Qwen2.5-VL Attention Visualization\nPrompt: "{PROMPT}"', fontsize=16)
output_path = f"{OUTPUT_FILENAME_BASE}_layer_{layer_idx+1}.png"
plt.savefig(output_path, bbox_inches='tight', dpi=150)
plt.close(fig)
print(f"第 {layer_idx+1} 层的可视化结果已成功保存到文件!")
print(f" 文件路径: {os.path.abspath(output_path)}")最后的生成效果