一、简介
Seed-X-PPO-7B 是强大的开源多语言翻译语言模型,表现出业界领先的翻译能力,它以其 70 亿(7B)参数的"轻量级"设计,实现了支持 28 种语言双向互译的强大能力,并且在多项测试中其翻译性能媲美甚至超越了 Gemini-2.5、Claude-3.5 和 GPT-4 等超大规模模型。
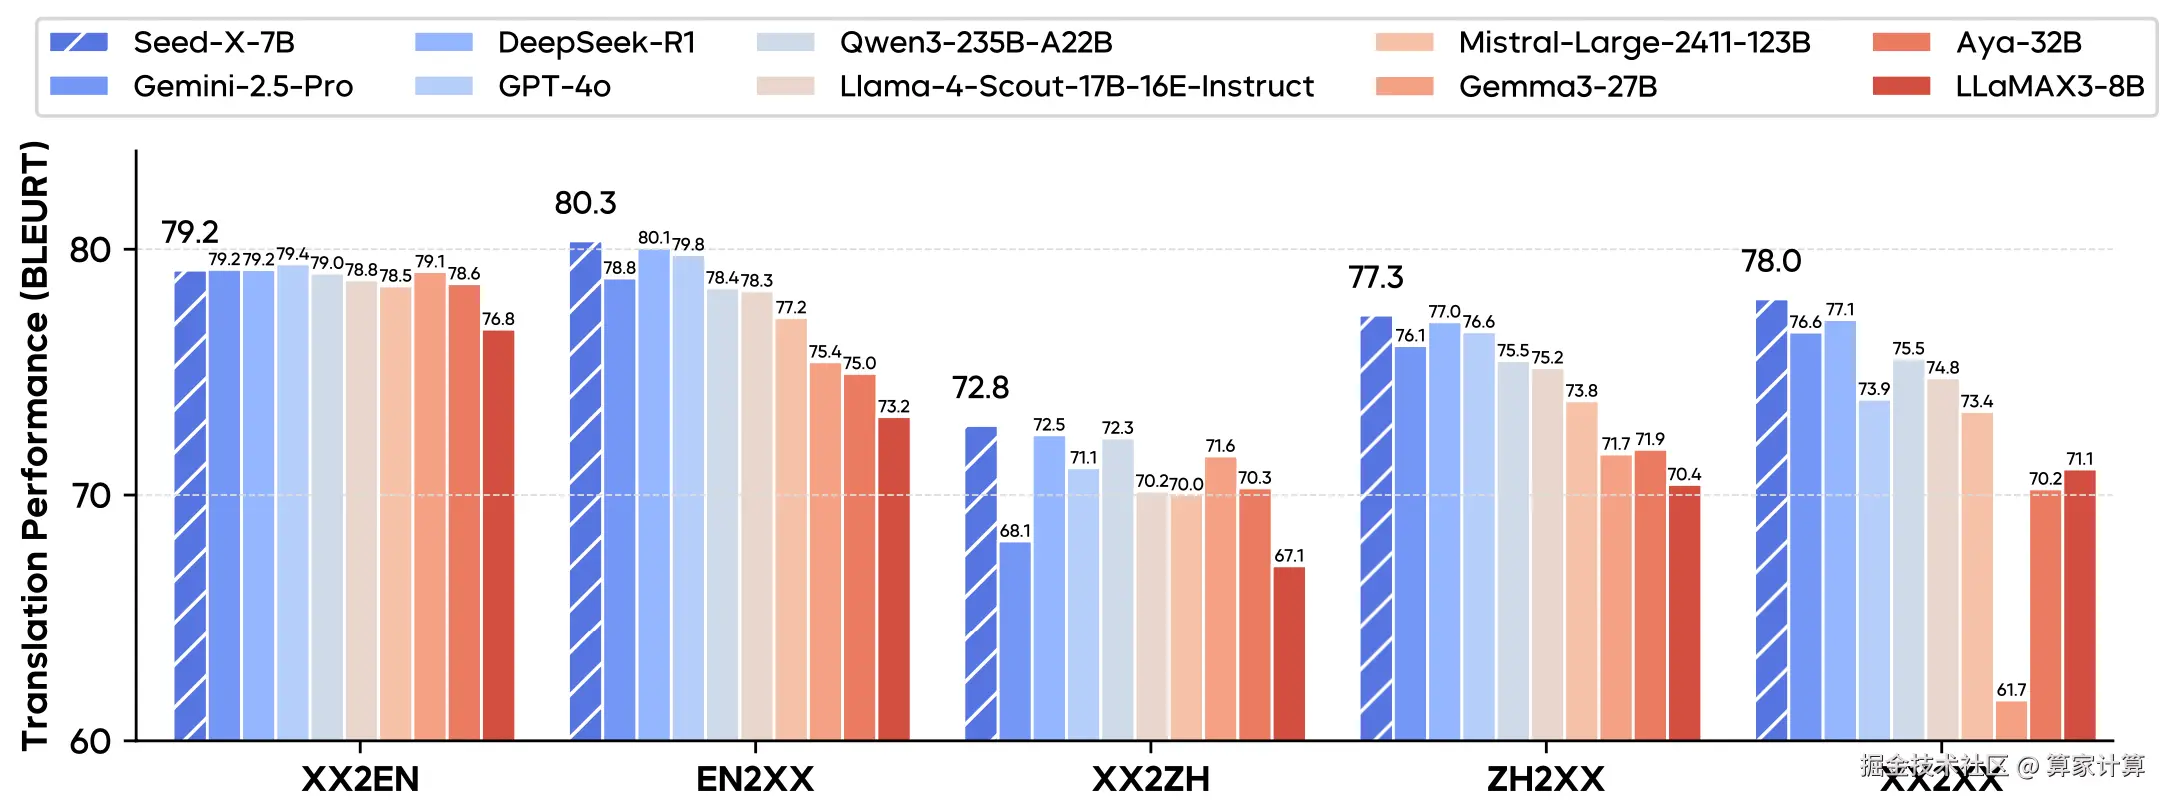
注:Seed-X-PPO 模型是Seed-X-7B模型的强化学习模型,其翻译性能优于 Seed-X-7B
二、环境部署
1.基础环境
4090*1,Ubuntu:22.04,cuda12.4.1
2.使用vllm 推理
创建环境:
ini
conda create -n seed python=3.12 -y
conda activate seed
安装特定版本的vllm和transformers:
ini
pip install vllm==0.8.0 transformers==4.51.33.模型下载
从 modelscope 下载模型:
css
modelscope download --model ByteDance-Seed/Seed-X-PPO-7B --local_dir ByteDance-Seed/Seed-X-PPO-7B通过软链接从数据社区调用模型:
bash
ln -s /root/sj-data/LargeModel/TextGeneration/ByteDance-Seed/Seed-X-PPO-7B/ Seed-X-PPO-7B4.vLLM 推理服务
css
vllm serve Seed-X-PPO-7B/ --served-model-name Seed-X-PPO-7B --tensor-parallel-size 1 --max-num-seqs 512 --enable-prefix-caching --gpu-memory-utilization 0.95 出现以下内容说明vllm 服务启动成功:
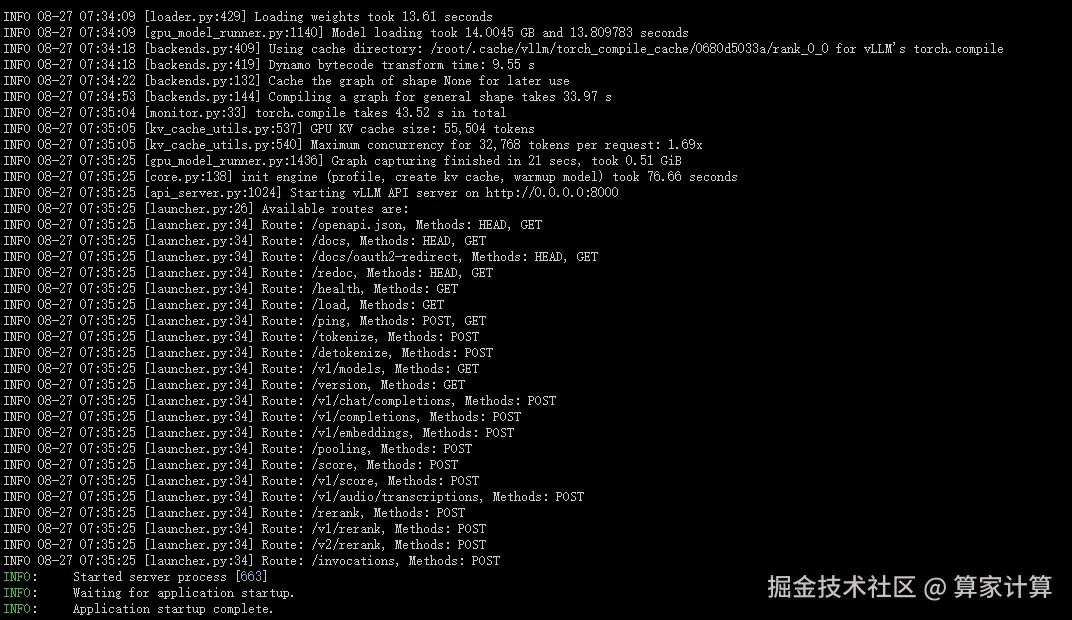
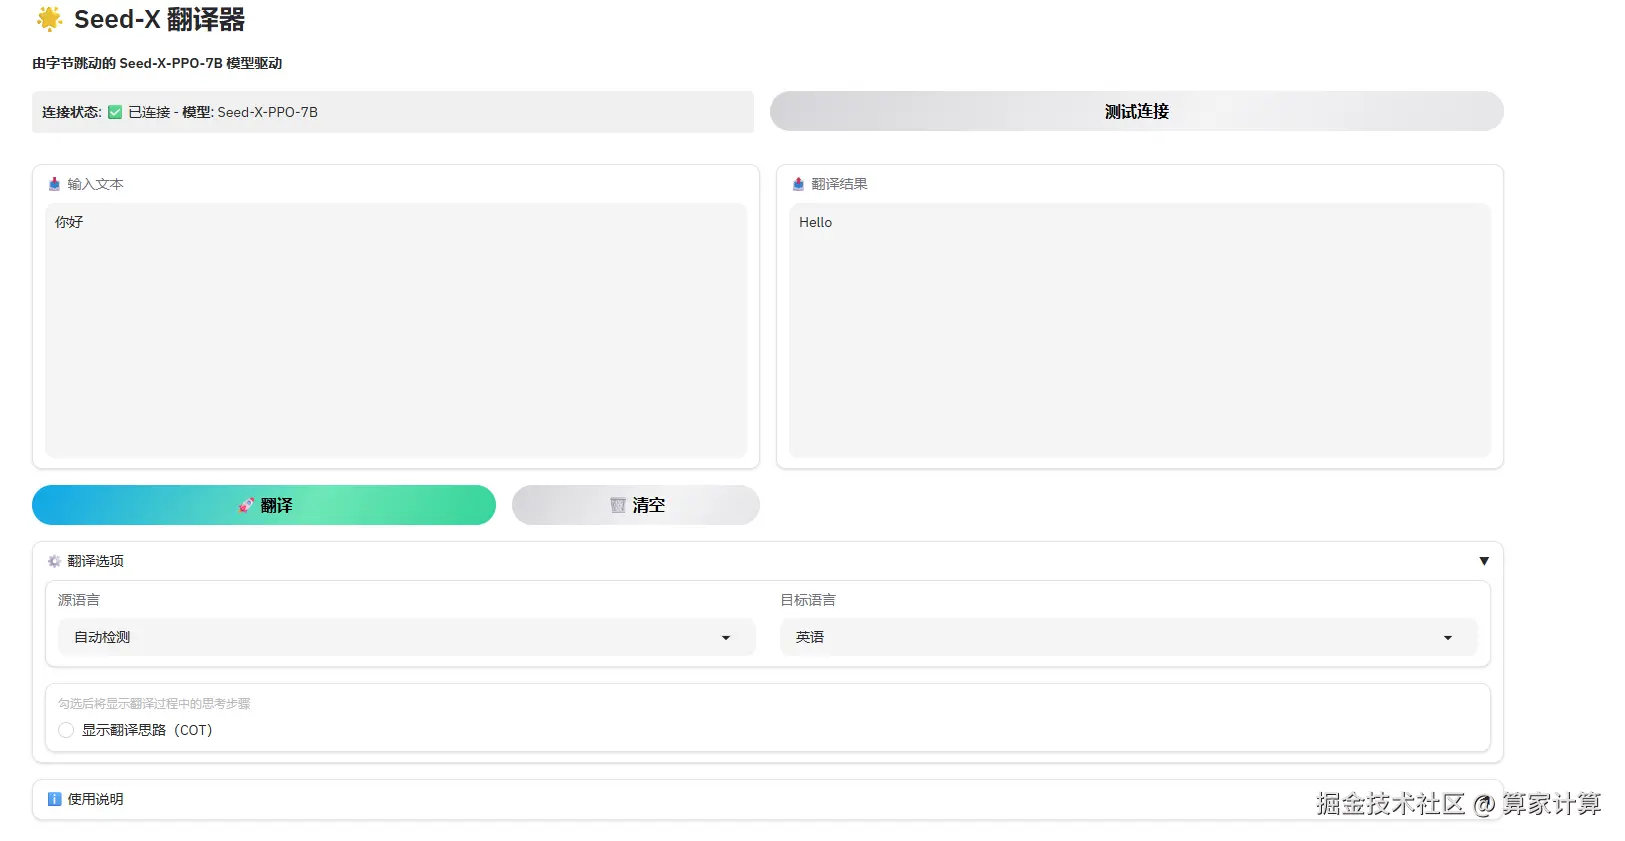
5.webui
使用huggingface ByteDance-Seed/Seed-X Spaces的代码:
bash
git clone https://huggingface.co/spaces/ByteDance-Seed/Seed-X
bash
pip install gradio spaces
python /Seed-X/app.py
然后修改其中的 app.py 代码:
1、修改成调用openai 接口服务;
2、模型连接状态检测;
3、调整webui的界面;
三、Nginx 代理8080端口
为了实现webui使用和vllm api 端点使用,可以使用Nginx 代理共享 8080 端口;
1.安装Nginx
sql
apt update && apt-get install nginx -y
nginx -v
sudo nginx
2.创建配置文件
/etc/nginx/conf.d/vllm_proxy.conf
ini
# 定义上游服务器组
upstream api_server {
    server 127.0.0.1:8000;
}

upstream webui_server {
    server 127.0.0.1:8081;  # 修改为WebUI实际运行的端口
}

server {
    listen 8080;
    server_name localhost;  # 或者您的域名

    # 根路径代理到WebUI服务
    location / {
        proxy_pass http://webui_server/;
        proxy_set_header Host $host;
        proxy_set_header X-Real-IP $remote_addr;
        proxy_set_header X-Forwarded-For $proxy_add_x_forwarded_for;
        proxy_set_header X-Forwarded-Proto $scheme;

        # 支持HTTP/1.1和WebSocket
        proxy_http_version 1.1;
        proxy_set_header Upgrade $http_upgrade;
        proxy_set_header Connection "upgrade";

        # 关闭缓冲以支持流式响应
        proxy_buffering off;
        proxy_request_buffering off;
    }

    # 代理到8000端口(api)的所有端点
    location /api/ {
        proxy_pass http://api_server/;
        proxy_set_header Host $host;
        proxy_set_header X-Real-IP $remote_addr;
        proxy_set_header X-Forwarded-For $proxy_add_x_forwarded_for;
        proxy_set_header X-Forwarded-Proto $scheme;

        # 支持HTTP/1.1和WebSocket
        proxy_http_version 1.1;
        proxy_set_header Upgrade $http_upgrade;
        proxy_set_header Connection "upgrade";

        # 关闭缓冲以支持流式响应
        proxy_buffering off;
        proxy_request_buffering off;
    }

    # 健康检查端点
    location /health {
        add_header Content-Type application/json;
        return 200 '{"status":"OK","api":"http://localhost:8080/api/","webui":"http://localhost:8080/"}';
    }

    # 错误页面
    error_page 502 503 504 /50x.html;
    location = /50x.html {
        root /usr/share/nginx/html;
    }

    # 访问日志
    access_log /var/log/nginx/vllm_access.log;
    error_log /var/log/nginx/vllm_error.log;
}
3.重新加载Nginx 配置
sudo nginx -t && sudo nginx -s reload4.测试调用情况
本地调用:
bash
curl http://localhost:8080/health浏览器调用,平台开启链接:

vllm 服务模型调用测试:
bash
http://xn-a.suanjiayun.com:64904/api/v1/models
webui界面显示:
arduino
http://xn-a.suanjiayun.com:64904/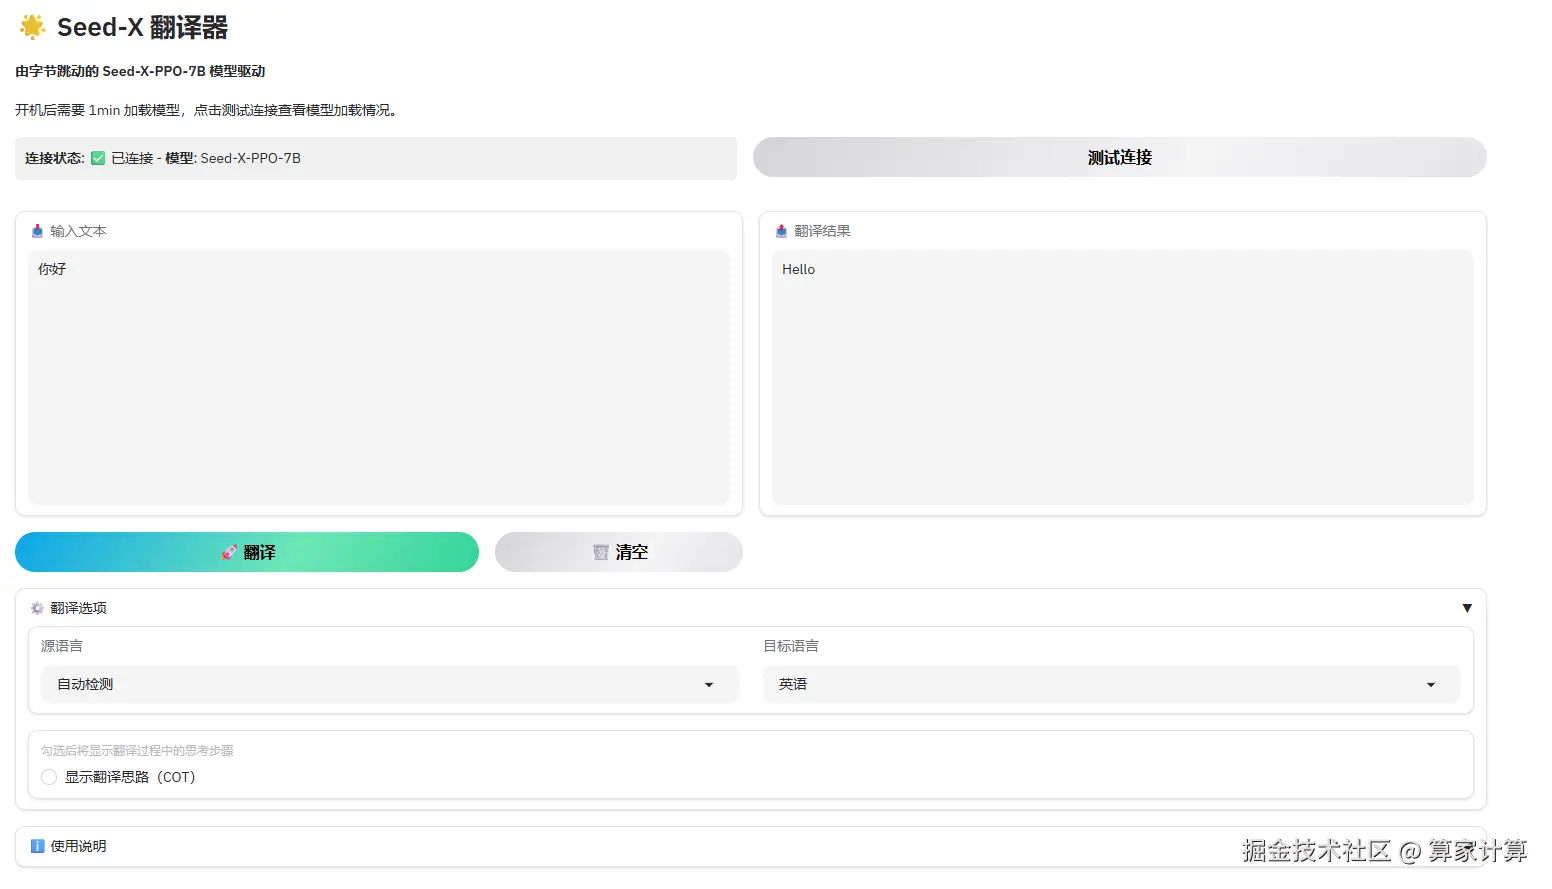
四、错误及解决
1.vllm 启动出错:
vllm 版本与 transformers 版本不匹配

解决方法:使用特定的版本 vllm==0.8.0, transformers==4.51.3
五、webui 源码
ini
import os
import gradio as gr
import spaces
from openai import OpenAI
import requests
import time
import threading
from threading import Timer

# 支持的语言选项
LANGUAGES = {
    "自动检测": "auto",
    "英语": "en",
    "中文": "zh",
    "俄语": "ru",
    "日语": "ja",
    "韩语": "ko",
    "西班牙语": "es",
    "法语": "fr",
    "葡萄牙语": "pt",
    "德语": "de",
    "意大利语": "it",
    "泰语": "th",
    "越南语": "vi",
    "印尼语": "id",
    "马来语": "ms",
    "阿拉伯语": "ar",
    "波兰语": "pl",
    "荷兰语": "nl",
    "罗马尼亚语": "ro",
    "土耳其语": "tr",
    "捷克语": "cs",
    "丹麦语": "da",
    "芬兰语": "fi",
    "乌克兰语": "uk",
    "挪威语(博克马尔)": "nb",
    "挪威语": "no",
    "克罗地亚语": "hr",
    "瑞典语": "sv",
    "匈牙利语": "hu"
}

# 初始化OpenAI客户端,连接到本地vllm服务器
client = OpenAI(
    base_url="http://127.0.0.1:8000/v1",
    api_key="empty"
)

# 全局变量存储模型状态
model_status = "检测中..."
model_name = "未知"
last_check_time = 0
status_check_interval = 30  # 每30秒检查一次状态

# 检测模型连接状态
def check_model_status():
    global model_status, model_name, last_check_time

    current_time = time.time()
    if current_time - last_check_time < status_check_interval:
        return f"**连接状态**: {model_status} - **模型**: {model_name}"

    try:
        # 尝试获取可用模型列表
        response = requests.get("http://127.0.0.1:8000/v1/models", timeout=5)
        if response.status_code == 200:
            models = response.json()
            if models.get('data') and len(models['data']) > 0:
                # 返回第一个可用的模型名称
                model_name = models['data'][0]['id']
                model_status = "✅ 已连接"
            else:
                model_status = "❌ 未找到可用模型"
                model_name = "未知"
        else:
            model_status = f"❌ API错误: {response.status_code}"
            model_name = "未知"
    except Exception as e:
        model_status = f"❌ 连接失败: {str(e)}"
        model_name = "未知"

    last_check_time = current_time
    return f"**连接状态**: {model_status} - **模型**: {model_name}"

def prompting(text, source_lang, target_lang, show_cot):
    l = LANGUAGES[target_lang]
    cot_instruction = "并详细解释你的翻译思路和步骤" if show_cot else ""

    if l == "auto":
        prompt = f"请将以下文本翻译成{target_lang}{cot_instruction}:\n{text} <{l}>"
    else:
        prompt = f"请将以下{source_lang}文本翻译成{target_lang}{cot_instruction}:\n{text} <{l}>"
    return prompt

@spaces.GPU(duration=120)
def translate_text(text, source_lang, target_lang, show_cot):
    if not text.strip():
        return "请输入要翻译的文本"

    # 检查模型状态
    status = check_model_status()
    if "❌" in status:
        return f"模型连接异常: {status}"

    try:
        prompt = prompting(text, source_lang, target_lang, show_cot)

        # 使用vllm的OpenAI API接口
        response = client.completions.create(
            model=model_name,  # 使用检测到的模型名称
            prompt=prompt,
            max_tokens=1024 if show_cot else 512,
            temperature=0.3 if show_cot else 0.1,
            top_p=0.9,
            stop=["<end>", "</s>"]
        )

        result = response.choices[0].text.strip()
        return result
    except Exception as e:
        return f"翻译出错: {str(e)}"

# 创建 Gradio 界面
with gr.Blocks(title="Seed-X 翻译器", theme=gr.themes.Ocean()) as demo:

    gr.Markdown(
        """
        # 🌟 Seed-X 翻译器
        **由字节跳动的 Seed-X-PPO-7B 模型驱动**

      开机后需要 1min 加载模型,点击测试连接查看模型加载情况。
        """
    )

    # 状态栏和测试按钮
    with gr.Row():
        status_display = gr.Markdown(
            value=check_model_status(),
            elem_id="status-bar"
        )
        test_btn = gr.Button("测试连接", variant="secondary")

    with gr.Row():
        # 输入区域
        with gr.Column(scale=1):
            source_text = gr.Textbox(
                label="📥 输入文本",
                placeholder="请输入要翻译的文本...",
                lines=12,
                max_lines=15
            )

            with gr.Row():
                translate_btn = gr.Button("🚀 翻译", variant='primary', scale=2)
                clear_btn = gr.Button("🗑️ 清空", variant='secondary', scale=1)

        # 输出区域
        with gr.Column(scale=1):
            target_text = gr.Textbox(
                label="📤 翻译结果",
                interactive=False,
                lines=12,
                max_lines=15
            )

    # 控制选项区域
    with gr.Accordion("⚙️ 翻译选项", open=True):
        with gr.Row():
            source_lang = gr.Dropdown(
                choices=list(LANGUAGES.keys()),
                value="自动检测",
                label="源语言",
                scale=1
            )
            target_lang = gr.Dropdown(
                choices=list(LANGUAGES.keys())[1:],  # 排除"自动检测"
                value="英语",
                label="目标语言",
                scale=1
            )

        # COT控制选项
        show_cot = gr.Checkbox(
            label="显示翻译思路(COT)",
            value=False,
            info="勾选后将显示翻译过程中的思考步骤"
        )

    # 底部信息和使用说明
    with gr.Accordion("ℹ️ 使用说明", open=False):
        gr.Markdown("""
        1. 在输入框中输入要翻译的文本
        2. 选择源语言和目标语言(默认为自动检测到英语)
        3. 可选:勾选"显示翻译思路"以查看详细的翻译过程
        4. 点击翻译按钮或按回车键进行翻译
        5. 查看翻译结果
        """)

    # 按钮点击事件
    translate_btn.click(
        fn=translate_text,
        inputs=[source_text, source_lang, target_lang, show_cot],
        outputs=target_text
    )

    # 清空按钮
    def clear_all():
        return "", ""

    clear_btn.click(
        fn=clear_all,
        inputs=[],
        outputs=[source_text, target_text]
    )

    # 测试连接按钮
    test_btn.click(
        fn=check_model_status,
        inputs=[],
        outputs=status_display
    )

    # 支持回车键翻译
    source_text.submit(
        fn=translate_text,
        inputs=[source_text, source_lang, target_lang, show_cot],
        outputs=target_text
    )

    # 页面加载时更新状态
    demo.load(
        fn=check_model_status,
        inputs=[],
        outputs=status_display
    )

# 添加自定义CSS
css = """
#status-bar {
    padding: 10px;
    border-radius: 5px;
    background-color: #f0f0f0;
    margin-bottom: 15px;
}
.footer {
    font-size: 14px;
    color: #666;
}
.accordion-content {
    padding: 10px 0;
}
"""

demo.css = css

# 启动应用
if __name__ == "__main__":
    demo.launch(
        server_name="0.0.0.0",
        server_port=8081,
        share=False
    )